武 汉 科 技 大 学
Java及移动开发实验报告
2019年 5 月 29 日
1.实验目的:
(1)熟悉 Android 开发环境及平台调试方法
(2)理解 Service、BroadcastReceiver 与 Activity 的不同点。
(3)掌握组件的使用
(4)熟悉按钮触发事件、单选框触发事件、复选框触发事件
2.实验内容:
1、一个垂直布局里有四个水平布局和两个TextView
2、第一个LinearLayout里面有一个TextView部件和EditText部件
3、第二个水平布局依次存放一个button部件和TextView部件,button按钮点击后,可将第一个水平布局中的EditText的内容更新到第二个水平布局的TextView中
4、第三个水平布局的有一组单选按钮(3个)
5、第四个水平布局有三个CheckBox
6、最后两个TextView分别实现单选框和复选框触发事件
3.实验代码:
activity_main.xml:
<?xml version="1.0" encoding="utf-8"?>
<RelativeLayout xmlns:android="http://schemas.android.com/apk/res/android"
    xmlns:tools="http://schemas.android.com/tools"
    android:layout_width="match_parent"
    android:layout_height="match_parent"
    android:paddingBottom="@dimen/activity_vertical_margin"
    android:paddingLeft="@dimen/activity_horizontal_margin"
    android:paddingRight="@dimen/activity_horizontal_margin"
    android:paddingTop="@dimen/activity_vertical_margin"
    tools:context="com.example.lenovo.ui.MainActivity">

    <LinearLayout
        android:orientation="vertical"
        android:layout_width="match_parent"
        android:layout_height="match_parent"
        android:layout_centerHorizontal="true"
        android:layout_alignParentTop="true"
        android:weightSum="1">

        <LinearLayout
            android:orientation="horizontal"
            android:layout_width="match_parent"
            android:layout_height="wrap_content"
            android:layout_gravity="center_horizontal"
            android:layout_weight="0.04">

            <TextView
                android:layout_width="wrap_content"
                android:layout_height="wrap_content"
                android:text="message:"
                android:id="@+id/TextView" />

            <EditText
                android:layout_width="wrap_content"
                android:layout_height="wrap_content"
                android:inputType="textPersonName"
                android:text=" "
                android:ems="10"
                android:id="@+id/editText1"
                android:layout_weight="1" />
        </LinearLayout>

        <LinearLayout
            android:orientation="horizontal"
            android:layout_width="match_parent"
            android:layout_height="wrap_content"
            android:layout_gravity="center_horizontal"
            android:layout_weight="0.07">

            <Button
                android:onClick="click1"
                android:layout_width="wrap_content"
                android:layout_height="wrap_content"
                android:text="get  message"
                android:id="@+id/btn" />

            <TextView
                android:layout_width="wrap_content"
                android:layout_height="wrap_content"
                android:text="得到输入信息"
                android:id="@+id/TextView2" />
        </LinearLayout>

        <LinearLayout
            android:orientation="horizontal"
            android:layout_width="match_parent"
            android:layout_height="wrap_content"
            android:weightSum="1"
            android:layout_weight="0.05">

            <RadioGroup
                android:id="@+id/color"
                android:layout_width="fill_parent"
                android:layout_height="wrap_content"
                android:orientation="horizontal"
                android:checkedButton="@+id/male">

                <RadioButton
                    android:layout_width="wrap_content"
                    android:layout_height="wrap_content"
                    android:text="red"
                    android:id="@+id/rb1"
                     />

                <RadioButton
                    android:layout_width="wrap_content"
                    android:layout_height="wrap_content"
                    android:text="green"
                    android:id="@+id/rb2"
                    />

                <RadioButton
                    android:layout_width="wrap_content"
                    android:layout_height="wrap_content"
                    android:text="blue"
                    android:id="@+id/rb3" />
            </RadioGroup>
        </LinearLayout>

        <LinearLayout
            android:orientation="horizontal"
            android:layout_width="match_parent"
            android:layout_height="wrap_content"
            android:layout_gravity="center_horizontal"
            android:weightSum="1"
            android:layout_weight="0.05">

            <CheckBox
                android:layout_width="wrap_content"
                android:layout_height="wrap_content"
                android:text="first"
                android:id="@+id/cb1"
                android:layout_weight="0.14" />

            <CheckBox
                android:layout_width="wrap_content"
                android:layout_height="wrap_content"
                android:text="second"
                android:id="@+id/cb2"
                android:layout_weight="0.12" />

            <CheckBox
                android:layout_width="wrap_content"
                android:layout_height="wrap_content"
                android:text="third"
                android:id="@+id/cb3"
                android:layout_weight="0.00" />
        </LinearLayout>

        <TextView
            android:layout_width="wrap_content"
            android:layout_height="wrap_content"
            android:text="color:"
            android:id="@+id/tv1"
            android:layout_weight="0.05" />

        <TextView
            android:layout_width="wrap_content"
            android:layout_height="wrap_content"
            android:text="sequence:"
            android:id="@+id/tv2"
            android:layout_weight="0.07" />
    </LinearLayout>
</RelativeLayout>
MainActivity.java:
package com.example.lenovo.ui;

import android.support.v7.app.AppCompatActivity;
import android.os.Bundle;
import android.widget.EditText;
import android.widget.TextView;
import android.widget.RadioButton;
import android.widget.RadioGroup;
import android.widget.CheckBox;
import android.widget.CompoundButton;
import android.view.View;
import android.widget.Toast;


public class MainActivity extends AppCompatActivity {
    EditText et1;
    TextView tv;

    private TextView tv1 = null;
    private RadioGroup color = null;
    private RadioButton rb1 = null;
    private RadioButton rb2 = null;
    private RadioButton rb3 = null;
    private String head = "color:";

    CheckBox cb1=null;
    CheckBox cb2=null;
    CheckBox cb3=null;
    TextView tv2=null;

    @Override
    protected void onCreate(Bundle savedInstanceState) {
        super.onCreate(savedInstanceState);
        setContentView(R.layout.activity_main);
        et1=(EditText)this.findViewById(R.id.editText1);
        tv=(TextView)this.findViewById(R.id.TextView2);
        cb1=(CheckBox)findViewById(R.id.cb1);
        cb2=(CheckBox)findViewById(R.id.cb2);
        cb3=(CheckBox)findViewById(R.id.cb3);
        tv2=(TextView)findViewById(R.id.tv2);

        //给CheckBox设置事件监听

        cb1.setOnCheckedChangeListener(new CompoundButton.OnCheckedChangeListener(){
            @Override
            public void onCheckedChanged(CompoundButton buttonView,
                                         boolean isChecked) {
                // TODO Auto-generated method stub
                if(isChecked){

                    tv2.setText("sequence:"+buttonView.getText());
                }else{
                    tv2.setText("sequence:"+buttonView.getText());
                }
            }
        });

        cb2.setOnCheckedChangeListener(new CompoundButton.OnCheckedChangeListener(){
            @Override
            public void onCheckedChanged(CompoundButton buttonView,
                                         boolean isChecked) {
                // TODO Auto-generated method stub
                if(isChecked){
                    tv2.setText("sequence:"+buttonView.getText());
                }else{
                    tv2.setText("sequence:"+buttonView.getText());
                }
            }
        });
        cb3.setOnCheckedChangeListener(new CompoundButton.OnCheckedChangeListener(){
            @Override
            public void onCheckedChanged(CompoundButton buttonView,
                                         boolean isChecked) {
                // TODO Auto-generated method stub
                if(isChecked){
                    tv2.setText("sequence:"+buttonView.getText());
                }else{
                    tv2.setText("sequence:"+buttonView.getText());
                }
            }
        });
    }


    public void click1(View view){
        String s1=et1.getText().toString().trim();
        tv.setText(" message :"+s1);
        initView();
    }

    private void initView(){
        //初始化组件
        tv1 = (TextView)super.findViewById(R.id.tv1);
        color = (RadioGroup)super.findViewById(R.id.color);
        rb1 = (RadioButton)super.findViewById(R.id.rb1);
        rb2 = (RadioButton)super.findViewById(R.id.rb2);
        rb3 = (RadioButton)super.findViewById(R.id.rb3);
        //获取显示前缀(即您的性别是:),以便显示美观
        head = tv1.getText().toString();
        //未调用监听时显示默认选择内容
        if(rb1.getId() == color.getCheckedRadioButtonId()){
            tv1.setText(head+rb1.getText().toString());
        }else if(rb2.getId() == color.getCheckedRadioButtonId()){
            tv1.setText(head+rb2.getText().toString());
        }else if(rb3.getId() == color.getCheckedRadioButtonId()) {
            tv1.setText(head + rb3.getText().toString());
        }
        //为RadioGroup设置监听事件
            color.setOnCheckedChangeListener(new RadioGroup.OnCheckedChangeListener() {

                @Override
                public void onCheckedChanged(RadioGroup group, int checkedId) {
                    // TODO Auto-generated method stub
                    String s2 = "";
                    if(checkedId == rb1.getId()){
                        s2 = rb1.getText().toString();
                    }else if(checkedId == rb2.getId()){
                        s2 = rb2.getText().toString();
                    }else if(checkedId == rb3.getId()){
                        s2 = rb3.getText().toString();
                    }
                    tv1.setText(head+s2);
                }
            });
        }
        //给CheckBox设置事件监听


    }
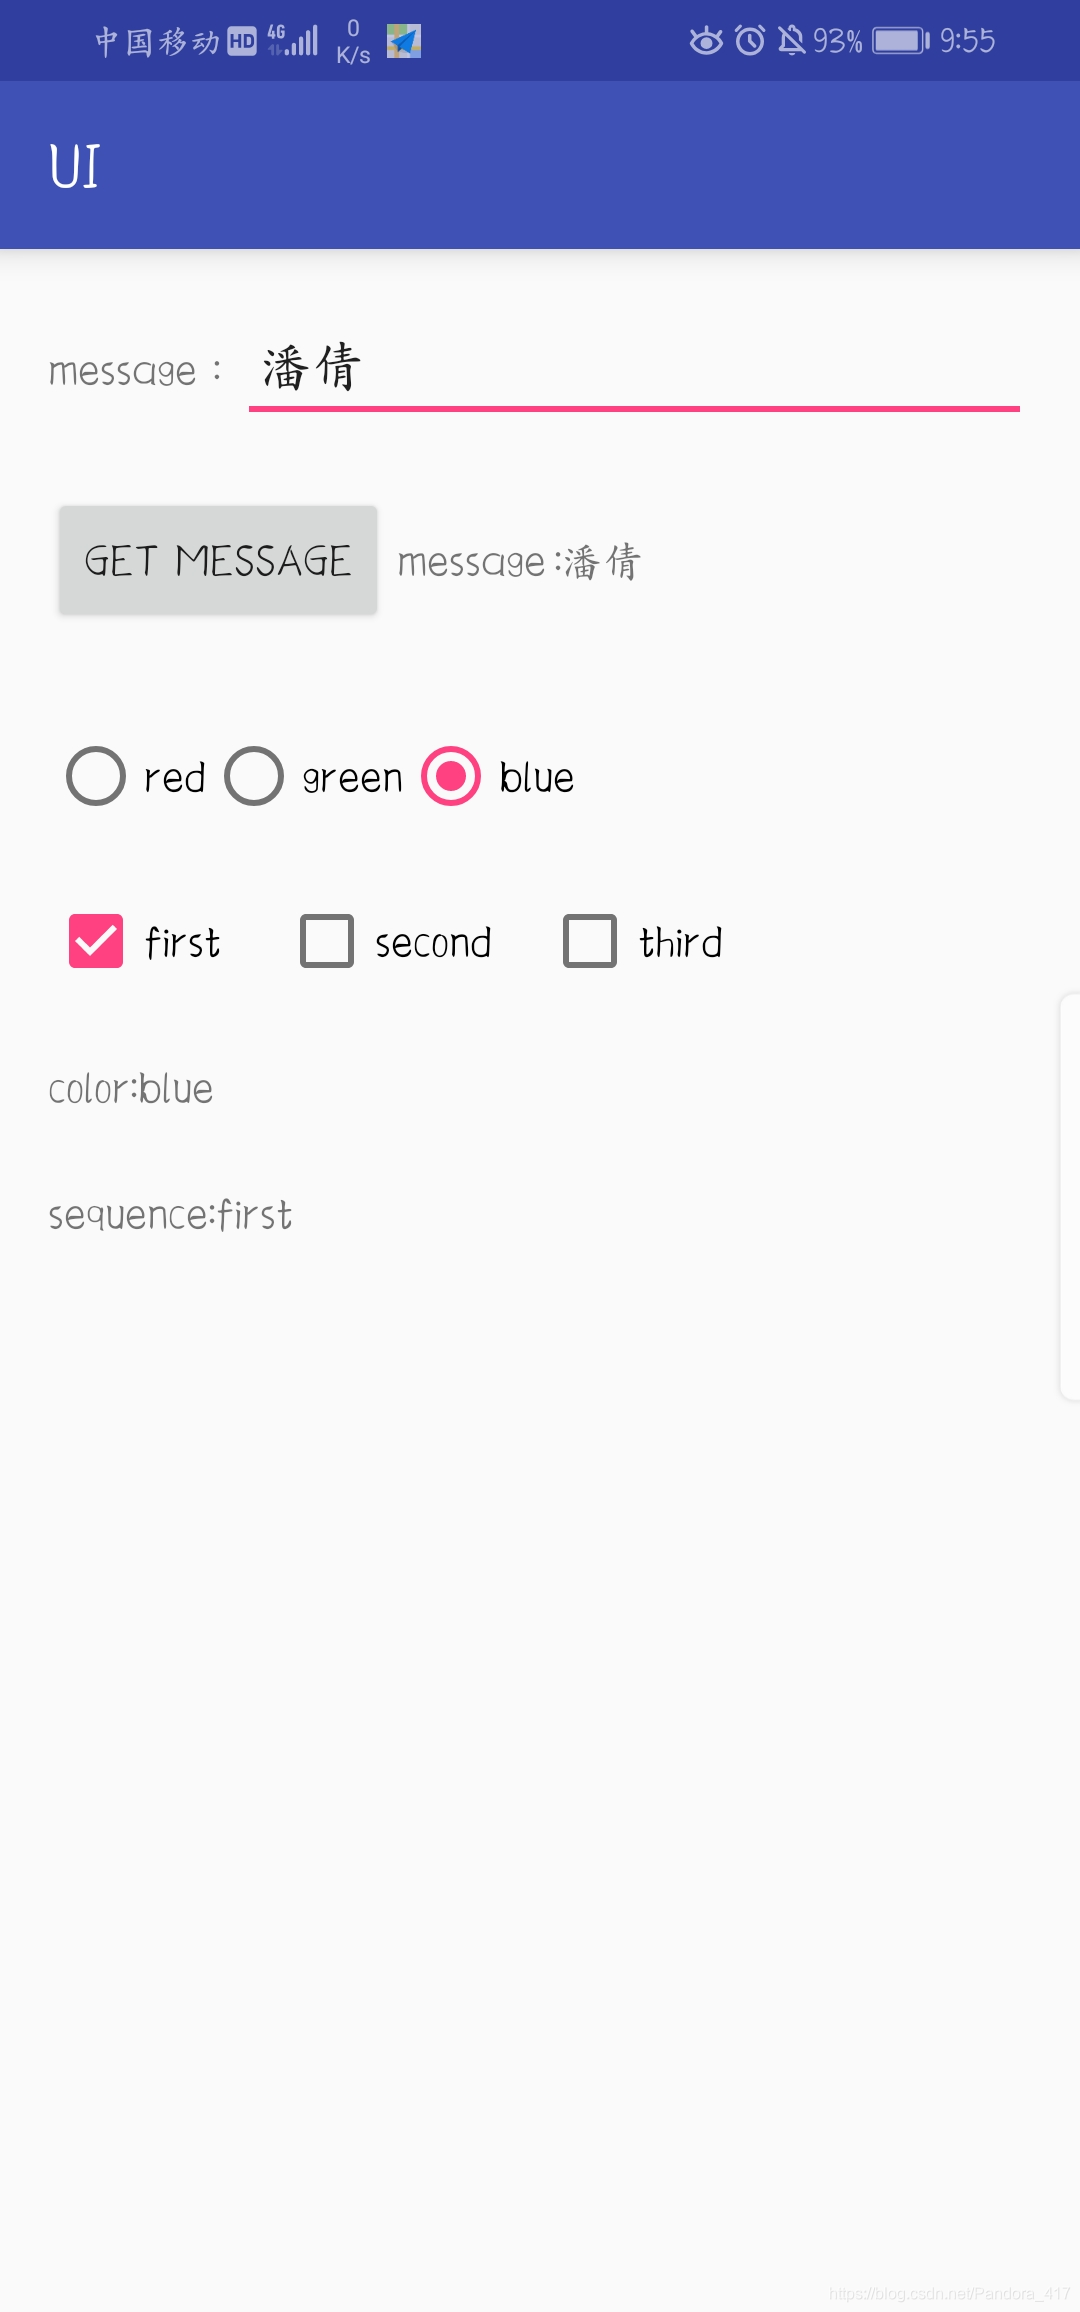
4.实验结果:
5.实验小结:
实验中遇到的问题:
① 按钮触发事件的方法名,在.xml文件和.java 文件写的不一致,导致app在手机上运行后,点击按钮,出现闪退的情况,更改方法名后,问题解决,不闪退;
② 单选按钮不能单选,可以多选于是添加了radiogroup,将三个radiobutton放进去,遂可以单选;
③ findViewById()处填入id名前,忘记加R.id.
④ 复选框按钮 不可打印多个text ,将ischecked设为true,用数组来实现。
实验心得:
通过本次实验,熟悉 Android 开发环境及平台调试方法,学会了一些基本组件的使用及布局,掌握按钮、单选按钮、复选框的触发事件的调用。虽然这次实验做的时间挺长的,但是收获了知识却蛮多的,让我逐渐对安卓产生了更浓厚的兴趣。