版权声明:本文为博主原创文章,未经博主允许不得转载。 https://blog.csdn.net/SDDDLLL/article/details/86622163
在前面我们提到过,通知其实就是一种切面,这种切面可以完成简单的织入功能。常见的通知有四种:
- 前置通知
- 后置通知
- 环绕通知
- 异常通知
一、使用通知之前的准备
1、导入jar包
2、定义目标类bean
package com.fdd.aop01;
public class SomeServiceImpl implements ISomeService {

	public void doFirst() {
		System.out.println("doFirst");
	}
	public void doSecond() {
		System.out.println("doSecond");
	}

}
3、定义通知类
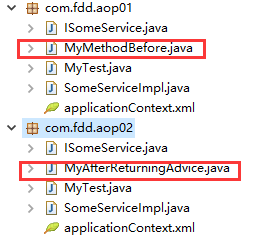
在这里先保留,因为通知分了好几种,使用到的时候再写,在这里先给出整个项目的结构:
4、注册目标类在applicationContext
<?xml version="1.0" encoding="UTF-8"?>
<beans xmlns="http://www.springframework.org/schema/beans"
    xmlns:xsi="http://www.w3.org/2001/XMLSchema-instance"
    xsi:schemaLocation="
        http://www.springframework.org/schema/beans
        http://www.springframework.org/schema/beans/spring-beans.xsd">

     <!-- 注册 目标对象-->
     <bean id="someService" class="com.fdd.aop01.SomeServiceImpl"></bean>

</beans>
5、注册通知
在上面的基础之上,添加通知

6、注册代理
使用代理来完成目标对象和通知之间的链接
    <!-- 生成代理对象 -->
    <bean id="serviceProxy" class="org.springframework.aop.framework.ProxyFactoryBean">
    	<!-- 指定目标对象 -->
    	<property name="target" ref="someService"></property>
   	<!-- 指定切面 -->
   	<property name="interceptorNames" value="myAdvice"></property>
    </bean>
在这里我们使用的是ProxyFactoryBean类。
里面有三部分:目标类、接口和切面。如果接口不指出来,那么默认的就是CGLB动态代理
7、整体的applicationContext
<?xml version="1.0" encoding="UTF-8"?>
<beans xmlns="http://www.springframework.org/schema/beans"
    xmlns:xsi="http://www.w3.org/2001/XMLSchema-instance"
    xsi:schemaLocation="
        http://www.springframework.org/schema/beans
        http://www.springframework.org/schema/beans/spring-beans.xsd">

     <!-- 注册 目标对象-->
     <bean id="someService" class="com.fdd.aop01.SomeServiceImpl">
    </bean>

     <!-- 注册切面:通知 -->
    <bean id="myAdvice" class="com.fdd.aop01.MyMethodBefore">
    </bean>

    <!-- 生成代理对象 -->
    <bean id="serviceProxy" class="org.springframework.aop.framework.ProxyFactoryBean">
    	<!-- 指定目标对象 -->
    	<property name="target" ref="someService"></property>
   		<!-- 指定切面 -->
   		<property name="interceptorNames" value="myAdvice"></property>
    </bean>

</beans>
二、前置通知
前置通知的特点:
- 在目标方法之前先执行
- 不改变目标方法的执行流程,前置通知不能阻止目标方法的执行
- 不改变目标方法的结果
首先看前置通知类
//前置通知
public class MyMethodBefore implements MethodBeforeAdvice {

	//前置方法在目标方法之前执行
	public void before(Method arg0, Object[] arg1, Object arg2)
			throws Throwable {
		System.out.println("执行前置通知方法");
	}

}
接下来注册通知和代理,然后就可以开始测试了
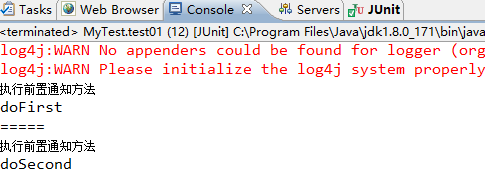
	@Test
	public void test01(){
		String resource = "com/fdd/aop01/applicationContext.xml";
		ApplicationContext ac = new ClassPathXmlApplicationContext(resource);
		ISomeService service =(ISomeService) ac.getBean("serviceProxy");
		service.doFirst();
		System.out.println("=====");
		service.doSecond();
	}
看结果:
三、后置通知
后置通知的特点:
- 在目标方法之后执行
- 不改变目标方法的执行流程,后置通知代码不能阻止目标代码的执行
- 不改变目标方法的结果
在这里我们修改SomeServiceImpl。这是为了验证后置通知的特点
public class SomeServiceImpl implements ISomeService {

	public String doFirst() {
		System.out.println("doFirst");
		return "abcde";
	}

	public void doSecond() {
		System.out.println("doSecond");
	}
}
先看后置通知类:
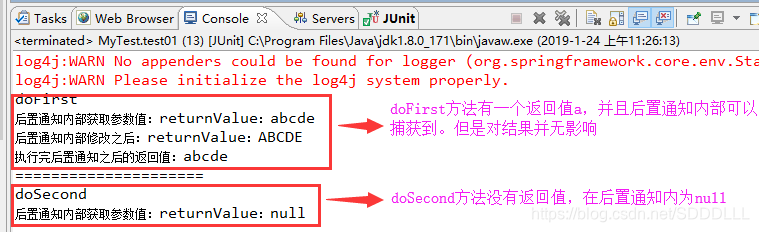
//后置通知:可以获取到目标方法的返回结果,但是无法改变其值
public class MyAfterReturningAdvice implements AfterReturningAdvice {
	//在目标方法执行之后
	//returnValue:目标方法的返回值
	public void afterReturning(Object returnValue, Method arg1, Object[] arg2,
			Object arg3) throws Throwable {
		System.out.println("后置通知内部获取参数值:returnValue:"+returnValue);
		if(returnValue!=null){
			returnValue=((String)(returnValue)).toUpperCase();
			System.out.println("后置通知内部修改之后:returnValue:"+returnValue);
		}

	}
}
接下来注册通知和代理,然后开始测试
@Test
	public void test01(){
		String resource = "com/fdd/aop02/applicationContext.xml";
		ApplicationContext ac = new ClassPathXmlApplicationContext(resource);
		ISomeService service =(ISomeService) ac.getBean("serviceProxy");
		String a=service.doFirst();
		System.out.println("执行完后置通知之后的返回值:"+a);

		System.out.println("=============================");
		service.doSecond();
	}
看结果:
四、环绕通知
环绕通知也叫作方法拦截器。可以在目标方法调用之前和之后进行调用,注意:可以改变目标方法的返回值,也可以改变程序的执行流程
现在看环绕通知类:
//环绕通知:可以修改目标方法的返回结果
public class MyMethodInterceptor implements MethodInterceptor {

	public Object invoke(MethodInvocation arg0) throws Throwable {
		System.out.println("环绕通知:目标方法之前执行");
		Object result=arg0.proceed();
		System.out.println("环绕通知:目标方法之后执行");
        //改变结果
		if(result!=null){
			result=((String)result).toUpperCase();
		}
		return result;
	}

}
接下来注册通知和代理,然后测试
@Test
	public void test01(){
		String resource = "com/fdd/aop03/applicationContext.xml";
		ApplicationContext ac = new ClassPathXmlApplicationContext(resource);
		ISomeService service =(ISomeService) ac.getBean("serviceProxy");
		String a=service.doFirst();
		System.out.println("执行完环绕通知之后的返回值:"+a);
		System.out.println("================================");
		service.doSecond();
	}
看结果:

五、异常通知
异常通知,是在方法抛出异常之后才会执行。当通知处理完异常之后,会将异常再次抛给这个目标方法。
我们验证用户身份的不合理。当用户名不正确的时候,抛出用户名异常,当密码不正确时,抛出密码异常。
1、定义UserException
public class UserException extends Exception {
	public UserException() {
		super();
	}

	public UserException(String message) {
		super(message);
		// TODO Auto-generated constructor stub
	}
}
2、定义两个子类
首先是用户名异常
public class UserNameException extends UserException {

	public UserNameException() {
		super();
		// TODO Auto-generated constructor stub
	}

	public UserNameException(String message) {
		super(message);
		// TODO Auto-generated constructor stub
	}
}
然后密码异常
public class PasswordException extends UserException {

	public PasswordException() {
		super();
	}

	public PasswordException(String message) {
		super(message);
	}
}
3、定义接口:
//主目标接口
public interface ISomeService {
	//目标方法
	boolean login(String username,String password) throws UserException;

}
在这里是抛出用户异常。
4、接口的实现类:
public class SomeServiceImpl implements ISomeService {

	@Override
	public boolean login(String username, String password) throws UserException {
		if(!"beijing".equals(username)){
			throw new UserNameException("用户名输错了");
		}
		if(!"111".equals(password)){
			throw new PasswordException("密码输错了");
		}
		return true;
	}

}
5、定义异常通知:
public class MyThrowsAdvice implements ThrowsAdvice {

	//当目标方法抛出UserNameException异常时,执行该方法
	public void afterThrowing(UserNameException ex){
		System.out.println("发生用户名异常:"+ex.getMessage());
	}

	//当目标方法抛出PasswordException异常时,执行该方法
	public void afterThrowing(PasswordException ex){
		System.out.println("发生密码异常:"+ex.getMessage());
	}
	//当目标方法抛出其他异常的时候,执行当前方法
	public void afterThrowing(Exception ex){
		System.out.println("发生异常:"+ex.getMessage());
	}
}
6、配置文件
<?xml version="1.0" encoding="UTF-8"?>
<beans xmlns="http://www.springframework.org/schema/beans"
    xmlns:xsi="http://www.w3.org/2001/XMLSchema-instance"
    xsi:schemaLocation="
        http://www.springframework.org/schema/beans
        http://www.springframework.org/schema/beans/spring-beans.xsd">

     <!-- 注册 目标对象-->
     <bean id="someService" class="com.fdd.aop05.SomeServiceImpl">
    </bean>

     <!-- 注册切面:通知 -->
    <bean id="myAdvice" class="com.fdd.aop05.MyThrowsAdvice">
    </bean>

    <!-- 生成代理对象 -->
    <bean id="serviceProxy" class="org.springframework.aop.framework.ProxyFactoryBean">
    	<!-- 指定目标对象 -->
    	<property name="target" ref="someService"></property>
   		<!-- 指定切面 -->
   		<property name="interceptorNames" value="myAdvice"></property>
    </bean>

</beans>
7、测试
(1)用户名错误
public class MyTest {
//两种异常抛出有区别
/*
* 第一:去掉throws UserException,在内部处理异常(铝条)
* 第二:不去掉,抛出异常,外部出现错误(红条)
*/
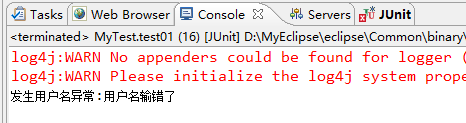
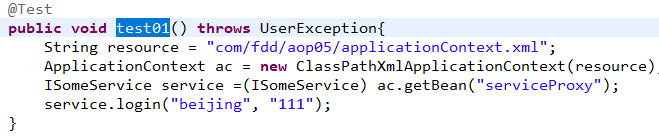
@Test
public void test01() throws UserException{
String resource = "com/fdd/aop05/applicationContext.xml";
ApplicationContext ac = new ClassPathXmlApplicationContext(resource);
ISomeService service =(ISomeService) ac.getBean("serviceProxy");
service.login("西安", "111");
}
}看结果:
(2)密码错误
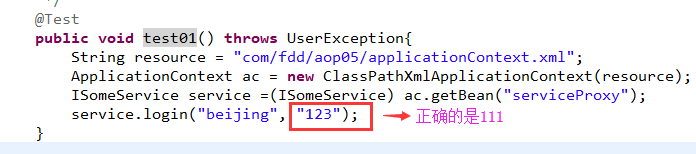
看结果:

(3)用户密码都错误

看结果:

(4)用户名密码都正确
后台没输出
六、给目标织入多个切面
若要给目标方法织入多个切面,则需要在配置代理对象的切面时候,使用list
比如说我们现在把前置通知和后置通知织入同一个目标方法中;
<?xml version="1.0" encoding="UTF-8"?>
<beans xmlns="http://www.springframework.org/schema/beans"
    xmlns:xsi="http://www.w3.org/2001/XMLSchema-instance"
    xsi:schemaLocation="
        http://www.springframework.org/schema/beans
        http://www.springframework.org/schema/beans/spring-beans.xsd">

     <!-- 注册 目标对象-->
     <bean id="someService" class="com.fdd.aop06.SomeServiceImpl"></bean>

     <!-- 注册切面:前置通知 -->
    <bean id="mybeforeAdvice" class="com.fdd.aop06.MyMethodBefore">	</bean>
    <!-- 注册切面:后置通知 -->
    <bean id="myafterAdvice" class="com.fdd.aop06.MyAfterReturningAdvice">	</bean>

    <!-- 生成代码对象 -->
    <bean id="serviceProxy" class="org.springframework.aop.framework.ProxyFactoryBean">
    	<property name="target" ref="someService"></property>

   		<!-- 指定切面 -->
   		<property name="interceptorNames" >
   			<array>
   				<value>mybeforeAdvice</value>
   				<value>myafterAdvice</value>
   			</array>
   		</property>

   	<!-- 	<property name="interceptorNames" value="mybeforeAdvice,myafterAdvice" ></property> -->

    </bean>

</beans>
然后看测试类:
	@Test
	public void test01(){
		String resource = "com/fdd/aop06/applicationContext.xml";
		ApplicationContext ac = new ClassPathXmlApplicationContext(resource);
		ISomeService service =(ISomeService) ac.getBean("serviceProxy");

		service.doFirst();
		System.out.println("================");
		service.doSecond();
	}
看结果:
