一、配置数据源
- 引入对应的jar包:
commons-dbcp-1.4.jar连接池(数据源配置)
commons-pool-1.6.jar连接池
ojdbc7.jar
spring-jdbc-4.3.9.RELEASE.jar
aopalliance-1.0.jar
spring-tx-4.3.9.RELEASE.jar - spring配置文件(数据源)
<!-- 配置事务管理器txManager -->
	<bean id="txManager"
		class="org.springframework.jdbc.datasource.DataSourceTransactionManager">
		<property name="dataSource" ref="dataSource"></property>
	</bean>

<!-- 配置事务空间 -->
	<tx:annotation-driven
		transaction-manager="txManager" />
Bean配置
1) mysql数据库
<bean id="dataSource"
		class="org.apache.commons.dbcp.BasicDataSource" destroy-method="close">

		<property name="driverClassName"
			value="com.mysql.jdbc.Driver" />

		<property name="url"
			value="jdbc:mysql://localhost:3306/sampledb" />

		<property name="username" value="root" />

		<property name="password" value="123456" />

	</bean>
2) Oracle数据库
<bean id="dataSource" class="org.apache.commons.dbcp.BasicDataSource">
        <property name="driverClassName">
            <value>oracle.jdbc.driver.OracleDriver</value>
        </property>
        <property name="url">
            <value>jdbc:oracle:thin:@localhost:1521:orcl</value>
        </property>
        <!--  数据库名 -->
        <property name="username">
            <value>scott</value>
        </property>
         <!-- 数据库密码 -->
        <property name="password">
            <value>tiger</value>
        </property>
         <!-- 最大活动时间 -->
        <property name="maxActive">
            <value>100</value>
        </property>
         <!-- 最大怠速值 -->
        <property name="maxIdle">
            <value>1</value>
        </property>
         <!-- 最大空闲时间 -->
        <property name="maxWait">
            <value>1000</value>
        </property>
    </bean>
3)sqlserver
<bean id="dataSource" class="com.mchange.v2.c3p0.ComboPooledDataSource"
        destroy-method="close">
    <property name="driverClass" value="com.mysql.jdbc.Driver"/>
    <property name="jdbcUrl" value="jdbc:mysql://localhost:3306/sampledb"/>
    <property name="user" value="root"/>
    <property name="password" value="123456"/>
</bean>
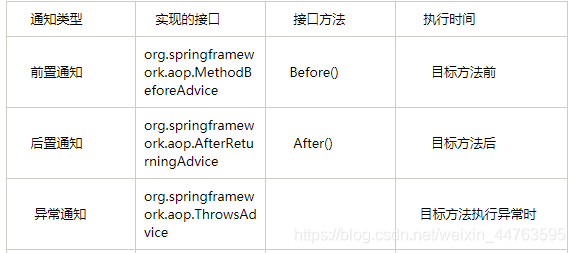
- Xml方式的通知类型
- 例题:(前置通知)
  <!-- 配置自动扫描的包 -->
 <context:component-scan base-package="com.yl.spring.aop.impl"></context:component-scan>
目标对象(Before类)
通过注解的方式进行关联
@Repository("Ttarget")
public class Before {


	private String Student;

	public void addStu() {


		System.out.println("这是ADD方法");
	}

	public void delete() {


		System.out.println("delete");
	}
}
前置通知方法
import java.lang.reflect.Method;

import org.springframework.aop.MethodBeforeAdvice;
@Repository("AopBefore")
public class aop1 implements MethodBeforeAdvice {


	@Override
	public void before(Method method, Object[] args, Object target) throws Throwable {


		System.out.println("前置通知");

	}

}
xml配置文件
<!-- 将目标对象方法与前置方法进行关联 -->
    <!-- execition(目标方法)   -->

	<aop:config>
	 <!--  配置切入点 id值保持一致     -->
		<aop:pointcut
			expression="execution(public void com.new1.Pub.delete()) or execution(public void com.new1.Pub.addStu())"
			id="point" />
			<!-- 相当于连接切入点和切入面的线 -->
		<aop:advisor advice-ref="AopBefore" pointcut-ref="point" />

	</aop:config>
测试
public class AopTest {


	public static void before() {


		ApplicationContext context = new ClassPathXmlApplicationContext("springcontext.xml");
		Pub p = (Pub) context.getBean("Ttarget");
		p.addStu();

	}

	public static void main(String[] args) {


		 before();

	}
}
结果:

后置通知
xml配置
<!-- 将目标对象方法与后置方法进行关联 -->
    <!-- execition(目标方法)   -->

	<aop:config>
	 <!--  配置切入点 id值保持一致     -->
		<aop:pointcut
			expression="execution(配置的方法)"
			id="point" />
			<!-- 相当于连接切入点和切入面的线 -->
		<aop:advisor advice-ref="后置通知id值" pointcut-ref="point" />

	</aop:config>
通过注解实现
import org.springframework.stereotype.Component;


@Component("method")
public class Method {


	public void add() {


		System.out.println("添加");
	}

}
  <!--配置扫描器-->
<context:component-scan
		base-package="com.qst.Test"></context:component-scan>
		<!--自动装配-->
	<aop:aspectj-autoproxy></aop:aspectj-autoproxy>
import org.aspectj.lang.JoinPoint;
import org.aspectj.lang.annotation.*;
import org.springframework.stereotype.Component;
@Aspect
@Component("bef")
public class BeforeMeh {


 @Before("execution(public void com.qst.Test.Method.add())")
 public void before() {


	 System.out.println("这是before方法");
 }
 @AfterReturning("execution(public void com.qst.Test.Method.add())")
 public void last() {


	 System.out.println("这是后置");
 }

 @AfterThrowing(pointcut = "execution(void com.qst.Test.Method.show())")
 public  void excaption(JoinPoint jp){


     String name=jp.getSignature().getName();
     System.out.println("执行"+name+"时发生异常");
 }
}
Main方法
import org.springframework.context.ApplicationContext;
import org.springframework.context.support.ClassPathXmlApplicationContext;

public class Main {


	public static void main(String[] args) {


		ApplicationContext con = new ClassPathXmlApplicationContext("Applicaiton.xml");
		Method m = (Method) con.getBean("method");

		m.add();

	}
}
