前面的文章都是基于在单机操作,正常情况下,一台机器无论配置多么高,线程开得再多,也总会有一个上限,或者说成本过于巨大。因此,本文将提及分布式的爬虫,让爬虫的效率提高得更快。
构建分布式爬虫首先需要有多台机器,作者利用 VMware 安装了 2 台虚拟机,安装的教程请看 VMwareWorkstation下安装Linux。安装的 2台机器为 CentOS6.6 ,命名为 device1 、device2 ,master 为 device1 , 初始密码为 1111 。
安装好了后,用 Xshell5 打开虚拟机的命令行,打开方式如下:
- 安装
Xshell5,可以在本网站首页 中的网盘中下载安装- 在虚拟机中右键打开控制台,输入
ifconfig得到机器的ip地址- 在
Xshell5中新建连接,名称为device1、device2,主机为ip地址,使用 用户身份验证登陆 ,用户名是root, 密码是1111
设备对应关系为:device1-192.168.230.218 、 device2-192.168.230.223 。首先需要给虚拟机安装 redis 集群,安装集群需要 ruby 环境,每台机器执行如下命令:
yum -y install zlib ruby rubygems
这里我用两台服务器,6 个节点,互为主从,即 3 个主节点 3 个从节点 ,我的两台机器的 ip 地址为 192.168.230.218 和 192.168.230.223 ,分别给两台机器安装 redis ,在 /usr/local/ 目录下操作,两台机器都进行如下操作:
cd /usr/local/
wget http://download.redis.io/releases/redis-3.2.0.tar.gz
tar -zxvf redis-3.2.0.tar.gz
mkdir redis
cd redis-3.2.0
make install PREFIX=/usr/local/redis
将集群工具复制到 /usr/local/redis/bin 下,创建目录和配置文件:
cp /usr/local/redis-3.2.0/src/redis-trib.rb /usr/local/redis/bin/
mkdir -p /usr/local/redis/{conf,data,logs}
cd /usr/local/redis
cp /usr/local/redis-3.2.0/redis.conf ./conf/redis-6380.conf
更改配置文件 redis-6380.conf 为:
# 基本配置
daemonize  yes
pidfile /usr/local/redis/data/redis-6380.pid
port 6380
bind 192.168.230.218
unixsocket /usr/local/redis/data/redis-6380.sock
unixsocketperm 700
timeout 300
loglevel verbose
logfile /usr/local/redis/logs/redis-6380.log
databases 16
dbfilename dump-6380.rdb
dir /usr/local/redis/data/

# aof持久化
appendonly yes
appendfilename appendonly-6380.aof
appendfsync everysec
no-appendfsync-on-rewrite yes
auto-aof-rewrite-percentage 80-100
auto-aof-rewrite-min-size 64mb
lua-time-limit 5000

# 集群配置
cluster-enabled yes
cluster-config-file /usr/local/redis/data/nodes-6380.conf
cluster-node-timeout 5000
启动 redis :
cd /usr/local/redis/
./bin/redis-server ./conf/redis-6380.conf
./bin/redis-server ./conf/redis-6381.conf
./bin/redis-server ./conf/redis-6382.conf
开始启动集群,注意两台机器的 redis 都要启动,都启动后执行如下命令:
cd /usr.local/
gem install redis
./bin/redis-trib.rb create --replicas 1 192.168.230.218:6380 192.168.230.218:6381 192.168.230.218:6382 192.168.230.223:6383 192.168.230.223:6384 192.168.230.223:6385
如果出现:
Could not connect to Redis at 192.168.230.223:6380: No route to host
则说明 192.168.230.223 的防火墙或者端口没开,简单一点的操作在 192.168.230.223 中执行:

iptables -A INPUT -p TCP --dport 6380 -j REJECT
iptables -A INPUT -p TCP --dport 6381 -j REJECT
iptables -A INPUT -p TCP --dport 6382 -j REJECT
sudo iptables -F
如果创建 Node 失败,即报出错误:
[ERR] Node 192.168.230.218:6380 is not empty. Either the node already knows other nodes (check with CLUSTER NODES) or contains some key in database 0.
则依次对每台机器每个端口都执行如下命令:
/usr/local/redis/bin/redis-cli -h 192.168.230.223 -p 6383
flushdb
/usr/local/redis/bin/redis-cli -h 192.168.230.223 -p 6384
flushdb
/usr/local/redis/bin/redis-cli -h 192.168.230.223 -p 6385
flushdb
并且将 data 里面的文件删除:
cd /usr/local/redis/data/
rm -rf ./*
最后重启全部的节点。其实启动和关闭可以写两个 shell 脚本执行,启动脚本 start.sh:
cd /usr/local/redis/
./bin/redis-server ./conf/redis-6380.conf
./bin/redis-server ./conf/redis-6381.conf
./bin/redis-server ./conf/redis-6382.conf
关闭脚本 end.sh :
/usr/local/redis/bin/redis-cli -h 192.168.230.223 -p 6383 shutdown
/usr/local/redis/bin/redis-cli -h 192.168.230.223 -p 6384 shutdown
/usr/local/redis/bin/redis-cli -h 192.168.230.223 -p 6385 shutdown
集群测试是否安装成功,两台机器都启动 redis 后,在 device1 中执行:
/usr/local/redis/bin/redis-cli -h 192.168.230.223 -p 6383
出现如下对话框:

则说明两台机器已经可以相互通讯了,防火墙已经关闭。
如果在执行了:
./bin/redis-trib.rb create --replicas 1 192.168.230.218:6380 192.168.230.218:6381 192.168.230.218:6382 192.168.230.223:6383 192.168.230.223:6384 192.168.230.223:6385
屏幕出现如下字样:
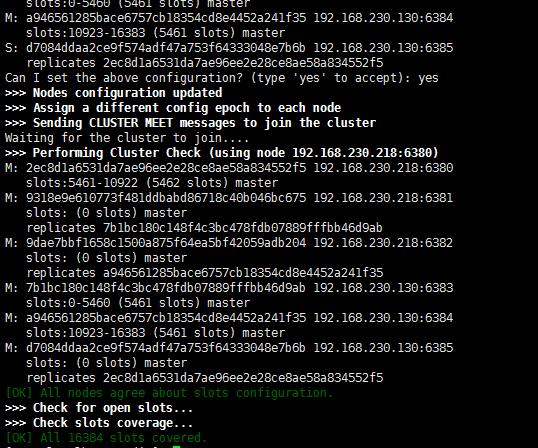
则说明 redis 集群连接成功,下面试一下通讯。在 192.168.230.218 输入以下命令进入集群模式:
/usr/local/redis/bin/redis-cli -c -h 192.168.230.223 -p 6385
192.168.230.223:6385> set ttyb baige
-> Redirected to slot [12905] located at 192.168.230.223:6384
OK
在 192.168.230.223 查询是否收到了命令:
/usr/local/redis/bin/redis-cli -c -h 192.168.230.218 -p 6382
192.168.230.218:6382> get ttyb
-> Redirected to slot [12905] located at 192.168.230.223:6384
"baige"
redis 集群搭建完毕!!!
现在需要在 Linux 系统里面安装相对应的 python 版本到系统里面,安装的教程请看 Linux下python2和python3共存。
安装完 python 后,可以先在本地写好脚本,再上传到虚拟机里面,推荐使用 Xshell5 和 Xftp5 。在本机先下载一个 redis 软件,这个可以在我的网盘里面弄找到百度网盘,
如果机器重启了无法连接,记得去虚拟机中关闭防火墙:
service iptables start / stop
iptables: Setting chains to policy ACCEPT: filter          [  OK  ]
iptables: Flushing firewall rules:                         [  OK  ]
iptables: Unloading modules:                               [  OK  ]
redis 的基本操作很多,但是本文只是用到了以下 lpush 和 rpop , redis 是一个消息列队,也可以理解成一个管道, lpush 的作用是向这个管道的左边插入一个元素,同理 rpush 是向管道的右边插入元素,而 rpop 是管道的右边取出一个元素。如果还想要更加深入的理解可以去看官方文档 redis中文官方 。
那么,我们可以将 url 放入到这个管道中,假设有 100 个 url ,可以依次插入管道中,然后在多台机器中从这个管道拿出 url 进行抓取,从而达到分布式的效果。
在 windows 中调试需要去网上下载 redis-2.4.5 windows版本,运行服务 E:\redis-2.4.5\64bit\redis-server.exe ,然后在 python 中写下安装库:
pip3.4 install redis
pip3.4 install install redis-py-cluster
建立一个 redis :
#!/usr/bin/python3.4
# -*- coding: utf-8 -*-
import redis

# http://doc.redisfans.com/
pool = redis.ConnectionPool(host='localhost', port=6379)
r = redis.Redis(connection_pool=pool)
向管道中插入 url :
r.lpush("url", "https://www.baidu.com")
r.lpush("url", "http://www.tybai.com/")
查看管道现在的元素个数:
len = r.llen("url")
print(len)
查看管道中的所有元素:
print(r.lrange("url", 0, -1))
取出元素:
print(r.rpop("url").decode())
print(r.rpop("url").decode())
取出完元素后管道应该没有其他的元素了。如果直接想清空管道可以用:
r.flushdb()
分布式基本需要用到的方法就这些,现在开始构建分布式爬虫。将虚拟机的 redis 启动,写一个小脚本给管道插入 100 个 url ,这 100 个 url 是用两个 url 循环生成的,我写的是 insert.py:
#!/usr/bin/python3.4
# -*- coding: utf-8 -*-

import redis
from rediscluster import StrictRedisCluster
'''
遇到python不懂的问题,可以加Python学习交流群:1004391443一起学习交流,群文件还有零基础入门的学习资料
'''
redis_nodes = [{'host': '192.168.230.218', 'port': 6380},
               {'host': '192.168.230.218', 'port': 6381},
               {'host': '192.168.230.218', 'port': 6382},
               {'host': '192.168.230.223', 'port': 6383},
               {'host': '192.168.230.223', 'port': 6384},
               {'host': '192.168.230.223', 'port': 6385}
               ]

r = StrictRedisCluster(startup_nodes=redis_nodes)

r.flushdb()

# 增加url到redis里面
def pushToRedis(name, valueList):
    for i in range(50):
        for item in valueList:
            r.lpush(name, item)

name = "url"
urlList = ["https://www.baidu.com", "http://www.tybai.com/"]
# 添加到消息列队中
pushToRedis(name, urlList)
增加权限后直接运行:
chmod +x insert.py
python3.4 insert.py
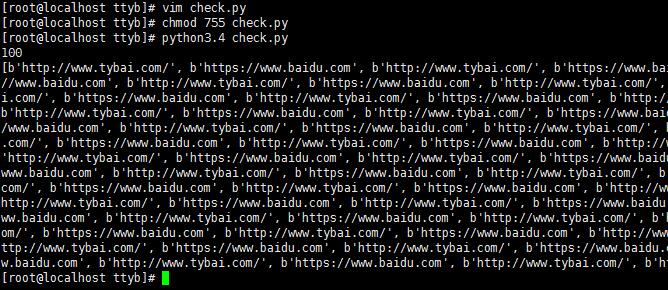
什么都没返回,再写一个脚本检查是否插入到了 redis 的消息列队中,脚本名 check.py :
#!/usr/bin/python3.4
# -*- coding: utf-8 -*-
'''
遇到python不懂的问题,可以加Python学习交流群:1004391443一起学习交流,群文件还有零基础入门的学习资料
'''
import redis
from rediscluster import StrictRedisCluster

redis_nodes = [{'host': '192.168.230.218', 'port': 6380},
               {'host': '192.168.230.218', 'port': 6381},
               {'host': '192.168.230.218', 'port': 6382},
               {'host': '192.168.230.223', 'port': 6383},
               {'host': '192.168.230.223', 'port': 6384},
               {'host': '192.168.230.223', 'port': 6385}
               ]

r = StrictRedisCluster(startup_nodes=redis_nodes)

name = "url"

length = r.llen(name)
print(length)
print(r.lrange(name, 0, -1))
增加权限后直接运行:
chmod +x check.py
python3.4 check.py
运行结果:
现在就需要写两份抓取的代码,分别在两台虚拟机中运行,抓取这 100 个 url ,设置抓取的函数:
import requests
session = requests.session()
headers = {"User-Agent": "Mozilla/5.0 (Windows NT 6.3; WOW64; rv:32.0) Gecko/20100101 Firefox/32.0"}
def getHtml(url):
    # 修饰头部
    headers.update(dict(Referer=url))
    # 抓取网页
    resp = session.get(url=url, headers=headers)
    return resp.content.decode("utf-8", "ignore")
将抓取到的 html 保存到 /home/ttyb/html 中,但是为了区分两台机器抓了哪些 url ,命名按照虚拟机的 ip 命名:
'''
遇到python不懂的问题,可以加Python学习交流群:1004391443一起学习交流,群文件还有零基础入门的学习资料
'''
import socket
import time
# 保存到本地
def saveToLocal(html):
    hostname = socket.gethostname()
    ipName = ("1" + socket.gethostbyname(hostname) + "#" + str(time.time())).replace(".", "_")
    with open("/home/ttyb/html/" + ipName, "w") as fle:
        fle.write(html)
        fle.close()
设置一个从 redis 取出 url 的函数:
# 从redis中拿到url
def popFromRedis(name):
    return r.rpop(name).decode()
最后一个一个的取出 url ,将抓取到的网页保存下来,每次抓取都暂停 1 秒:
'''
遇到python不懂的问题,可以加Python学习交流群:1004391443一起学习交流,群文件还有零基础入门的学习资料
'''
def main():
    name = "url"
    length = r.llen(name)
    for i in range(length):
        url = popFromRedis(name)
        print(url)
        html = getHtml(url)
        saveToLocal(html)
        time.sleep(1)


if __name__ == "__main__":
    time.sleep(10)
    main()
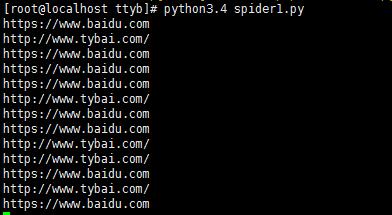
这里我将代码写成 spider1.py 和 spider2.py ,分别在两台机器下运行。增加权限后分别在两台机器上运行,第一台虚拟机:
pip3.4 install requests
chmod +x spider1.py
python3.4 spider1.py
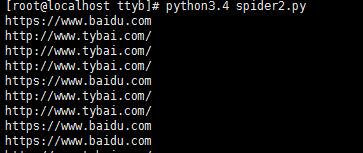
第二台虚拟机:
pip3.4 install requests
chmod +x spider2.py
python3.4 spider2.py
运行效果:
运行到最后会报错停止:
Traceback (most recent call last):
  File "spider2.py", line 55, in <module>
    main()
  File "spider2.py", line 46, in main
    url = popFromRedis(name)
  File "spider2.py", line 22, in popFromRedis
    return r.rpop(name).decode()
AttributeError: 'NoneType' object has no attribute 'decode'
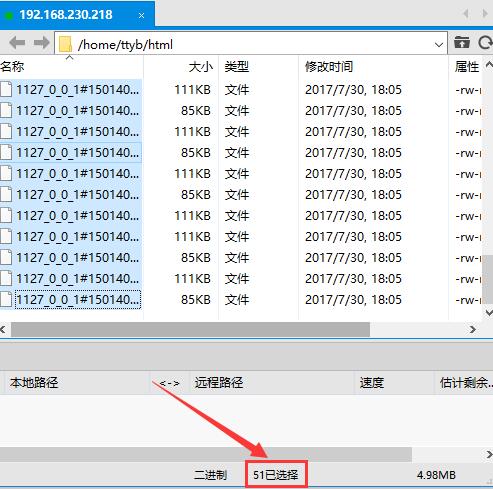
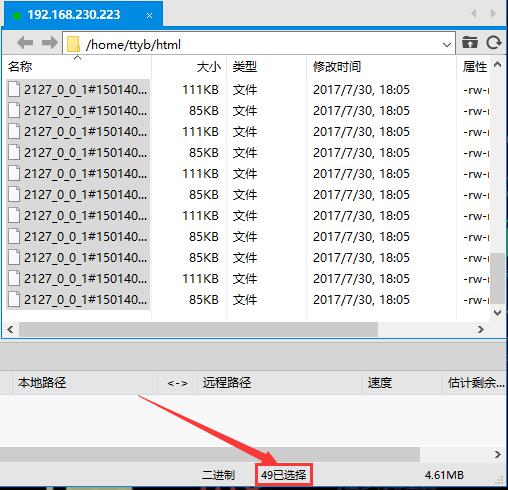
因为管道中已经没有 url 了,被全部取完并下载到了 /home/ttyb/html/ 中,现在去查看每台虚拟机抓取的效果:
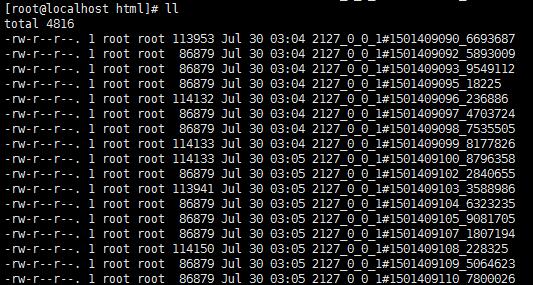

得到结果,虚拟机1 抓取的网页有 51 个,虚拟机2 抓取的网页有 49 个,分布式抓取完成!