本篇文章首发于头条号Flink程序是如何执行的?通过源码来剖析一个简单的Flink程序,欢迎关注头条号和微信公众号“大数据技术和人工智能”(微信搜索bigdata_ai_tech)获取更多干货,也欢迎关注我的CSDN博客。
在这之前已经介绍了如何在本地搭建Flink环境和如何创建Flink应用和如何构建Flink源码,这篇文章用官方提供的SocketWindowWordCount例子来解析一下一个常规Flink程序的每一个基本步骤。
示例程序
public class SocketWindowWordCount {
    public static void main(String[] args) throws Exception {
        // the host and the port to connect to
        final String hostname;
        final int port;
        try {
            final ParameterTool params = ParameterTool.fromArgs(args);
            hostname = params.has("hostname") ? params.get("hostname") : "localhost";
            port = params.getInt("port");
        } catch (Exception e) {
            System.err.println("No port specified. Please run 'SocketWindowWordCount " +
                    "--hostname <hostname> --port <port>', where hostname (localhost by default) " +
                    "and port is the address of the text server");
            System.err.println("To start a simple text server, run 'netcat -l <port>' and " +
                    "type the input text into the command line");
            return;
        }
        // get the execution environment
        final StreamExecutionEnvironment env = StreamExecutionEnvironment.getExecutionEnvironment();
        // get input data by connecting to the socket
        DataStream<String> text = env.socketTextStream(hostname, port, "\n");
        // parse the data, group it, window it, and aggregate the counts
        DataStream<WordWithCount> windowCounts = text
                .flatMap(new FlatMapFunction<String, WordWithCount>() {
                    @Override
                    public void flatMap(String value, Collector<WordWithCount> out) {
                        for (String word : value.split("\\s")) {
                            out.collect(new WordWithCount(word, 1L));
                        }
                    }
                })
                .keyBy("word")
                .timeWindow(Time.seconds(5))

                .reduce(new ReduceFunction<WordWithCount>() {
                    @Override
                    public WordWithCount reduce(WordWithCount a, WordWithCount b) {
                        return new WordWithCount(a.word, a.count + b.count);
                    }
                });
        // print the results with a single thread, rather than in parallel
        windowCounts.print().setParallelism(1);
        env.execute("Socket Window WordCount");
    }
    // ------------------------------------------------------------------------
    /**
     * Data type for words with count.
     */
    public static class WordWithCount {
        public String word;
        public long count;
        public WordWithCount() {}
        public WordWithCount(String word, long count) {
            this.word = word;
            this.count = count;
        }
        @Override
        public String toString() {
            return word + " : " + count;
        }
    }
}上面这个是官网的SocketWindowWordCount程序示例,它首先从命令行中获取socket连接的host和port,然后获取执行环境、从socket连接中读取数据、解析和转换数据,最后输出结果数据。
每个Flink程序都包含以下几个相同的基本部分:
- 获得一个execution environment,
- 加载/创建初始数据,
- 指定此数据的转换,
- 指定放置计算结果的位置,
- 触发程序执行
Flink执行环境
final StreamExecutionEnvironment env = StreamExecutionEnvironment.getExecutionEnvironment();Flink程序都是从这句代码开始,这行代码会返回一个执行环境,表示当前执行程序的上下文。如果程序是独立调用的,则此方法返回一个由createLocalEnvironment()创建的本地执行环境LocalStreamEnvironment。从其源码里可以看出来:
//代码目录:org/apache/flink/streaming/api/environment/StreamExecutionEnvironment.java
public static StreamExecutionEnvironment getExecutionEnvironment() {
    if (contextEnvironmentFactory != null) {
        return contextEnvironmentFactory.createExecutionEnvironment();
    }
    ExecutionEnvironment env = ExecutionEnvironment.getExecutionEnvironment();
    if (env instanceof ContextEnvironment) {
        return new StreamContextEnvironment((ContextEnvironment) env);
    } else if (env instanceof OptimizerPlanEnvironment || env instanceof PreviewPlanEnvironment) {
        return new StreamPlanEnvironment(env);
    } else {
        return createLocalEnvironment();
    }
}
获取输入数据
DataStream<String> text = env.socketTextStream(hostname, port, "\n");这个例子里的源数据来自于socket,这里会根据指定的socket配置创建socket连接,然后创建一个新数据流,包含从套接字无限接收的字符串,接收的字符串由系统的默认字符集解码。当socket连接关闭时,数据读取会立即终止。通过查看源码可以发现,这里实际上是通过指定的socket配置来构造一个SocketTextStreamFunction实例,然后源源不断的从socket连接里读取输入的数据创建数据流。
//代码目录:org/apache/flink/streaming/api/environment/StreamExecutionEnvironment.java
@PublicEvolving
public DataStreamSource<String> socketTextStream(String hostname, int port, String delimiter, long maxRetry) {
    return addSource(new SocketTextStreamFunction(hostname, port, delimiter, maxRetry),
            "Socket Stream");
}SocketTextStreamFunction的类继承关系如下:
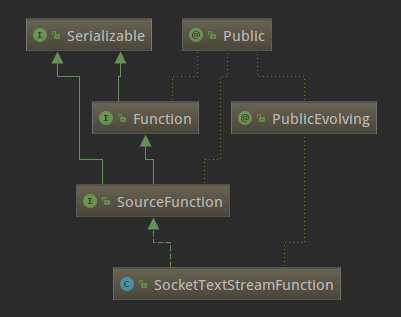
可以看出SocketTextStreamFunction是SourceFunction的子类,SourceFunction是Flink中所有流数据源的基本接口。SourceFunction的定义如下:
//代码目录:org/apache/flink/streaming/api/functions/source/SourceFunction.java
@Public
public interface SourceFunction<T> extends Function, Serializable {
    void run(SourceContext<T> ctx) throws Exception;
    void cancel();
    @Public
    interface SourceContext<T> {
        void collect(T element);
        @PublicEvolving
        void collectWithTimestamp(T element, long timestamp);
        @PublicEvolving
        void emitWatermark(Watermark mark);
        @PublicEvolving
        void markAsTemporarilyIdle();
        Object getCheckpointLock();
        void close();
    }
}SourceFunction定义了run和cancel两个方法和SourceContext内部接口。
- run(SourceContex):实现数据获取逻辑,并可以通过传入的参数ctx进行向下游节点的数据转发。
- cancel():用来取消数据源,一般在run方法中,会存在一个循环来持续产生数据,cancel方法则可以使该循环终止。
- SourceContext:source函数用于发出元素和可能的watermark的接口,返回source生成的元素的类型。
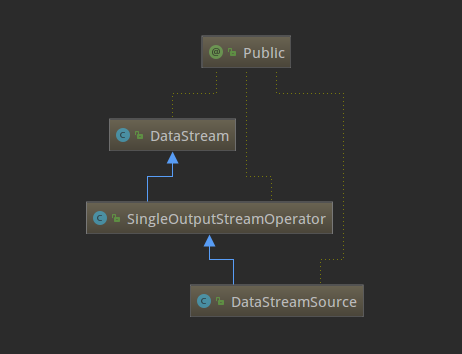
了解了SourceFunction这个接口,再来看下SocketTextStreamFunction的具体实现(主要是run方法),逻辑就已经很清晰了,就是从指定的hostname和port持续不断的读取数据,按回车换行分隔符划分成一个个字符串,然后再将数据转发到下游。现在回到StreamExecutionEnvironment的socketTextStream方法,它通过调用addSource返回一个DataStreamSource实例。思考一下,例子里的text变量是DataStream类型,为什么源码里的返回类型却是DataStreamSource呢?这是因为DataStream是DataStreamSource的父类,下面的类关系图可以看出来,这也体现出了Java的多态的特性。
数据流操作
对上面取到的DataStreamSource,进行flatMap、keyBy、timeWindow、reduce转换操作。
DataStream<WordWithCount> windowCounts = text
        .flatMap(new FlatMapFunction<String, WordWithCount>() {
            @Override
            public void flatMap(String value, Collector<WordWithCount> out) {
                for (String word : value.split("\\s")) {
                    out.collect(new WordWithCount(word, 1L));
                }
            }
        })
        .keyBy("word")
        .timeWindow(Time.seconds(5))
        .reduce(new ReduceFunction<WordWithCount>() {
            @Override
            public WordWithCount reduce(WordWithCount a, WordWithCount b) {
                return new WordWithCount(a.word, a.count + b.count);
            }
});这段逻辑中,对上面取到的DataStreamSource数据流分别做了flatMap、keyBy、timeWindow、reduce四个转换操作,下面说一下flatMap转换,其他三个转换操作读者可以试着自己查看源码理解一下。
先看一下flatMap方法的源码吧,如下。
//代码目录:org/apache/flink/streaming/api/datastream/DataStream.java
public <R> SingleOutputStreamOperator<R> flatMap(FlatMapFunction<T, R> flatMapper) {
    TypeInformation<R> outType = TypeExtractor.getFlatMapReturnTypes(clean(flatMapper),
            getType(), Utils.getCallLocationName(), true);
    return transform("Flat Map", outType, new StreamFlatMap<>(clean(flatMapper)));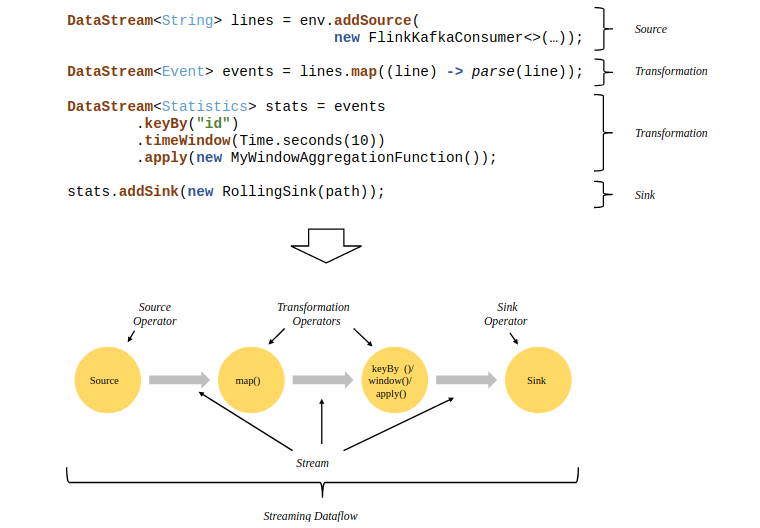
}这里面做了两件事,一是用反射拿到了flatMap算子的输出类型,二是生成了一个operator。flink流式计算的核心概念就是将数据从输入流一个个传递给operator进行链式处理,最后交给输出流的过程。对数据的每一次处理在逻辑上成为一个operator。上面代码中的最后一行transform方法的作用是返回一个SingleOutputStreamOperator,它继承了Datastream类并且定义了一些辅助方法,方便对流的操作。在返回之前,transform方法还把它注册到了执行环境中。下面这张图是一个由Flink程序映射为Streaming Dataflow的示意图:
结果输出
windowCounts.print().setParallelism(1);每个Flink程序都是以source开始以sink结尾,这里的print方法就是把计算出来的结果sink标准输出流。在实际开发中,一般会通过官网提供的各种Connectors或者自定义的Connectors把计算好的结果数据sink到指定的地方,比如Kafka、HBase、FileSystem、Elasticsearch等等。这里的setParallelism是设置此接收器的并行度的,值必须大于零。
执行程序
env.execute("Socket Window WordCount");Flink有远程模式和本地模式两种执行模式,这两种模式有一点不同,这里按本地模式来解析。先看下execute方法的源码,如下:
//代码目录:org/apache/flink/streaming/api/environment/LocalStreamEnvironment.java
@Override
public JobExecutionResult execute(String jobName) throws Exception {
    // transform the streaming program into a JobGraph
    StreamGraph streamGraph = getStreamGraph();
    streamGraph.setJobName(jobName);
    JobGraph jobGraph = streamGraph.getJobGraph();
    jobGraph.setAllowQueuedScheduling(true);
    Configuration configuration = new Configuration();
    configuration.addAll(jobGraph.getJobConfiguration());
    configuration.setString(TaskManagerOptions.MANAGED_MEMORY_SIZE, "0");
    // add (and override) the settings with what the user defined
    configuration.addAll(this.configuration);
    if (!configuration.contains(RestOptions.BIND_PORT)) {
        configuration.setString(RestOptions.BIND_PORT, "0");
    }
    int numSlotsPerTaskManager = configuration.getInteger(TaskManagerOptions.NUM_TASK_SLOTS, jobGraph.getMaximumParallelism());
    MiniClusterConfiguration cfg = new MiniClusterConfiguration.Builder()
        .setConfiguration(configuration)
        .setNumSlotsPerTaskManager(numSlotsPerTaskManager)
        .build();
    if (LOG.isInfoEnabled()) {
        LOG.info("Running job on local embedded Flink mini cluster");
    }
    MiniCluster miniCluster = new MiniCluster(cfg);
    try {
        miniCluster.start();
        configuration.setInteger(RestOptions.PORT, miniCluster.getRestAddress().get().getPort());
        return miniCluster.executeJobBlocking(jobGraph);
    }
    finally {
        transformations.clear();
        miniCluster.close();
    }
}这个方法包含三部分:将流程序转换为JobGraph、使用用户定义的内容添加(或覆盖)设置、启动一个miniCluster并执行任务。关于JobGraph暂先不讲,这里就只说一下执行任务,跟进下return miniCluster.executeJobBlocking(jobGraph);这行的源码,如下:
//代码目录:org/apache/flink/runtime/minicluster/MiniCluster.java
@Override
public JobExecutionResult executeJobBlocking(JobGraph job) throws JobExecutionException, InterruptedException {
    checkNotNull(job, "job is null");
    final CompletableFuture<JobSubmissionResult> submissionFuture = submitJob(job);
    final CompletableFuture<JobResult> jobResultFuture = submissionFuture.thenCompose(
        (JobSubmissionResult ignored) -> requestJobResult(job.getJobID()));
    final JobResult jobResult;
    try {
        jobResult = jobResultFuture.get();
    } catch (ExecutionException e) {
        throw new JobExecutionException(job.getJobID(), "Could not retrieve JobResult.", ExceptionUtils.stripExecutionException(e);
    }
    try {
        return jobResult.toJobExecutionResult(Thread.currentThread().getContextClassLoader());
    } catch (IOException | ClassNotFoundException e) {
        throw new JobExecutionException(job.getJobID(), e);
    }
}这段代码的核心逻辑就是final CompletableFuture<JobSubmissionResult> submissionFuture = submitJob(job);,调用了MiniCluster类的submitJob方法,接着看这个方法:
//代码目录:org/apache/flink/runtime/minicluster/MiniCluster.java
public CompletableFuture<JobSubmissionResult> submitJob(JobGraph jobGraph) {
    final CompletableFuture<DispatcherGateway> dispatcherGatewayFuture = getDispatcherGatewayFuture();
    // we have to allow queued scheduling in Flip-6 mode because we need to request slots
    // from the ResourceManager
    jobGraph.setAllowQueuedScheduling(true);
    final CompletableFuture<InetSocketAddress> blobServerAddressFuture = createBlobServerAddress(dispatcherGatewayFuture);
    final CompletableFuture<Void> jarUploadFuture = uploadAndSetJobFiles(blobServerAddressFuture, jobGraph);
    final CompletableFuture<Acknowledge> acknowledgeCompletableFuture = jarUploadFuture
        .thenCombine(
            dispatcherGatewayFuture,
            (Void ack, DispatcherGateway dispatcherGateway) -> dispatcherGateway.submitJob(jobGraph, rpcTimeout))
        .thenCompose(Function.identity());
    return acknowledgeCompletableFuture.thenApply(
        (Acknowledge ignored) -> new JobSubmissionResult(jobGraph.getJobID()));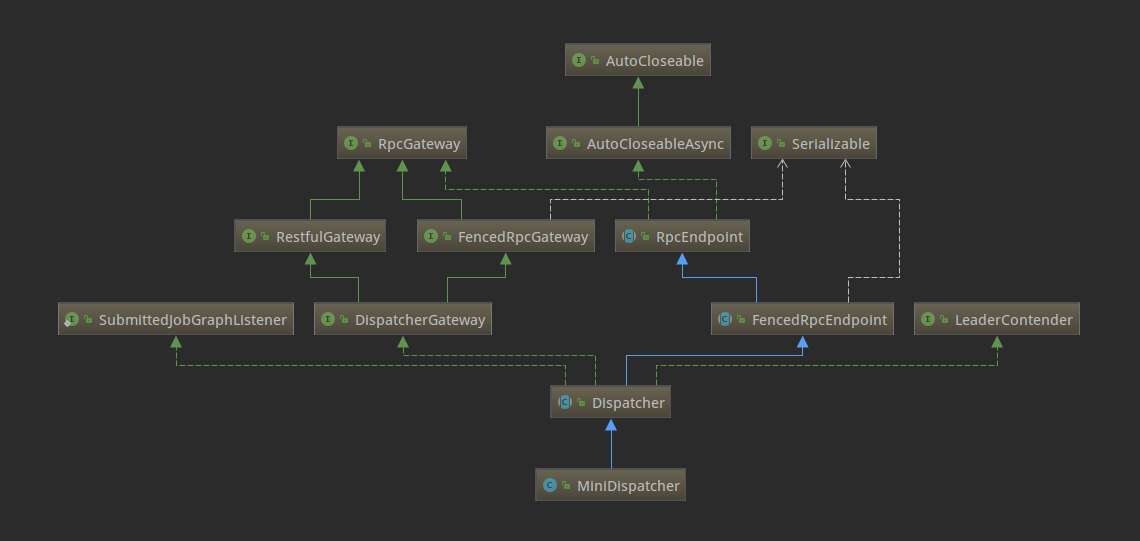
}这里的Dispatcher组件负责接收作业提交,持久化它们,生成JobManagers来执行作业并在主机故障时恢复它们。Dispatcher有两个实现,在本地环境下启动的是MiniDispatcher,在集群环境上启动的是StandaloneDispatcher。下面是类结构图:
这里的Dispatcher启动了一个JobManagerRunner,委托JobManagerRunner去启动该Job的JobMaster。对应的代码如下:
//代码目录:org/apache/flink/runtime/jobmaster/JobManagerRunner.java
private CompletableFuture<Void> verifyJobSchedulingStatusAndStartJobManager(UUID leaderSessionId) {
    final CompletableFuture<JobSchedulingStatus> jobSchedulingStatusFuture = getJobSchedulingStatus();
    return jobSchedulingStatusFuture.thenCompose(
        jobSchedulingStatus -> {
            if (jobSchedulingStatus == JobSchedulingStatus.DONE) {
                return jobAlreadyDone();
            } else {
                return startJobMaster(leaderSessionId);
            }
        });
}JobMaster经过一系列方法嵌套调用之后,最终执行到下面这段逻辑:
//代码目录:org/apache/flink/runtime/jobmaster/JobMaster.java
private void scheduleExecutionGraph() {
    checkState(jobStatusListener == null);
    // register self as job status change listener
    jobStatusListener = new JobManagerJobStatusListener();
    executionGraph.registerJobStatusListener(jobStatusListener);
    try {
        executionGraph.scheduleForExecution();
    }
    catch (Throwable t) {
        executionGraph.failGlobal(t);
    }
}这里executionGraph.scheduleForExecution();调用了ExecutionGraph的启动方法。在Flink的图结构中,ExecutionGraph是真正被执行的地方,所以到这里为止,一个任务从提交到真正执行的流程就结束了,下面再回顾一下本地环境下的执行流程:
- 客户端执行
execute方法; MiniCluster完成了大部分任务后把任务直接委派给MiniDispatcher;Dispatcher接收job之后,会实例化一个JobManagerRunner,然后用这个实例启动job;JobManagerRunner接下来把job交给JobMaster去处理;JobMaster使用ExecutionGraph的方法启动整个执行图,整个任务就启动起来了。