1. 说明
在编写脚本时,可能会遇到需要在另一台主机上执行一个命令,或者在本机拷贝另一台主机内的一个文件。如果两台主机之间没有做互信,就会牵扯到用户输入密码的交互过程,这对编写自动脚本来说, 就行不通了。
要实现在脚本内的自动交互,就需要 expect
2. expect 命令介绍
expect 是一个用来处理交互的命令。借助 expect 可以将交互过程写在一个脚本里,就可以实现自动化完成。上面的问题也能得到解决。
形象来说,如下命令的交互都能得到解决:
- ssh
- scp
- ftp
CentOS / RHEL 安装 expect
# yum install expect -y
2.1 expect 中常用的命令
expect 中最关键的四个命令: send 、 expect 、spawn 、 interact
- send:用于向进程发送字符串
- expect:从进程接收字符串
- spawn:启动新的进程
- interact:允许用户交互
(1) send 命令
send命令接收一个字符串参数,并将该参数发送到进程。
[root@localhost ~]# expect
expect1.1> send "hello china\n"
hello china
(2) expect命令
A. 基础知识
expect命令和send命令正好相反,expect通常是用来等待一个进程的反馈。expect可以接收一个字符串参数,也可以接收正则表达式参数。和上文中的send命令结合。
#!/usr/bin/expect
expect "hi\n"
send "hello there!\n"
上面脚本的意思:
expect "hi\n" --> 从标准输入中等待 "hi\n"
send "hello there!\n" --> 向标准输出输出 hello where
如果写成简单的伪代码如下:
if [ "$cmd" == "hi" ] ; then
  echo "hello there!"
fi
来看一个简单的 expect 脚本:
#!/usr/bin/expect
expect "hi\n"
send "you typed <$expect_out(buffer)>"
send "but I only expected <$expect_out(0,string)>"
执行结果:
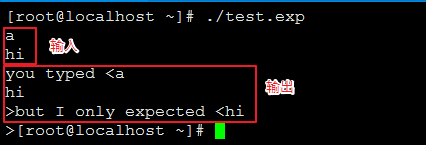
通过执行脚本,可以判定:
$expect_out(buffer) 匹配到的是所有输入
$expect_out(0,string) 匹配到 expect 参数的输入
B. 模式 - 动作
(a)单一分支模式语法:
expect "hi" {send "You said hi\n"}

只有当输入 hi 时, 才会返回 "You said hi\n"
(b)多分支模式语法:
expect "hi" { send "You said hi\n" } \
"hello" { send "Hello yourself\n" } \
"bye" { send "That was unexpected\n" }
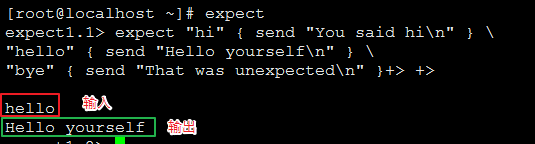
匹配到 hi 、hello 、 bye 执行相应的输出:
hi --> You said hi\n
hello --> You said hi\n
bye --> That was unexpected\n
(3) spawn 命令
上面的测试都是通过手动输入来进行交互的,spawn 命令就是用来启动新的进程,然后通过 send 和 expect 和 spawn 打开的进程进行交互的。
#!/usr/bin/expect
set timeout -1
spawn scp [email protected]:/root/testfile /root/
expect "*password*"
send "123456\r"
expect "100%"
expect eof
执行结果:

通过 spawn 配合 expect 、send 就能实现自动交互了,接下来分析下这个代码:

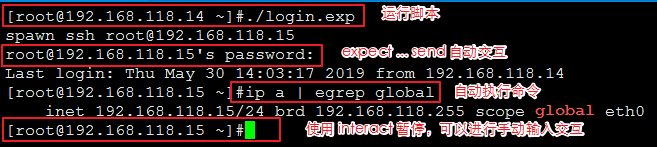
(4)interact 命令
通过上面三个命令 spawn 、 send 、 expect 已经能完成很多自动化脚本了,但是,如果需要在适当的时候,需要人工干预这个过程,就需要用到 interact 命令。
#!/usr/bin/expect
set timeout -1
spawn ssh [email protected]
expect "*password*"
send "123456\r"
expect "#*"
send "ip a | egrep global\r"
interact
3. expect 使用实例
expect 经常是作为脚本出来的, 接下来通过我日常使用的几个实例来说明:
3.1 expect scp的实现
scp 执行流程如图:
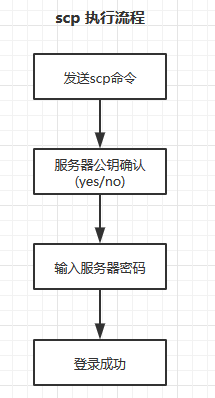
在编写实现 scp 之前,我们要考虑:
(1)如果是第一次执行 scp 需要确认服务器公钥,如果不是第一次执行则无需这一步
(2)timeout 时间设定,当拷贝大文件时,timeout设置的过短会造成文件没有完全的传输完成。
在编写脚本的时,需要考虑以上问题,脚本如下:
#!/usr/bin/expect
set timeout 3
set host "192.168.118.15"
set username "root"
set password "123456"

# 使用spawn 启动一个新进程执行 scp 命令
spawn scp $username@$host:/root/testfile /root/

# 在这里timeout 为 3秒,超过三秒执行下一个匹配
expect "*yes/no*" {send "yes\r"}
expect "*password*" {send "$password\r"}

# 在scp传输文件时,timeout时间设置为无限时,当大文件传输时,需要更多的时间
set timeout -1

# 当匹配到 传输完成 100%后,转到下一步
expect "100%"

# 使用 eof 结束该进程,因为上面设置 timeout 为 -1 无限时
expect eof
执行结果:

可以看到,文件传输需要 14 秒,而上面如果设置的超时时间低于 14 秒, 则文件传输不完整。
在日常使用中,expect 结合 shell 使用,在 shell 中引用 expect 脚本如下:
#!/usr/bin/bash
...
[shell 执行脚本]
...
expect <<EOF
set timeout 3
...
[expect 执行脚本]
...
EOF
...
[shell 执行脚本]
...
例如:拷贝一个压缩包到本地,然后解压
#!/bin/bash

host="192.168.118.15"
username="root"
password="123456"
expect <<EOF
set timeout 3
spawn scp $username@$host:/root/testfile.tar.gz /root/
expect "*yes/no*" {send "yes\r"}
expect "*password*" {send "$password\r"}
set timeout -1
expect "100%"
expect eof
EOF
echo '开始解压...'
tar xf testfile.tar.gz
if [ $? -eq 0 ]; then
  echo '解压完成.'
fi
执行结果:

3.2 expect ssh执行远程命令
ssh远程执行命令流程如下:

执行脚本:
#!/usr/bin/expect
set timeout 3
set host "192.168.118.15"
set username "root"
set password "123456"

spawn ssh $username@$host ifconfig
expect "*yes/no*" {send "yes\r"}
expect "*password*" {send "$password\r"}
expect eof
执行结果:

expect 匹配 shell 使用还是很强大的,尤其是在没有 python 和无法连接互联网的环境中。