我们首先引用《Spring in Action》上的一张图来了解Spring MVC 的核心组件和大致处理流程:
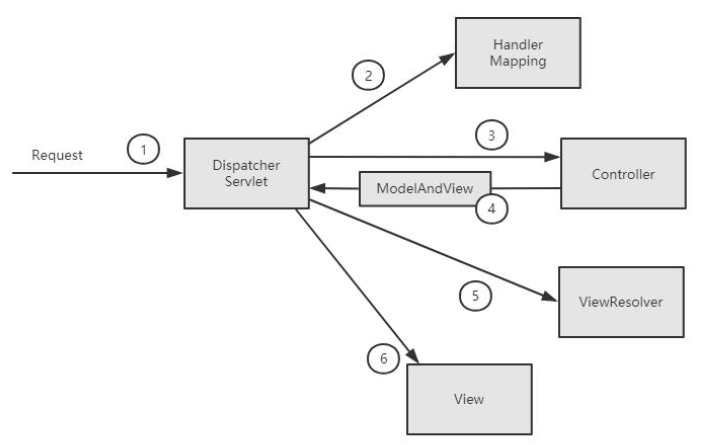
从上图中看到①、DispatcherServlet 是SpringMVC 中的前端控制器(Front Controller),负责接收Request 并将Request 转发给对应的处理组件。
② 、HanlerMapping 是SpringMVC 中完成url 到Controller 映射的组件。DispatcherServlet 接收Request, 然后从HandlerMapping 查找处理Request 的Controller。
③、Controller 处理Request,并返回ModelAndView 对象,Controller 是SpringMVC中负责处理Request 的组件(类似于Struts2 中的Action),ModelAndView 是封装结果视图的组件。
④、⑤、⑥视图解析器解析ModelAndView 对象并返回对应的视图给客户端。在前面的学习中我们已经大致了解到,容器初始化时会建立所有url 和Controller 中的Method 的对应关系,保存到HandlerMapping 中,用户请求是根据Request 请求的url 快速定位到Controller 中的某个方法。在Spring 中先将url 和Controller 的对应关系,保存到Map<url,Controller>中。Web 容器启动时会通知Spring 初始化容器(加载Bean 的定义信息和初始化所有单例Bean),然后SpringMVC 会遍历容器中的Bean,获取每一个Controller 中的所有方法访问的url,然后将url 和Controller 保存到一个Map中;这样就可以根据Request 快速定位到Controller,因为最终处理Request 的是Controller 中的方法,Map 中只保留了url 和Controller 中的对应关系,所以要根据Request 的url 进一步确认Controller 中的Method,这一步工作的原理就是拼接Controller 的url(Controller 上@RequestMapping 的值) 和方法的url(Method 上@RequestMapping 的值),与request 的url 进行匹配,找到匹配的那个方法;确定处理请求的Method 后,接下来的任务就是参数绑定,把Request 中参数绑定到方法的形式参数上,这一步是整个请求处理过程中最复杂的一个步骤。
Spring MVC 九大组件
MultipartResolver(多文件上传组件)
其实这是一个大家很熟悉的组件,MultipartResolver 用于处理上传请求,通过将普通的Request 包装成MultipartHttpServletRequest 来实现。MultipartHttpServletRequest可以通过getFile() 直接获得文件,如果是多个文件上传,还可以通过调用getFileMap得到Map<FileName, File> 这样的结构。MultipartResolver 的作用就是用来封装普通的request,使其拥有处理文件上传的功能。
LocaleResolver(本地语言环境组件)
在上面我们有看到ViewResolver 的resolveViewName()方法,需要两个参数。那么第二个参数Locale 是从哪来的呢,这就是LocaleResolver 要做的事了。LocaleResolver用于从request 中解析出Locale, 在中国大陆地区,Locale 当然就会是zh-CN 之类,用来表示一个区域。这个类也是i18n 的基础。
ThemeResolver(模板主题处理组件)
从名字便可看出,这个类是用来解析主题的。主题,就是样式,图片以及它们所形成的显示效果的集合。Spring MVC 中一套主题对应一个properties 文件,里面存放着跟当前主题相关的所有资源,如图片,css 样式等。创建主题非常简单,只需准备好资源,然后新建一个"主题名.properties" 并将资源设置进去,放在classpath 下,便可以在页面中使用了。Spring MVC 中跟主题有关的类有ThemeResolver, ThemeSource 和Theme。ThemeResolver 负责从request 中解析出主题名, ThemeSource 则根据主题名找到具体的主题, 其抽象也就是Theme, 通过Theme 来获取主题和具体的资源。
HandlerMappings
HandlerMapping 是用来查找Handler 的,也就是处理器,具体的表现形式可以是类也可以是方法。比如,标注了@RequestMapping 的每个method 都可以看成是一个Handler,由Handler 来负责实际的请求处理。HandlerMapping 在请求到达之后,它的作用便是找到请求相应的处理器Handler 和Interceptors。
HandlerAdapters (初始化拦截适配器)
从名字上看,这是一个适配器。因为Spring MVC 中Handler 可以是任意形式的,只要能够处理请求便行, 但是把请求交给Servlet 的时候,由于Servlet 的方法结构都是如doService(HttpServletRequest req, HttpServletResponse resp) 这样的形式,让固定的Servlet 处理方法调用Handler 来进行处理,这一步工作便是HandlerAdapter 要做的事。
HandlerExceptionResolvers(异常处理组件)
从这个组件的名字上看,这个就是用来处理Handler 过程中产生的异常情况的组件。具体来说,此组件的作用是根据异常设置ModelAndView, 之后再交给render()方法进行渲染, 而render() 便将ModelAndView 渲染成页面。不过有一点,HandlerExceptionResolver 只是用于解析对请求做处理阶段产生的异常,而渲染阶段的异常则不归他管了,这也是Spring MVC 组件设计的一大原则分工明确互不干涉。
RequestToViewNameTranslator(视图预处理器组件)
这个组件的作用,在于从Request 中获取viewName. 因为ViewResolver 是根据ViewName 查找View, 但有的Handler 处理完成之后,没有设置View 也没有设置ViewName, 便要通过这个组件来从Request 中查找viewName。
ViewResolvers(试图转换器)
视图解析器,相信大家对这个应该都很熟悉了。因为通常在SpringMVC 的配置文件中,都会配上一个该接口的实现类来进行视图的解析。这个组件的主要作用,便是将String类型的视图名和Locale 解析为View 类型的视图。这个接口只有一个resolveViewName()方法。从方法的定义就可以看出,Controller 层返回的String 类型的视图名viewName,最终会在这里被解析成为View。View 是用来渲染页面的,也就是说,它会将程序返回的参数和数据填入模板中,最终生成html 文件。ViewResolver 在这个过程中,主要做两件大事,即,ViewResolver 会找到渲染所用的模板(使用什么模板来渲染?)和所用的技术(其实也就是视图的类型,如JSP 啊还是其他什么Blabla 的)填入参数。默认情况下,Spring MVC 会为我们自动配置一个InternalResourceViewResolver,这个是针对JSP 类型视图的。
FlashMapManager()
说到FlashMapManager,就得先提一下FlashMap。FlashMap 用于重定向Redirect 时的参数数据传递,比如,在处理用户订单提交时,为了避免重复提交,可以处理完post 请求后redirect 到一个get 请求,这个get 请求可以用来显示订单详情之类的信息。这样做虽然可以规避用户刷新重新提交表单的问题,但是在这个页面上要显示订单的信息,那这些数据从哪里去获取呢,因为redirect 重定向是没有传递参数这一功能的,如果不想把参数写进url(其实也不推荐这么做,url 有长度限制不说,把参数都直接暴露,感觉也不安全), 那么就可以通过flashMap 来传递。只需要在redirect 之前, 将要传递的数据写入request ( 可以通过ServletRequestAttributes.getRequest() 获得) 的属性OUTPUT_FLASH_MAP_ATTRIBUTE 中,这样在redirect 之后的handler 中Spring 就会自动将其设置到Model 中,在显示订单信息的页面上,就可以直接从Model 中取得数据了。而FlashMapManager 就是用来管理FlashMap 的。
Spring MVC 源码分析
根据上面分析的Spring MVC 工作机制,从三个部分来分析Spring MVC 的源代码。
- ApplicationContext 初始化时用Map 保存所有url 和Controller 类的对应关系;
- 根据请求url 找到对应的Controller,并从Controller 中找到处理请求的方法;
- Request 参数绑定到方法的形参,执行方法处理请求,并返回结果视图。
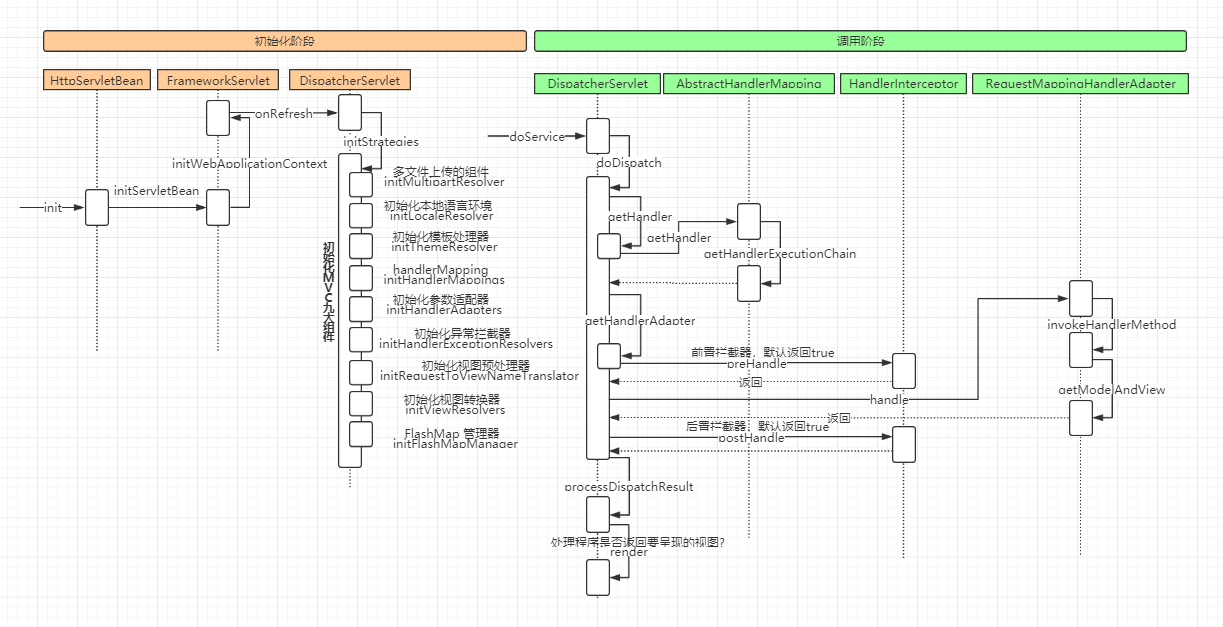
初始化阶段
我们首先找到DispatcherServlet 这个类,必然是寻找init()方法。然后,我们发现其init方法其实在父类HttpServletBean 中,其源码如下:
public final void init() throws ServletException {
        if (logger.isDebugEnabled()) {
            logger.debug("Initializing servlet '" + getServletName() + "'");
        }

        // Set bean properties from init parameters.
        //从初始化参数设置bean属性。
        PropertyValues pvs = new ServletConfigPropertyValues(getServletConfig(), this.requiredProperties);
        if (!pvs.isEmpty()) {
            try {
                //定位资源
                BeanWrapper bw = PropertyAccessorFactory.forBeanPropertyAccess(this);
                //加载配置信息
                ResourceLoader resourceLoader = new ServletContextResourceLoader(getServletContext());
                bw.registerCustomEditor(Resource.class, new ResourceEditor(resourceLoader, getEnvironment()));
                initBeanWrapper(bw);
                bw.setPropertyValues(pvs, true);
            }
            catch (BeansException ex) {
                if (logger.isErrorEnabled()) {
                    logger.error("Failed to set bean properties on servlet '" + getServletName() + "'", ex);
                }
                throw ex;
            }
        }

        // Let subclasses do whatever initialization they like.
        //模板方法,子类可以去自定义
        initServletBean();

        if (logger.isDebugEnabled()) {
            logger.debug("Servlet '" + getServletName() + "' configured successfully");
        }
    }
我们看到在这段代码中, 又调用了一个重要的initServletBean() 方法。进入initServletBean()方法看到以下源码:
protected final void initServletBean() throws ServletException {
        getServletContext().log("Initializing Spring FrameworkServlet '" + getServletName() + "'");
        if (this.logger.isInfoEnabled()) {
            this.logger.info("FrameworkServlet '" + getServletName() + "': initialization started");
        }
        long startTime = System.currentTimeMillis();

        try {
            this.webApplicationContext = initWebApplicationContext();
            initFrameworkServlet();
        }
        catch (ServletException ex) {
            this.logger.error("Context initialization failed", ex);
            throw ex;
        }
        catch (RuntimeException ex) {
            this.logger.error("Context initialization failed", ex);
            throw ex;
        }

        if (this.logger.isInfoEnabled()) {
            long elapsedTime = System.currentTimeMillis() - startTime;
            this.logger.info("FrameworkServlet '" + getServletName() + "': initialization completed in " +
                    elapsedTime + " ms");
        }
    }
这段代码中 initWebApplicationContext() 最主要的逻辑就是初始化IOC 容器,最终会调用refresh()方法,前面的IOC 容器的初始化细节我们已经详细掌握,在此不再赘述。
private boolean refreshEventReceived = false;
protected WebApplicationContext initWebApplicationContext() {
        WebApplicationContext rootContext =
                WebApplicationContextUtils.getWebApplicationContext(getServletContext());
        WebApplicationContext wac = null;

    。。。。。。。。if (wac == null) {
            // No context instance is defined for this servlet -> create a local one
            wac = createWebApplicationContext(rootContext);
        }

        if (!this.refreshEventReceived) {
            // Either the context is not a ConfigurableApplicationContext with refresh
            // support or the context injected at construction time had already been
            // refreshed -> trigger initial onRefresh manually here.
            onRefresh(wac);
        }
    。。。。。。。。return wac;
    }
我们看到上面的代码中,IOC 容器初始化之后,最后有调用了onRefresh()方法。这个方法最终是在DisptcherServlet 中实现,来看源码:
@Override
protected void onRefresh(ApplicationContext context) {
    initStrategies(context);
}

    /**
     * Initialize the strategy objects that this servlet uses.
     * <p>May be overridden in subclasses in order to initialize further strategy objects.
     */
    //初始化策略
protected void initStrategies(ApplicationContext context) {
        //多文件上传的组件
        initMultipartResolver(context);
        //初始化本地语言环境
        initLocaleResolver(context);
        //初始化模板处理器
        initThemeResolver(context);
        //handlerMapping
        initHandlerMappings(context);
        //初始化拦截适配器
        initHandlerAdapters(context);
        //初始化异常拦截器
        initHandlerExceptionResolvers(context);
        //初始化视图预处理器
        initRequestToViewNameTranslator(context);
        //初始化视图转换器
        initViewResolvers(context);
        //FlashMap 管理器
        initFlashMapManager(context);
}
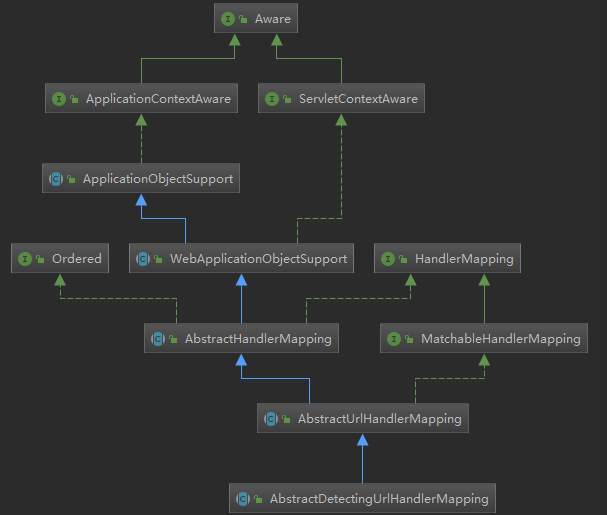
到这一步就完成了Spring MVC 的九大组件的初始化。接下来,我们来看url 和Controller的关系是如何建立的呢?HandlerMapping是个接口。先来看一下HandlerMapping 的实现类,会看到一个AbstractDetectingUrlHandlerMapping,可以看到其实现了ApplicationContextAware,在Spring容器会检测容器中的所有Bean,如果发现某个Bean实现了ApplicationContextAware接口,Spring容器会在创建该Bean之后,自动调用该Bean的setApplicationContextAware()方法。看看他的类图再慢慢去寻找这个触发点。
最后我们找啊找,会在ApplicationObjectSupport 发现了这个方法,继而调用到了HandlerMapping 的子类AbstractDetectingUrlHandlerMapping 中的initApplicationContext()方法,所以我们直接看子类中的初始化容器方法:
//建立当前ApplicationContext 中的所有Controller 和url 的对应关系
protected void detectHandlers() throws BeansException {
        ApplicationContext applicationContext = obtainApplicationContext();
        if (logger.isDebugEnabled()) {
            logger.debug("Looking for URL mappings in application context: " + applicationContext);
        }
        // 获取ApplicationContext 容器中所有bean 的Name
        String[] beanNames = (this.detectHandlersInAncestorContexts ?
                BeanFactoryUtils.beanNamesForTypeIncludingAncestors(applicationContext, Object.class) :
                applicationContext.getBeanNamesForType(Object.class));

        // Take any bean name that we can determine URLs for.
        // 遍历beanNames,并找到这些bean 对应的url
        for (String beanName : beanNames) {
            // 找bean 上的所有url(Controller 上的url+方法上的url),该方法由对应的子类实现
            String[] urls = determineUrlsForHandler(beanName);
            if (!ObjectUtils.isEmpty(urls)) {
                // URL paths found: Let's consider it a handler.
                // 保存urls 和beanName 的对应关系,put it to Map<urls,beanName>,
                // 该方法在父类AbstractUrlHandlerMapping 中实现
                registerHandler(urls, beanName);
            }
            else {
                if (logger.isDebugEnabled()) {
                    logger.debug("Rejected bean name '" + beanName + "': no URL paths identified");
                }
            }
        }
}

    /** 获取Controller 中所有方法的url,由子类实现,典型的模板模式**/
protected abstract String[] determineUrlsForHandler(String beanName);
determineUrlsForHandler(String beanName)方法的作用是获取每个Controller 中的url,不同的子类有不同的实现,这是一个典型的模板设计模式。因为开发中我们用的最多的就是用注解来配置Controller 中的url , BeanNameUrlHandlerMapping 是AbstractDetectingUrlHandlerMapping 的子类,处理注解形式的url 映射.所以我们这里以BeanNameUrlHandlerMapping 来进行分析。我们看BeanNameUrlHandlerMapping 是如何查beanName 上所有映射的url。
protected String[] determineUrlsForHandler(String beanName) {
        List<String> urls = new ArrayList<>();
        if (beanName.startsWith("/")) {
            urls.add(beanName);
        }
        String[] aliases = obtainApplicationContext().getAliases(beanName);
        for (String alias : aliases) {
            if (alias.startsWith("/")) {
                urls.add(alias);
            }
        }
        return StringUtils.toStringArray(urls);
}
到这里HandlerMapping 组件就已经建立所有url 和Controller 的对应关系。
运行调用阶段
这一步步是由请求触发的,所以入口为DispatcherServlet 的核心方法为doService(),doService()中的核心逻辑由doDispatch()实现,源代码如下:
    /** 中央控制器,控制请求的转发**/
    protected void doDispatch(HttpServletRequest request, HttpServletResponse response) throws Exception {
        HttpServletRequest processedRequest = request;
        HandlerExecutionChain mappedHandler = null;
        boolean multipartRequestParsed = false;

        WebAsyncManager asyncManager = WebAsyncUtils.getAsyncManager(request);

        try {
            ModelAndView mv = null;
            Exception dispatchException = null;

            try {
                // 1.检查是否是文件上传的请求
                processedRequest = checkMultipart(request);
                multipartRequestParsed = (processedRequest != request);

                // Determine handler for the current request.
                // 2.取得处理当前请求的Controller,这里也称为hanlder,处理器,
                // 第一个步骤的意义就在这里体现了.这里并不是直接返回Controller,
                // 而是返回的HandlerExecutionChain 请求处理器链对象,
                // 该对象封装了handler 和interceptors.
                mappedHandler = getHandler(processedRequest);
                if (mappedHandler == null) {
                    noHandlerFound(processedRequest, response);
                    return;
                }

                // Determine handler adapter for the current request.
                //3. 获取处理request 的处理器适配器handler adapter
                HandlerAdapter ha = getHandlerAdapter(mappedHandler.getHandler());

                // Process last-modified header, if supported by the handler.
                // 处理last-modified 请求头
                String method = request.getMethod();
                boolean isGet = "GET".equals(method);
                if (isGet || "HEAD".equals(method)) {
                    long lastModified = ha.getLastModified(request, mappedHandler.getHandler());
                    if (logger.isDebugEnabled()) {
                        logger.debug("Last-Modified value for [" + getRequestUri(request) + "] is: " + lastModified);
                    }
                    if (new ServletWebRequest(request, response).checkNotModified(lastModified) && isGet) {
                        return;
                    }
                }

                if (!mappedHandler.applyPreHandle(processedRequest, response)) {
                    return;
                }

                // Actually invoke the handler.
                // 4.实际的处理器处理请求,返回结果视图对象
                mv = ha.handle(processedRequest, response, mappedHandler.getHandler());

                if (asyncManager.isConcurrentHandlingStarted()) {
                    return;
                }
                // 结果视图对象的处理
                applyDefaultViewName(processedRequest, mv);
                mappedHandler.applyPostHandle(processedRequest, response, mv);
            } catch (Exception ex) {
                dispatchException = ex;
            } catch (Throwable err) {
                // As of 4.3, we're processing Errors thrown from handler methods as well,
                // making them available for @ExceptionHandler methods and other scenarios.
                dispatchException = new NestedServletException("Handler dispatch failed", err);
            }
            processDispatchResult(processedRequest, response, mappedHandler, mv, dispatchException);
        } catch (Exception ex) {
            triggerAfterCompletion(processedRequest, response, mappedHandler, ex);
        } catch (Throwable err) {
            triggerAfterCompletion(processedRequest, response, mappedHandler,
                    new NestedServletException("Handler processing failed", err));
        } finally {
            if (asyncManager.isConcurrentHandlingStarted()) {
                // Instead of postHandle and afterCompletion
                if (mappedHandler != null) {
                    // 请求成功响应之后的方法
                    mappedHandler.applyAfterConcurrentHandlingStarted(processedRequest, response);
                }
            } else {
                // Clean up any resources used by a multipart request.
                if (multipartRequestParsed) {
                    cleanupMultipart(processedRequest);
                }
            }
        }
    }
getHandler(processedRequest)方法实际上就是从HandlerMapping 中找到url 和Controller 的对应关系。也就是Map<url,Controller>。我们知道,最终处理Request的是Controller 中的方法,我们现在只是知道了Controller,我们如何确认Controller中处理Request 的方法呢?继续往下看。从Map<urls,beanName>中取得Controller 后,经过拦截器的预处理方法,再通过反射获取该方法上的注解和参数,解析方法和参数上的注解,然后反射调用方法获取ModelAndView 结果视图。最后,调用的就是RequestMappingHandlerAdapter 的handle()中的核心逻辑由handleInternal(request, response, handler)实现。
/** 根据url 获取处理请求的方法**/
    protected HandlerMethod getHandlerInternal(HttpServletRequest request) throws Exception {
        // 如果请求url 为,http://localhost:8080/web/hello.json, 则lookupPath=web/hello.json
        String lookupPath = getUrlPathHelper().getLookupPathForRequest(request);
        if (logger.isDebugEnabled()) {
            logger.debug("Looking up handler method for path " + lookupPath);
        }
        this.mappingRegistry.acquireReadLock();
        try {
            // 遍历Controller 上的所有方法,获取url 匹配的方法
            HandlerMethod handlerMethod = lookupHandlerMethod(lookupPath, request);
            if (logger.isDebugEnabled()) {
                if (handlerMethod != null) {
                    logger.debug("Returning handler method [" + handlerMethod + "]");
                }
                else {
                    logger.debug("Did not find handler method for [" + lookupPath + "]");
                }
            }
            return (handlerMethod != null ? handlerMethod.createWithResolvedBean() : null);
        }
        finally {
            this.mappingRegistry.releaseReadLock();
        }
    }
通过上面的代码分析,已经可以找到处理Request 的Controller 中的方法了,现在看如何解析该方法上的参数,并反射调用该方法。
/** 获取处理请求的方法,执行并返回结果视图**/
protected ModelAndView invokeHandlerMethod(HttpServletRequest request,
            HttpServletResponse response, HandlerMethod handlerMethod) throws Exception {

        ServletWebRequest webRequest = new ServletWebRequest(request, response);
        try {
            WebDataBinderFactory binderFactory = getDataBinderFactory(handlerMethod);
            ModelFactory modelFactory = getModelFactory(handlerMethod, binderFactory);

            ServletInvocableHandlerMethod invocableMethod = createInvocableHandlerMethod(handlerMethod);
            if (this.argumentResolvers != null) {
                invocableMethod.setHandlerMethodArgumentResolvers(this.argumentResolvers);
            }
            if (this.returnValueHandlers != null) {
                invocableMethod.setHandlerMethodReturnValueHandlers(this.returnValueHandlers);
            }
            invocableMethod.setDataBinderFactory(binderFactory);
            invocableMethod.setParameterNameDiscoverer(this.parameterNameDiscoverer);

            ModelAndViewContainer mavContainer = new ModelAndViewContainer();
            mavContainer.addAllAttributes(RequestContextUtils.getInputFlashMap(request));
            modelFactory.initModel(webRequest, mavContainer, invocableMethod);
            mavContainer.setIgnoreDefaultModelOnRedirect(this.ignoreDefaultModelOnRedirect);

            AsyncWebRequest asyncWebRequest = WebAsyncUtils.createAsyncWebRequest(request, response);
            asyncWebRequest.setTimeout(this.asyncRequestTimeout);

            WebAsyncManager asyncManager = WebAsyncUtils.getAsyncManager(request);
            asyncManager.setTaskExecutor(this.taskExecutor);
            asyncManager.setAsyncWebRequest(asyncWebRequest);
            asyncManager.registerCallableInterceptors(this.callableInterceptors);
            asyncManager.registerDeferredResultInterceptors(this.deferredResultInterceptors);

            if (asyncManager.hasConcurrentResult()) {
                Object result = asyncManager.getConcurrentResult();
                mavContainer = (ModelAndViewContainer) asyncManager.getConcurrentResultContext()[0];
                asyncManager.clearConcurrentResult();
                if (logger.isDebugEnabled()) {
                    logger.debug("Found concurrent result value [" + result + "]");
                }
                invocableMethod = invocableMethod.wrapConcurrentResult(result);
            }

            invocableMethod.invokeAndHandle(webRequest, mavContainer);
            if (asyncManager.isConcurrentHandlingStarted()) {
                return null;
            }

            return getModelAndView(mavContainer, modelFactory, webRequest);
        }
        finally {
            webRequest.requestCompleted();
        }
    }
invocableMethod.invokeAndHandle()最终要实现的目的就是:完成Request 中的参数和方法参数上数据的绑定。Spring MVC 中提供两种Request 参数到方法中参数的绑定方式:
- 通过注解进行绑定,@RequestParam。
- 通过参数名称进行绑定。
使用注解进行绑定,我们只要在方法参数前面声明@RequestParam("name"),就可以将request 中参数name 的值绑定到方法的该参数上。使用参数名称进行绑定的前提是必须要获取方法中参数的名称,Java 反射只提供了获取方法的参数的类型,并没有提供获取参数名称的方法。SpringMVC 解决这个问题的方法是用asm 框架读取字节码文件,来获取方法的参数名称。asm 框架是一个字节码操作框架,关于asm 更多介绍可以参考其官网。个人建议,使用注解来完成参数绑定,这样就可以省去asm 框架的读取字节码的操作。
到这里,方法的参数值列表也获取到了,就可以直接进行方法的调用了。整个请求过程中最复杂的一步就是在这里了。到这里整个请求处理过程的关键步骤都已了解。理解了Spring MVC 中的请求处理流程,整个代码还是比较清晰的。最后我们再来梳理一下Spring MVC 核心组件的关联关系(如下图):

时序图: