springmvc工作流程——DispatcherServlet处理请求详解与源码分析
一、Dispatchservlet继承体系

在我上一篇博客中,我主要分析了springmvc体系的创建过程,主要是上图中DispatcherServlet,它的父类FrameworkServlet,及HttpServletBean的创建过程,详情可至 springmvc的创建过程详解 查看,配合本文食用效果更佳。
本篇文章,将主要讲解springmvc自顶而下是怎么处理请求的,我将详细的分析处理请求的全过程及涉及到的知识点,这样大家就可以明白从servlet容器将请求交给springmvc一直到DispatcherServlet具体处理请求之前都做了些什么,最后再将重点分析springmvc中最核心的处理方法----doDispatch的结构。
二、HttpServletBean处理请求过程
HttpServletBean主要参与的是创建过程,并没有涉及到请求的处理。我特地列出来是为了告诉大家,这个类是没有去处理请求的!
三、FrameworkServlet处理请求过程
大家都知道,servlet处理请求的过程首先是从service方法开始的,然后在HttpServlet的service方法中,将不同的请求方式路由到各自的方法中进行处理。FrameworkServlet不但重写了HttpServlet的service方法,而且重写了具体的除doHead之外的所有处理方法。它在service方法中加入了对PATCH类型请求的处理。其他类型的请求直接交给了父类处理,下面是service方法的源代码:
/**
	 * Override the parent class implementation in order to intercept PATCH requests.
	 */
	@Override
	protected void service(HttpServletRequest request, HttpServletResponse response)
			throws ServletException, IOException {

		HttpMethod httpMethod = HttpMethod.resolve(request.getMethod());
		if (HttpMethod.PATCH == httpMethod || httpMethod == null) {
			processRequest(request, response);
		}
		else {
			super.service(request, response);
		}
	}
在FrameworkServlet中有2个属性:dispatchOptionsRequest 、dispatchTraceRequest,可以通过设置这2个参数来决定是FrameworkServlet自己处理doOptions和doTrace方法还是父类来处理(默认是父类来处理),而doGet、doPost、doPut、doDelete方法都是FrameworkServlet自己处理(因为重写了HttpServlet中的方法),而所有需要自己处理的方法都交给了processRequest方法处理:
doOptions():通过dispatchOptionsRequest 来判断是自己处理还是由父类处理
@Override
	protected void doOptions(HttpServletRequest request, HttpServletResponse response)
			throws ServletException, IOException {

        //dispatchOptionsRequest 默认为false
		if (this.dispatchOptionsRequest || CorsUtils.isPreFlightRequest(request)) {
			processRequest(request, response);
			if (response.containsHeader("Allow")) {
				// Proper OPTIONS response coming from a handler - we're done.
				return;
			}
		}
		//默认是由父类处理
		super.doOptions(request, new HttpServletResponseWrapper(response) {
			@Override
			public void setHeader(String name, String value) {
				if ("Allow".equals(name)) {
					value = (StringUtils.hasLength(value) ? value + ", " : "") + HttpMethod.PATCH.name();
				}
				super.setHeader(name, value);
			}
		});
	}
doGet():走自己类(FrameworkServlet)的处理方法
@Override
	protected final void doGet(HttpServletRequest request, HttpServletResponse response)
			throws ServletException, IOException {

		processRequest(request, response);
	}
我们可以看出,FrameworkServlet处理请求的方法与HttpServlet处理请求的方法刚好相反,它将所有的请求全部合并到了processRequest方法中
下面就来看一下processRequest方法,它是FrameworkServlet类处理请求的过程中最核心的方法:
/**
	 * Process this request, publishing an event regardless of the outcome.
	 * <p>The actual event handling is performed by the abstract
	 * {@link #doService} template method.
	 */
	protected final void processRequest(HttpServletRequest request, HttpServletResponse response)
			throws ServletException, IOException {

		long startTime = System.currentTimeMillis();
		Throwable failureCause = null;

			//获取LocaleContextHolder中原来保存的LocaleContext
		LocaleContext previousLocaleContext = LocaleContextHolder.getLocaleContext();
			//获取当前请求的LocaleContext
		LocaleContext localeContext = buildLocaleContext(request);
			//获取RequestContextHolder原来保存的RequestAttributes
		RequestAttributes previousAttributes = RequestContextHolder.getRequestAttributes();
			//获取当前请求的RequestAttributes
		ServletRequestAttributes requestAttributes = buildRequestAttributes(request, response, previousAttributes);

		WebAsyncManager asyncManager = WebAsyncUtils.getAsyncManager(request);
		asyncManager.registerCallableInterceptor(FrameworkServlet.class.getName(), new RequestBindingInterceptor());
			//将当前请求的LocaleContext和ServletRequestAttributes设置到LocaleContextHolder和RequestContextHolder中
		initContextHolders(request, localeContext, requestAttributes);

		try {
			//实际处理请求的入口
			doService(request, response);
		}
		catch (ServletException ex) {
			failureCause = ex;
			throw ex;
		}
		catch (IOException ex) {
			failureCause = ex;
			throw ex;
		}
		catch (Throwable ex) {
			failureCause = ex;
			throw new NestedServletException("Request processing failed", ex);
		}

		finally {
			//恢复原来的LocaleContext和ServletRequestAttributes到LocaleContextHolder和			   RequestContextHolder中
			resetContextHolders(request, previousLocaleContext, previousAttributes);
			if (requestAttributes != null) {
				requestAttributes.requestCompleted();
			}

			if (logger.isDebugEnabled()) {
				if (failureCause != null) {
					this.logger.debug("Could not complete request", failureCause);
				}
				else {
					if (asyncManager.isConcurrentHandlingStarted()) {
						logger.debug("Leaving response open for concurrent processing");
					}
					else {
						this.logger.debug("Successfully completed request");
					}
				}
			}
			//发布servletRequestHandledEvent消息
			publishRequestHandledEvent(request, response, startTime, failureCause);
		}
	}
processRequest方法中核心语句是doService方法,这是一个模板方法,在DispatcherServlet中具体实现,也是整个springmvc中处理请求的核心方法,这里我们之后再说。而在doService方法执行前还做了一些事情(有点装饰模式的味道):
- 获取LocaleContextHolder和RequestContextHolder中原来保存的LocaleContext与RequestAttributes
- 对异步的请求做出一些处理
- 获取当前请求的LocaleContext和RequestAttributes,一并设置到LocaleContextHolder和RequestContextHolder中
最后,处理完请求之后(finally),通过resetContextHolders方法又恢复到之前的样子,并调用publishRequestHandledEvent发布了一个ServletRequestHandlerEvent类型的消息。
在这里涉及到了2个接口类:LocaleContext,RequestAttributes,我简单介绍一下这2个类:
- LocaleContext:这个类中主要是存储着本地化信息,如zh-cn等
- RequestAttributes:这个类里面封装了request、response、session,并提供了get方法,可以直接获取
四、DispatcherServlet处理请求过程
通过之前对FrameworkServlet的分析,我们可以知道,DispatcherServlet处理请求的入口方法是doService,不过doService方法并没有直接处理请求,而是交给了doDispatch方法进行处理,而在这之前,doService方法还做了其他一些事情:
- 判断是否为include请求,如果是,则对request的Attribute进行备份
- 对request设置了一些属性
下面是源代码:
@Override
	protected void doService(HttpServletRequest request, HttpServletResponse response) throws Exception {
		if (logger.isDebugEnabled()) {
			String resumed = WebAsyncUtils.getAsyncManager(request).hasConcurrentResult() ? " resumed" : "";
			logger.debug("DispatcherServlet with name '" + getServletName() + "'" + resumed +
					" processing " + request.getMethod() + " request for [" + getRequestUri(request) + "]");
		}

//***************如果是include请求,则对request进行快照备份***********************
		Map<String, Object> attributesSnapshot = null;
		if (WebUtils.isIncludeRequest(request)) {
			attributesSnapshot = new HashMap<String, Object>();
			Enumeration<?> attrNames = request.getAttributeNames();
			while (attrNames.hasMoreElements()) {
				String attrName = (String) attrNames.nextElement();
				if (this.cleanupAfterInclude || attrName.startsWith("org.springframework.web.servlet")) {
					attributesSnapshot.put(attrName, request.getAttribute(attrName));
				}
			}
		}

//****************************** 对request设置一些属性****************************.
		request.setAttribute(WEB_APPLICATION_CONTEXT_ATTRIBUTE, getWebApplicationContext());
		request.setAttribute(LOCALE_RESOLVER_ATTRIBUTE, this.localeResolver);
		request.setAttribute(THEME_RESOLVER_ATTRIBUTE, this.themeResolver);
		request.setAttribute(THEME_SOURCE_ATTRIBUTE, getThemeSource());

		FlashMap inputFlashMap = this.flashMapManager.retrieveAndUpdate(request, response);
		if (inputFlashMap != null) {
			request.setAttribute(INPUT_FLASH_MAP_ATTRIBUTE, Collections.unmodifiableMap(inputFlashMap));
		}
		request.setAttribute(OUTPUT_FLASH_MAP_ATTRIBUTE, new FlashMap());
		request.setAttribute(FLASH_MAP_MANAGER_ATTRIBUTE, this.flashMapManager);

		try {
			doDispatch(request, response);
		}
		finally {
			if (!WebAsyncUtils.getAsyncManager(request).isConcurrentHandlingStarted()) {
				// 还原快照备份(如果是include请求)
				if (attributesSnapshot != null) {
					restoreAttributesAfterInclude(request, attributesSnapshot);
				}
			}
		}
	}
在处理完请求之后,如果请求是include请求,则会还原request的快照属性
————————————————————————————————————————————————————————————
在对request设置的属性中,前面的四个属性:WebApplicationContext、localeResolver、themeResolver、ThemeSource,我会在之后分析。
但后面request设置的三个属性都与flashMap有关:flashMap主要用于redirect的时候传递参数,比如,为了避免重复提交表单,可以在post请求之后redirect到一个get的请求,这样即使用户刷新浏览器也不会造成重复提交表单。不过这里有个问题,如果想要在用户提交表单之后转到该订单的详情页面,就必须要在传递一些参数,而redirect本身是无法传递参数的,只有通过在url之后加入参数,但是这种方法又有长度限制,这时候就可以使用flashMap来传递参数了,flashMap的具体使用方法可以看我的这篇文章,我这里就不再赘述了:
————————————————————————————小小的分割线————————————————————————————
下面,我们重点分析doDispatch方法的结构,它是一个请求在springmvc中要面对的最终大boss
五、doDispatch
先贴源代码,我在上面加了文字注释,如果能直接通过IDE看源代码,就直接跳到后面的文字部分吧:
protected void doDispatch(HttpServletRequest request, HttpServletResponse response) throws Exception {
		HttpServletRequest processedRequest = request;
		HandlerExecutionChain mappedHandler = null;
		boolean multipartRequestParsed = false;

		WebAsyncManager asyncManager = WebAsyncUtils.getAsyncManager(request);

		try {
			ModelAndView mv = null;
			Exception dispatchException = null;

			try {
		//*******************检查是不是上传请求**************************
				processedRequest = checkMultipart(request);
				multipartRequestParsed = (processedRequest != request);

		// *******************根据request找到Handler*******************
				mappedHandler = getHandler(processedRequest);
				if (mappedHandler == null || mappedHandler.getHandler() == null) {
					noHandlerFound(processedRequest, response);
					return;
				}

		//*******************根据Handler找到HandlerAdapter*******************
				HandlerAdapter ha = getHandlerAdapter(mappedHandler.getHandler());

		// *******************处理get、head请求的Last-Modified*******************
				String method = request.getMethod();
				boolean isGet = "GET".equals(method);
				if (isGet || "HEAD".equals(method)) {
					long lastModified = ha.getLastModified(request, mappedHandler.getHandler());
					if (logger.isDebugEnabled()) {
						logger.debug("Last-Modified value for [" + getRequestUri(request) + "] is: " + lastModified);
					}
					if (new ServletWebRequest(request, response).checkNotModified(lastModified) && isGet) {
						return;
					}
				}

		//*******************执行拦截器的PreHandler方法*******************
				if (!mappedHandler.applyPreHandle(processedRequest, response)) {
					return;
				}

		// *******************使用Handler处理请求*******************
				mv = ha.handle(processedRequest, response, mappedHandler.getHandler());

		//*******************如果需要异步处理,则直接返回*******************
				if (asyncManager.isConcurrentHandlingStarted()) {
					return;
				}
		//*******************当view为空时(Controller方法返回void),根据request设置默认的view**************
				applyDefaultViewName(processedRequest, mv);
		//*******************执行拦截器的PostHandle方法*******************
				mappedHandler.applyPostHandle(processedRequest, response, mv);
			}
			catch (Exception ex) {
				dispatchException = ex;
			}
			catch (Throwable err) {
	//*******************这里是spring4.3之后新加的一句话*******************
				dispatchException = new NestedServletException("Handler dispatch failed", err);
			}
   //*******************处理返回结果,包括异常、渲染页面、触发拦截器的afterCompletion方法*******************
			processDispatchResult(processedRequest, response, mappedHandler, mv, dispatchException);
		}
		catch (Exception ex) {
			triggerAfterCompletion(processedRequest, response, mappedHandler, ex);
		}
		catch (Throwable err) {
			triggerAfterCompletion(processedRequest, response, mappedHandler,
					new NestedServletException("Handler processing failed", err));
		}
		finally {
	//*******************如果需要异步处理*******************
			if (asyncManager.isConcurrentHandlingStarted()) {
				// Instead of postHandle and afterCompletion
				if (mappedHandler != null) {
					mappedHandler.applyAfterConcurrentHandlingStarted(processedRequest, response);
				}
			}
			else {
	 // *******************删除上传请求的资源*******************
				if (multipartRequestParsed) {
					cleanupMultipart(processedRequest);
				}
			}
		}
	}
doDispatch方法的结构也还算简洁,其中最核心的代码就4句:
***mappedHandler = getHandler(processedRequest);
***HandlerAdapter ha = getHandlerAdapter(mappedHandler.getHandler());
***mv = ha.handle(processedRequest, response, mappedHandler.getHandler());
***processDispatchResult(processedRequest, response, mappedHandler, mv, dispatchException);
它们分别对应的任务是:
- 根据request找到handler
- 根据handler找到HandlerAdapter
- 用HandlerAdapter处理handler
- 调用processDispatchResult方法处理返回的结果(包括渲染页面并返回给用户)
这里涉及的三个概念HandlerMapping、Handler和HandlerAdapter,这对理解springmvc十分重要,如果对这三个概念还是有点迷迷糊糊的话,可以先看下我的这篇文章:HandlerMapping、Handler和HandlerAdapter的介绍
—————————————————————————高能分割线———————————————————————————————
下面,我将详细地分析doDispatch方法,若只想了解大体流程的话,看上面源代码的文字注释也能大体明白,如果你能耐心往下看的话就来吧!
doDispatch方法大体可以分为2个部分:处理请求与处理请求结果,开头部分定义了几个变量,我简单介绍一下:
- HttpServletRequest processedRequest:实际处理时的request,如果不是上传请求则直接使用传入的request,如果是,就将这个变量封装为上传类型request。
- HandlerExecutionChain mappedHandler:处理请求的处理器链,这个类中封装了处理器与对应的拦截器
public class HandlerExecutionChain {

	private static final Log logger = LogFactory.getLog(HandlerExecutionChain.class);

	private final Object handler;

	private HandlerInterceptor[] interceptors;

	private List<HandlerInterceptor> interceptorList;

	private int interceptorIndex = -1;

	.......................................

}
- boolean multipartRequestParsed:是否为上传请求
- ModelAndView mv:封装了model与view的容器
- Exception dispatchException:处理请求过程中抛出的异常,注意,这里并不包括渲染页面时发生的异常。
处理请求
- 先检查是不是上传的请求,并将标志赋给multipartRequestParsed。
- 根据request获取Handler处理器链,其中包含着当前请求的Handler与拦截器,我们来看看getHandler的源码:
protected HandlerExecutionChain getHandler(HttpServletRequest request) throws Exception {
		for (HandlerMapping hm : this.handlerMappings) {
			if (logger.isTraceEnabled()) {
				logger.trace(
						"Testing handler map [" + hm + "] in DispatcherServlet with name '" + getServletName() + "'");
			}
			HandlerExecutionChain handler = hm.getHandler(request);
			if (handler != null) {
				return handler;
			}
		}
		return null;
	}
这个方法中获取handler的方法就是hm.getHandler(request),其中hm就是dispatchServlet初始化的时候,通过applicationContext传入进来的(initHandlerMappings),还算比较好理解
- 根据Handler查找HandlerAdapter,这里的原理跟上面类似,不过多了一个判断条件:判断初始化时注册的HandlerAdapter是否支持该Handler
	.........

	if (ha.supports(handler)) {
					return ha;
				}

	.........
- 接下来处理GET、HEAD请求的Last-Modified:当浏览器第一次跟服务器请求资源(GET\HEAD)的时候,服务器会在返回的请求头里加入一个Last-Modified属性,代表资源最后是什么时候修改的。浏览器以后发送请求时,会将这个属性同时发送给服务器,服务器会将传过来的值与实际资源修改的时间做对比,如果资源过期则返回新的资源与新的Last-Modified,如果没有过期,则直接使用之前浏览器缓存的资源。
- 执行该请求的拦截器中的preHandler方法
- HandlerAdapter使用Handler处理请求,这里就是controller层写的代码执行的地方了
- 当view为空时,设置默认的view:这里对应的情况就是controller层的方法返回void值。
- 执行该请求的拦截器中的postHandler方法
处理请求结果
这里的处理结果包括处理异常、渲染页面、与触发拦截器的AfterCompletion方法,处理的方法就是processDispatchResult(),下面是源代码,并附上文字注释:
private void processDispatchResult(HttpServletRequest request, HttpServletResponse response,
			HandlerExecutionChain mappedHandler, ModelAndView mv, Exception exception) throws Exception {

		boolean errorView = false;

	//*********************如果处理“请求”的过程中有异常,则处理异常************************
		if (exception != null) {
			if (exception instanceof ModelAndViewDefiningException) {
				logger.debug("ModelAndViewDefiningException encountered", exception);
				mv = ((ModelAndViewDefiningException) exception).getModelAndView();
			}
			else {
				Object handler = (mappedHandler != null ? mappedHandler.getHandler() : null);
				mv = processHandlerException(request, response, handler, exception);
				errorView = (mv != null);
			}
		}

	// ******************************渲染页面*************************************
		if (mv != null && !mv.wasCleared()) {
			render(mv, request, response);
			if (errorView) {
				WebUtils.clearErrorRequestAttributes(request);
			}
		}
		else {
			if (logger.isDebugEnabled()) {
				logger.debug("Null ModelAndView returned to DispatcherServlet with name '" + getServletName() +
						"': assuming HandlerAdapter completed request handling");
			}
		}

		if (WebAsyncUtils.getAsyncManager(request).isConcurrentHandlingStarted()) {
			// Concurrent handling started during a forward
			return;
		}

//***************************触发拦截器的AfterCompletion************************
		if (mappedHandler != null) {
			mappedHandler.triggerAfterCompletion(request, response, null);
		}
	}
我们先说一下doDispatch方法的处理异常的方式,在这里,异常共分为2层异常,内层是处理请求时发生的异常,外层是处理结果时发生的异常。内层异常在会设置到dispatchException中,然后传入processDispatchResult方法,在这里面处理;而外层异常则是processDispatchResult方法中发生的异常。processDispatchResult处理异常的方法则是直接将异常设置到view里面
渲染页面的具体方法则是render方法,渲染之后则通过triggerAfterCompletion调用拦截器的afterCompletion方法,至此,processDispatchResult方法结束
再返回doDispatch方法中,如果请求时异步请求,则调用相应的异步处理的拦截器,否则,进入下一步,如果是上传请求则删除上传的临时资源。
doDispatch方法就分析完了,我们回顾一下整个方法的流程,发现前一部分处理请求是关联着Controller层的,中间处理请求结果时是关联着View层的,而Model层则贯穿全场,不愧叫springmvc啊!
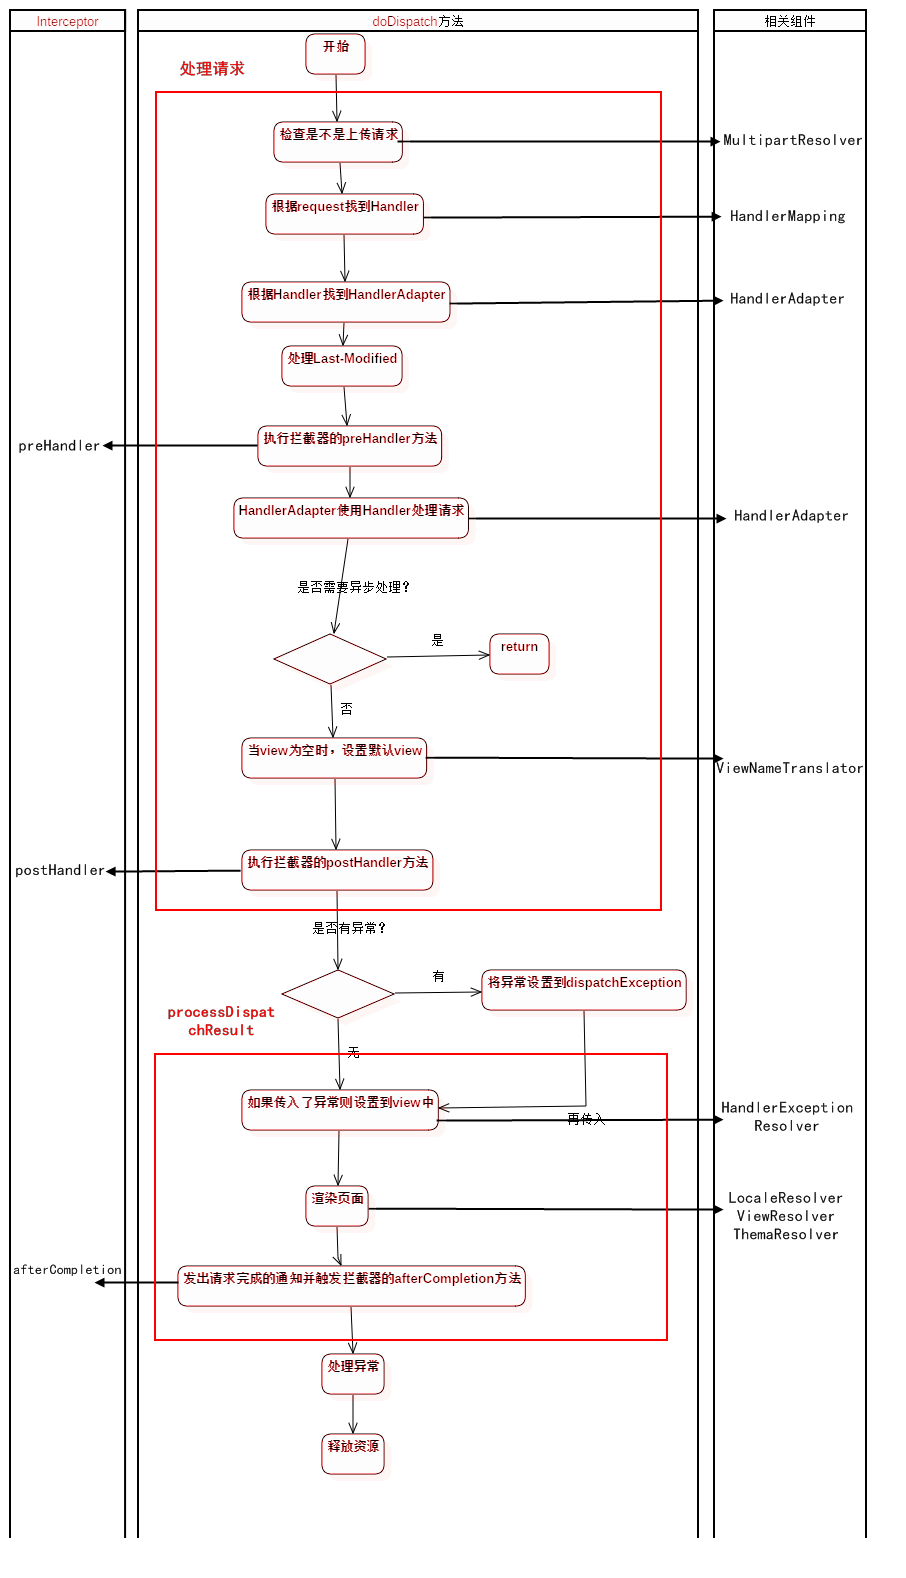
最后,我附上用startUML画的流程图,左边是拦截器,中间是doDispatch方法的流程,右边是用到的相关组件,这里一共用到了8个组件,除了FlashMapManager。
———————————原创文章,转载请说明—————————————————