常见错误:
如果在getBean的时候,传入的id不存在,就会报以下错误:

IOC程序 -- 通过类型获取对象(重点)
实验2:根据bean的类型从IOC容器中获取bean的实例★
程序代码:
当applicationContext.xml配置文件中,只有一个Person.class的对象实例配置的时候,程序是可以正常运行的。
@Test
publicvoid test2() {
// applicationContext 就是 IOC容器
// ClassPathXmlApplicationContext是容器的实现类
ApplicationContext applicationContext= newClassPathXmlApplicationContext("classpath:applicationContext.xml");
// 从容器中获取id 为 person 定义的对象
Person person = (Person)applicationContext.getBean(Person.class);
System.out.println( person );
}
在applicationContext.xml配置文件中:
<?xmlversion="1.0"encoding="UTF-8"?>
<beansxmlns="http://www.springframework.org/schema/beans"
xmlns:xsi="http://www.w3.org/2001/XMLSchema-instance"
xsi:schemaLocation="http://www.springframework.org/schema/beanshttp://www.springframework.org/schema/beans/spring-beans.xsd">
<!--
bean标签配置一个组件类======会由Spring容器来管理
id 属性给bean添加唯一标识
class 属性设置 配置的类的全类名
-->
<bean id="person" class="com.xypuxing.pojo.Person">
<!-- property 标签 设置 属性信息 -->
<property name="id" value="1" />
<property name="name" value="张三" />
<property name="age" value="18" />
<property name="phone" value="18688888888" />
</bean>
<bean id="person02" class="com.xypuxing.pojo.Person">
<!-- property 标签 设置 属性信息 -->
<property name="id" value="2" />
<property name="name" value="李四" />
</bean>
</beans>
常见错误说明:
当在applicationContext.xml配置文件中。有多个同Person.class类型实现的时候。

IOC程序 -- 通过构造方法参数名注入值
实验3:通过构造器为bean的属性赋值
applicationContext.xml配置文件中的内容:
<!-- int id, String name, intage, String phone -->
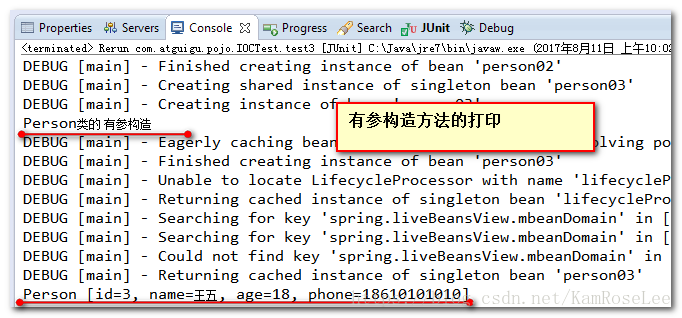
<bean id="person03" class="com.xypuxing.pojo.Person">
<!--constructor-arg 表示有参构造方法中的一个参数 -->
<constructor-arg name="id" value="3"></constructor-arg>
<constructor-arg name="name" value="王五"></constructor-arg>
<constructor-arg name="age" value="18"></constructor-arg>
<constructor-arg name="phone" value="18610101010"></constructor-arg>
</bean>
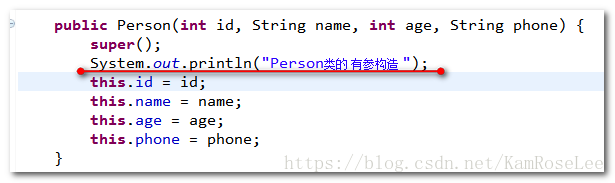
在Person类的有参构造方法中添加打印:
代码:
@Test
publicvoid test3() {
ApplicationContextapplicationContext = newClassPathXmlApplicationContext("applicationContext.xml");
Personperson03 = (Person) applicationContext.getBean("person03");
System.out.println(person03);
}
运行结果:
IOC程序 -- index属性指定参数的位置
实验4:通过index属性指定参数的位置
applicationContext.xml配置文件中的内容:
<!-- int id, String name, intage, String phone -->
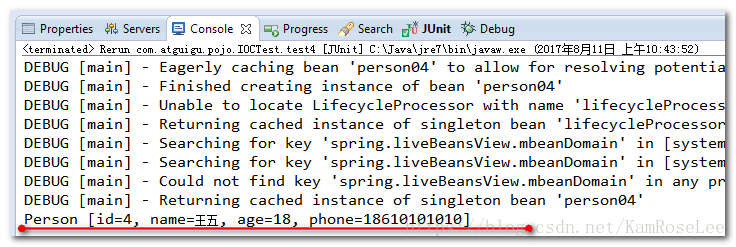
<bean id="person04" class="com.xypuxing.pojo.Person">
<!-- index 表示参数的索引位置。索引值从零0开始算 -->
<constructor-arg index="0" value="4"></constructor-arg>
<constructor-arg index="1" value="王五"></constructor-arg>
<constructor-arg index="3" value="18610101010"></constructor-arg>
<constructor-arg index="2" value="18"></constructor-arg>
</bean>
代码:
@Test
publicvoid test4() {
ApplicationContextapplicationContext = newClassPathXmlApplicationContext("applicationContext.xml");
Personperson04 = (Person) applicationContext.getBean("person04");
System.out.println(person04);
}
运行结果:
IOC程序 -- 根据参数类型注入
实验5:根据参数类型注入
applicationContext.xml配置文件中的内容:
<!-- int id, String name, intage, String phone -->
<bean id="person05" class="com.xypuxing.pojo.Person">
<!-- index 表示参数的索引位置。索引值从零0开始算 -->
<constructor-arg index="3" value="18610101010" type="java.lang.String"></constructor-arg>
<constructor-arg index="1" value="王五" type="java.lang.String"></constructor-arg>
<!--
使用类型区分重载的构造函数
这个地方有一点需要特别注意:
如果代码中的类型是Integer , 那么type类型是 java.lang.Integer
如果代码中的类型是int , 那么type类型是int
-->
<constructor-arg index="2" value="18" type="int"></constructor-arg>
<constructor-arg index="0" value="4" type="int"></constructor-arg>
</bean>
代码:
@Test
publicvoid test5() {
ApplicationContextapplicationContext = newClassPathXmlApplicationContext("applicationContext.xml");
Personperson05 = (Person) applicationContext.getBean("person05");
System.out.println(person05);
}
运行结果:

IOC之 P名称空间
实验6:通过p名称空间为bean赋值
先打开applicationContext.xml配置文件,添加P名称空间:

在applicationContext.xml中的配置
<!-- p名称空间,使用很简单。 p:属性="值" -->
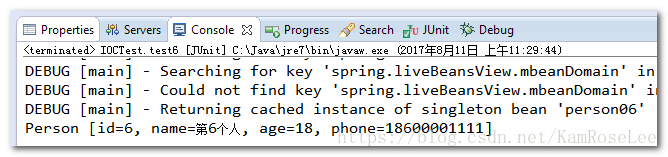
<bean id="person06" class="com.xypuxing.pojo.Person" p:id="6"p:name="第6个人" p:age="18" p:phone="18600001111" />
代码:
@Test
publicvoid test6() {
ApplicationContextapplicationContext = newClassPathXmlApplicationContext("applicationContext.xml");
Personperson06 = (Person) applicationContext.getBean("person06");
System.out.println(person06);
}
运行结果:
测试null值的使用
实验7:测试使用null值
修改Person类的属性,添加默认值
publicclass Person {
privateintid;
private String name;
privateintage;
private String phone = "默认值";
applicationContext.xml中配置的内容
<bean id="person07" class="com.xypuxing.pojo.Person" p:id="7"p:age="18"p:name="第七个人">
<property name="phone">
<null />
</property>
</bean>
测试的代码:
@Test
publicvoid test7() {
ApplicationContextapplicationContext = newClassPathXmlApplicationContext("applicationContext.xml");
Personperson07 = (Person) applicationContext.getBean("person07");
System.out.println(person07);
}
运行的结果

IOC之子对象的赋值测试(重点)
实验8:引用其他bean★
创建个新的工程。测试Spring的开发环境。此不重复。请参阅前面,环境搭建。
创建实体Bean对象
publicclass Car {
private String name;
private String carNo;
publicclass Person {
privateintid;
private String name;
privateintage;
private String phone;
private Car car;
在applicationContext.xml中配置如下:
<!--
定义一个车
-->
<bean id="car" class="com.xypuxing.pojo.Car" p:name="宝马" p:carNo="京A12312" />
<!--
定义一个Person类
-->
<bean id="person10" class="com.xypuxing.pojo.Person">
<property name="id" value="10" />
<property name="name" value="perosn10" />
<property name="age" value="18" />
<property name="phone" value="0101001" />
<!-- ref表示引用一个对象 -->
<property name="car" ref="car" />
</bean>
测试的代码:
@Test
publicvoid test10() {
//创建容器对象
ApplicationContextapplicationContext = newClassPathXmlApplicationContext("applicationContext.xml");
Personperson10 = (Person) applicationContext.getBean("person10");
System.out.println(person10);
}
运行结果:

IOC之内部Bean的使用
实验9:引用内部bean
在applicationContext.xml中的配置:
<bean id="person11" class="com.xypuxing.pojo.Person">
<property name="id" value="10" />
<property name="name" value="perosn10" />
<property name="age" value="18" />
<property name="phone" value="0101001" />
<!-- ref表示引用一个对象 -->
<property name="car">
<bean id="car02" class="com.xypuxing.pojo.Car" p:name="保时捷" p:carNo="京B12341"></bean>
</property>
</bean>
测试代码:
@Test
publicvoid test11() {
//创建容器对象
ApplicationContextapplicationContext= newClassPathXmlApplicationContext("applicationContext.xml");
Personperson11 = (Person) applicationContext.getBean("person11");
System.out.println(person11);
System.out.println( applicationContext.getBean("car02") );
}
内部的Bean不能被外部使用

IOC之List属性的赋值
实验10:使用list子元素为List类型的属性赋值
给Person类,添加List集合的属性:
publicclass Person {
privateintid;
private String name;
privateintage;
private String phone;
private Car car;
private List<String> phones;
在applicationContext.xml 配置文件中的内容:
<bean id="person12" class="com.xypuxing.pojo.Person">
<property name="id" value="10" />
<property name="name" value="perosn10" />
<property name="age" value="18" />
<property name="phone" value="0101001" />
<!-- ref表示引用一个对象 -->
<property name="car">
<bean id="car02" class="com.xypuxing.pojo.Car" p:name="保时捷"
p:carNo="京B12341"></bean>
</property>
<!-- 给list集合赋值 -->
<property name="phones">
<list>
<value>18611110000</value>
<value>18611110001</value>
<value>18611110002</value>
</list>
</property>
</bean>
测试的代码:
@Test
publicvoid test12() {
//创建容器对象
ApplicationContextapplicationContext = newClassPathXmlApplicationContext("applicationContext.xml");
Personperson12 = (Person) applicationContext.getBean("person12");
System.out.println(person12);
}
运行的结果:

IOC之Map属性的赋值
实验11:使用map子元素为Map类型的属性赋值
给Person对象添加Map属性
publicclass Person {
privateintid;
private String name;
privateintage;
private String phone;
private Car car;
private List<String> phones;
private Map<String, Object> map;
在applicationContext.xml中的配置
<bean id="person13" class="com.xypuxing.pojo.Person">
<property name="id" value="10" />
<property name="name" value="perosn10" />
<property name="age" value="18" />
<property name="phone" value="0101001" />
<!-- ref表示引用一个对象 -->
<property name="car">
<bean id="car02" class="com.xypuxing.pojo.Car" p:name="保时捷"
p:carNo="京B12341"></bean>
</property>
<!-- map对象-->
<property name="map">
<map>
<!-- entry 表示map中有每一项 -->
<entry key="aaa" value="aaaValue" />
<entry key="bbb" value="bbbValue" />
<entry key="ccc" value="cccValue" />
</map>
</property>
</bean>
测试的代码:
@Test
publicvoid test13() {
//创建容器对象
ApplicationContextapplicationContext = newClassPathXmlApplicationContext("applicationContext.xml");
Personperson13 = (Person) applicationContext.getBean("person13");
System.out.println(person13);
}

IOC之Properties属性的赋值
实验12:使用prop子元素为Properties类型的属性赋值
给Person对象添加Properties属性
publicclass Person {
privateintid;
private String name;
privateintage;
private String phone;
private Car car;
private List<String> phones;
private Map<String, Object> map;
private Properties props;
在applicationContext.xml中的配置
<bean id="person14" class="com.xypuxing.pojo.Person">
<property name="id" value="10" />
<property name="name" value="perosn10" />
<property name="age" value="18" />
<property name="phone" value="0101001" />
<!-- map对象 -->
<property name="props">
<props>
<propkey="username">root</prop>
<propkey="password">root</prop>
<propkey="drivers">com.mysql.jdbc.Driver</prop>
<propkey="url">jdbc:mysql://localhost:3306/spring</prop>
</props>
</property>
</bean>
测试的代码
@Test
publicvoid test14() {
//创建容器对象
ApplicationContextapplicationContext = newClassPathXmlApplicationContext("applicationContext.xml");
Personperson14 = (Person) applicationContext.getBean("person14");
System.out.println(person14);
}
运行结果:

IOC之util 名称空间
util名称空间,可以定义
实验13:通过util名称空间创建集合类型的bean
添加util名称空间

applicationContext.xml中的配置
<!-- 定义一个list集合 -->
<util:list id="list1">
<value>string1</value>
<value>string2</value>
<value>string3</value>
</util:list>
<bean id="person15" class="com.xypuxing.pojo.Person">
<property name="id" value="10" />
<property name="name" value="perosn10" />
<property name="age" value="18" />
<property name="phone" value="0101001" />
<!-- list对象 ref表示引用-->
<property name="phones" ref="list1" />
</bean>
测试的代码:
@Test
publicvoid test15() {
//创建容器对象
ApplicationContextapplicationContext = newClassPathXmlApplicationContext("applicationContext.xml");
Personperson15 = (Person) applicationContext.getBean("person15");
System.out.println(person15);
List<String>list = (List<String>) applicationContext.getBean("list1");
System.out.println(list);
}
运行结果:

IOC之级联属性赋值
实验14:给bean的级联属性赋值
applicationContext.xml中的配置
<bean id="person16" class="com.xypuxing.pojo.Person">
<property name="id" value="10" />
<property name="name" value="perosn10" />
<property name="age" value="18" />
<property name="phone" value="0101001" />
<!-- list对象 ref表示引用 -->
<property name="car" ref="car"/>
<!-- 级联属性-->
<property name="car.name" value="我的爱车" />
</bean>
测试的代码
@Test
publicvoid test16() {
ApplicationContextapplicationContext = newClassPathXmlApplicationContext("applicationContext.xml");
Personperson16 = (Person) applicationContext.getBean("person16");
System.out.println( person16 );
}
运行的结果:

IOC之静态工厂方法创建Bean
实验15:配置通过静态工厂方法创建的bean
创建一个工厂类
publicclass PersonFactory {
publicstatic Person createPerson() {
Person person = new Person();
person.setId(17);
person.setName("这是静态工厂方法");
return person;
}
}
在applicationContext.xml
<!-- 使用静态工厂方法
class是工厂 的全类名
factory-method这是工厂方法
-->
<bean id="person17" class="com.xypuxing.pojo.factory.PersonFactory"factory-method="createPerson"/>
测试代码
@Test
publicvoid test17() {
ApplicationContextapplicationContext = newClassPathXmlApplicationContext("applicationContext.xml");
Person person17 = (Person)applicationContext.getBean("person17");
System.out.println( person17 );
}
运行结果

IOC之工厂实例方法创建Bean
实验16:配置通过实例工厂方法创建的bean
在PersonFactory类中添加获取Person对象的方法
publicclass PersonFactory {
public Person getPerson() {
Person person = new Person();
person.setId(18);
person.setName("这是工厂实例方法");
return person;
}
}
在applicationContext.xml配置文件中的配置:
<!-- 工厂实例方法分两步:
第一步:先使用bean标签配置一个bean对象
第二步:使用bean标签配置factory-bean和factory-method方法
-->
<bean id="personFactory" class="com.xypuxing.pojo.factory.PersonFactory"/>
<!--
factory-bean表示使用哪一个工厂对象的实现
factory-method表示调用对象的哪一个方法去获取对象实例
-->
<bean id="person18" factory-bean="personFactory" factory-method="getPerson">
测试的代码:
@Test
publicvoid test18() {
ApplicationContextapplicationContext = newClassPathXmlApplicationContext("applicationContext.xml");
Personperson18 = (Person) applicationContext.getBean("person18");
System.out.println( person18 );
}
运行结果:

IOC之FactoryBean接口方式创建对象
实验17:配置FactoryBean接口创建Bean对象
创建一个FactoryBean实现对象
publicclass PersonFactoryBean implements FactoryBean<Person>{
public Person getObject() throws Exception {
Person person = new Person();
person.setId(20);
person.setName("这是PersonFactoryBean创建出来的");
return person;
}
public Class<?>getObjectType() {
return Person.class;
}
/**
* 判断是否是单例<br/>
* 返回true是单例 <br/>
* 返回false是多例
*/
publicboolean isSingleton() {
returntrue;
}
}
在applicataion.xml配置文件中的内容
<!-- 使用FactoryBean接口方式创建Bean对象 -->
<bean id="person19" class="com.xypuxing.pojo.factory.PersonFactoryBean"/>
测试的代码
@Test
publicvoid test19() {
ApplicationContextapplicationContext = newClassPathXmlApplicationContext(
"applicationContext.xml");
Personperson19 = (Person) applicationContext.getBean("person19");
System.out.println(person19);
Personperson191 = (Person) applicationContext.getBean("person19");
System.out.println(person19 ==person191);
}
运行结果

IOC之继承Bean配置
实验18:通过继承实现bean配置信息的重用
在applicationContext.xml配置文件中配置
<!-- 先定义一个base的 person对象 -->
<beanid="base"class="com.xypuxing.pojo.Person"p:name="basePerson"p:age="18"p:id="12312"/>
<!-- 然后在另一个bean中。使用parent继承所有的 -->
<bean id="person20" class="com.xypuxing.pojo.Person" parent="base"p:id="20"/>
测试代码
@Test
publicvoid test20() {
ApplicationContext applicationContext= newClassPathXmlApplicationContext(
"applicationContext.xml");
Person person20 = (Person)applicationContext.getBean("person20");
System.out.println(person20);
System.out.println( "这是base的---" + applicationContext.getBean("base") );
}
运行结果
