1.安装zabbix-server
环境:
10.0.0.50 zabbix-server
10.0.0.51 zabbix-web
10.0.0.52 zabbix-agent
yum -y install mariadb-server
vim /etc/my.cnf  # 添加两行内容
skip_name_resolve = ON
innodb_file_per_table = ON
systemctl start mariadb.service
systemctl enable mariadb.service
# 设置数据库
mysql
create database zabbix charset 'utf8';
grant all on zabbix.* to 'zbxuser'@'10.0.%.%' identified by 'zbxpass';
grant all on zabbix.* to 'zbxuser'@'127.0.0.1' identified by 'zbxpass';
flush privileges;
#安装包下载地址,zabbix3没有server包
https://mirrors.tuna.tsinghua.edu.cn/zabbix/zabbix/3.0/rhel/7/x86_64/
ls
zabbix-agent-3.0.2-1.el7.x86_64.rpm        zabbix-sender-3.0.2-1.el7.x86_64.rpm
zabbix-get-3.0.2-1.el7.x86_64.rpm          zabbix-server-mysql-3.0.2-1.el7.x86_64.rpm
zabbix-proxy-mysql-3.0.2-1.el7.x86_64.rpm  zabbix-web-3.0.2-1.el7.noarch.rpm
zabbix-web-mysql-3.0.2-1.el7.noarch.rpm
yum install zabbix-server-mysql-3.0.2-1.el7.x86_64.rpm zabbix-get-3.0.2-1.el7.x86_64.rpm
Requires: libiksemel.so.3()(64bit)
用yum安装无法解决依赖关系,只好另辟蹊径
wget http://repo.zabbix.com/zabbix/3.5/rhel/7/x86_64/zabbix-release-3.5-1.el7.noarch.rpm
rpm -ivh zabbix-release-3.5-1.el7.noarch.rpm
yum -y install zabbix-server-mysql zabbix-get
# 导入数据库脚本
cp /usr/share/doc/zabbix-server-mysql-4.0.0/create.sql.gz .
gzip -d create.sql.gz
mysql -uzbxuser -h127.0.0.1 -pzbxpass zabbix < create.sql
# 修改后四行内容zabbix_server.conf
ListenPort=10051
LogFile=/var/log/zabbix/zabbix_server.log
PidFile=/var/run/zabbix/zabbix_server.pid
DBHost=10.0.0.50
DBName=zabbix
DBUser=zbxuser
DBPassword=zbxpass
# 确保trousers这个包的版本大于0.3.12
yum info trousers
systemctl start zabbix-server.service
2.安装zabbix web
# zabbix web可以安装在其他机器上,能连上这台zabbix-server就行,
yum -y install httpd php php-mysql php-mbstring php-gd php-bcmath php-ldap php-xml
# 安装web GUI
yum -y install zabbix-web zabbix-web-mysql
# 配置时区,/etc/httpd/conf.d/zabbix.conf
# 或者php.ini(/usr/share/doc/php-common-5.4.16/php.ini-production)
php_value date.timezone Asia/Sshanghai
systemctl start httpd.service
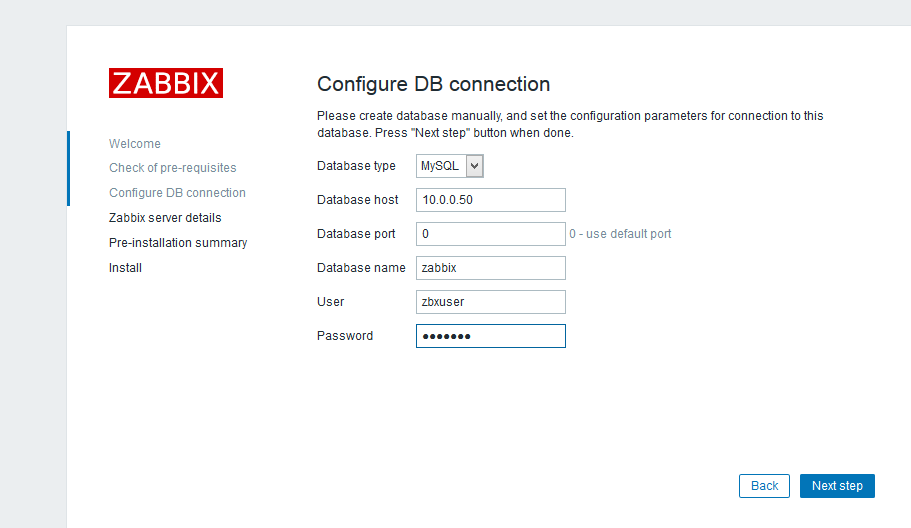
截图:zabbix前端页面设置连接数据库.png
http://10.0.0.51/zabbix

Congratulations! You have successfully installed Zabbix frontend.
Configuration file "/etc/zabbix/web/zabbix.conf.php" created.
默认账号密码为admin,zabbix

3.安装zabbix-agent
yum -y install zabbix-agent zabbix-sender
grep -i "^#####" /etc/zabbix/zabbix_agentd.conf
# Passive checks related 被动监控
# Active checks related 主动监控
# USER-DEFINED MONITORED PARAMETERS 用户自定义监控参数
# 第一行是被动部分参数,第二、三行是主动部分参数
Server=10.0.0.50
ServerActive=10.0.0.50
Hostname=ansible-node2

systemctl start zabbix-agent.service
快速配置一个监控项
host groups-->host-->applications-->item--triggers(events)-->actions(condition,operation),创建一个主机,默认会创建一个主机组,创建一个监控项,默认会创建一个applications(应用),创建一个触发器,定义动作.
# 获取客户端信息用zabbix_get
zabbix_get -s 10.0.0.51 -k "agent.hostname"
# 查看日志,各主机得变为可用状态
enabling Zabbix agent checks on host "ansible-master": host became available
enabling Zabbix agent checks on host "ansible-node1": host became available
enabling Zabbix agent checks on host "ansible-node2": host became available

这样安装完zabbix,因为web GUI和zabbix-server不在同一台服务器上,会在面板上报这样的提示
zabbix server is not running: the information displayed may not be current
4.创建触发器
{www.example.com:system.cpu.load[all,avg1].last(0)}>3
表示主机上所有CPU过去一分钟内的平均负载的最后一次取值大于3时将处罚状态变换,last(0)相当于last(#1)
zabbix4使用手册:https://www.zabbix.com/documentation/4.0/zh/manual