考试环境:考试过程中所有的操作是在kvm虚拟机中进行,虚拟机root密码需要破解,重设为题目指定的密码。
上午:时间2.5H
把root密码设置为要求的:
grub启动菜单选e编辑,找见默认kernel(linux16,在行末添加rd.break,b引导。(虚拟机需要删到ro,ro保留。 虚拟机中小键盘不能用的可能性比较大,特别是用passwd指定root密码的时候不易察觉,易导致root破解失败,所以虚拟机下不用小键盘。)
mount -o rw,remount /sysroot
chroot  /sysroot
passwd root  (或者 echo 123456 |passwd --stdin root)
touch /.autorelabel   (注意/之后.  最后是bel)
reboot
重启之后虚拟机可能默认命令行界面,如果需要切换到图形界面,root登录,执行以下命令:
[root@server ~]# systemctl isolate graphical.target (暂时图形化界面,重启之后还是命令行)(不建议*)如果嫌每次重启切换麻烦,可以改变默认界面,执行以下命令:
[root@server ~]# systemctl get-default
multi-user.target
[root@server ~]# systemctl set-default graphical.target但是切记*最后要改回命令行界面,即:
[root@server ~]# systemctl set-default multi-user.target
按要求配置虚拟机:(注意在虚拟机中配置)
- Hostname: serverX.example.com
- IP address: 172.25.X.11 (static)
- Netmask: 255.255.255.0
- Gateway: 172.25.X.254
- Name server: 172.25.X.254
命令:
配置主机名:
[root@server ~]# hostnamectl set-hostname serverX.example.com或者
[root@server ~]# vim /etc/hostname (默认没有此文件,手动编写)
配置网络:
[root@server ~]# nmcli con show --active
[root@server ~]# nmcli con mod "System eth0" ipv4.method manual ipv4.addresses "172.25.X.11/24 172.25.X.254" ipv4.dns 172.25.X.254
检验
[root@server ~]# cat /etc/hostname
[root@server ~]# cat /etc/sysconfig/network-scripts/ifcfg-eth0
重启服务,重启虚拟机检验
[root@server ~]# systemctl restart NetworkManager
[root@server ~]# reboot
检验网络没问题之后开始正式答题,推荐从实机ssh -X到server虚拟机,方便复制粘贴
正式答题
1.selinux开启为enforcing
[root@server16 ~]# setenforce 1
[root@server16 ~]# vim /etc/selinux/config
SELINUX=enforcing
2. YUM 的软件库源为 http://172.25.254.254/content/rhel7.0/x86_64/dvd. 将此配置为您的系统的默认软件仓库。
[root@server16 ~]# cd /etc/yum.repos.d/
[root@server16 yum.repos.d]# vim server.repo
              [base]
              name=server
              baseurl=http://172.25.254.254/content/rhel7.0/x86_64/dvd
              enabled=1
              gpgcheck=0
[root@server16 ~]# yum clean all
[root@server16 yum.repos.d]# yum makecache
或者 [root@server16 yum.repos.d]# yum repolist
3. 将逻辑卷vol和其文件系统大小调整到 380 MiB。要确保文件系统中的内容保持完整。请注意:分区大小很少能够完全符合要求的大小,所以大小在 350 MiB 和 410 MiB 之间都是可以接受的。
准备分区:(顺便准备14,18题所需分区)
[root@server16 ~]# fdisk /dev/vdb
   Device Boot      Start         End      Blocks   Id  System
/dev/vdb1            2048    20971519    10484736    5  Extended
/dev/vdb5            4096     1028095      512000   83  Linux
/dev/vdb6         1030144     2578431      774144   83  Linux
/dev/vdb7         2580480     3645439      532480   83  Linux
三个逻辑分区大小分别为500M,765M,520M,fdisk完成之后记得w保存退出。
[root@server16 ~]# partprobe /dev/vdb
[root@server16 ~]# pvcreate /dev/vdb5
  Physical volume "/dev/vdb5" successfully created
[root@server16 ~]# vgcreate vg0 /dev/vdb5
  Volume group "vg0" successfully created
[root@server16 ~]# lvcreate -L 200M -n vol vg0
  Logical volume "vol" created
[root@server ~]# lvdisplay   (查看vol路径path)
[root@server ~]# lvresize -r -L 380M /dev/vg0/vol   (切记-r,文件系统)
逻辑卷ext4在线放大,离线缩小,xfs只能放大,不能缩小。
4. 按照以下要求创建用户,组,及用户与组的关系
新建一个名为sharegrp的组
新建一个名为natasha的用户,并将sharegrp作为其附属组
新建一个名为harry的用户,也将sharegrp作为其附属组
新建一个名为sarah的用户,其不属于sharegrp组,并将其shell设置为不可登录shell
natasha、harry、sarah用户的密码均设置为emesgravy
[root@server16 ~]# groupadd sharegrp
[root@server16 ~]# useradd -G sharegrp natasha
[root@server16 ~]# useradd -G sharegrp harry
[root@server16 ~]# useradd -s /sbin/nologin sarah
[root@server16 ~]# echo emesgravy |passwd --stdin sarah
[root@server16 ~]# echo emesgravy |passwd --stdin harry
[root@server16 ~]# echo emesgravy |passwd --stdin natasha
测试:
[root@server16 ~]# id natasha
[root@server16 ~]# id harry
[root@server16 ~]# id sarah
[root@server16 ~]# grep sarah /etc/passwd
5.复制文件/etc/fstab 到 /var/tmp目录中,并按以下要求配置/var/tmp/fstab文件的权限:
文件/var/tmp/fstab的所属人为root
文件/var/tmp/fstab的所属组为root
文件/var/tmp/fstab对任何人均没有执行权限
用户natasha对文件/var/tmp/fstab有读和写的权限
用户harry对文件/var/tmp/fstab既不能读也不能写
所有其他用户(包换当前用户及未来创建的用户)对文件/var/tmp/fstab都有读的权限
[root@server16 ~]# cd /var/tmp/
[root@server16 tmp]# cp /etc/fstab .
[root@server16 tmp]# ll fstab
[root@server16 tmp]# setfacl -m u:natasha:rw fstab
[root@server16 tmp]# setfacl -m u:harry:- fstab
检查:
[root@server16 tmp]# ll fstab
[root@server16 tmp]# getfacl fstab
PS: ① acl权限(rwx)给错怎么办?再次setfacl -m 覆盖即可。例如:
[root@server16 tmp]# setfacl -m u:natasha:rwx fstab
[root@server16 tmp]# setfacl -m u:natasha:rw fstab
②acl权限用户指定错误怎么办?先删除,再添加。例如:
[root@server16 tmp]# setfacl -m u:sarah:rw fstab
[root@server16 tmp]# setfacl -x u:sarah fstab
[root@server tmp]# setfacl -m u:natasha:rw fstab
记不得-x怎么办?:) 删掉fstab文件再来一次,简单粗暴。
6.对natasha用户配置计划任务,要求在本地时间的每天14:23分执行以下命令:/bin/echo hiya
[root@server ~]# crontab -e -u natasha
23 14 * * * /bin/echo hiya

(分 时 日 月 星期)    星期日 = 0 or 7
检查:
[root@server ~]# crontab -l -u natasha
PS:由于bug,编辑保存退出时有可能自动复制出好多23 14 * /bin/echo hiya,所以一定要-l确保没问题。
7.创建一个目录/nfsshare:
- 其拥有者root,拥有组为sharegrp,组拥有所有权限,其他人无任何权限。
- 用户sarah对其拥有所有权限。
-
用户在该目录下创建的新文件的拥有组为sharegrp。
[root@server16 ~]# mkdir /nfsshare
[root@server16 ~]# chgrp sharegrp /nfsshare
[root@server16 ~]# chmod g=rwx,o=- /nfsshare/     (*)
[root@server16 ~]# chmod g+s /nfsshare/          (*)
[root@server16 ~]# setfacl -m u:sarah:rwx /nfsshare
检查:
[root@server16 ~]# ll -d /nfsshare
[root@server16 ~]# getfacl /nfsshare
PS:(*)标注的两条不能用原答案上给的chmod g=rws,o=- /nfsshare 一条代替,因为ll可以发现这样做组权限为rwS,即并没有x执行权限,而用上面(*)标注的两句执行完ll组权限必然是rws,即有x执行权限,符合题意要求。
8.按以下要求更新系统的内核,新内核的RPM包位于http://classroom.example.com/rhel7.0/x86_64/errata/Packages/kernel-3.10.0-123.1.2.el7.x86_64.rpm.
重新重启时,会默认以新内核启动系统。原始的内核将继续可用。
[root@server16 ~]# wget http://172.25.254.254/content/rhel7.0/x86_64/errata/Packages/kernel-3.10.0-123.1.2.el7.x86_64.rpm
[root@server16 ~]# ls
[root@server16 ~]# rpm -ivh kernel-3.10.0-123.1.2.el7.x86_64.rpm
[root@server16 ~]# reboot
[root@server16 ~]# uname -r
3.10.0-123.1.2.el7.x86_64
9.在classroom.example.com 上已部署了一台LDAP认证服务器,按以下要求配置你的系统以加入到该LDAP服务中:
该认证服务的Base DN为: dc=example,dc=com
该LDAP 服务既提供的帐户信息也同时提供认证信息
认证的会话连接需要被加密,证书的下载地址为http://classroom.example.com/pub/EXAMPLE-CA-CERT.
当配置完成后,你可以使用ldapuserX登录,但在你完成autofs配置之前,是无法获取到家目录的。
ldapuserX 的密码为password
[root@server16 ~]# yum -y install authconfig-gtk sssd krb5-workstation
[root@server16 ~]# authconfig-gtk 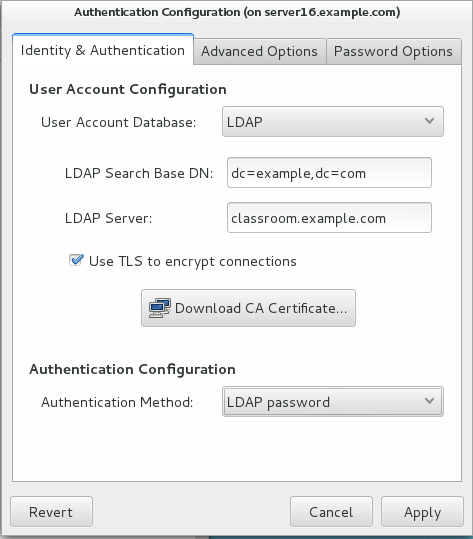

[root@server16 ~]# su - ldapuser16
su: warning: cannot change directory to /home/guests/ldapuser16: No such file or directory
mkdir: cannot create directory '/home/guests': Permission denied
-bash-4.2$
10.配置你的系统以使其时间与服务器classroom.example.com 同步.
[root@server16 ~]# vim /etc/chrony.conf
server classroom.example.com iburst
[root@server16 ~]# systemctl restart chronyd.service
[root@server16 ~]# timedatectl
      Local time: Sat 2017-10-28 10:27:35 CST
  Universal time: Sat 2017-10-28 02:27:35 UTC
        RTC time: Sat 2017-10-28 02:27:34
        Timezone: Asia/Shanghai (CST, +0800)
     NTP enabled: yes
NTP synchronized: no
 RTC in local TZ: no
      DST active: n/a
[root@server16 ~]# timedatectl set-ntp true
[root@server16 ~]# systemctl restart chronyd.service
[root@server16 ~]# timedatectl
      Local time: Sat 2017-10-28 10:30:18 CST
  Universal time: Sat 2017-10-28 02:30:18 UTC
        RTC time: Sat 2017-10-28 02:30:17
        Timezone: Asia/Shanghai (CST, +0800)
     NTP enabled: yes
NTP synchronized: yes
 RTC in local TZ: no
      DST active: n/a
[root@server16 ~]# chronyc sources -v
11.配置autofs以当你使用ldapuserX登录时自动挂载家目录: /home/guests/ldapuserX(X为你的座位号)
classroom.example.com (172.25.254.254) 已使用NFS-exports共享了/home/guests目录。该共享目录里包括ldapuserX的家目录。
ldapuserX的家目录在classroom.example.com:/home/guests/ldapuserX
ldapuserX的家目录将会在你访问/home/guests/ldapuserX时被自动挂载本地的/home/guests/ldapuserX
ldapuserX要对其家目录有完整权限。
ldapuserX 的密码为password
[root@server16 ~]# showmount -e classroom.example.com
Export list for classroom.example.com:
/home/guests 172.25.0.0/255.255.0.0
[root@server16 ~]# yum -y install autofs
[root@server16 ~]# vim /etc/auto.master
/home/guests    /etc/auto.ldap
[root@server16 ~]# vim /etc/auto.ldap
*  -intr,soft,rw,v3 172.25.254.254:/home/guests/&
[root@server16 ~]# systemctl restart autofs
[root@server16 ~]# systemctl enable autofs
[root@server16 ~]# su - ldapuser16
Last login: Sat Oct 28 10:38:45 CST 2017 on pts/0
[ldapuser16@server16 ~]
12.搭建一个Web Server,站点为http://serverX.example.com , 然后按以下步骤配置:
下载http://172.25.254.254/content/rhce/web/station.html到你的web server的DocumentRoot 重命名为index.html
不要修改index.html文件的内容
[root@server16 ~]# yum -y install httpd
[root@server16 ~]# cd /var/www/html/
[root@server16 html]# wget -O index.html http://172.25.254.254/content/rhce/web/station.html
[root@server16 html]# systemctl start httpd
[root@server16 html]# systemctl enable httpd.service
检查:
[root@server16 html]# firefox http://server16.example.com
13.创建一个名为alex的用户,设置其用户ID为3456,密码为glegunge
[root@server16 ~]# useradd -u 3456 alex
[root@server16 ~]# echo glengunge |passwd --stdin alex
Changing password for user alex.
passwd: all authentication tokens updated successfully.
[root@server16 ~]# id alex
uid=3456(alex) gid=3456(alex) groups=3456(alex)
14.为你的系统增加一个756MiB的SWAP分区,新的SWAP分区将会在重新启动系统后自动被激活。不要删除或修改已存在的SWAP分区。
[root@server16 ~]# mkswap /dev/vdb6
Setting up swapspace version 1, size = 774140 KiB
no label, UUID=975a0fa9-2147-48e4-bc9b-1dfd0a7833e8
[root@server16 ~]# blkid /dev/vdb6
/dev/vdb6: UUID="975a0fa9-2147-48e4-bc9b-1dfd0a7833e8" TYPE="swap"
[root@server16 ~]# blkid /dev/vdb6 >> /etc/fstab
[root@server16 ~]# vim /etc/fstab
UUID="975a0fa9-2147-48e4-bc9b-1dfd0a7833e8" swap   swap   defaults   0 0
[root@server16 ~]# swapon -a
[root@server16 ~]# swapon -s
Filename                Type        Size    Used    Priority
/dev/vdb6                                  partition    774140    0    -1
[root@server16 ~]# free -m
             total       used       free     shared    buffers     cached
Mem:          1841       1574        266         16          4       1044
-/+ buffers/cache:        525       1315
Swap:          755          0        755
15.找出用户natasha拥有的所有的文件,并把它们复制到/root/findfiles/目录中。
[root@server16 ~]# mkdir findfiles
[root@server16 ~]# find / -user natasha -exec cp -rp {} findfiles/ \;
find: ‘/proc/32344/task/32344/fd/6’: No such file or directory
find: ‘/proc/32344/task/32344/fdinfo/6’: No such file or directory
find: ‘/proc/32344/fd/6’: No such file or directory
find: ‘/proc/32344/fdinfo/6’: No such file or directory
cp: cannot overwrite non-directory ‘findfiles/natasha’ with directory ‘/home/natasha’
[root@server16 ~]# cd findfiles/
[root@server16 findfiles]# ll
total 8
drwxr-xr-x. 2 natasha natasha    6 Jan 27  2014 extensions
-rw-r--r--. 1 natasha natasha    4 Jul 11  2014 gnome-initial-setup-done
-rw-r--r--. 1 natasha natasha 1443 Jul 11  2014 monitors.xml
-rw-rw----. 1 natasha mail       0 Oct 28 11:20 natasha
drwxr-xr-x. 2 natasha natasha    6 Jan 27  2014 plugins
16.查找出/usr/share/dict/words文件当中所有包含seismic字符串的行,并将这些行仍然按照原始文件中的顺序.
存放入/root/wordlist中,/root/wordlist文件不能包含空行。
[root@server16 ~]#  grep seismic /usr/share/dict/words  > wordlist
检查:
[root@server16 ~]#  less wordlist
17.创建/root/backup.tar.bz2的归档文件,其中包括/usr/local的内容,必须使用bzip的压缩。
[root@server16 ~]# tar -cjvf backup.tar.bz2 /usr/local/*
检查:
[root@server16 ~]# tar -tjvf backup.tar.bz2
PS: man tar
-c, --create
-v, --verbose
-f, --file ( 选项最后一个)
-j, --bzip2
-J, --xz
-z, --gzip
18.按照以下要求创建一个新的逻辑卷:
逻辑卷的名字为database,其属于datastore卷组,该逻辑卷由30个PE组成。
卷组datastore的单个PE大小为16MiB。
将新创建的逻辑卷格式化为xfs文件系统,在系统启动逻辑卷会被自动挂载到/mnt/database目录下。
[root@server16 ~]# pvcreate /dev/vdb7
  Physical volume "/dev/vdb7" successfully created
[root@server16 ~]# vgcreate -s 16M datastore /dev/vdb7
  Volume group "datastore" successfully created
[root@server16 ~]# lvcreate -l 30 -n database datastore
  Logical volume "database" created
[root@server16 ~]# mkfs.xfs /dev/datastore/database
[root@server16 ~]# blkid /dev/datastore/database
/dev/datastore/database: UUID="5e3db0a4-f9cc-4976-a8f8-26fd091bc811" TYPE="xfs"
[root@server16 ~]# blkid /dev/datastore/database >> /etc/fstab
[root@server16 ~]# vim /etc/fstab
UUID="5e3db0a4-f9cc-4976-a8f8-26fd091bc811" /mnt/database  xfs defaults 0 0
[root@server16 ~]# mkdir /mnt/database
[root@server16 ~]# mount -a
[root@server16 ~]# df -h
/dev/mapper/datastore-database  477M   25M  453M   6% /mnt/database