1、安装supervisor管理进程的工具
pip install supervisor
2、安装nginx
yum install epel-release
sudo yum install python-devel nginx
3、安装uWSGI(uWSGI是实现了WSGI协议、uwsgi、http等协议的一个web服务器)
了解uWSGI参考:https://blog.csdn.net/l_vip/article/details/81487608
- WSGI是一种Web服务器网关接口。它是一个Web服务器(如nginx,uWSGI等服务器)与web应用(如用Flask框架写的程序)通信的一种规范。
- uwsgi是一种线路协议而不是通信协议,在此常用于在uWSGI服务器与其他网络服务器的数据通信。
- 而uWSGI是实现了uwsgi和WSGI两种协议的Web服务器。
- uwsgi协议是一个uWSGI服务器自有的协议,它用于定义传输信息的类型(type of information),每一个uwsgi packet前4byte为传输信息类型描述,它与WSGI相比是两样东西。
安装命令:sudo pip install uwsgi --upgrade
该命令会将uwsgi安装在 /usr/local/bin/uwsgi ,你需要手动添加服务,建立 /etc/ini/uwsgi.conf 文件,内容如下:
description "uWSGI Emperor"
start on runlevel [2345]
stop on runlevel [!2345]
respawn
exec /usr/local/bin/uwsgi --emperor /etc/uwsgi/vassals/ --logto /var/log/uwsgi/uwsgi.log
然后你就可以通过如下的命令来管理uwsgi的进程了:
sudo initctl start|stop|restart|reload| uwsgi
sudo service uwsgi start|stop|restart|reload
4、在django同级目录下建script目录,script目录下创建uwsgi.ini

uwsgi.ini内容如下:
[uwsgi] #使用HTTP访问的端口号, 使用这个端口号是直接访问了uWSGI, 绕过了Nginx http = :8010 #与外界连接的端口号, Nginx通过这个端口转发给uWSGI socket = 127.0.0.1:8001 #是否使用主线程 master = true # 项目在服务器中的目录(绝对路径) chdir = /opt/dbplus/files/ # Django's wsgi 文件目录 wsgi-file = dbplus/wsgi.py # 最大进程数 processes = 4 #每个进程的线程数 threads = 2 #状态监听端口 stats = 127.0.0.1:9191 # 退出时自动清理环境配置 vacuum = true #目录下文件改动时自动重启 touch-reload = /opt/dbplus/files/ #Python文件改动时自动重启 #py-auto-reload = 1 #后台运行并把日志存到.log文件 daemonize = /opt/dbplus/uWSGI.log5、用uwsgi启动django项目 启动之前先在防火墙配置把8010端口开放了 firewall-cmd --add-port=8010/tcp --zone=public --permanent firewall-cmd --reload 然后运行:uwsgi --ini uwsgi.ini 要到文件的目录下运行或加上文件路劲运行6、停止uwsgi用sudo pkill -f uwsgi -9killall -9 uwsgi
7、在/etc下创建supervisormul
mkdir supervisor
生成supervisord.conf配置文件
(sudo) echo_supervisord_conf > /etc/supervisord.conf
8、编辑supervisord.conf
将底部改为
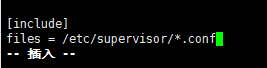
然后在/etc/supervisor下新建配置文件,名称随意,例如直接vim dbplus.conf
编辑内容

[program:dbplus]
command=uwsgi --ini uwsgi.ini
directory= /opt/dbplus/files/script
process_name=%(process_num)02d
numprocs=5
autostart=true
autorestart=true
startsecs=1
startretries=20
redirect_stderr=true
user=root
9、启动 supervisor用(sudo) supervisord -c /etc/supervisord.conf
重启 用(sudo) supervisorctl -c /etc/supervisord.conf restart (配置文件写的项目名)
启动,停止,或重启 supervisor 管理的某个程序 或 所有程序:(sudo) supervisorctl -c /etc/supervisord.conf [start|stop|restart] [program-name|all]
如果修改了 /etc/supervisord.conf ,需要执行 supervisorctl reload 来重新加载配置文件
10. Supervisorctl管理命令:
supervisorctl status                ---- 查看supervisor管理进程的状态;
supervisorctl stop programname      ---- 用来关闭某个进程,programname指上例中的flasky;
supervisorctl start programname     ---- 用来启动某个进程;
supervisorctl restart programname   ---- 用来重启某个进程;
supervisorctl stop all              ---- 关闭所有的进程;
supervisorctl reload                ---- 停止所有进程,载入最新的配置文件,并根据最新的配置启动、管理进程;
supervisorctl update                ---- 根据最新的配置文件,启动新配置的进程或重启配置有变化的进程,没有改动过的进程不会受到影响;
supervisorctl shutdown              ---- 关闭supervisor服务。
11、配置nginx编辑/etc/nginx/nginx.conf
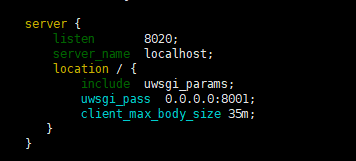
将server替换为
server {
listen 8020;
server_name localhost;
location / {
include uwsgi_params;
uwsgi_pass 0.0.0.0:8001;
client_max_body_size 35m;
}
}
server_name写localhost,因为没有买域名,如果买了域名写域名,现在用本地ip+端口访问,端口改成8020
uwsgi_pass与uwsgi的配置文件对应起来
然后/usr/sbin/nginx -t测试/usr/sbin/nginx启动

此时可以访问:curl 192.168.2.162:8020/use/select
ip+端口,/usr/select为所部署的服务的接口地址

12、如果修改了nginx配置需要重置nginx
nginx -c /etc/nginx/nginx.conf
然后在测试启动
/usr/sbin/nginx -t
/usr/sbin/nginx
如果遇到启动报错如绑定不了端口,nging自己占的端口就停nginx再起,如果是别人占的端口就配置文件重新写一个没被占用的端口

停nginx用
ps -ef |grep nginx
查看进程号
然后
kill -QUIT 进程号
或
kill -TERM 进程号
或直接pkill -9 nginx
及
killall nginx
或用命令
nginx -s quit
及
nginx -s stop
systemctl stop nginx.service
重启nginx
systemctl restart nginx.service
或
/usr/sbin/nginx -s reload