5行代码实现微信模版消息推送,springboot实现微信推送,java微信推送
今天来带大家学习下微信模版消息推送。
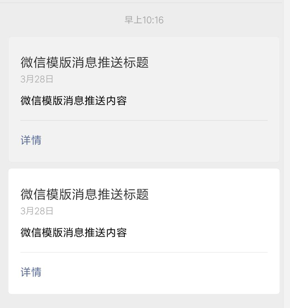
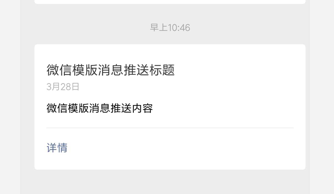
先看效果图:
核心代码只有下面几行,即可轻松实现微信模版消息推送
    //1,配置
    WxMpInMemoryConfigStorage wxStorage = new WxMpInMemoryConfigStorage();
    wxStorage.setAppId("wx77bb69292323a000");
    wxStorage.setSecret("29bd368145806115ad6820133e62806e");
    WxMpService wxMpService = new WxMpServiceImpl();
    wxMpService.setWxMpConfigStorage(wxStorage);
    //2,推送消息
    WxMpTemplateMessage templateMessage = WxMpTemplateMessage.builder()
            .toUser("o5kho6DgC7SDry8zCmXuvHJGvrgI")//要推送的用户openid
            .templateId("Tpln-Eue2obJ0B-8JNkgkiRJaDMPgVeIgGxna982xrg")//模版id
            .url("https://30paotui.com/")//点击模版消息要访问的网址
            .build();
    try {
        wxMpService.getTemplateMsgService().sendTemplateMsg(templateMessage);
    } catch (Exception e) {
        System.out.println("推送失败:" + e.getMessage());
    }
所用知识点
1, springboot实现java后台
2,微信测试账号的申请
3,微信模版推送的配置
接下来就带领大家来一步步实现微信模版消息推送。
一,springboot创建java后台
至于springboot怎么创建java后台,我这里就不再唠叨了,大家百度一下,一大堆的文章。这里只需要重点讲解下以下几点。
1,在pom.xml文件里引入下面类库
com.github.binarywang
weixin-java-mp
3.3.0
2,写一个推送的controller
package com.qiushi.wxpush;
import org.springframework.web.bind.annotation.GetMapping;
import org.springframework.web.bind.annotation.RestController;
import me.chanjar.weixin.mp.api.WxMpInMemoryConfigStorage;
import me.chanjar.weixin.mp.api.WxMpService;
import me.chanjar.weixin.mp.api.impl.WxMpServiceImpl;
import me.chanjar.weixin.mp.bean.template.WxMpTemplateMessage;
/**
-
Created by qcl on 2019-03-28
扫描二维码关注公众号,回复: 6187787 查看本文章
-
微信:2501902696
-
desc: 模版消息推送模拟
*/
@RestController
public class PushController {/*
-
微信测试账号推送
-
*/
@GetMapping("/push")
public void push() {
//1,配置
WxMpInMemoryConfigStorage wxStorage = new WxMpInMemoryConfigStorage();
wxStorage.setAppId(“wx77bb69292323a000”);
wxStorage.setSecret(“29bd368145806115ad6820133e62806e”);
WxMpService wxMpService = new WxMpServiceImpl();
wxMpService.setWxMpConfigStorage(wxStorage);//2,推送消息
WxMpTemplateMessage templateMessage = WxMpTemplateMessage.builder()
.toUser(“o5kho6DgC7SDry8zCmXuvHJGvrgI”)//要推送的用户openid
.templateId(“Tpln-Eue2obJ0B-8JNkgkiRJaDMPgVeIgGxna982xrg”)//模版id
.url(“https://30paotui.com/”)//点击模版消息要访问的网址
.build();
//3,如果是正式版发送模版消息,这里需要配置你的信息
// templateMessage.addData(new WxMpTemplateData(“name”, “value”, “#FF00FF”));
// templateMessage.addData(new WxMpTemplateData(name2, value2, color2));
try {
wxMpService.getTemplateMsgService().sendTemplateMsg(templateMessage);
} catch (Exception e) {
System.out.println(“推送失败:” + e.getMessage());
e.printStackTrace();
}
}
-
}
二,接下来就来重点讲讲我们如何注册微信测试账号,并实现推送功能。
正常我们企业开发,实现微信模版消息推送,必须要有微信公众号,备案的网址,并且最麻烦的一点是要获取到用户的openid,作为个人,这些条件基本上都不具备。所以今天就来带大家注册微信开发测试账号,来轻松实现微信模版消息推送。
1,微信扫码登录下面网址
https://mp.weixin.qq.com/debug/cgi-bin/sandbox?t=sandbox/login
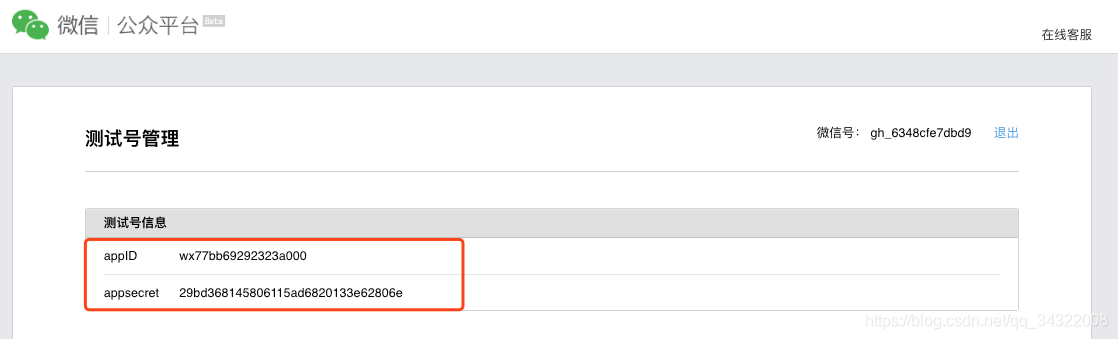
扫码登录成功后,就会给我们生成微信公号的appid和appsecret
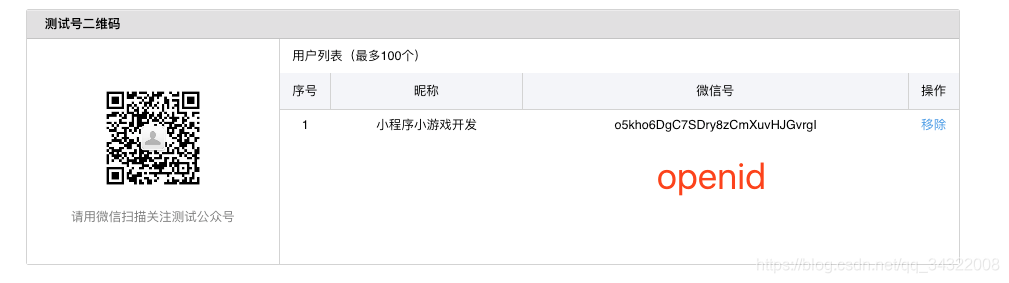
2,微信扫码关注 测试号二维码,微信给我们返回我们的openid,这个openid在推送时特别重要。因为你推送肯定要知道推送给 谁啊,就比如你打电话,肯定要知道用户的电话号码吧。这个openid就是我们要推送给那个用户的唯一标示。
3,拿到这些以后,我们就可以去实现微信推送了。推送的代码就只有下面这么点。
     //1,配置
    WxMpInMemoryConfigStorage wxStorage = new WxMpInMemoryConfigStorage();
    wxStorage.setAppId("wx77bb69292323a000");//appid
    wxStorage.setSecret("29bd368145806115ad6820133e62806e");//appsecret
    WxMpService wxMpService = new WxMpServiceImpl();
    wxMpService.setWxMpConfigStorage(wxStorage);

    //2,推送消息
    WxMpTemplateMessage templateMessage = WxMpTemplateMessage.builder()
            .toUser("o5kho6DgC7SDry8zCmXuvHJGvrgI")//要推送的用户openid
            .templateId("Tpln-Eue2obJ0B-8JNkgkiRJaDMPgVeIgGxna982xrg")//模版id
            .url("https://30paotui.com/")//点击模版消息要访问的网址
            .build();
    //3,如果是正式版发送模版消息,这里需要配置你的信息
    //        templateMessage.addData(new WxMpTemplateData("name", "value", "#FF00FF"));
    //                templateMessage.addData(new WxMpTemplateData(name2, value2, color2));

    //发起推送
    try {
        String msg = wxMpService.getTemplateMsgService().sendTemplateMsg(templateMessage);
        System.out.println("推送成功:" + msg);
    } catch (Exception e) {
        System.out.println("推送失败:" + e.getMessage());
        e.printStackTrace();
    }
三,推送测试
代码都完成后,我们就可以来测试推送了。测试我们这个分两种
1,java的单元测试
2,运行springboot,通过get请求来触发推送
单元测试
package com.qiushi.wxpush;
import org.junit.Test;
import org.junit.runner.RunWith;
import org.springframework.beans.factory.annotation.Autowired;
import org.springframework.boot.test.context.SpringBootTest;
import org.springframework.test.context.junit4.SpringRunner;
import static org.junit.Assert.*;
/**
-
Created by qcl on 2019-03-28
-
微信:2501902696
-
desc:测试用例
*/
@RunWith(SpringRunner.class)
@SpringBootTest
public class PushControllerTest {@Autowired
PushController pushController;@Test
public void push() {
pushController.push();
}
}
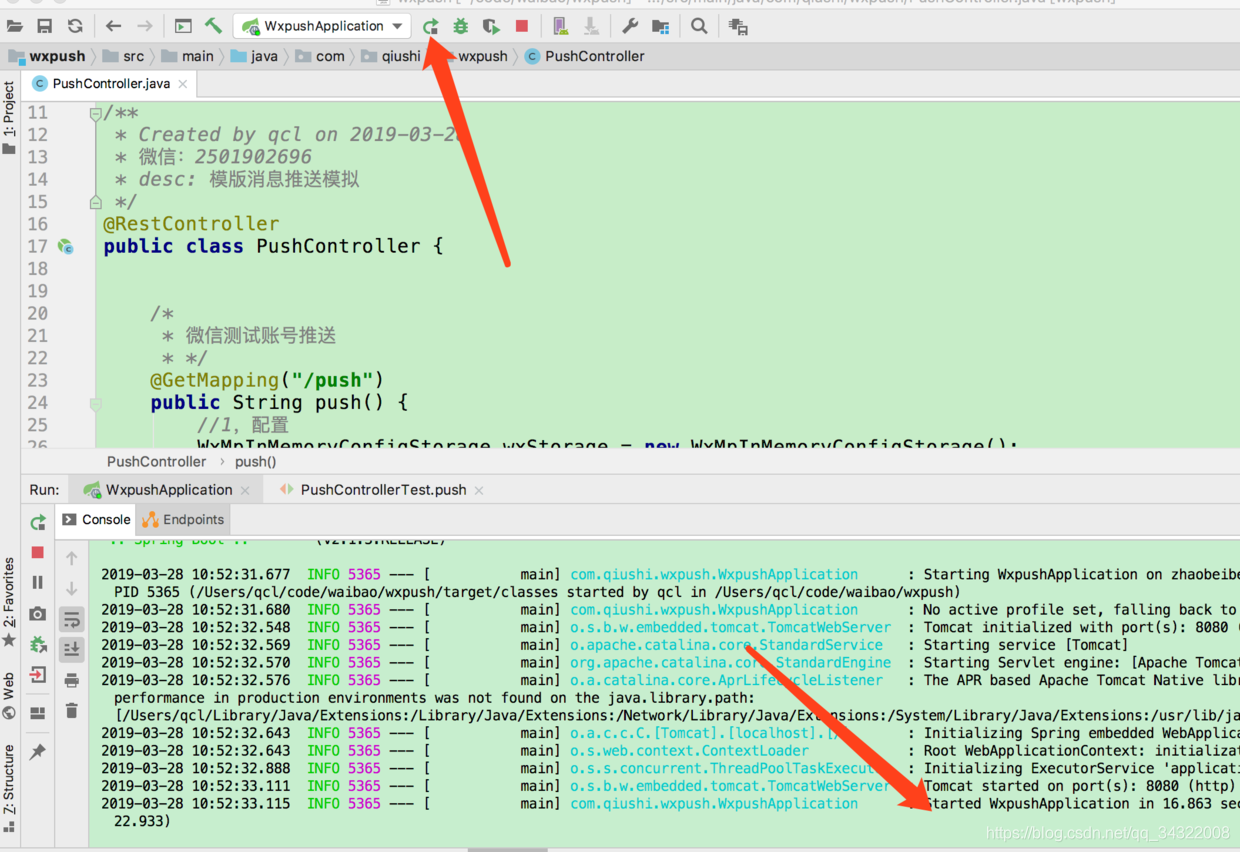
单元测试其实很简单,我们只需要点击箭头所指的绿色按钮,即可运行单元测试,运行通过后就可以看到发送消息成功了。
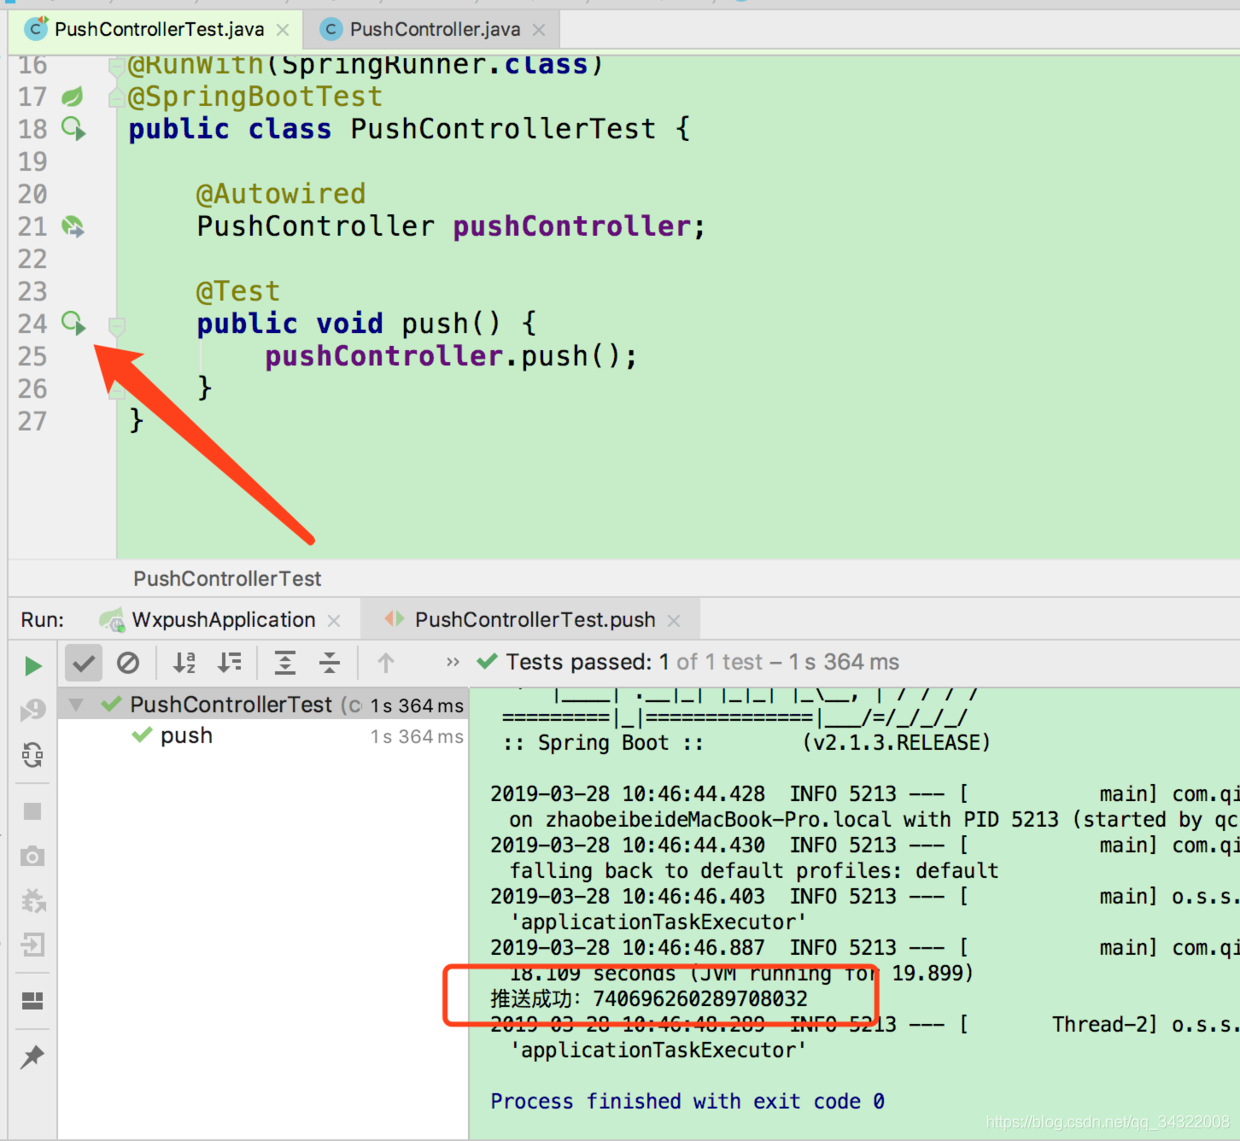
log里可以看出我们是10:46发起推送的,看下图我们微信接受到的推送消息也是10:46
运行springboot,通过get请求来触发推送
这个就更简单了,我们启动springboot项目,然后调用get请求:
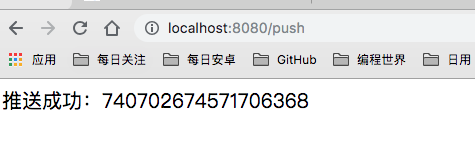
可以看到我们也推送成功了。
到这里我们就轻松通过简单几行代码实现了微信模版消息推送的功能了。
我们在企业生产环境时,实现这个功能,步骤和这里是一样的。代码也和这里差不多,只不过多了一个获取用户openid的步骤,这个步骤微信要求比较严格,必须要有备案的网址作为回调,今天就不给大家深入讲解了,后期我会专门写一篇获取微信用户openid的文章出来。
如果你有微信或者java开发方面的问题,可以加我微信交流学习:2501902696。也可以加我微信获取完整源码。
最后一次编辑于 03-28 (未经腾讯允许,不得转载)