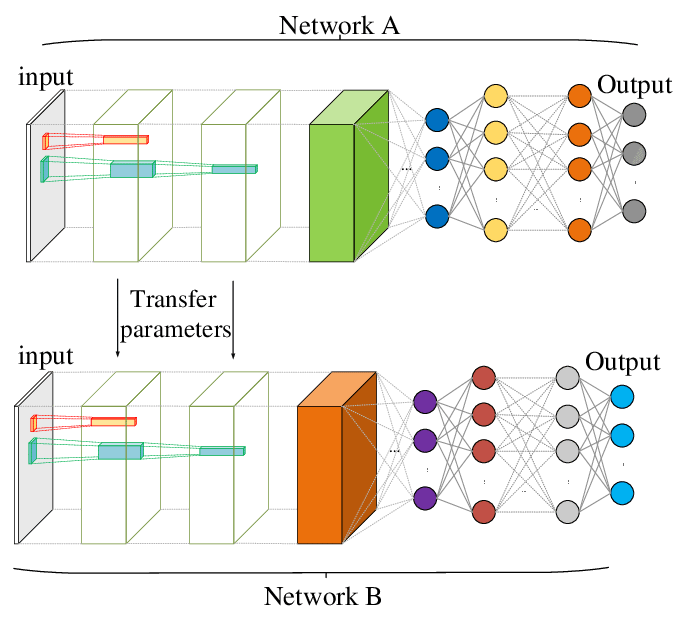
目的
想直接在pretrain的模型上进行finetune,使用的框架分别是tensorflow和keras。
(1)预训练权重的作用:
- 预测
- 特征提取
- 微调
(2)Finetune过程:
- 构建图结构,截取目标张量,添加新层
- 加载目标张量权重
- 训练新层
- 全局微调
目标概括如下图所示:
一、Keras
keras的finetune方法很简单。Keras的applications模块中就提供了带有预训练权重的深度学习模型。该模块会根据参数设置,自动检查本地的~/.keras/models/目录下是否含有所需要的权重,没有时会自动下载,在notebook上下载会占用notebook线程资源,不太方便,因此也可以手动wget。
keras应用模块applications,以MobileNet为例说明:
#-----------------------------------构建模型------------------------------------
from keras.applications.mobilenet import MobileNet
from keras.layers import Input, Reshape, AvgPool2D,\
        Dropout, Conv2D, Softmax, BatchNormalization, Activation
from keras import Model

## 加载预训练权重,输入大小可以设定,include_top表示是否包括顶层的全连接层
base_model = MobileNet(input_shape=(128,128,3), include_top=False)

## 添加新层,get_layer方法可以根据层名返回该层,output用于返回该层的输出张量tensor
with tf.name_scope("output"):
    x = base_model.get_layer("conv_dw_6_relu").output
    x = Conv2D(256,kernel_size=(3,3))(x)
    x = Activation("relu")(x)
    x = AvgPool2D(pool_size=(5,5))(x)
    x = Dropout(rate=0.5)(x)
    x = Conv2D(10,kernel_size=(1,1),)(x)
    predictions = Reshape((10,))(x)

## finetune模型
model = Model(inputs=base_model.input, outputs=predictions)

#-------------------------------------训练新层-----------------------------------
## 冻结原始层位,在编译后生效
for layer in base_model.layers:
    layer.trainable = False

## 设定优化方法,并编译
sgd = keras.optimizers.SGD(lr=0.01)
model.compile(optimizer=sgd,loss="categorical_crossentropy")
‘’‘可选:记录模型训练过程、数据写入tensorboard
callback = [keras.callbacks.ModelCheckpoint(filepath="./vibration_keras/checkpoints",monitor="val_loss"),
           keras.callbacks.TensorBoard(log_dir="./vibration_keras/logs",histogram_freq=1,write_grads=True)]
’‘’

## 训练
model.fit(...)

#--------------------------------------全局微调-----------------------------------
## 设定各层是否用于训练,编译后生效
for layer in model.layers[:80]:
    layer.trainable = False
for layer in model.layers[80:]:
    layer.trainable = True

# 设定优化方法,并编译
sgd = keras.optimizer.SGD(lr=0.0001)
model.compile(optimizer=sgd, loss="categorical_crossentropy")

## 训练
model.fit(...)
获取各层名称的方法:

二、Tensorflow
tensorflow的finetune方法有3种:
- 1、利用tf-slim中构建好的网络结构和权重,手动调整;
- 2、利用tf-slim提供的train_image_classifier.py脚本自动化构建,具体方法这里;
- 3、利用tf.keras,过程与keras相同。
这里主要介绍上面的第一种方法,注意事项:
- tensorflow/models在1.0版本后从tf主框架移除,需要手动下载,位置在这里tensorflow/models,可以使用git clone下载到本地目录下,使用时使用下面命令临时添加到python搜索路径里:
import sys sys.path.append("./models/research/slim") - tf-slim的预训练网络的checkpoint文件在tensorflow/models/research/slim里,常见网络预训练权重;
- mobilenet预训练网络的checkpoint文件在slim/nets/mobilenet里面列举得更具体,Mobilenet权重。
2.1 模型构建方法
tensorflow有3种方法,从checkpoint文件中恢复模型结构和权重,这里列出的模型恢复后都可以直接进行前向推导计算,进行预测分析。
1) 直接加载图结构,再加载权重
# import_meta_graph可以直接从meta文件中加载图结构
saver = tf.train.import_meta_graph(os.path.join(model_path,r"resnet_v2/model.ckpt-258931.meta"))

# allow_soft_placement自动选择设备
with tf.Session(config=tf.ConfigProto(allow_soft_placement=True)) as sess:
    # latest_checkpoint检查checkpoint检查点文件,查找最新的模型
    # restore恢复图权重
    saver.restore(sess,tf.train.latest_checkpoint(r"./model/resnet_v2"))
    graph = sess.graph
    # get_tensor_by_name通过张量名称获取张量
    print(sess.run(graph.get_tensor_by_name("resnet_model/conv2d/kernel:0")))
2)先构建图结构,再加载权重
# 临时添加slim到python搜索路径
import sys
sys.path.append("./models/research/slim")

# 导入mobilenet_v2
from nets.mobilenet import mobilenet_v2
# 重置图
tf.reset_default_graph()

# 导入mobilenet,先构建图结构。
‘’‘加载完毕后,tf.get_default_graph()中包含了mobilenet计算图结构,
可以使用tf.get_collection(tf.GraphKeys.TRAINABLE_VARIABLES)对比reset_graph前后的差异
’‘’
images = tf.placeholder(tf.float32,(None,224,224,3))
with tf.contrib.slim.arg_scope(mobilenet_v2.training_scope(is_training=False)):
    logits, endpoints = mobilenet_v2.mobilenet(images,depth_multiplier=1.4)

# 定义saver类,用于恢复图权重
saver = tf.train.Saver()
with tf.Session() as sess:
    # latest_checkpoint检查checkpoint检查点文件,查找最新的模型
    # restore恢复图权重
    saver.restore(sess,tf.train.latest_checkpoint("./model_ckpt/mobilenet_v2"))
    # get_tensor_by_name通过张量名称获取张量
print(sess.run(tf.get_default_graph().get_tensor_by_name("MobilenetV2/Conv/weights:0")).shape)输出计算图结构内的节点名称,张量名称后面要有:0之类的数字,表示某个计算节点的第一个输出: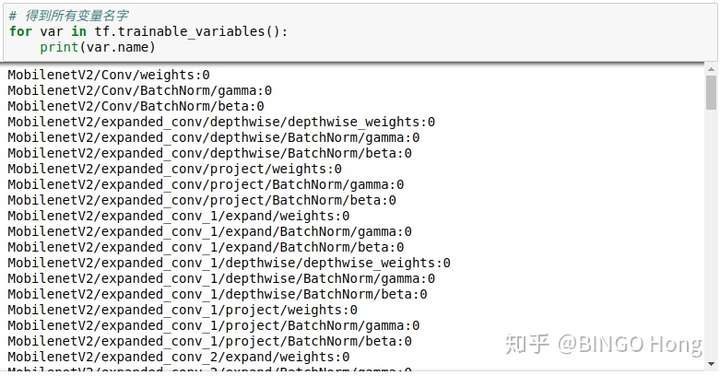
3) frozen inference
pb文件将变量取值和计算图整个结构统一放在一个文件中,通过convert_variable_to_constants将变量及取值转化为常量保存,在模型测试的时候,输入只需要经过前向传播至输出层就可以。
# 读取保存的pb文件,并解析成对应的GraphDef Protocol Buffer
gd =  tf.GraphDef.FromString(open('./model_ckpt/mobilenet_v2/mobilenet_v2_1.4_224_frozen.pb',"rb").read())
# import_graph_def将graphdef中保存的图加载到当前图中,return_elements返回指定张量
inp, predictions = \
tf.import_graph_def(gd,return_elements=["input:0","MobilenetV2/Predictions/Reshape_1:0"])

# 此时的计算图可以直接用于预测
# 拉取一张图片 !wget https://upload.wikimedia.org/wikipedia/commons/f/fe/Giant_Panda_in_Beijing_Zoo_1.JPG -O panda.jpg
from PIL import Image
img = np.array(Image.open('panda.jpg').resize((224, 224))).astype(np.float) / 128 - 1
# inp是需要feed的输入,predictions是需要输出的预测结构
with tf.Session(graph=inp.graph) as sess:
    x = sess.run(predictions,feed_dict={inp:img.reshape(1,224,224,3)})
2.2 Finetune过程
- 1) 构建图结构,截取目标张量,添加新层
- 2) 加载目标张量权重
- 3) 训练新层
- 4) 全局微调
1) 构建图结构,截取目标张量,添加新层
这个步骤中的图结构,是通过“先构建图结构,再加载权重”方法得到的mobilenet计算图结构。
tf.reset_default_graph()
# 构建计算图
images = tf.placeholder(tf.float32,(None,224,224,3))
with tf.contrib.slim.arg_scope(mobilenet_v2.training_scope(is_training=False)):
    logits, endpoints = mobilenet_v2.mobilenet(images,depth_multiplier=1.4)

# 获取目标张量,添加新层
with tf.variable_scope("finetune_layers"):
    # 获取目标张量,取出mobilenet中指定层的张量
    mobilenet_tensor = tf.get_default_graph().get_tensor_by_name("MobilenetV2/expanded_conv_14/output:0")
    # 将张量向新层传递
    x = tf.layers.Conv2D(filters=256,kernel_size=3,name="conv2d_1")(mobilenet_tensor)
    # 观察新层权重是否更新 tf.summary.histogram("conv2d_1",x)
    x = tf.nn.relu(x,name="relu_1")
    x = tf.layers.Conv2D(filters=256,kernel_size=3,name="conv2d_2")(x)
    x = tf.layers.Conv2D(10,3,name="conv2d_3")(x)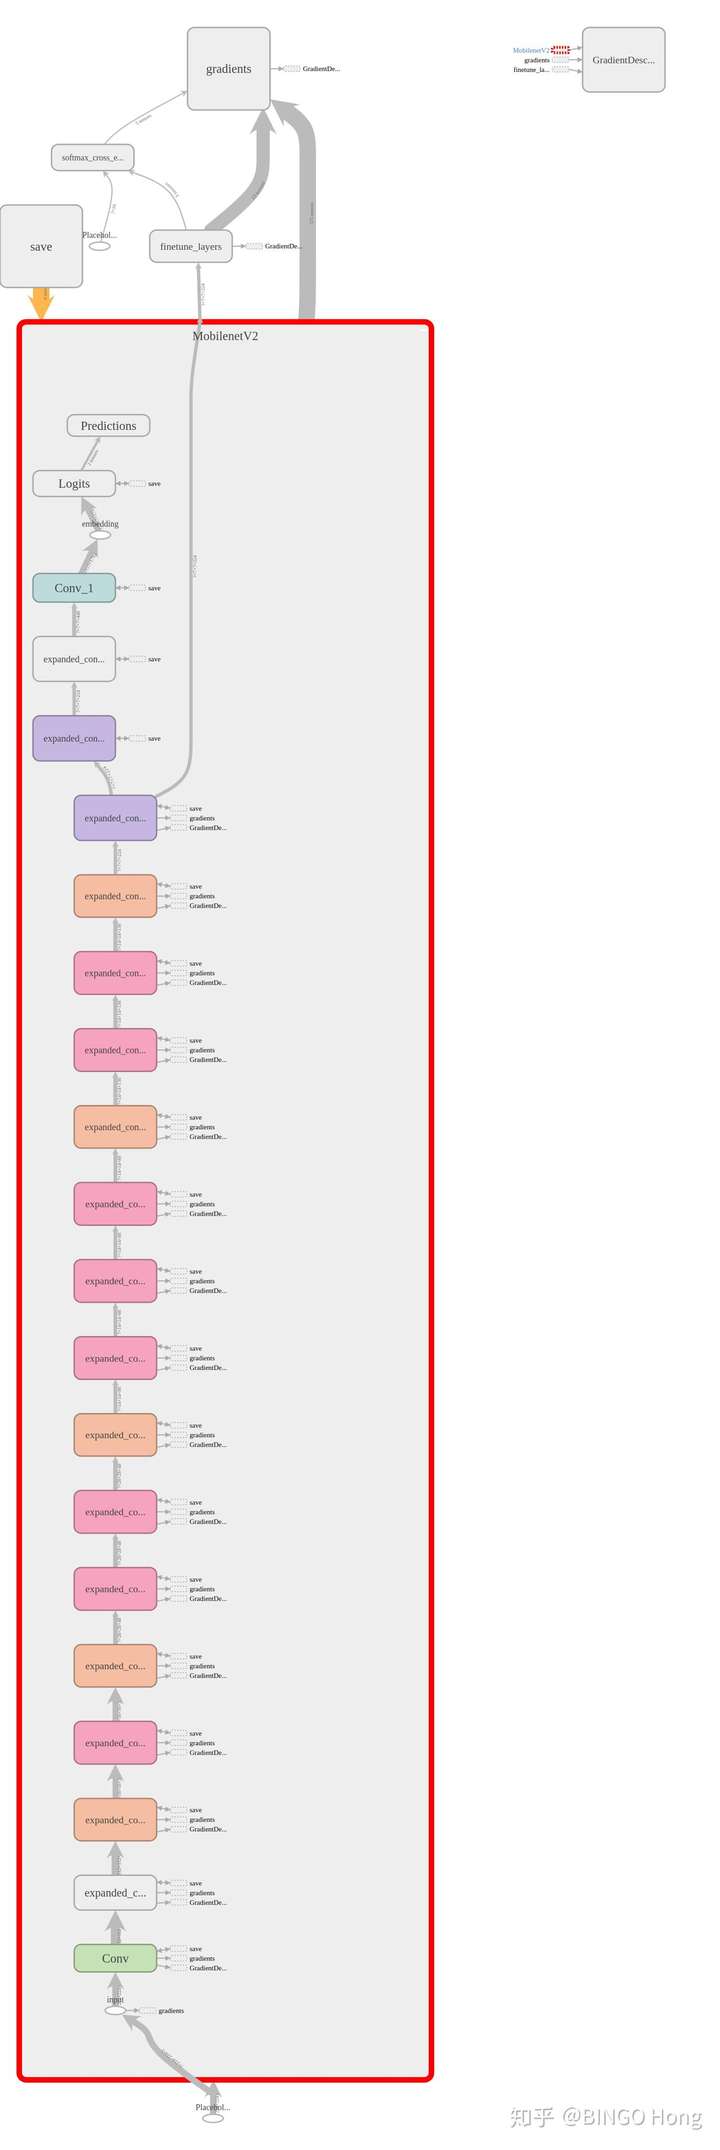
predictions = tf.reshape(x, (-1,10))计算图结构:ttps://pic4.zhimg.com/80/v2-f745afae04881302990bdffe3c5c0bf7_hd.jpg

红色框内的是Mobilenet网络结构,由上至下的第二个紫色节点为"MobilenetV2/expanded_conv_14/output"节点,可以看出直接与finetune_layers相接。
2) 加载目标权重,训练新层
# one-hot编码
def to_categorical(data, nums):
return np.eye(nums)[data]
# 随机生成数据
x_train = np.random.random(size=(141,224,224,3))
y_train = to_categorical(label_fake,10)
# 训练条件配置
## label占位符
y_label = tf.placeholder(tf.int32, (None,10))
## 收集变量作用域finetune_layers内的变量,仅更新添加层的权重
train_var = tf.get_collection(tf.GraphKeys.TRAINABLE_VARIABLES,scope="finetune_layers")
## 定义loss
loss = tf.nn.softmax_cross_entropy_with_logits_v2(labels=y_label,logits=predictions)
## 定义优化方法,用var_list指定需要更新的权重,此时仅更新train_var权重
train_step = tf.train.GradientDescentOptimizer(0.1).minimize(loss,var_list=train_var)
## 观察新层权重是否更新
tf.summary.histogram("mobilenet_conv8",tf.get_default_graph().get_tensor_by_name('MobilenetV2/expanded_conv_8/depthwise/depthwise_weights:0'))
tf.summary.histogram("mobilenet_conv9",tf.get_default_graph().get_tensor_by_name('MobilenetV2/expanded_conv_9/depthwise/depthwise_weights:0'))
## 合并所有summary
merge_all = tf.summary.merge_all()
## 设定迭代次数和批量大学
epochs = 10
batch_size = 16
# 获取指定变量列表var_list的函数
def get_var_list(target_tensor=None):
'''获取指定变量列表var_list的函数'''
if target_tensor==None:
target_tensor = r"MobilenetV2/expanded_conv_14/output:0"
target = target_tensor.split("/")[1]
all_list = []
all_var = []
# 遍历所有变量,node.name得到变量名称
# 不使用tf.trainable_variables(),因为batchnorm的moving_mean/variance不属于可训练变量
for var in tf.global_variables():
if var != []:
all_list.append(var.name)
all_var.append(var)
try:
all_list = list(map(lambda x:x.split("/")[1],all_list))
# 查找对应变量作用域的索引
ind = all_list[::-1].index(target)
ind = len(all_list) - ind - 1
print(ind)
del all_list
return all_var[:ind+1]
except:
print("target_tensor is not exist!")
# 目标张量名称,要获取一个需要从文件中加载权重的变量列表var_list
target_tensor = "MobilenetV2/expanded_conv_14/output:0"
var_list = get_var_list(target_tensor)
saver = tf.train.Saver(var_list=var_list)
# 加载文件内的权重,并训练新层
with tf.Session(config=tf.ConfigProto(allow_soft_placement=True)) as sess:
writer = tf.summary.FileWriter(r"./logs", sess.graph)
## 初始化参数:从文件加载权重 train_var使用初始化函数
sess.run(tf.variables_initializer(var_list=train_var))
saver.restore(sess,tf.train.latest_checkpoint("./model_ckpt/mobilenet_v2"))
for i in range(2000):
start = (i*batch_size) % x_train.shape[0]
end = min(start+batch_size, x_train.shape[0])
_, merge, losses = sess.run([train_step,merge_all,loss],\
feed_dict={images:x_train[start:end],\
y_label:y_train[start:end]})
if i%100==0:
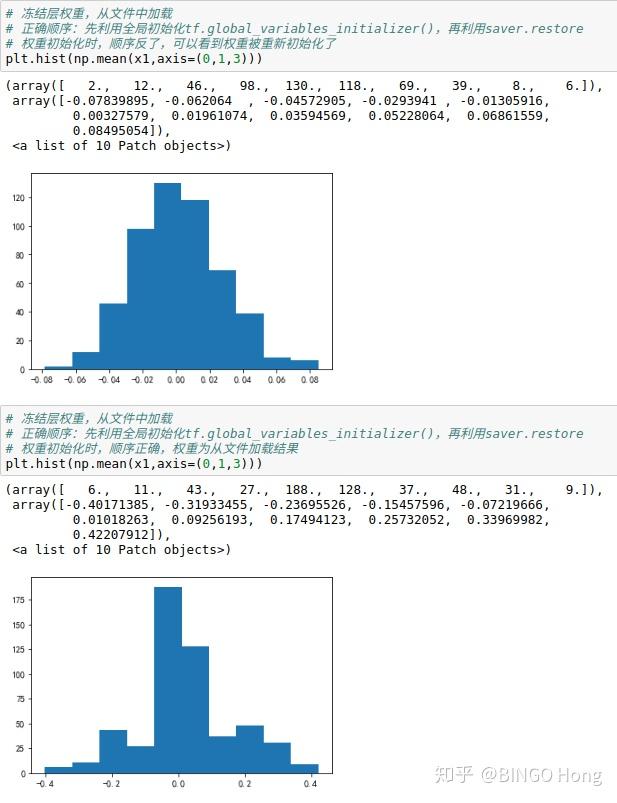
writer.add_summary(merge, i)权重初始化注意事项:
1.先利用全局初始化tf.global_variables_initializer(),再利用saver.restore顺序不能错,否则加载的权重会被重新初始化 。
sess.run(tf.global_variables_initializer())
saver.restore(sess,tf.train.latest_checkpoint("./model_ckpt/mobilenet_v2"))
2.先利用saver.restore从模型中加载权重,再利用tf.variable_initializaer()初始化指定的var_list,顺序可以调换。
saver.restore(sess,tf.train.latest_checkpoint("./model_ckpt/mobilenet_v2"))
sess.run(tf.variables_initializer(var_list=train_var))
3.前两种方法会对无用的节点也进行变量初始化,并且需要提前进行saver.restore操作,也就是说需要两次save.restore操作,才能保证finetune过程不会报错。现在可以通过筛选出需要从文件中加载权重的所有变量组成var_list,然后定义saver=tf.train.Saver(var_list),选择性的加载变量.
上面代码使用了第三种方法,以上3种初始化方法的差异可以仔细体会下。可以仔细看看下面的截图。
参考链接:知乎-https://zhuanlan.zhihu.com/p/42183653?utm_oi=731956459062951936