ls -lrt df -Th
1.虚拟机所在磁盘空间不够,能够把虚拟机复制到还有一块磁盘里。
2.进入VMware的安装文件夹,在命令提示符后输入"vmware-vdiskmanager",什么參数也不加直接按回车键,可显示这一命令的说明。
3.这一步要关闭虚拟机才行:
扩容命令:C:\Program Files\VMware\VMware Workstation>vmware-vdiskmanager -x 40Gb "D:\Program Files\Virtual Machines\Ubuntu\Ubuntu.vmdk"
參数 "-x" 表示要扩展虚拟机硬盘空间,紧随其后的数字是要扩展到的大小 ( 扩展到 40GB ,包括了原先的磁盘容量 ) 。

重新启动 VMware ,会发现虚拟机硬盘空间已变成 40GB 了

4.运行命令 df -ah查看磁盘情况,发现磁盘空间和扩容前一样,仍是20G:

5.查看分区,运行命令:
fdisk -l
以下是当前的磁盘分区表截图,这时我们能够看到磁盘的总量的确添加�到 40GB 了,可是分区仅仅有曾经的那几个原有的分区。

添加�分区过程截图:

重新启动后格式化该分区:

发现一个问题,我命名扩增了20G,为什么新增的分区容量这么小,以至于格式化时提示“Filesystem too small for a journal”
再看虚拟机配置,截图:

图上显示的是:眼下此虚拟硬盘的大小(current size)是19.8G,最大是(maximum size)40G。可是怎么获得这个最大磁盘容量呢?
然后我用了还有一种方法扩容:
与之前的思路不同,本方法不是扩大原来的虚拟磁盘的容量,而是另加一个虚拟磁盘来扩充容量。
第一步、退出Linux虚拟机系统,通过在VMware上对虚拟机进行设置来添加�一块虚拟硬盘。
附截图:


第二步、重新启动Linux虚拟机,对这块虚拟硬盘进行分区、格式化和挂载。
看下磁盘分区情况:
root@ubuntu:/home/now/android4.0.1# fdisk -l

Disk /dev/sda: 21.5 GB, 21474836480 bytes
255 heads, 63 sectors/track, 2610 cylinders, total 41943040 sectors
Units = sectors of 1 * 512 = 512 bytes
Sector size (logical/physical): 512 bytes / 512 bytes
I/O size (minimum/optimal): 512 bytes / 512 bytes
Disk identifier: 0x000e4e09

   Device Boot      Start         End      Blocks   Id  System
/dev/sda1   *        2048    39845887    19921920   83  Linux
/dev/sda2        39847934    41940991     1046529    5  Extended
/dev/sda5        39847936    41940991     1046528   82  Linux swap / Solaris

Disk /dev/sdb: 21.5 GB, 21474836480 bytes
255 heads, 63 sectors/track, 2610 cylinders, total 41943040 sectors
Units = sectors of 1 * 512 = 512 bytes
Sector size (logical/physical): 512 bytes / 512 bytes
I/O size (minimum/optimal): 512 bytes / 512 bytes
Disk identifier: 0x00000000

Disk /dev/sdb doesn't contain a valid partition table
这里能够看到/dev/sdb 就是我们新加入�的硬盘,我们须要给新的硬盘分区。
步骤例如以下(看提示):
root@ubuntu:/home/now/android4.0.1# fdisk /dev/sdb
Device contains neither a valid DOS partition table, nor Sun, SGI or OSF disklabel
Building a new DOS disklabel with disk identifier 0x9d6a9772.
Changes will remain in memory only, until you decide to write them.
After that, of course, the previous content won't be recoverable.

Warning: invalid flag 0x0000 of partition table 4 will be corrected by w(rite)

Command (m for help): m
Command action
   a   toggle a bootable flag
   b   edit bsd disklabel
   c   toggle the dos compatibility flag
   d   delete a partition
   l   list known partition types
   m   print this menu
   n   add a new partition
   o   create a new empty DOS partition table
   p   print the partition table
   q   quit without saving changes
   s   create a new empty Sun disklabel
   t   change a partition's system id
   u   change display/entry units
   v   verify the partition table
   w   write table to disk and exit
   x   extra functionality (experts only)

Command (m for help): n
Partition type:
   p   primary (0 primary, 0 extended, 4 free)
   e   extended
Select (default p): p
Partition number (1-4, default 1): 1
First sector (2048-41943039, default 2048):
Using default value 2048
Last sector, +sectors or +size{K,M,G} (2048-41943039, default 41943039):
Using default value 41943039

Command (m for help): p

Disk /dev/sdb: 21.5 GB, 21474836480 bytes
255 heads, 63 sectors/track, 2610 cylinders, total 41943040 sectors
Units = sectors of 1 * 512 = 512 bytes
Sector size (logical/physical): 512 bytes / 512 bytes
I/O size (minimum/optimal): 512 bytes / 512 bytes
Disk identifier: 0x9d6a9772

   Device Boot      Start         End      Blocks   Id  System
/dev/sdb1            2048    41943039    20970496   83  Linux

Command (m for help): w
The partition table has been altered!

Calling ioctl() to re-read partition table.
Syncing disks.
再看磁盘分区,已达到我们想要的结果:
root@ubuntu:/home/now/android4.0.1# fdisk -l

Disk /dev/sda: 21.5 GB, 21474836480 bytes
255 heads, 63 sectors/track, 2610 cylinders, total 41943040 sectors
Units = sectors of 1 * 512 = 512 bytes
Sector size (logical/physical): 512 bytes / 512 bytes
I/O size (minimum/optimal): 512 bytes / 512 bytes
Disk identifier: 0x000e4e09

   Device Boot      Start         End      Blocks   Id  System
/dev/sda1   *        2048    39845887    19921920   83  Linux
/dev/sda2        39847934    41940991     1046529    5  Extended
/dev/sda5        39847936    41940991     1046528   82  Linux swap / Solaris

Disk /dev/sdb: 21.5 GB, 21474836480 bytes
213 heads, 34 sectors/track, 5791 cylinders, total 41943040 sectors
Units = sectors of 1 * 512 = 512 bytes
Sector size (logical/physical): 512 bytes / 512 bytes
I/O size (minimum/optimal): 512 bytes / 512 bytes
Disk identifier: 0x9d6a9772

   Device Boot      Start         End      Blocks   Id  System
/dev/sdb1            2048    41943039    20970496   83  Linux
我们把新加的磁盘/dev/sdb1 挂载到根分区
root@ubuntu:/home/now# mount /dev/sdb1 /
mount: you must specify the filesystem type
系统提示须要明白的文件类型,即我们须要对其进行格式化。
以下是格式化操作:
root@ubuntu:/home/now# mkfs -t ext3 /dev/sdb1
mke2fs 1.42 (29-Nov-2011)
Filesystem label=
OS type: Linux
Block size=4096 (log=2)
Fragment size=4096 (log=2)
Stride=0 blocks, Stripe width=0 blocks
1310720 inodes, 5242624 blocks
262131 blocks (5.00%) reserved for the super user
First data block=0
Maximum filesystem blocks=0
160 block groups
32768 blocks per group, 32768 fragments per group
8192 inodes per group
Superblock backups stored on blocks:
	32768, 98304, 163840, 229376, 294912, 819200, 884736, 1605632, 2654208,
	4096000

Allocating group tables: done
Writing inode tables: done
Creating journal (32768 blocks): done
Writing superblocks and filesystem accounting information: done
然后挂载,成功:
root@ubuntu:/home/now# mount /dev/sdb1 /
root@ubuntu:/home/now#
查看挂载情况,能够看到/dev/sdb1挂载到了根分区:
root@ubuntu:/home/now# df
Filesystem     1K-blocks     Used Available Use% Mounted on
/dev/sda1       19478204 16257028   2208696  89% /
udev              503544        4    503540   1% /dev
tmpfs             102472     1108    101364   2% /run
none                5120        0      5120   0% /run/lock
none              512352      152    512200   1% /run/shm
/dev/sdb1       19478204 16257028   2208696  89% /
能够看到这不是我们想要的结果,这是由于“挂载点”必须是一个已经存在的文件夹,这个文件夹能够不为空,但挂载后这个文件夹下曾经的内容将不可用,只是umount以后会恢复正常。
使用卸载命令,发现不能卸载:
root@ubuntu:/# umount /dev/sdb1
umount: /: device is busy.
        (In some cases useful info about processes that use
         the device is found by lsof(8) or fuser(1))
好在使用mount挂载系统的一个特点是一旦系统重新启动之后就失效,须要又一次挂载。所以我们重新启动就能卸载掉磁盘/dev/sdb1了。
系统重新启动后,在根文件夹下新建一个子文件夹(由于全部的文件夹都是挂载到根文件夹下的),然后把磁盘/dev/sdb1挂载在此文件夹下:
root@ubuntu:/home/now# cd /
root@ubuntu:/# mkdir /storehouse
root@ubuntu:/# mount /dev/sdb1 /storehouse
查看存储空间利用情况:
root@ubuntu:/# df -h
Filesystem      Size  Used Avail Use% Mounted on
/dev/sda1        19G   16G  2.2G  88% /
udev            492M  4.0K  492M   1% /dev
tmpfs           101M  956K  100M   1% /run
none            5.0M     0  5.0M   0% /run/lock
none            501M  152K  501M   1% /run/shm
/dev/sdb1        20G  173M   19G   1% /storehouse
看到了吧,最后一行就是我们挂载的文件夹。
使用下面试试,往里面拷贝一个压缩文件:
root@ubuntu:/# cp  /home/now/android4.0.1.tar.gz  /storehouse
root@ubuntu:/# ls /storehouse/
android4.0.1.tar.gz  lost+found
然后查看存储空间利用情况:
root@ubuntu:/# df -h
Filesystem      Size  Used Avail Use% Mounted on
/dev/sda1        19G   16G  2.2G  88% /
udev            492M  4.0K  492M   1% /dev
tmpfs           101M  968K  100M   1% /run
none            5.0M     0  5.0M   0% /run/lock
none            501M  152K  501M   1% /run/shm
/dev/sdb1        20G  1.9G   17G  11% /storehouse
可以看到可以正常使用。
改动/etc/fstab文件,开机自己主动挂载:
如图,红色方框是我们加入�的

磁盘分区
仅仅是通过上述步骤进行虚拟磁盘扩容, Ubuntu还不能识别扩展后的容量, 此时还需进行一步对其进行分区. 这里介绍使用fdisk对磁盘进行分区的步骤[3].
(1) 查看已有分区
sudo fdisk -l- 1
(2) 分区过程
输入下面命令进入fdisk命令模式(假设要分区的硬盘为/dev/sda):
sudo fdisk /dev/sda- 1
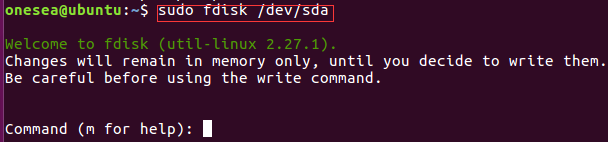
根据上图提示, 输入m可以显示帮助信息:

根据上图提示, 输入n添加一个新分区.
在后面的分区类型选择中输入p(创建主分区), 其余的设施保持默认值即可.
最后输入w保持分区结果.
3 格式化分区
假设通过上述步骤所创建的新分区为/dev/sda4, 可以通过下面命令将其格式化为ext4文件系统格式:
sudo mkfs -t ext4 /dev/sda44 挂载分区
4.1 手动挂载
sudo mount /dev/sda4 /home/onesea/Mini24404.2 自动挂载
若希望开机时自动挂载, 可在/etc/fstab最后一行添加:
/dev/sda4 /home/onesea/Mini2440 ext4 defaults 0 0说明: 假设新分区为/dev/sda4, 挂载点为/home/onesea/Mini2440, 可根据实际情况修改.
虚拟机或物理服务器热添加硬盘
此方法试用于物理机或虚拟机。不用重启即可添加硬盘
echo "- - -" >/sys/class/scsi_host/host0/scan # 中间有空格
echo "- - -" >/sys/class/scsi_host/host1/scan
echo "- - -" >/sys/class/scsi_host/host2/scan
https://blog.csdn.net/jiaping0424/article/details/51777043
参考资料
[3]VMware中调大虚拟硬盘容量以后ubuntu中硬盘容量为什么不变?
此方法试用于物理机或虚拟机。不用重启即可添加硬盘
echo "- - -" >/sys/class/scsi_host/host0/scan # 中间有空格
echo "- - -" >/sys/class/scsi_host/host1/scan
echo "- - -" >/sys/class/scsi_host/host2/scan
https://blog.csdn.net/jiaping0424/article/details/51777043