个人理解:elk,主要用来收集服务器端产生的日志、Elasticsearch主要是用来部署服务端搜索日志的需要创建节点,kibana主要用来连接Elasticsearch展现出来,还要安装一个logstash插件用来收集日志信息。
- 系统:CentOS7
- Elasticsearch版本:elasticsearch-5.6.7.zip
- logstash版本:logstash-2.4.0.zip wget https://artifacts.elastic.co/downloads/logstash/logstash-6.2.3.zip
- Kibana版本:kibana-5.6.3-linux-x86_64.tar.gz (下载地址:https://www.elastic.co/cn/downloads/kibana)

1 环境准备
两台CentOS 7的Linux虚拟机
2 安装JDK
分别在每台机器上安装JDK 1.8(根据ES官网最新要求,推荐版本Oracle JDK version 1.8.0_121)
[es@cent-1 config]$ java -version
java version "1.8.0_11"
Java(TM) SE Runtime Environment (build 1.8.0_11-b12)
Java HotSpot(TM) 64-Bit Server VM (build 25.11-b03, mixed mode)- 1
- 2
- 3
- 4
3 下载Elasticsearch安装包并解压到每个节点对应目录
下载地址:https://www.elastic.co/downloads/elasticsearch
4 每台机器创建es专用用户名,并对Elasticsearch解压文件夹授权
由于Elasticsearch不允许以root用户启动或操作相关服务,所以需要另外创建一个单独的用户
[root@cent-1 centos]useradd es
[root@cent-1 centos]chown -R es:es /opt/install/elasticsearch-5.2.2- 1
- 2
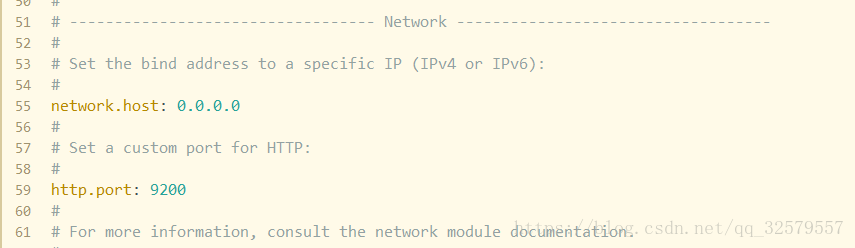
5 修改elasticsearch.yml配置文件,配置集群名称、节点名称等相关参数
注意:Elasticsearch可以自动发现同一个局域网下面的不同节点,前提是需要把配置文件中的集群名称配置成相同
[root@cent-1 centos]cd /opt/install/elasticsearch-5.2.2/config
[root@cent-1 centos] vi elasticsearch.yml- 1
- 2
6 启动Elasticsearch服务,分别在不同节点上面启动,后启动的节点可以自动加入到集群
参数-d表示在后台启动
[es@cent-1 elasticsearch-5.2.2]$ bin/elasticsearch -d
[es@cent-2 elasticsearch-5.2.2]$ bin/elasticsearch -d- 1
- 2
7 通过Web UI检查集群是否启动成功

elasticsearch-head安装前准备
1.操作系统
64位CentOS Linux release 7.2.1511 (Core)
2.git是必需的
elasticsearch-head是一款开源软件,被托管在github上面,所以如果我们要使用它,必须先安装git,通过git获取elasticsearch-head。我一开始在centos上装了git,但是后来仔细一想,我windows上已经装过了,没必要为了获取elasticsearch-head再在centos上装git。不过既然已经装了,那我们就在centos上获取吧。
可参考我的另一片文章安装git:centos7安装git
3.nodejs也是必需的
运行elasticsearch-head会用到grunt,而grunt需要npm包管理器,所以nodejs是必须要安装的。
可参考我的另一片文章安装nodejs:centos7安装nodejs
4.单独部署elasticsearch-head
elasticsearch5.0之后,elasticsearch-head不做为插件放在其plugins目录下了,所以可以单独部署一台服务器,没必要和elasticsearch部署在同一台机器
下载elasticsearch-head
使用git拷贝elasticsearch-head到本地
[root@localhost local]# cd /usr/local/
[root@localhost local]# git clone git://github.com/mobz/elasticsearch-head.git
安装elasticsearch-head依赖包
[root@localhost _site]# cd /usr/local/elasticsearch-head/
[root@localhost local]# cnpm install
如果出现下面的黄色警告,不用管,不影响使用。
npminstall WARN package.json not exists: /usr/local/package.json
修改Gruntfile.js
[root@localhost _site]# cd /usr/local/elasticsearch-head/
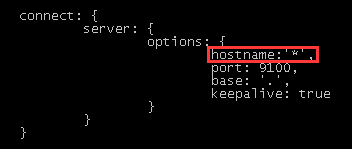
[root@localhost elasticsearch-head]# vi Gruntfile.js
在connect-->server-->options下面添加:hostname:’*’,允许所有IP可以访问
修改elasticsearch-head默认连接地址:
[root@localhost elasticsearch-head]# cd /usr/local/elasticsearch-head/_site/
[root@localhost _site]# vi app.js
将this.base_uri = this.config.base_uri || this.prefs.get("app-base_uri") || "http://localhost:9200";中的localhost修改成你es的服务器地址,我的是:192.168.1.60:9200
配置elasticsearch允许跨域访问
进入elasticsearch服务器,打开elasticsearch的配置文件elasticsearch.yml,在文件末尾追加下面两行代码即可:
http.cors.enabled: true
http.cors.allow-origin: "*"
打开9100端口
如果想在别的机器上访问,防火墙必须开启9100端口
永久打开9100端口
[root@localhost elasticsearch-head]# firewall-cmd --zone=public --add-port=9100/tcp --permanent
重启防火墙
[root@localhost elasticsearch-head]# firewall-cmd --reload
启动elasticsearch
这里就不介绍了。
只有启动了elasticsearch,连接的时候才能连接上。
下面是我个人整理的一些笔记,有兴趣可以看下
centos7 elasticsearch之kibana安装
启动elasticsearch-head
[root@localhost _site]# cd /usr/local/elasticsearch-head/
[root@localhost elasticsearch-head]# node_modules/grunt/bin/grunt server
[root@localhost elasticsearch-head]# cd /usr/local/elasticsearch-head/
[root@localhost elasticsearch-head]#  node_modules/grunt/bin/grunt server
Running "connect:server" (connect) task
Waiting forever...
Started connect web server on http://localhost:9100

如上,表示elasticsearch-head启动成功
访问elasticsearch-head
浏览器输入网址:http://192.168.1.88:9100/

