Wireshark 针对 UNIX Like 系统的 GUI 发行版界面采用的是 X Window(1987年更改X版本到X11)。Mac OS X 在 Mountain Lion 之后放弃 X11,取而代之的是开源的 XQuartz(X11.app)。因此,在 Mac OS X 上安装 Wireshark 之前,需要先下载安装 Quartz。
1.安装 XQuartz
XQuartz(XQuartz-2.7.6.dmg)安装完成后,按照提示需要 注销 重新 登录,以使 XQuartz 作为默认的 X11 Server。
安装成功后,在终端输入“xterm --help”可查看命令行帮助,输入“xterm -version”可查看 xterm 版本信息。在终端输入“xterm”或通过菜单“Applications->Terminal”可启动X Window(XQuartz)的终端(xterm)。

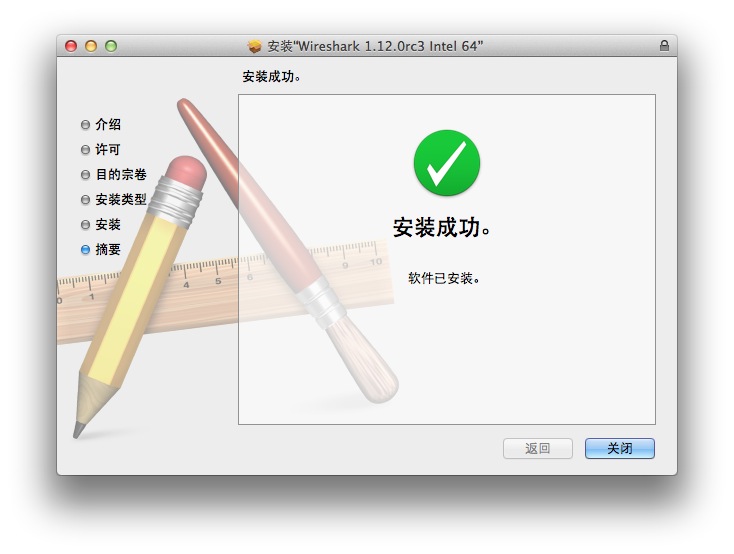
2.安装 Wireshark
安装 OS X 10.6 and later Intel 64-bit 版本(Wireshark 1.12.0 Intel 64.dmg)。
安装成功后,在终端输入“wireshark --help”可查看命令行帮助,输入“wireshark --v”可查看 wireshark 版本信息。
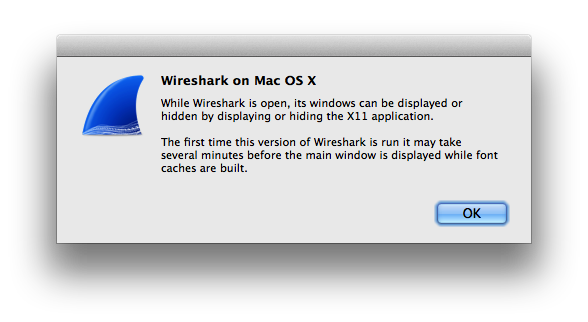
3.启动 Wireshark
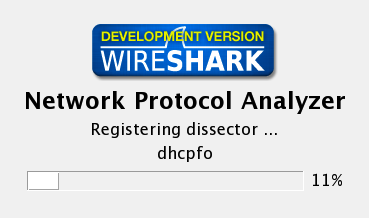
关于 Mac OS X 升级 Yosemite 后无法启动 Wireshark 的问题首次启动 Wireshark,提示通过前端 X11 窗口可以操控 Wireshark;由于需要编译字体包,可能需要耗费几分钟。
扫描二维码关注公众号,回复: 6133128 查看本文章
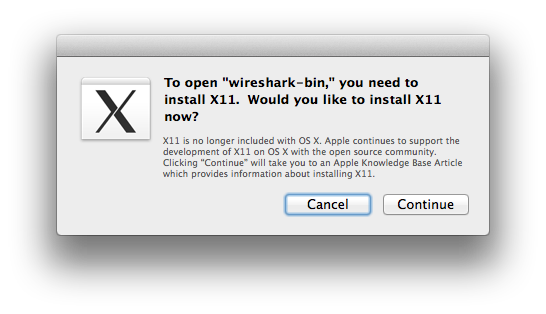
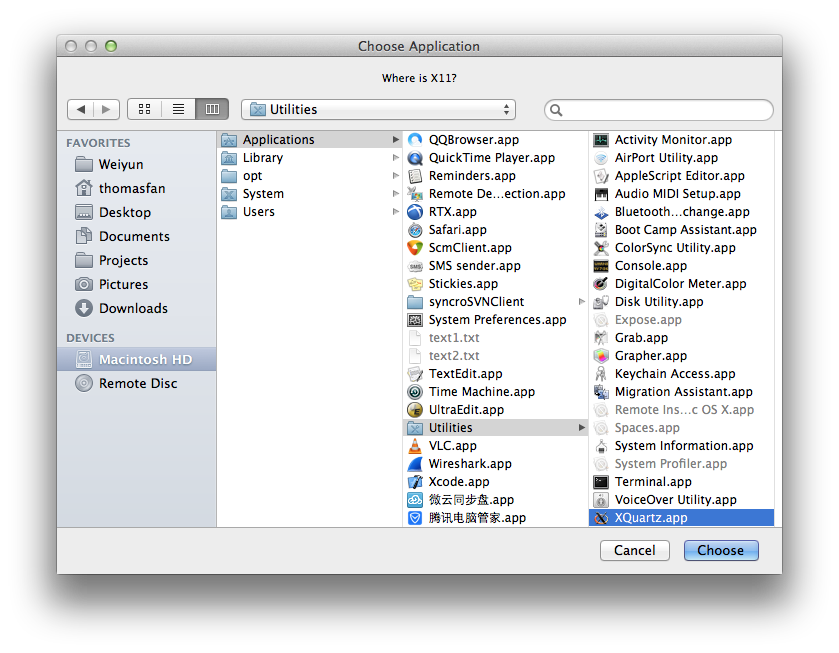
如果事先没有安装 X11(XQuartz),则会提示引导安装 X11。
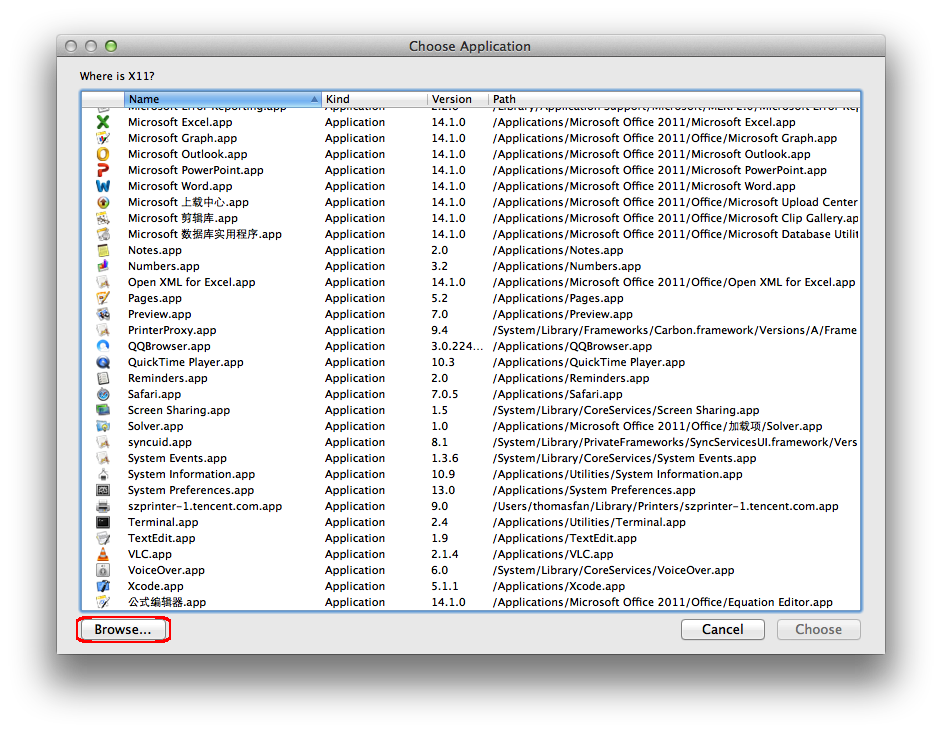
如果事先已经安装好 XQuartz(X11),则会引导选择 X11.app 所在路径。——最新版本的 Wireshark 1.12.4 Intel 64.dmg 貌似会自动识别已安装的 X11 路径而无需手动指定。
点击 Browse 到“/Applications/Utilities/XQuartz.app”,将 XQuartz 作为 Wireshark 的 X11 前端。——最新版本的 Wireshark 1.12.4 Intel 64.dmg 貌似会自动识别已安装的 X11 路径而无需手动指定。
如果不出意外的话,Wireshark 将成功启动。
Mac OS X 升级 Yosemite 后,无法启动 Wireshark,是因为 Yosemite 将 X11 外链文件夹从原来的 /usr 移动到了 /opt 下。可通过以下三种方式解决:
-解决方法1:重装或升级 XQuartz
-解决方法2:将 /opt/X11 拷贝一份到 /usr/X11:sudo mv /opt/X11 /usr/X11
-解决方法3:将 /opt/X11 软链一份到 /usr/X11:sudo ln -s /opt/X11 /usr/X11
4.选择网卡,开始抓包
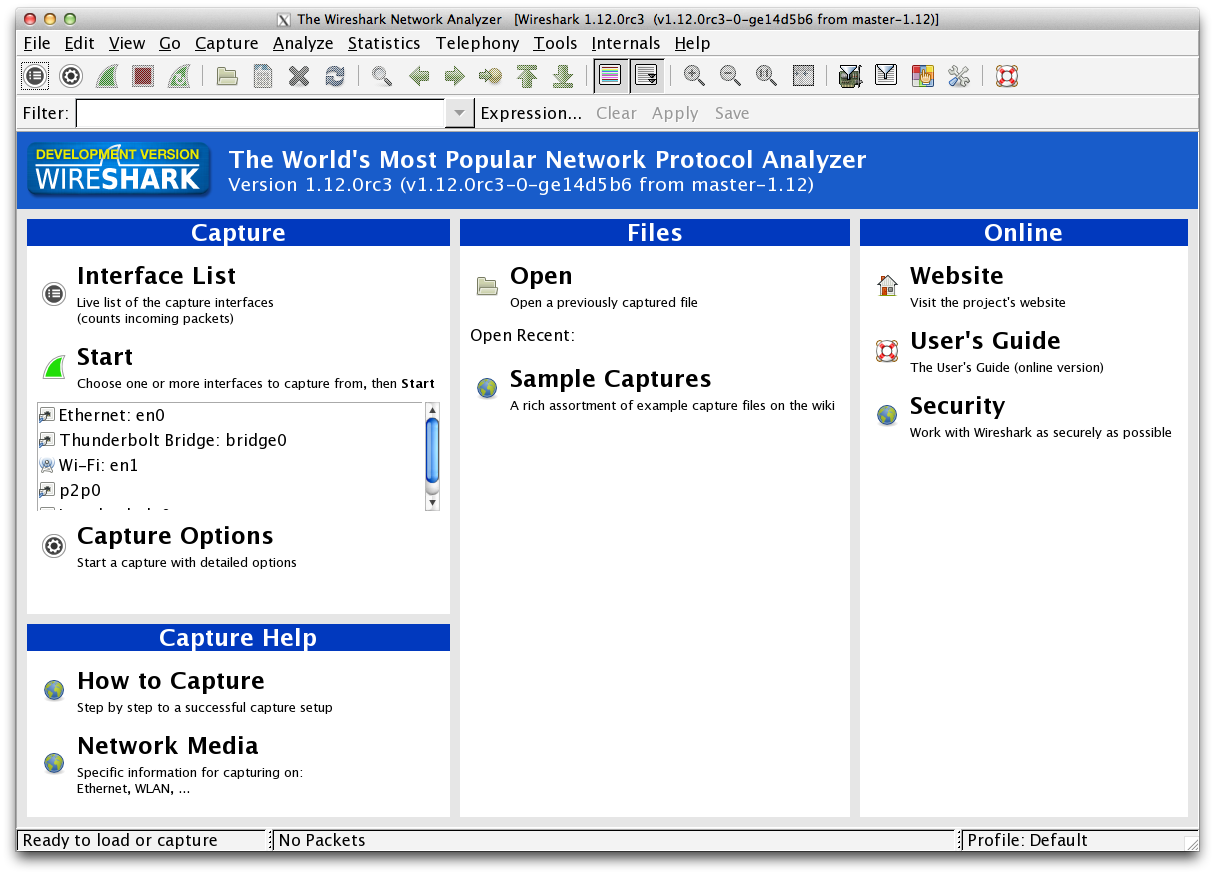
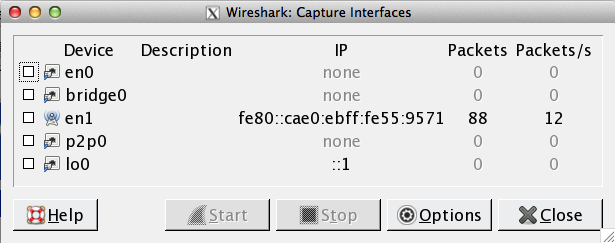
点击启动首页中的“Interface List”(相当于菜单“Capture->Interfaces”),可以查看本机活跃网卡(通过系统菜单Apple->About This Mac->More Info->Overview->System Report或终端命令 ifconfig 也可查看)。
由于本人 iMac 使用无线接入,故 en1(Wireless NIC)和 lo0(本机环路)活跃(active),有线网卡 en0(Wired NIC)未使用(inactive)。注意:MBP 上没有有线网卡,en0 即为无线网卡 ,可通过 ifconfig 命令自行识别。
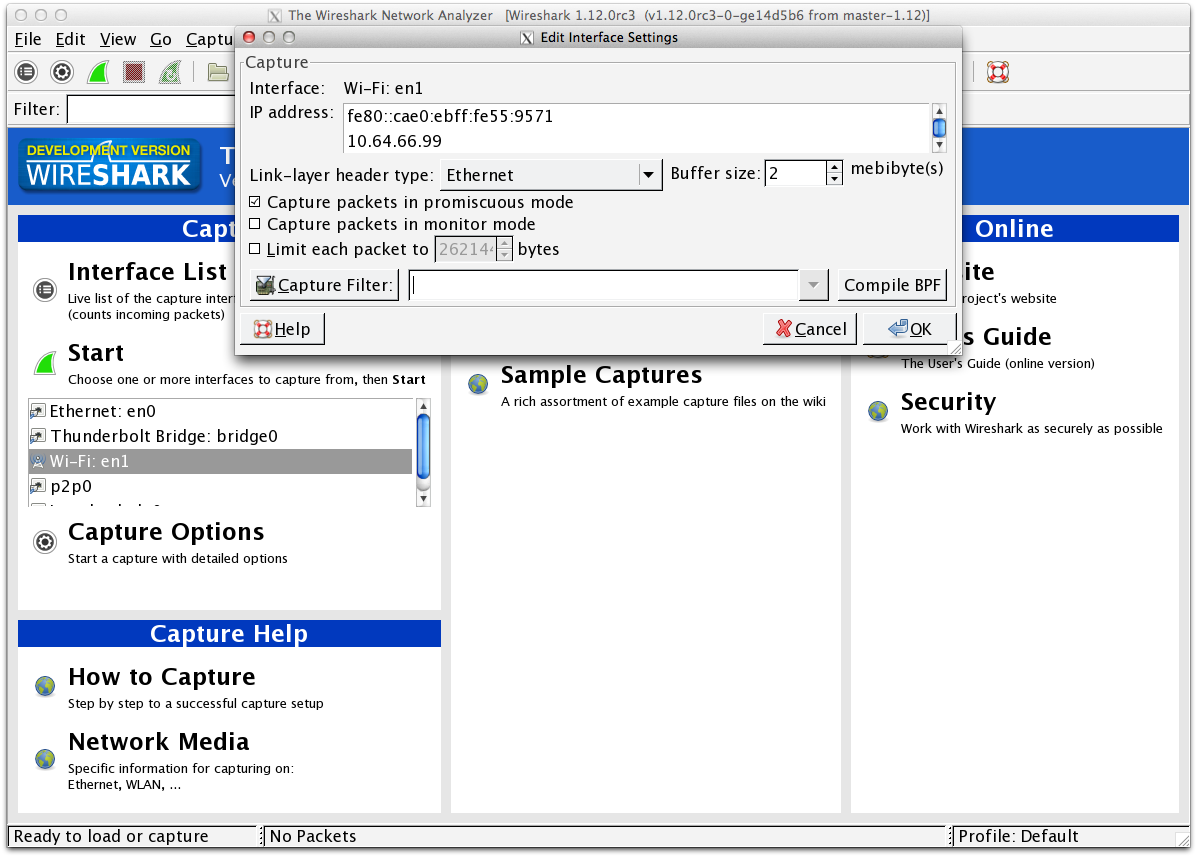
这里可以直接勾选 en1,点击 Start 按钮使用默认 Capture Options(默认勾选了混杂模式[promiscuous mode])进行抓包;可以在启动首页点选“Wi-Fi:en1”打开“Edit Interface Settings”,设置(例如可配置 Capture Filters 只捕捉指定类型或条件的数据包)或使用默认 Capture Options 开始抓包;也可以从菜单“Capture->Options”着手,选择网卡设置选项开始抓包。
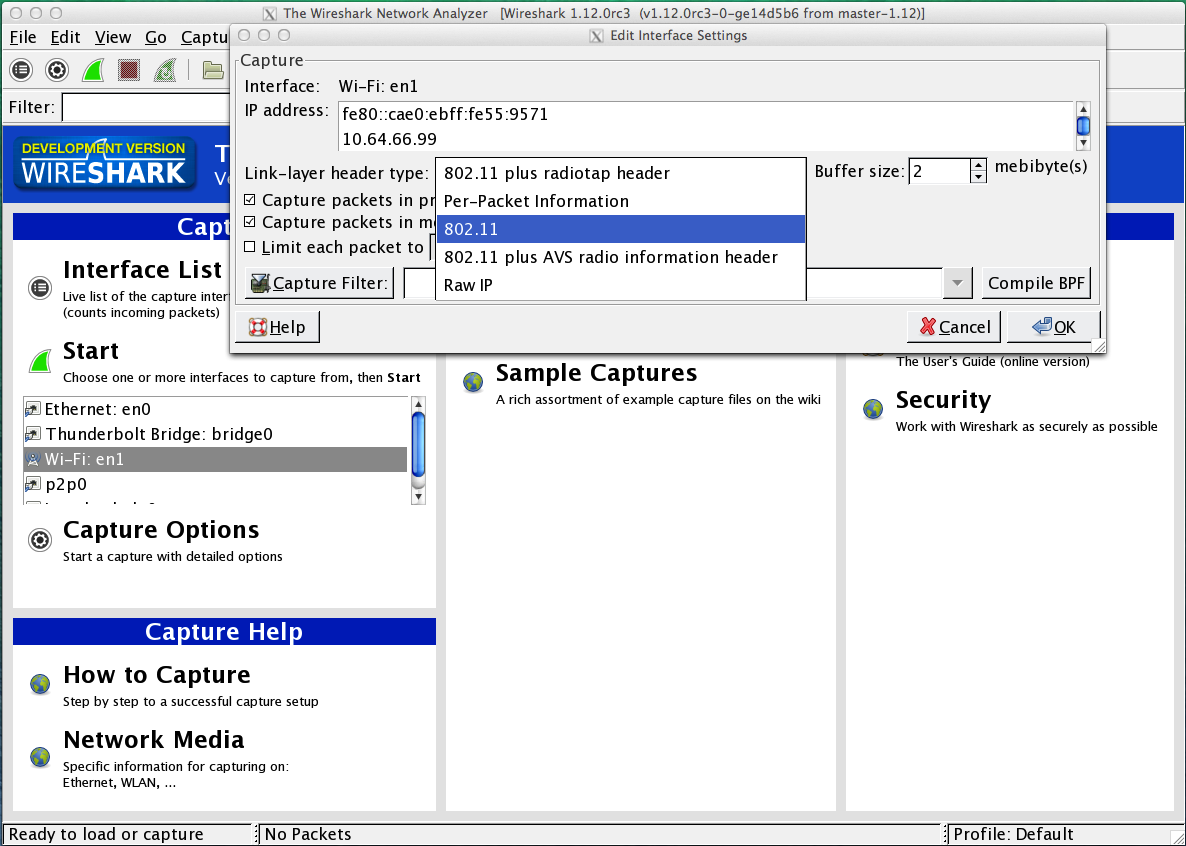
这里选择了无线网卡(Wi-Fi: en1),怎么抓到的是以太网包(Ethernet Packet)呢?实际上它是某些 BSD 提供的伪以太网头(fake Ethernet headers)。如果要抓取 IEEE802.11 无线包(Beacon Frame 等),则需要开启监听模式[monitor mode],并且将 Link-layer header type 选为 802.11 系列选项。
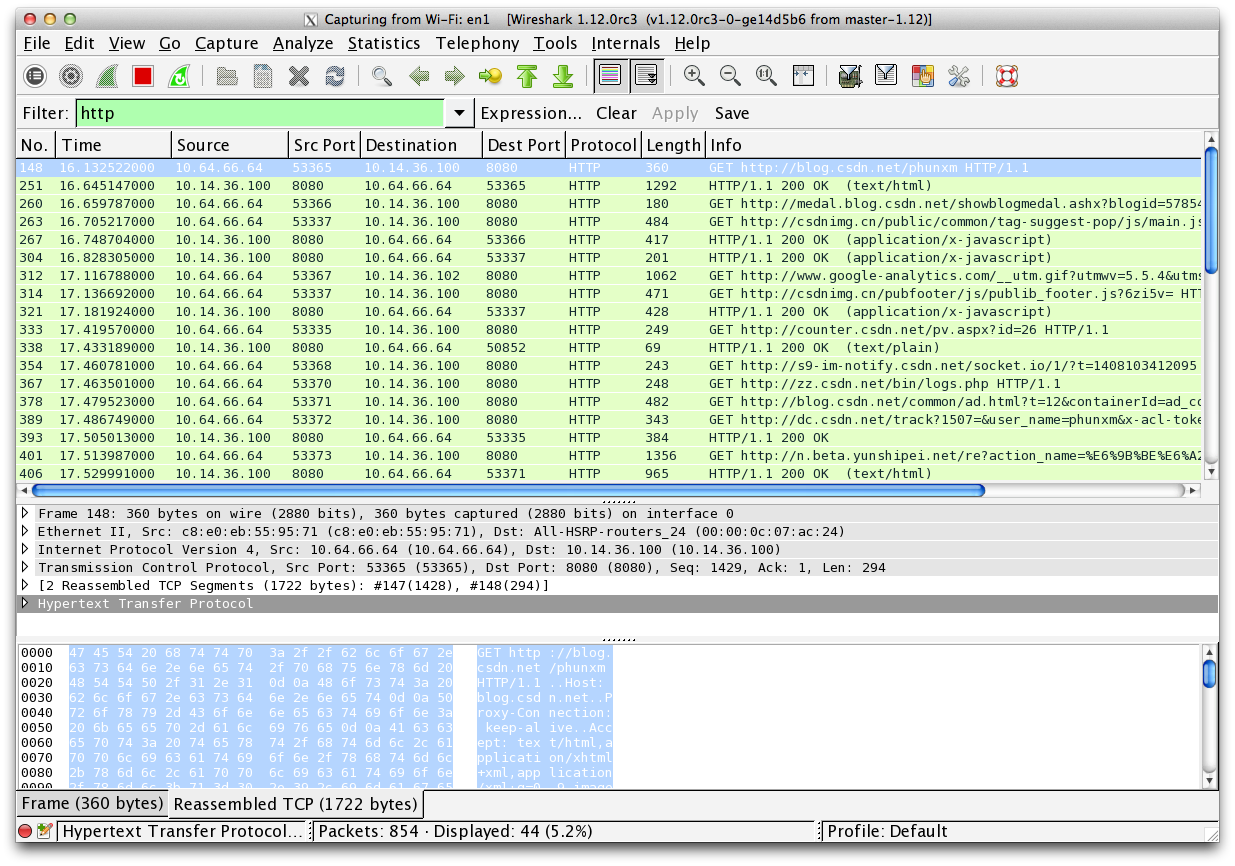
另外,在 Display Filters 中填写了“http”,将从捕捉到的数据包中过滤出并只显示 HTTP 协议包。
5.监听抓取802.11无线帧
在“Edit Interface Settings”或“Capture Options”中勾选“Capture packets in monitor mode”开启监听模式,然后勾选 Link-layer header type 为“802.11”开始抓取无线包。
说明:
(1)iMac 开启 Monitor Mode 时,可能会阻塞网卡导致上不了网,参见下文相关说明。
(2)Windows 下抓取 802.11 无线帧(Management/Control/DataFrame),需要 Wireshark 配合 AirPcap 或使用 OmniPeek。
(3)常见 802.11 无线帧(802.11 frames)类型:
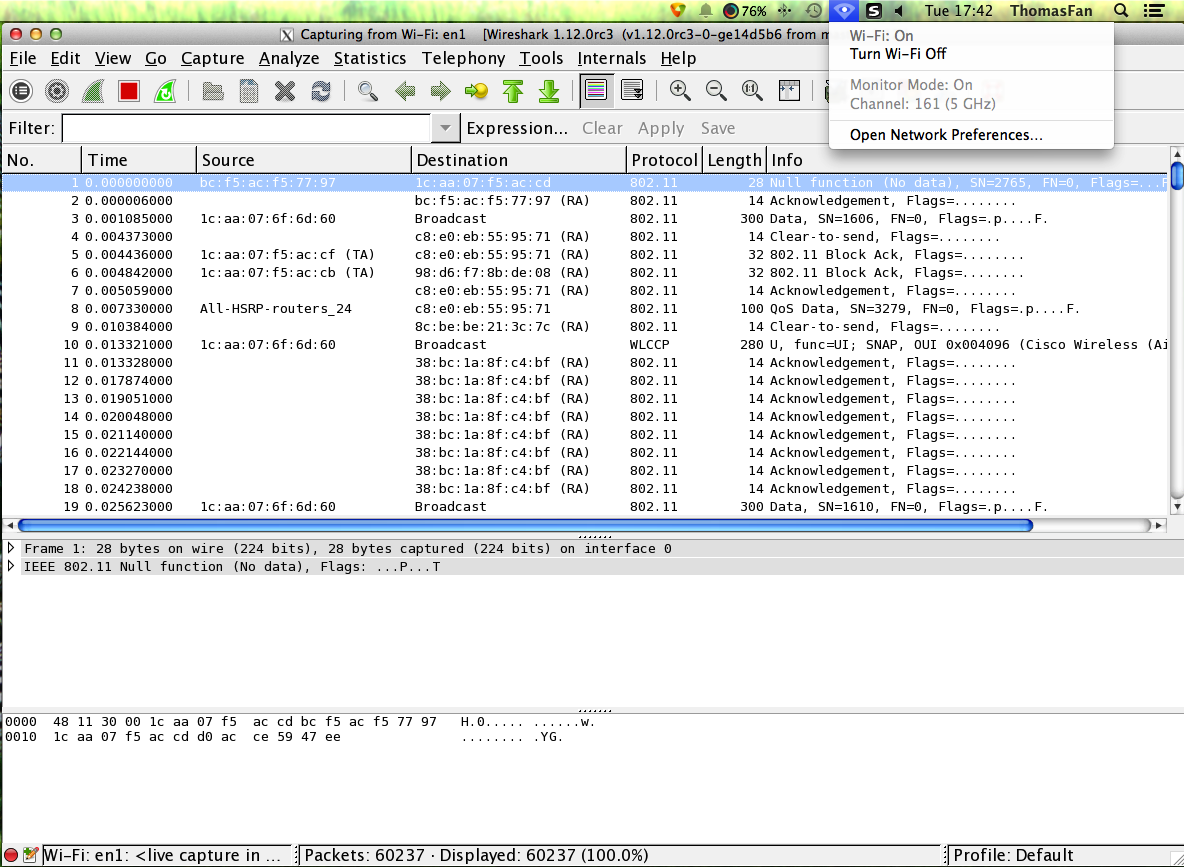
(1)Management Frame:
Type/Subtype: Beacon frame (0x0008,Bit[5:0]=00,1000B)
Type/Subtype: Probe Response (0x0005,Bit[5:0]=00,0101B)
(2)Control Frame:
Type/Subtype: 802.11 Block Ack (0x0019,Bit[5:0]=01,1001B)
Type/Subtype: Request-to-send (0x001b,Bit[5:0]=01,1011B)
Type/Subtype: Clear-to-send (0x001c,Bit[5:0]=01,1100B)
Type/Subtype: Acknowledgement (0x001d,Bit[5:0]=01,1101B)
(3)Data Frame:
Type/Subtype: Data (0x0020,Bit[5:0]=10,0000B)
Type/Subtype: Null function (No data) (0x0024,Bit[5:0]=10,0100B)
Type/Subtype: QoS Data (0x0028,Bit[5:0]=10,1000B)
Type/Subtype: QoS Data + CF-Ack + CF-Poll (0x002b,Bit[5:0]=10,1011B)
6.通过 RVI 抓取 iPhone 数据包
(1)RVI 简介
使用 Mac 抓取 iPhone 数据包可通过共享和代理两种方式:
这两种方式都是将 iPhone 的网络流量导入到 Mac 电脑中,通过 Mac 连接互联网。这就要求 Mac 本身是联网的,对于网络共享的方式还要求 Mac 本身的网络不能使用 WiFi,而且在 iPhone 上只能使用 WiFi 连接,无法抓取到 xG(2G/3G/4G) 网络包。
苹果在 iOS 5 中新引入了“远程虚拟接口(Remote Virtual Interface,RVI)”的特性,可以在 Mac 中建立一个虚拟网络接口来作为 iOS 设备的网络栈,这样所有经过 iOS 设备的流量都会经过此虚拟接口。此虚拟接口只是监听 iOS 设备本身的协议栈(但并没有将网络流量中转到 Mac 本身的网络连接上),所有网络连接都是 iOS 设备本身的,与 Mac 电脑本身联不联网或者联网类型无关。iOS设备本身可以为任意网络类型(WiFi/xG),这样在 Mac 电脑上使用任意抓包工具(tcpdump、Wireshark、CPA)抓取 RVI 接口上的数据包就实现了对 iPhone 的抓包。
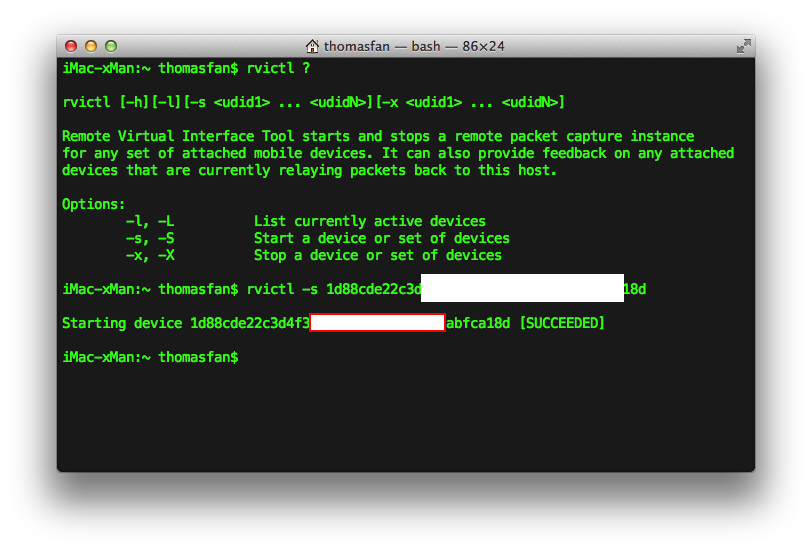
Mac OS X 对 RVI 的支持是通过终端命令 rvictl 提供的,在终端(Terminal)中输入“ rvictl ? ”命令可查看帮助:
==================================================
rvictl Options:
-l, -L List currently active devices
-s, -S Start a device or set of devices
-x, -X Stop a device or set of devices
==================================================
(2)使用 “ rvictl -s ”命令创建虚拟接口
首先,通过 MFI USB 数据线将 iPhone 连接到安装了 Mac OS+Xcode 4.2(or later) 的 Mac 机上。iOS 7 以上需要搭配 Xcode 5.0(or later),抓包过程中必须保持连接。
然后,通过 iTunes->Summary 或者 Xcode->Organizer->Devices 获取 iPhone 的 UDID(identifier)。
接着,使用“rvictl -s”命令创建 RVI 接口,使用 iPhone 的 UDID 作为参数。
==================================================
$rvictl -s <UDID>
==================================================
创建成功后,在终端通过 ifconfig 命令可以看到多了一个 rvi0 接口。当有多个 iOS 设备连接 iMac 时,依次是 rvi1,rvi2…,使用“ rvictl -l ”命令可以列出所有挂接的虚拟接口。
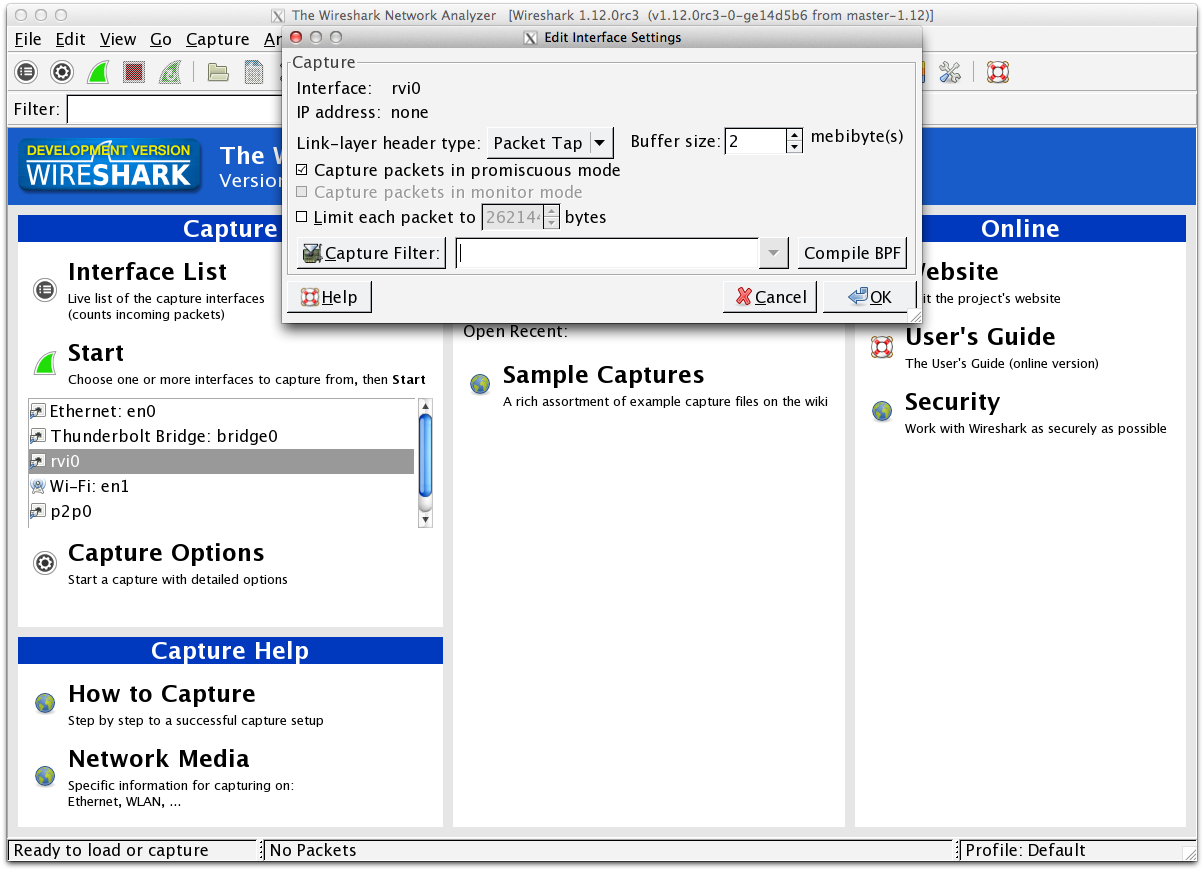
在 Wireshark 首页选择 rvi0,使用默认的 Capture Options 即可开始对 iPhone 进行抓包。
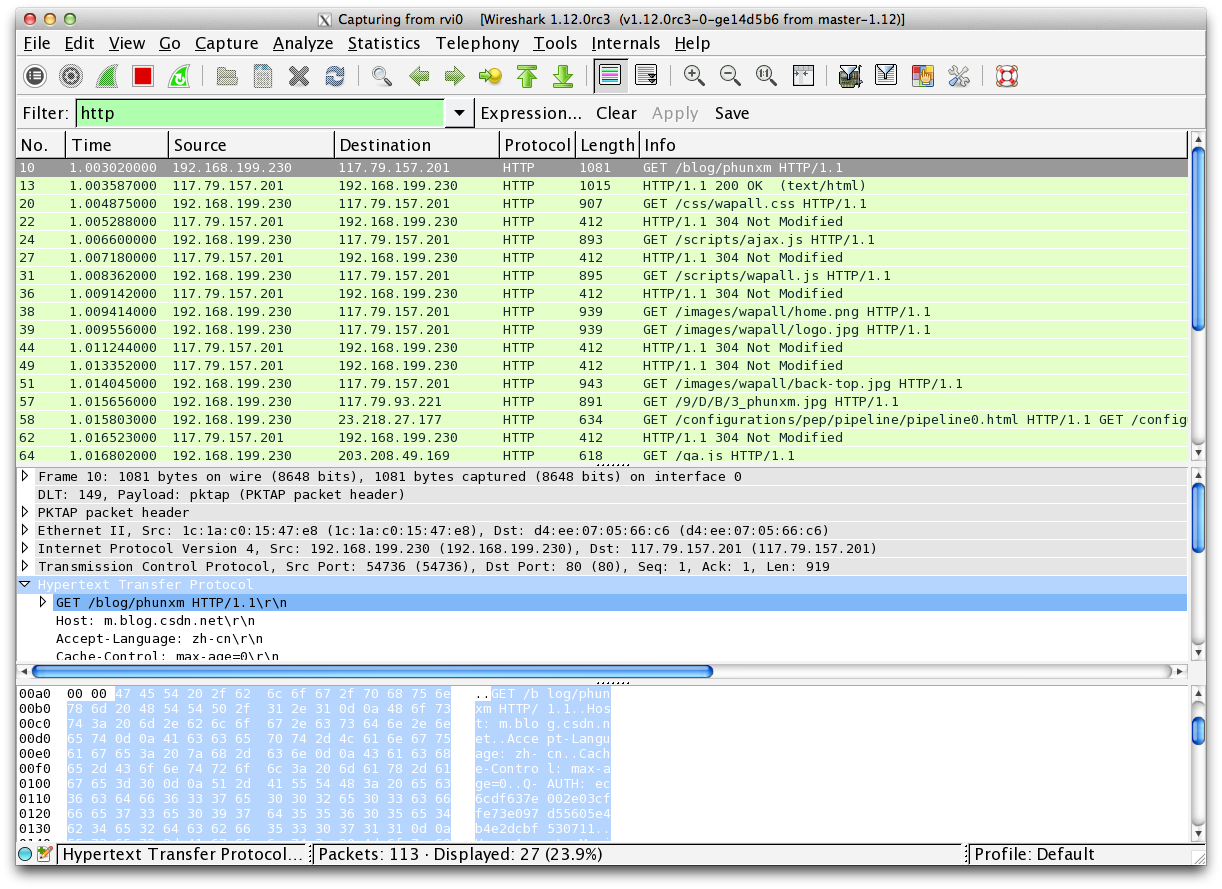
下图为抓取的 WiFi 数据包:
其中 iPhone 手机连接 WiFi 动态获取的 IP 地址为 192.168.199.230。
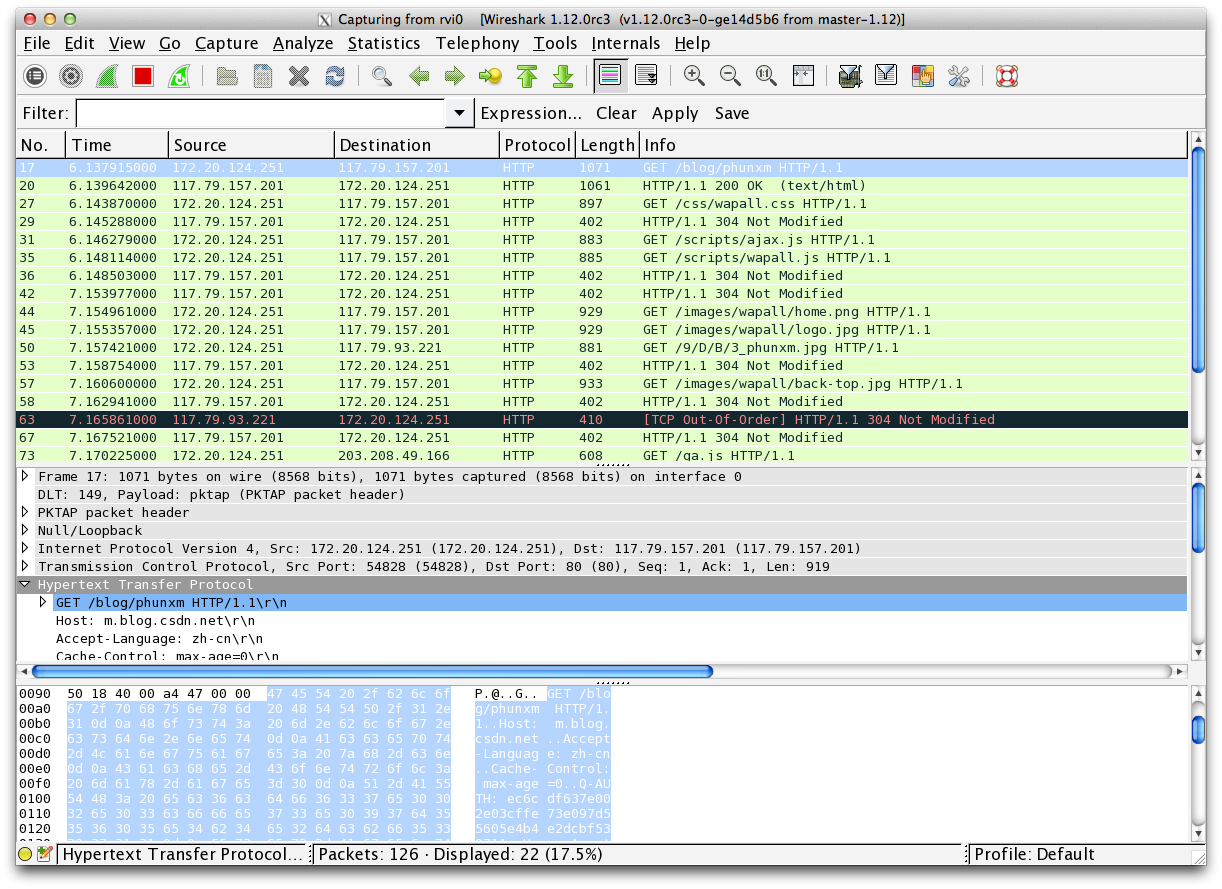
下图为抓取的 3G 数据包:
说明:联通 3G 上网动态分配的都是 172.20 网段(例如172.20.124.251)的这种B类私网地址(172.16.0.0~172.32.255.255)。手机百度中输入 IP,ip138 中显示 112.97.24.178 是深圳联通附近基站对外的公网网关IP地址。
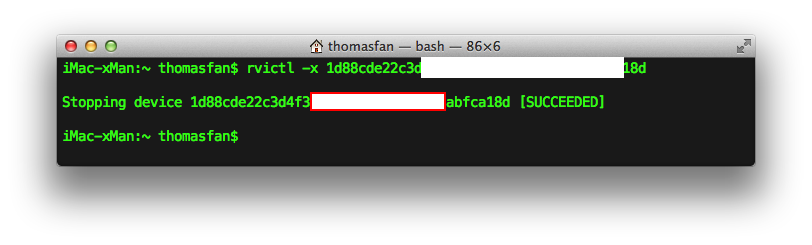
(3)使用“ rvictl -x ”命令删除虚拟接口
使用 rvictl -x 命令删除 RVI 接口,使用 iPhone 的 UDID 作为参数。
==================================================
$rvictl -x <UDID>
==================================================
7.关于监控模式(Monitor Mode)
(1)《Wireshark FAQ》:Q 10.1: How can I capture raw 802.11 frames, including non-data (management, beacon) frames?
NOTE: an interface running in monitor mode will, on most if not all platforms, not be able to act as a regular network interface; putting it into monitor mode will, in effect, take your machine off of whatever network it's on as long as the interface is in monitor mode, allowing it only to passively capture packets.
This means that you should disable name resolution when capturing in monitor mode; otherwise, when Wireshark (or TShark, or tcpdump) tries to display IP addresses as host names, it will probably block for a long time trying to resolve the name because it will not be able to communicate with any DNS or NISservers.
(2)《AirSnort FAQ》:Q 3: What is the difference betwen monitor and promiscuous mode?
Monitor mode enables a wireless NIC to capture packets without associating with an access point or ad-hoc network. This is desirable in that you can choose to "monitor" a specific channel, and you need never transmit any packets. In fact transmiting is sometimes not possible while in monitor mode (driver dependent). Another aspect of monitor mode is that the NIC does not care whether the CRC values are correct for packets captured in monitor mode, so some packets that you see may in fact be corrupted.
8.关于 Wireshark 的 BPF 权限问题
实际上,我在 OS X 10.9.4 上安装 XQuartz+Wireshark 非常顺利,没有出现什么诸如无法发现网卡(no interface available)的权限问题。
安装前执行“ ls -l /dev/bpf* ”,bpf0/bpf1/bpf2/bpf3 只有“rw-------”权限;安装完成时,再次执行“ ls -l /dev/bpf* ”,发现权限已经升级为了 “rw-rw----”,即 Wireshark 已经给当前安装使用 Wireshark 的 user(administrator)所在的 group 配置了 rw 权限。相当于执行过“sudo chmod g+rw /dev/bpf* ”,并且已经被配置到随机启动,下次开机不用重新执行该命令。
--------------------------------------------------------------------------------
/CapturePrivileges- you must have sufficient privileges to capture packets, e.g. special privileges allowing capturing as a normal user (preferred) or root / Administrator privileges.
In order to capture packets under BSD (including Mac OS X), you must have read access to the BPF devices in /dev/bpf*.
Enabling and using the "root" user in Mac OS X
Platform-Specific information about capture privileges。
Howto securely configure Mac OS X for network packet sniffing with Wireshark
--------------------------------------------------------------------------------
9.在越狱 iPhone 上指定网卡(WiFi/xG)抓包
上文主要讲解的是在不越狱正常权限情况下,通过 RVI 虚拟接口挂钩抓取 iPhone 数据包,一台 iPhone 通常只对应一个 RVI 虚拟接口。但是 iPhone 本身支持两种上网模式——WiFi/xG(类似PC工作站多网卡情形),当 xG 和 WiFi 同时活跃时(en0 为无线网卡,pdp_ip0 为 3G 网卡),iOS 将 WiFi 作为优先默认路由通道。
那么,当需要调试分析 xG/WiFi 切换或并存时的一些路由策略或临界流量问题时,如何抓取指定通道(WiFi/xG)的数据包呢?使用 RVI 通过包源 IP 可能可以区分,但是由于权限等问题,总是不那么方便。此时,通过越狱,在 iPhone 上安装远程登录工具包(OpenSSH)、网络诊断分析命令行工具 network-cmds (arp,ifconfig,ping,traceroute,netstat),然后在 WinPC 或 iMac 上通过SSH隧道发送tcpdump命令可指定WiFi/xG网卡进行抓包(SSH 远程控制 iPhone 运行 tcpdump 抓包),最后通过 Wireshark 对 pcap 文件进行分析或统计。
10.关于数据包的源/目的地址
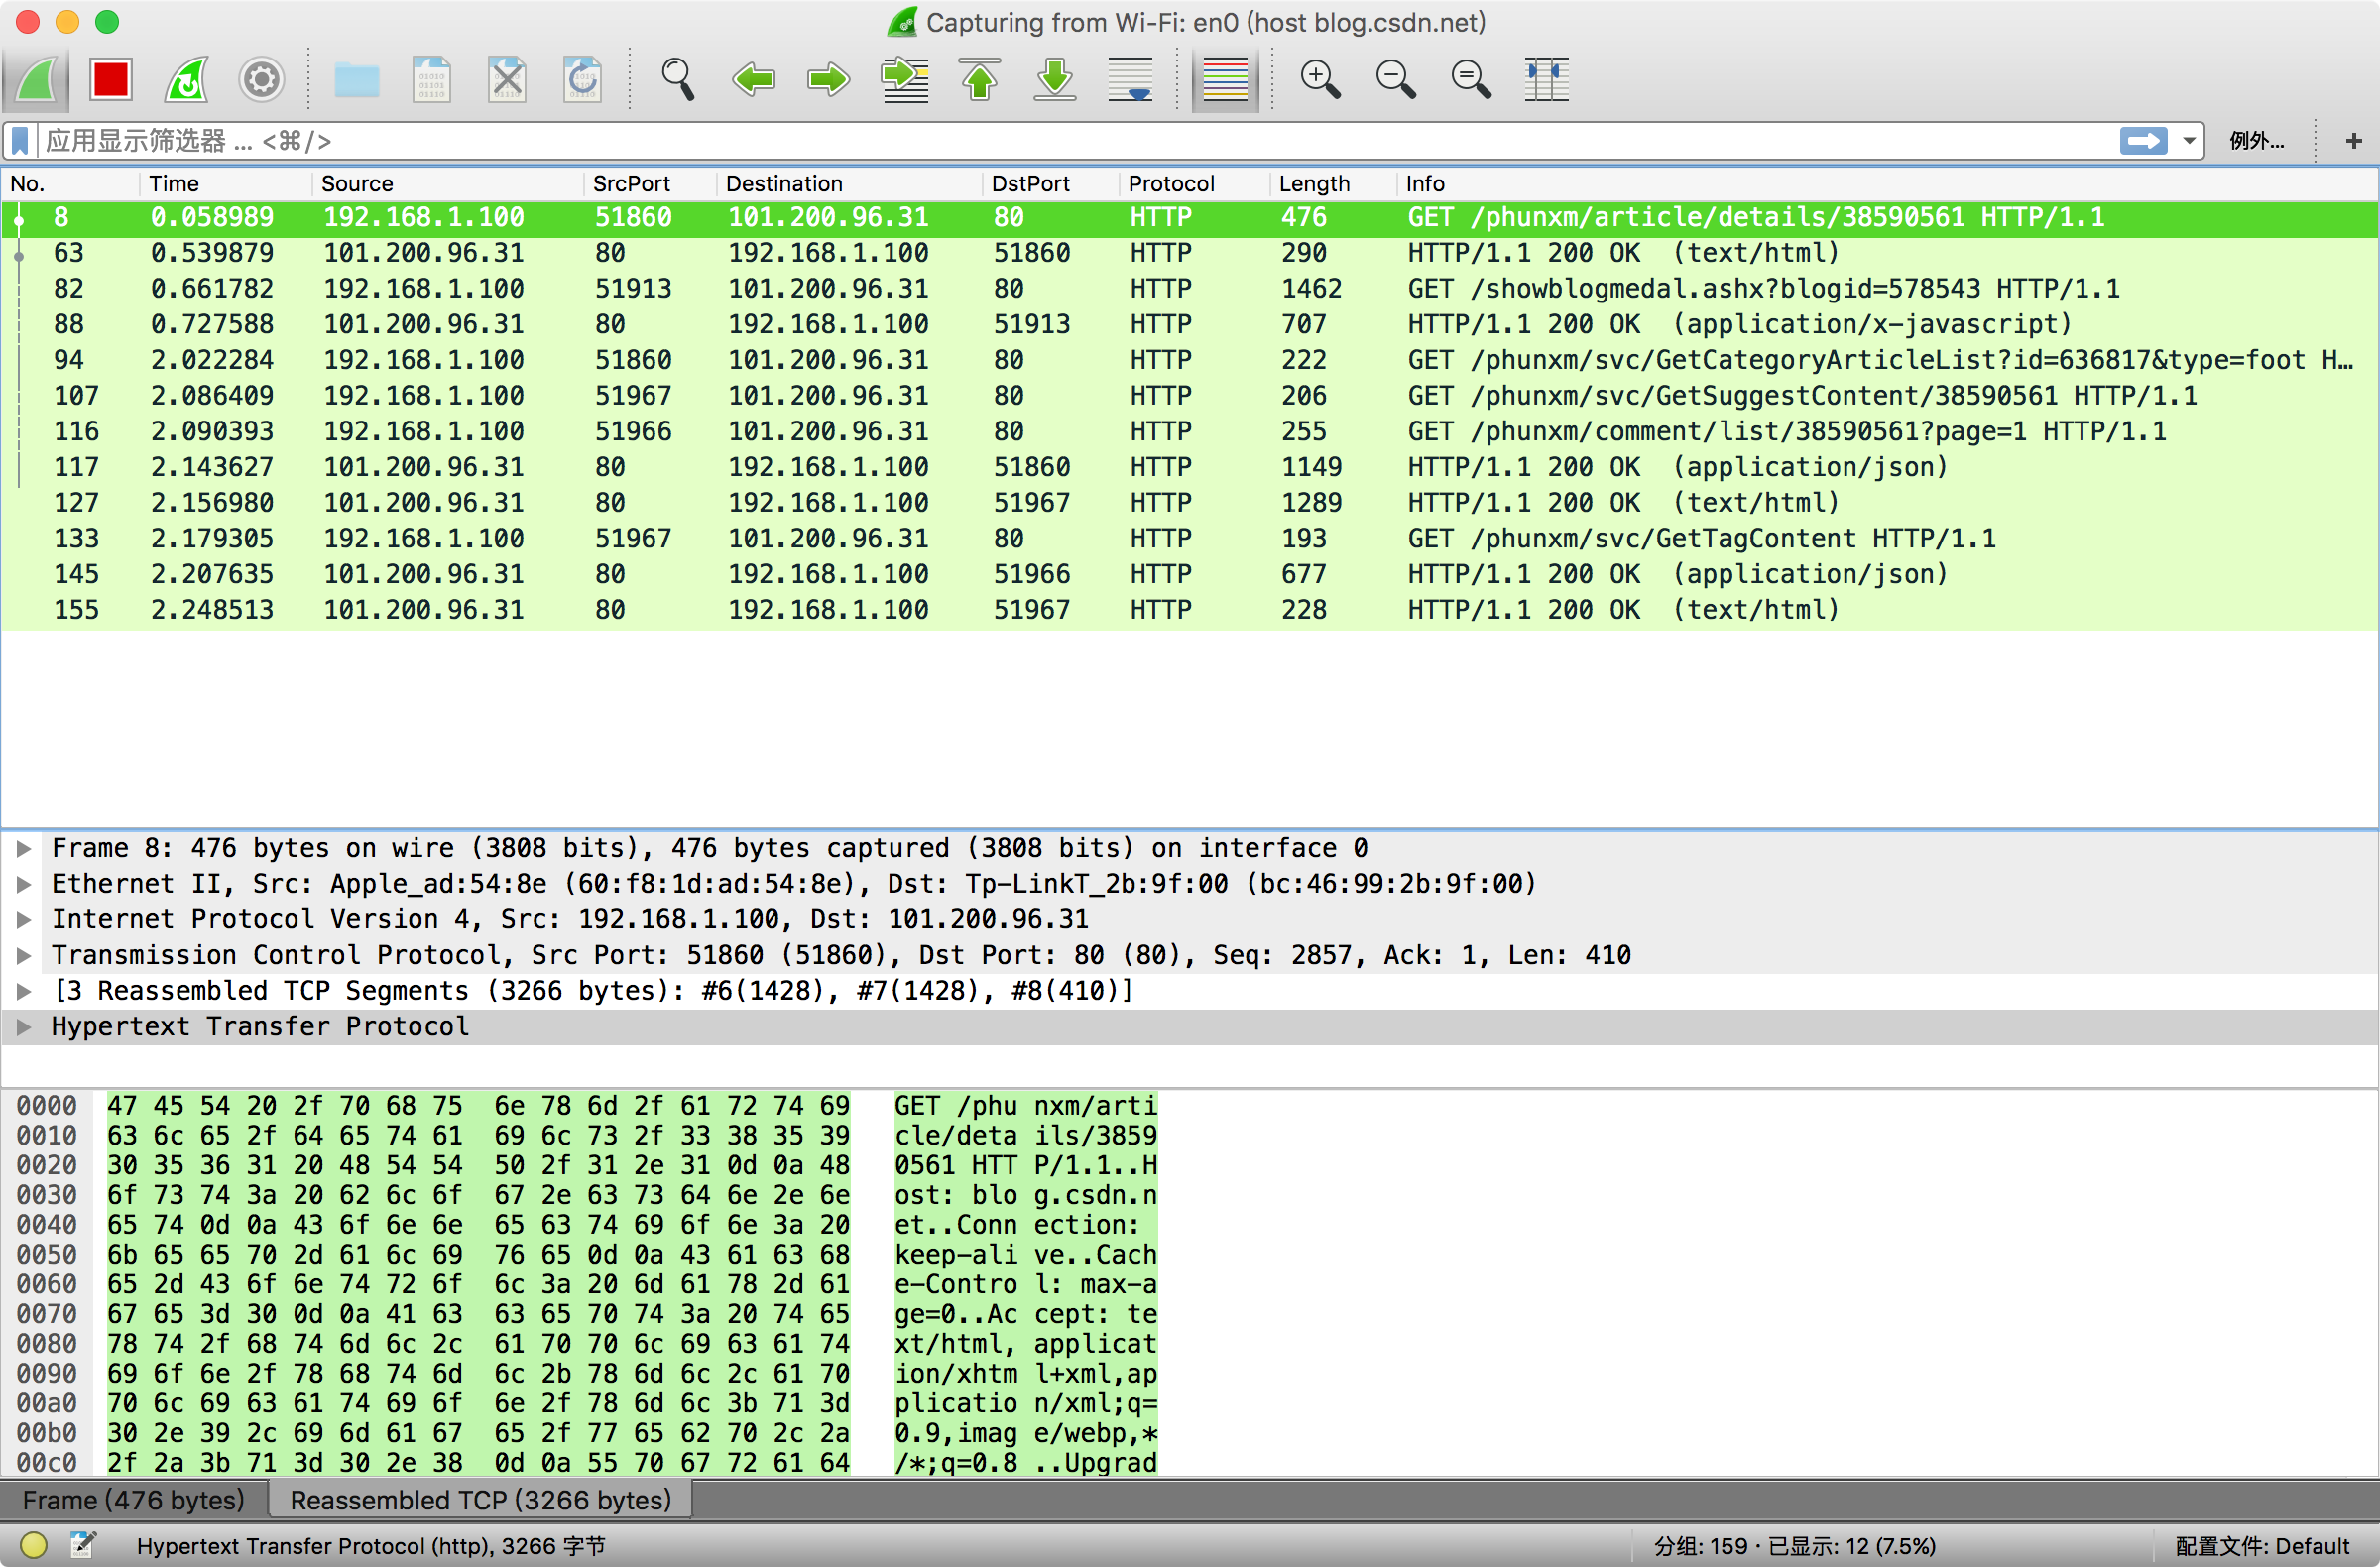
以第4节中 GET http://blog.csdn.net/phunxm 为例,仅做简单的分析。
###############################################################
No 148:发包 的源MAC/IP地址为本机 MAC/IP 地址。
(1)Destination Mac 为 00:00:0c:07:ac:24(CISCO All-HSRP-routers_24)
socket 编程通常在 IP 层以上进行,一般不关心 MAC 地址。我们的电脑也不可能与 CSDN 博客服务器直接相连,一般要经过很多中间节点(hops)。根据邻居协议,目的 MAC 地址为下一跳(next hop,[default] gateway/Router)的 MAC 地址。
通过 Network Utility 或“route -n get default”或“netstat -rn”命令可获得默认网关为 10.64.66.1。通过“arp -a”显示“? (10.64.66.1) at0:0:c:7:ac:24 on en1 ifscope [ethernet]”。(2)Destination IP 为 10.14.36.100
按道理,目的 IP 地址应该为 CSDN 博客服务器(blog.csdn.net)主机的 IP(117.79.157.201),为什么这里的却为 A 类私网地址(10.14.36.100)呢?这是因为内网使用了 HTTP Proxy,10.14.36.100 是 proxy.pac(参考:原理 、 脚本 、设置 、自动化)基于域名判断出口返回的 Proxy Server 的IP地址。
###############################################################
No 251: 收包(HTTP/1.1 200 OK)的目的 MAC/IP 地址为接收方(本机)的 MAC/IP 地址。
(1)源 IP 地址为 Proxy Server 的 IP 地址,同上。
(2)源 MAC 地址一般应为【默认】网关的 MAC 地址(进出都要过关),实际抓包却发现 MAC 地址并非【默认】网关的MAC地址,这是什么情况呢?
通过 Windows 的“route print”或 Mac OS X/UNIX 下的 “netstat -r”命令可查看路由表(Routing Tables)信息。通过 Windows 下的“tracert 10.14.36.100”或 Mac OS X/UNIX 下的“traceroute 10.14.36.100”命令可查看本机到代理 10.14.36.100 之间的路由信息,第一跳并非默认网关(10.64.66.1),而是10.64.66.2!
这是因为采用了热备路由(HSRP),HSRP 协议利用优先级决定哪个路由器成为活动路由器,收包的那个陌生源 MAC 地址即是热备路由(10.64.66.2)的 MAC 地址!
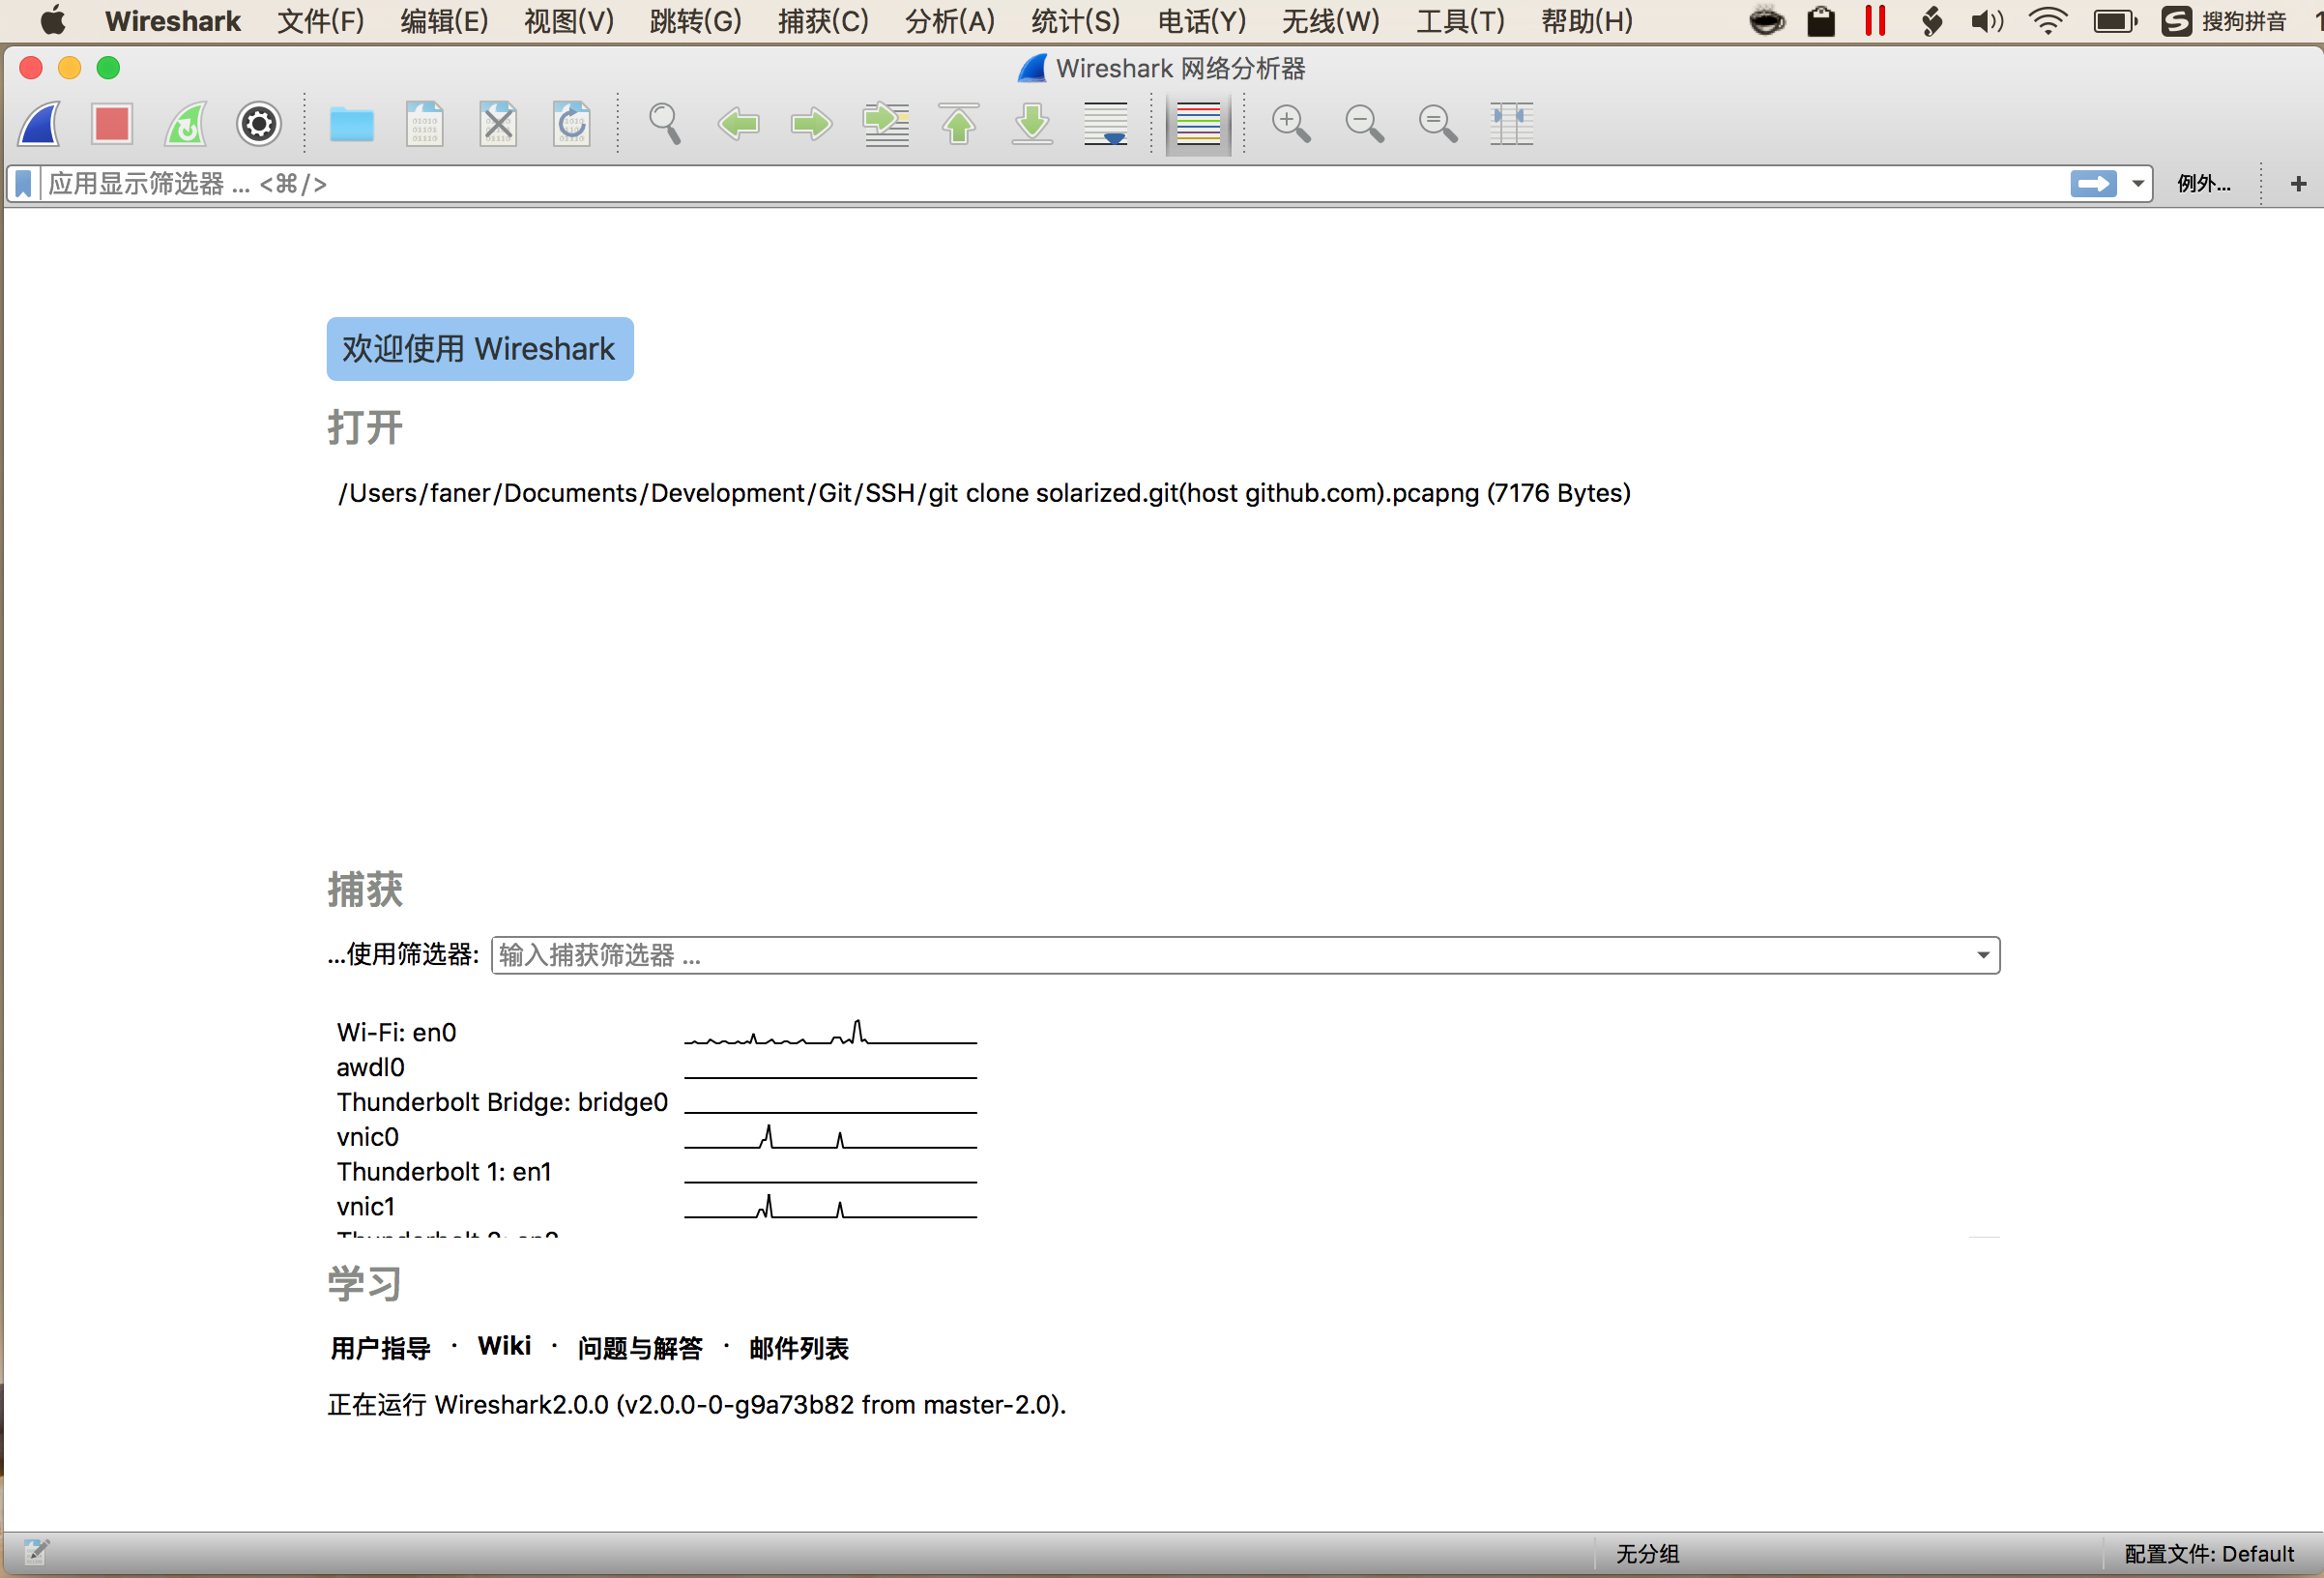
11.在 Mac OS X 上安装体验最新 Wireshark 2.0.0
升级到 XQuartz-2.7.8 后,貌似 Wireshark 出现了无法发现网卡的问题,索性卸载了之前通过 dmg with pkg 安装的 Wireshark 1.12.0,完整的卸载指令可参考 complete uninstall instructions。
Wireshark 官网 于 18 November,2015 发布了 Stable Release (2.0.0),可前往下载 OS X 10.6 and later Intel 64-bit .dmg 安装包进行安装体验。这次,我使用 brew-cask 来安装 wireshark 软件,完整的安装日志可参考《brew-cask install wireshark.log》。
鉴于 Mac OS X 在 Mountain Lion 之后已不再自带 X11,新版的 Wireshark 2.0.0 也摒弃了陈旧的 GTK+/X11 界面,取而代之的是与 Windows 版保持一致的 Qt 界面,简洁清爽。
“Wireshark’s Debian- and RPM-based package definitions provide the new interface in the “wireshark-qt” package and the old interface in the “wireshark-gtk” package.
The OS X installer only provides the new interface.”
—— Wireshark 2.0.0 Release Notes - What’s New
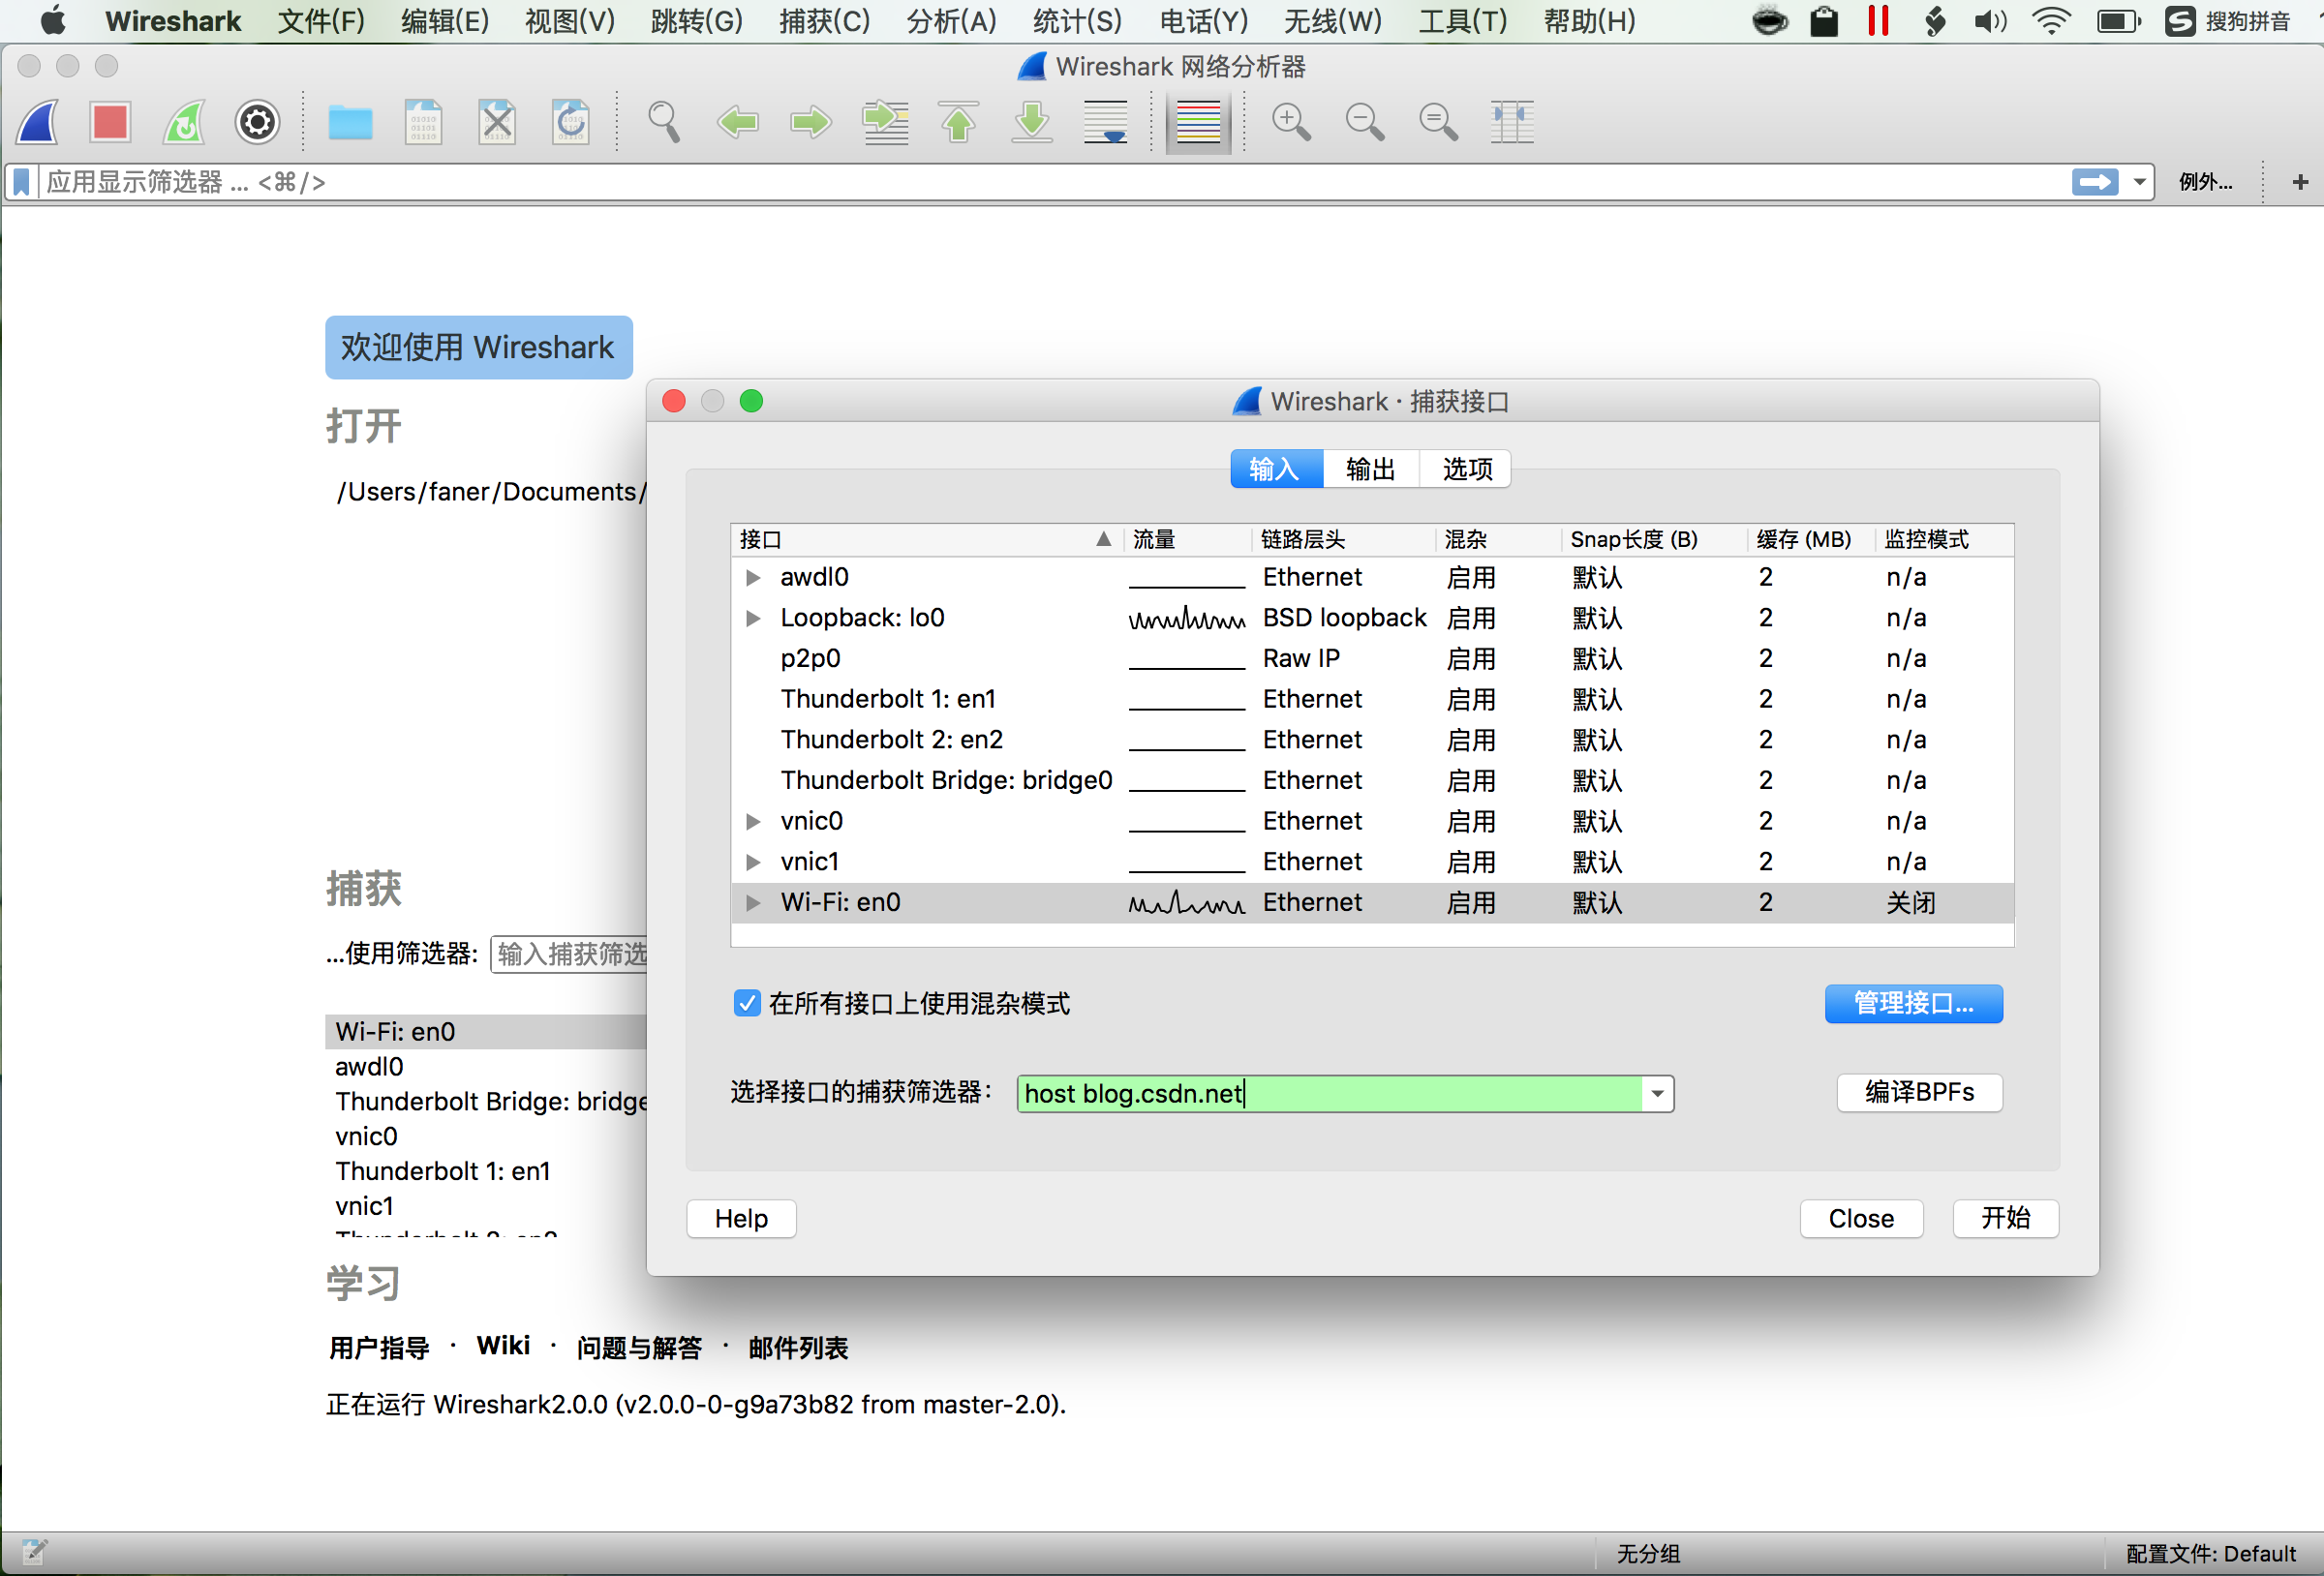
以下选取了启动界面和针对本文(Capture Filter 为 host blog.csdn.net,Display Filter 可选 http.host == blog.csdn.net)的通信抓包截图,以飨读者一睹为快。
参考:
《Getting a Packet Trace with Sniffing Tools under OS X》
《Wireshark capture under Mac OS X》
《Launching Wireshark 1.10.0 on Mac OS X Mountain Lion》
《Mac OS X Lion使用Wireshark远程抓包》
《iOS APP网络分析之RVI》《在iOS设备上使用RVI进行抓包》
《iOS联网在MAC机器上进行抓包》《使用数据线+RVI调试iPhone网络流量》
《升级iOS7后利用RVI和Wireshark抓包失效?》《Mavericks- cannot capture from iPhone using RVI》
《Wireshark抓包针对无线网卡的设置》《使用Wireshark抓取无线网卡的数据包》
《About Wireless Diagnostics》 《OSX Lion Wi-Fi Diagnostics》
《Mac OS安装Aircrack》《Aircrack 无线破解详细解说》《Aircrack-ng破解WEP、WPA-PSK加密利器》
《BT5 + Wireshark玩wifi捕获和中间人攻击》《BT5 aircrack-ng破解无线密码(wpa/wep)》
原文链接:http://blog.csdn.net/phunxm/article/details/38590561
投资自己,让自己升值!!!