版权声明:本文为博主原创文章,转载请附上博文链接 https://blog.csdn.net/weixin_40807247/article/details/89599186
复习
一.注解代替xml配置
准备工作:
4+2 + spring-aop包
xml中导入context约束
在xml中开启扫描包中类的注解
注解:
@Component(“BeanName”) 将对象注册到spring容器
|- @Controler
|- @Service
|- @Repository
	@Scope	指定对象的作用范围
		|- singleton
		|- prototype

	@Value 值类型属性注入

	@Autowired 自动属性注入.根据类型注入.
	@Qulifier 指定注入的对象的名称

	@Resource 指定对象的名称注入

	@PostConstruct 初始化方法
	@PreDestory    销毁方法
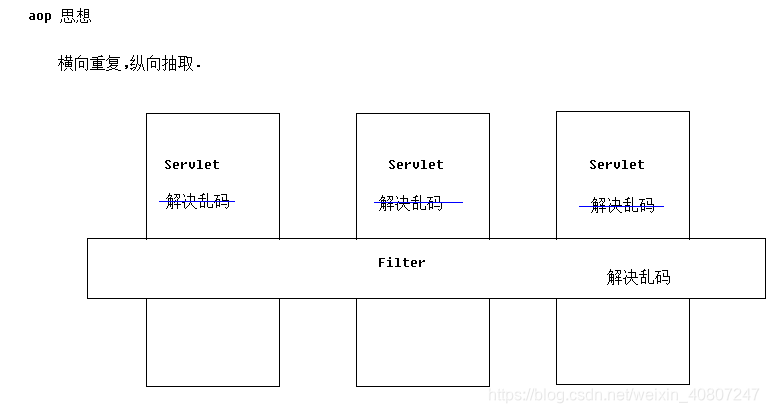
二.spring AOP开发
aop思想: 纵向重复,横向抽取.
|- filter中
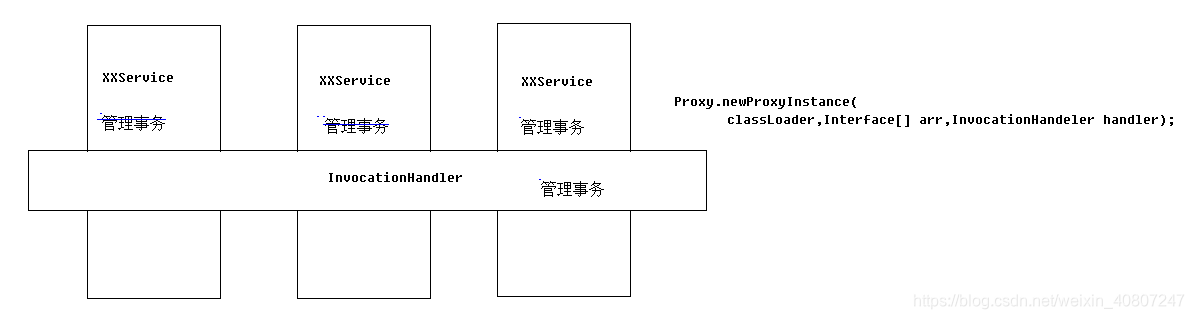
|- 动态代理
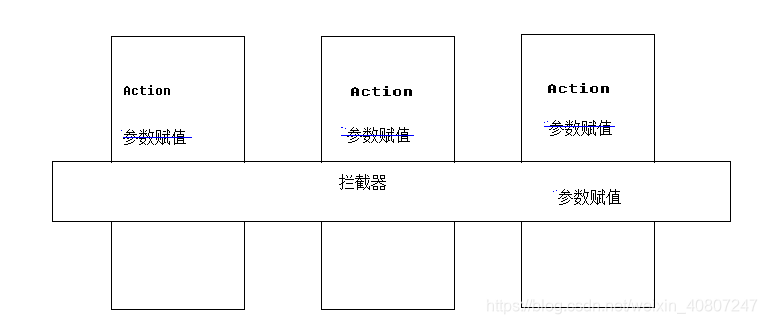
|- interceptor中
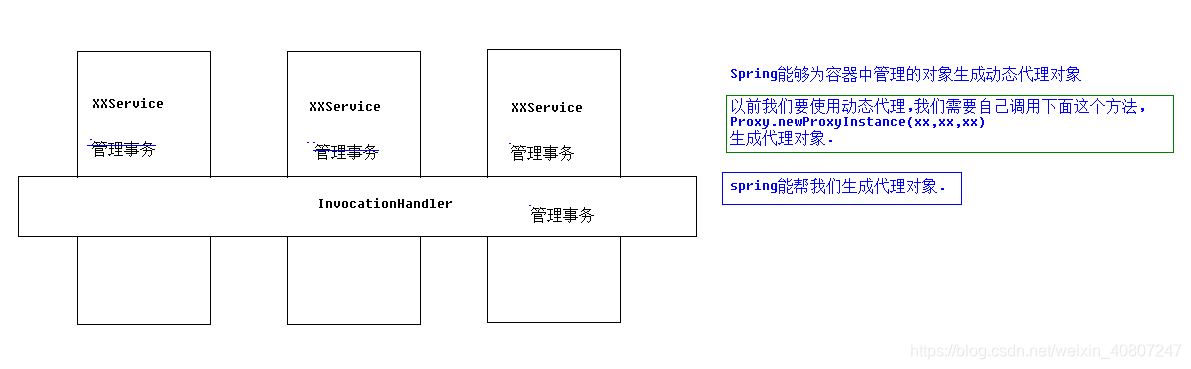
spring AOP: 封装了动态代理技术.来体现aop.
springaop实现: 可以对所有对象进行代理
|- 动态代理 代理需要实现接口.
|- cglib代理 对目标对象继承代理.
springaop名词:
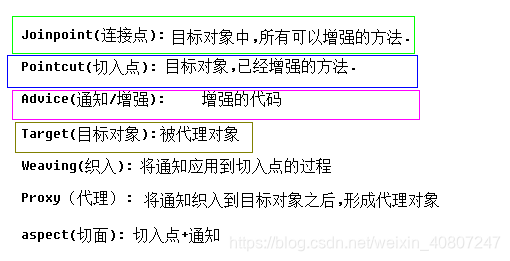
join point: 连接点.所有可以织入通知的方法.
point cut : 切入点.需要|已经织入通知的方法.
advice: 需要增强的代码.
weaving: 动词.将通知应用的切点的过程.
target: 目标对象.
proxy: 代理对象
aspect: 切面. 切入点+通知
步骤:
1.导包
4+2
2 aop+aspect
2 aop联盟+weaving
2.准备目标对象
3.准备通知类
前置通知
后置通知 方法正常结束
环绕通知
异常拦截通知
后置通知 无论如何都执行
4.配置文件中配置,导入aop约束
1>目标对象
2>通知对象
3><aop:config>
<aop:ponint-cut id="切点名称" expression="execution(切点表达式)" />
<aop:aspect ref="通知对象名称" >
<aop:before method="" ponintcut-ref="" />
<aop:after-returning method="" ponintcut-ref="" />
<aop:around method="" ponintcut-ref="" />
<aop:after-throwing method="" ponintcut-ref="" />
<aop:after method="" ponintcut-ref="" />
</aop:aspect>
扩展:使用注解完成aop
1.导包
4+2
2 aop+aspect
2 aop联盟+weaving
2.准备目标对象
3.准备通知类
4.配置文件中配置,导入aop约束
1>目标对象
2>通知对象
3><aop:aspect-autoproxy> 开启注解aop
5.注解
@Aspect 指定当前类是通知类
@Before 前置通知方法
@after-returning 后置通知方法
@around 环绕通知方法
@after-throwing 异常拦截通知方法
@after 后通知方法
@PointCut 抽取切点表达式
一、使用注解配置spring
1.步骤
1.1 导包4+2+spring-aop
4代表:
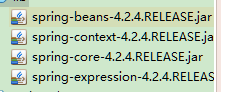
2代表:
日志包:com.springsource.org.apache.commons.logging-1.1.1.jar
可选:com.springsource.org.apache.log4j-1.2.15.jar(老版本要导入的,导入可以保证一定能运行)
1.2 为主配置文件引入新的命名空间(约束)
1.3 开启使用注解代替配置文件
<?xml version="1.0" encoding="UTF-8"?>
<beans xmlns="http://www.springframework.org/schema/beans"
       xmlns:xsi="http://www.w3.org/2001/XMLSchema-instance"
       xmlns:contet="http://www.springframework.org/schema/context"
       xsi:schemaLocation="http://www.springframework.org/schema/beans http://www.springframework.org/schema/beans/spring-beans.xsd http://www.springframework.org/schema/context http://www.springframework.org/schema/context/spring-context.xsd">

    <!--2.开启使用注解代理配置文件-->
    <!--指定扫描com.kankan.bean包下所有类中的注解
    注意:扫描包时,会扫描指定包下的所有子孙包-->
    <contet:component-scan base-package="com.kankan.bean"></contet:component-scan>
</beans>
1.4 在类中使用注解完成配置
package com.kankan.bean;

import org.springframework.stereotype.Controller;
import org.springframework.stereotype.Repository;
import org.springframework.stereotype.Component;
import org.springframework.stereotype.Service;

/*3.在类中使用注解完成配置*/
/*<bean name="user" class="cn.itcast.bean.User"  />*/
//@Component("user")
//@Service("user")// service层
@Controller("user")// web层
//@Repository("user")// dao层
public class User {
    private String name;
    private Integer age;
    private Car car;

    public User() {
        System.out.println("User对象空参构造函数");
    }

    public User(Integer name, Car car) {
        System.out.println("User(Integer name, Car car)");
        this.name = name + "";
        this.car = car;
    }

    public User(Car car, String name) {
        System.out.println("User(Car car,String name)");
        this.name = name;
        this.car = car;
    }

    public void setName(String name) {
        this.name = name;
    }

    public void setAge(Integer age) {
        this.age = age;
    }

    public String getName() {
        return name;
    }

    public Integer getAge() {
        return age;
    }

    public void init(){
        System.out.println("我是初始化方法");
    }
    public void destroy(){
        System.out.println("我是销毁方法");
    }

    public Car getCar() {
        return car;
    }

    public void setCar(Car car) {
        this.car = car;
    }

    @Override
    public String toString() {
        return "User{" +
                "name='" + name + '\'' +
                ", age=" + age +
                ", car=" + car +
                '}';
    }
}
2.将对象注册到容器
测试是否注入成功
package com.kankan.bean;
import org.junit.Test;
import org.springframework.context.ApplicationContext;
import org.springframework.context.support.ClassPathXmlApplicationContext;
import org.springframework.test.context.TestExecutionListeners;
/**
* @author kankan
* @creater 2019-04-27 11:02
*/
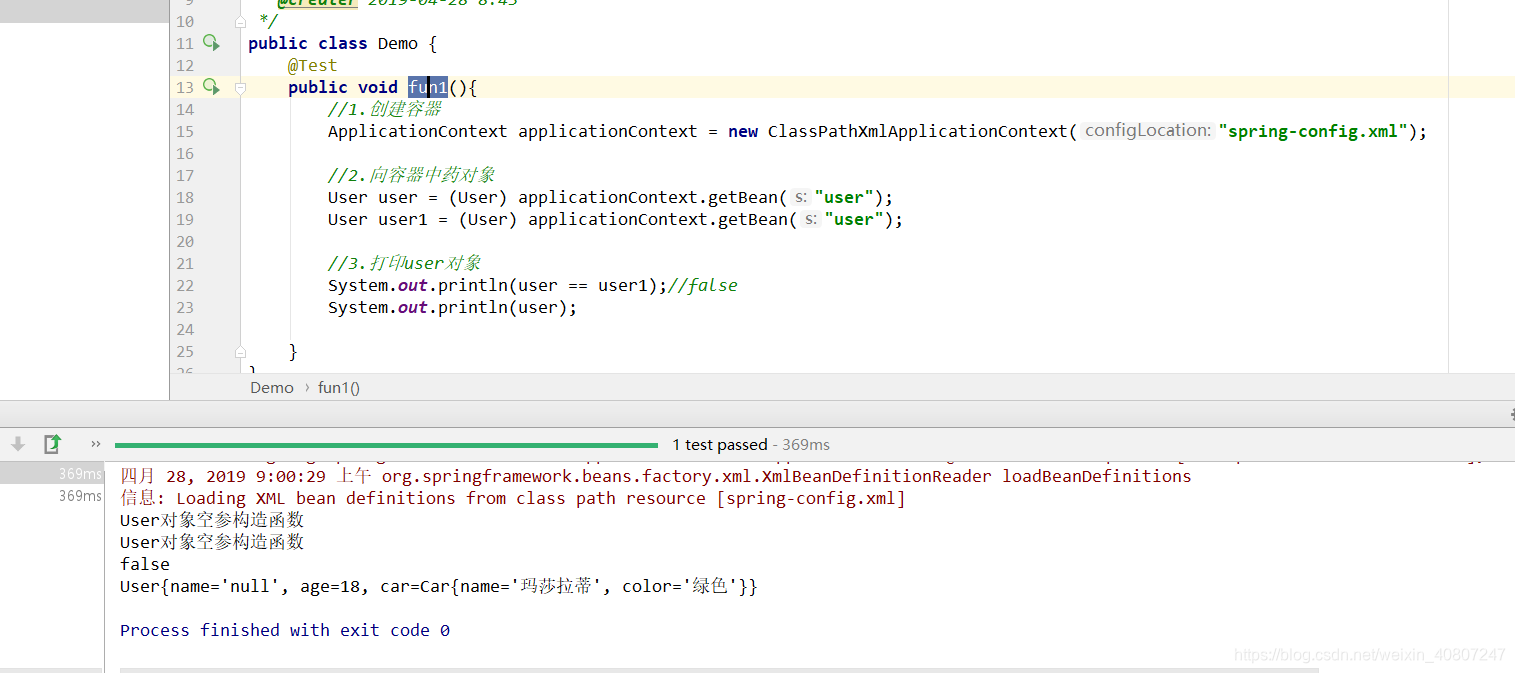
public class Demo {
@Test
public void fun1(){
//1.创建容器
ApplicationContext applicationContext = new ClassPathXmlApplicationContext("applicationContext.xml");
//2.向容器中药对象
User user = (User) applicationContext.getBean("user");
//3.打印user对象
System.out.println(user);
}
}
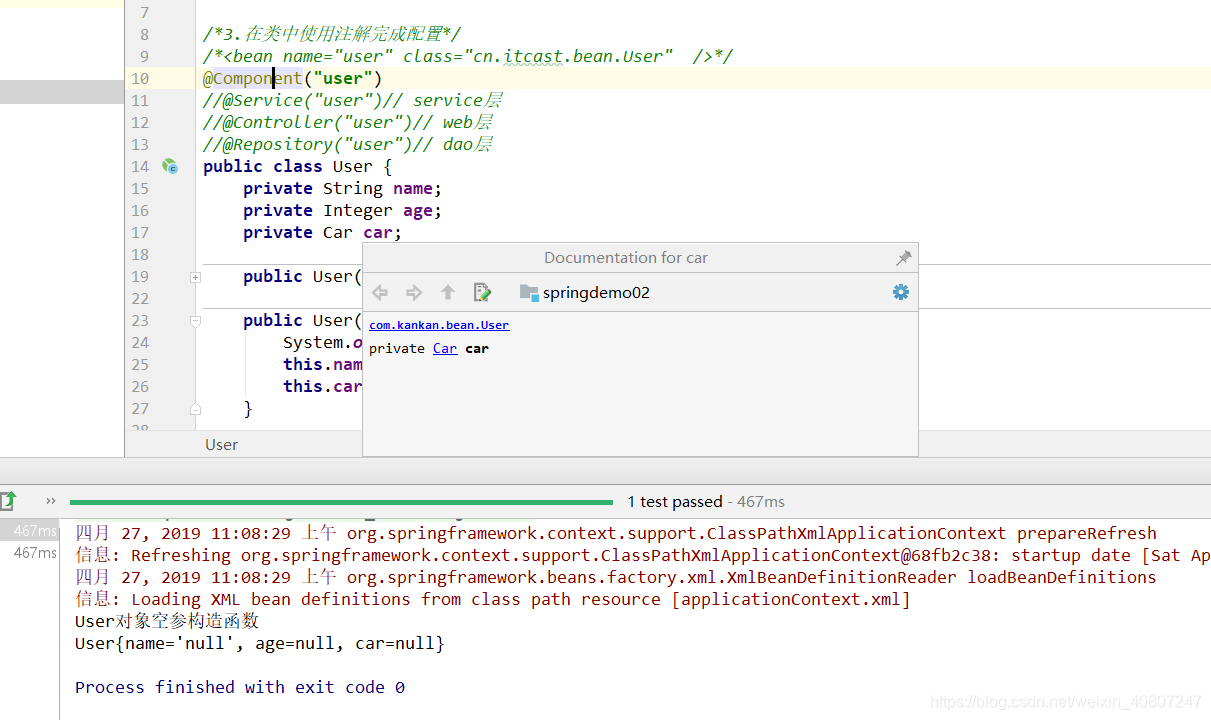
引用类型注入
package com.kankan.bean;

import org.springframework.beans.factory.annotation.Value;
import org.springframework.stereotype.Component;

/**
 * @author kankan
 * @creater 2019-04-28 8:44
 */
@Component("car")
public class Car {

    private String name;

    private String color;

    public String getName() {
        return name;
    }
    @Value("玛莎拉蒂")
    //set,推荐使用
    public void setName(String name) {
        this.name = name;
    }

    public String getColor() {
        return color;
    }
    @Value("绿色")
    public void setColor(String color) {
        this.color = color;
    }

    @Override
    public String toString() {
        return "Car{" +
                "name='" + name + '\'' +
                ", color='" + color + '\'' +
                '}';
    }
}
package com.kankan.bean;

import org.springframework.beans.factory.annotation.Value;
import org.springframework.stereotype.Component;

/**
 * @author kankan
 * @creater 2019-04-28 8:44
 */
@Component("car")
public class Car {
    @Value("玛莎拉蒂")
    private String name;
    @Value("绿色")
    private String color;

    public String getName() {
        return name;
    }
    //set,推荐使用
    public void setName(String name) {
        this.name = name;
    }

    public String getColor() {
        return color;
    }

    public void setColor(String color) {
        this.color = color;
    }

    @Override
    public String toString() {
        return "Car{" +
                "name='" + name + '\'' +
                ", color='" + color + '\'' +
                '}';
    }
}
<?xml version="1.0" encoding="UTF-8"?>
<beans xmlns="http://www.springframework.org/schema/beans"
       xmlns:xsi="http://www.w3.org/2001/XMLSchema-instance"
       xmlns:contet="http://www.springframework.org/schema/context"
       xsi:schemaLocation="http://www.springframework.org/schema/beans http://www.springframework.org/schema/beans/spring-beans.xsd http://www.springframework.org/schema/context http://www.springframework.org/schema/context/spring-context.xsd">

    <!--2.开启使用注解代理配置文件-->
    <!--指定扫描com.kankan.bean包下所有类中的注解
    注意:扫描包时,会扫描指定包下的所有子孙包-->
    <contet:component-scan base-package="com.kankan.bean"></contet:component-scan>

</beans>
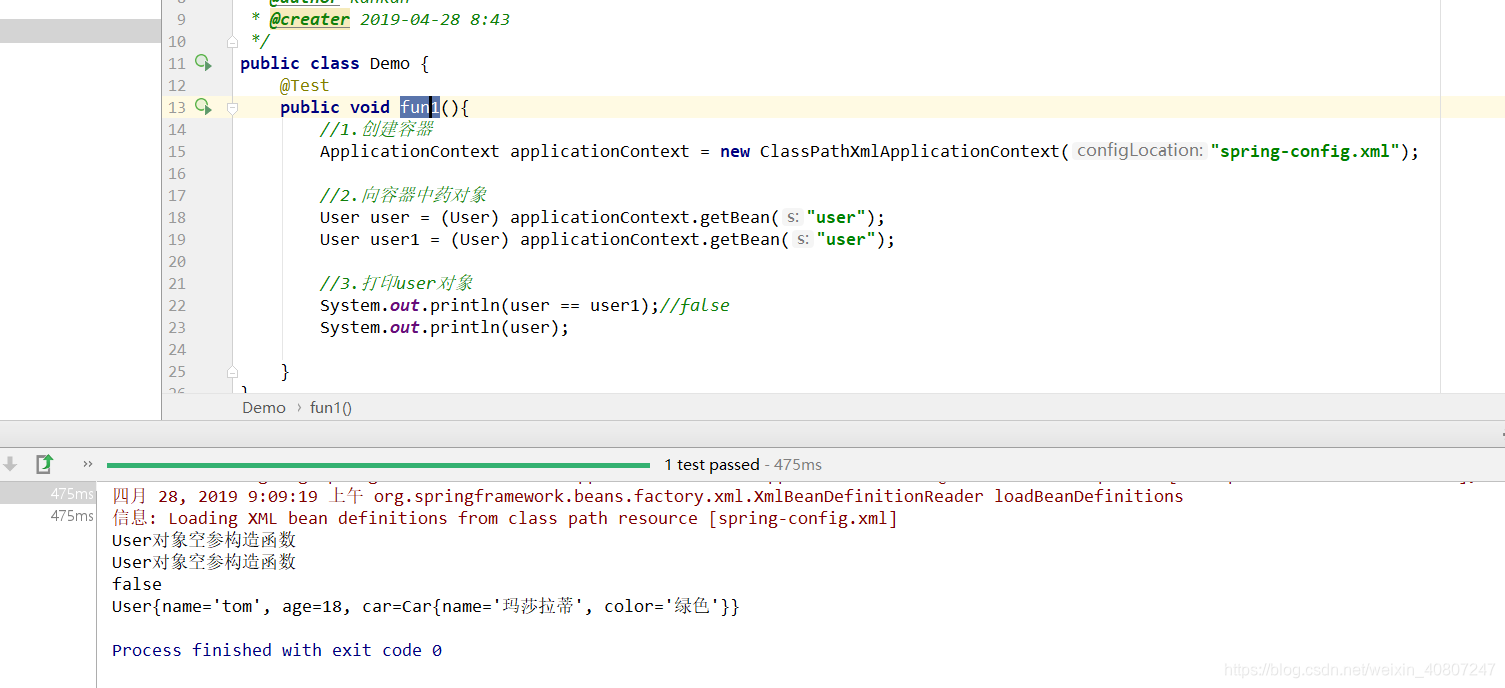
第二种对象注入


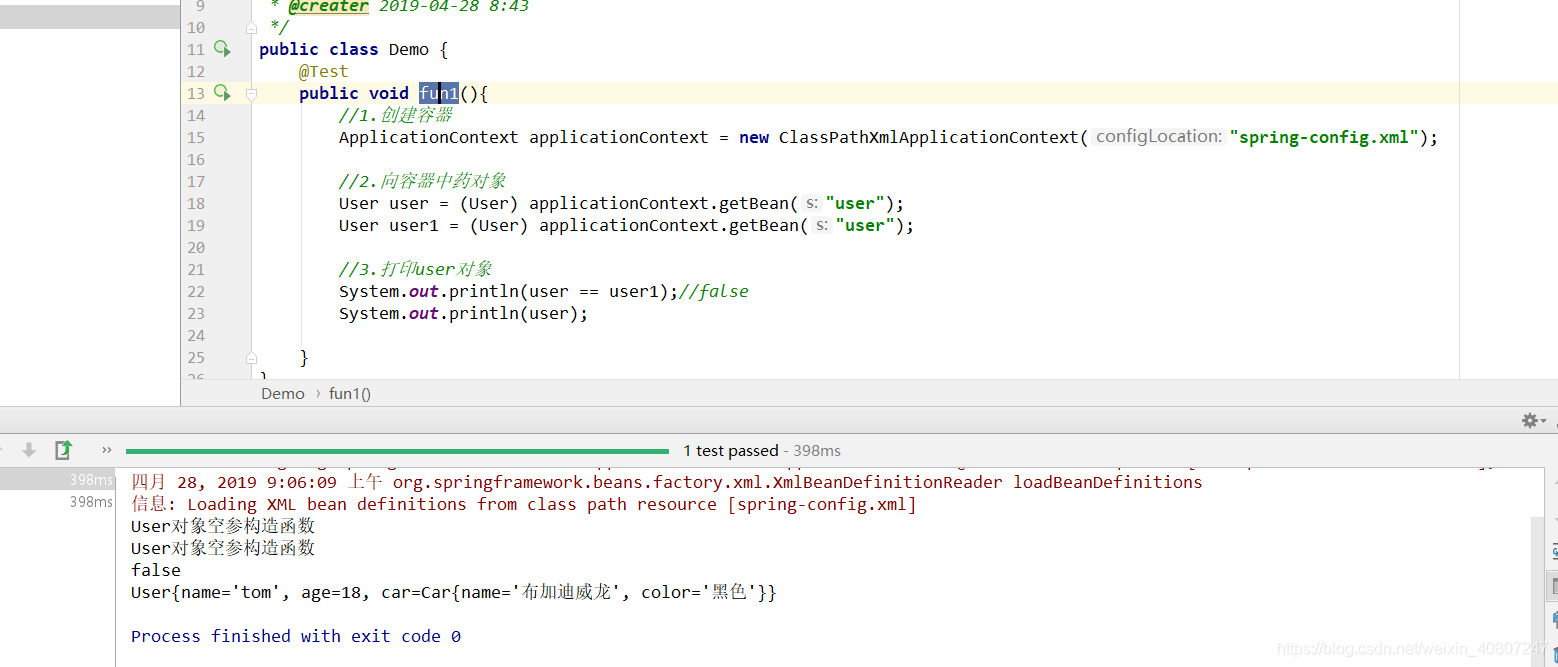
第三种对象注入

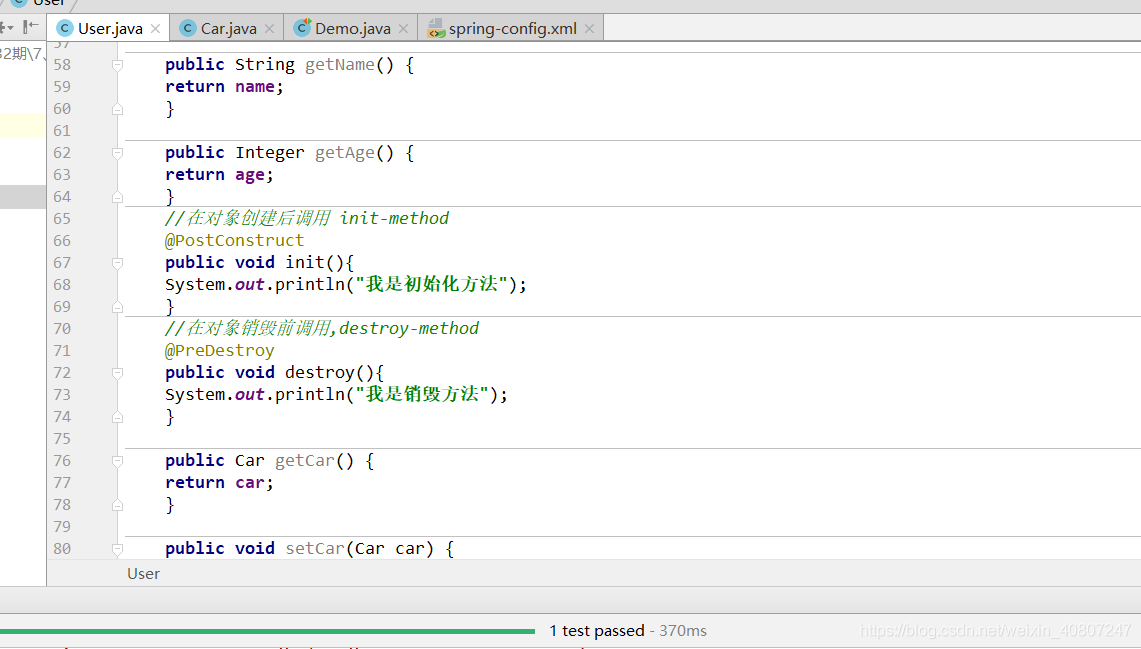
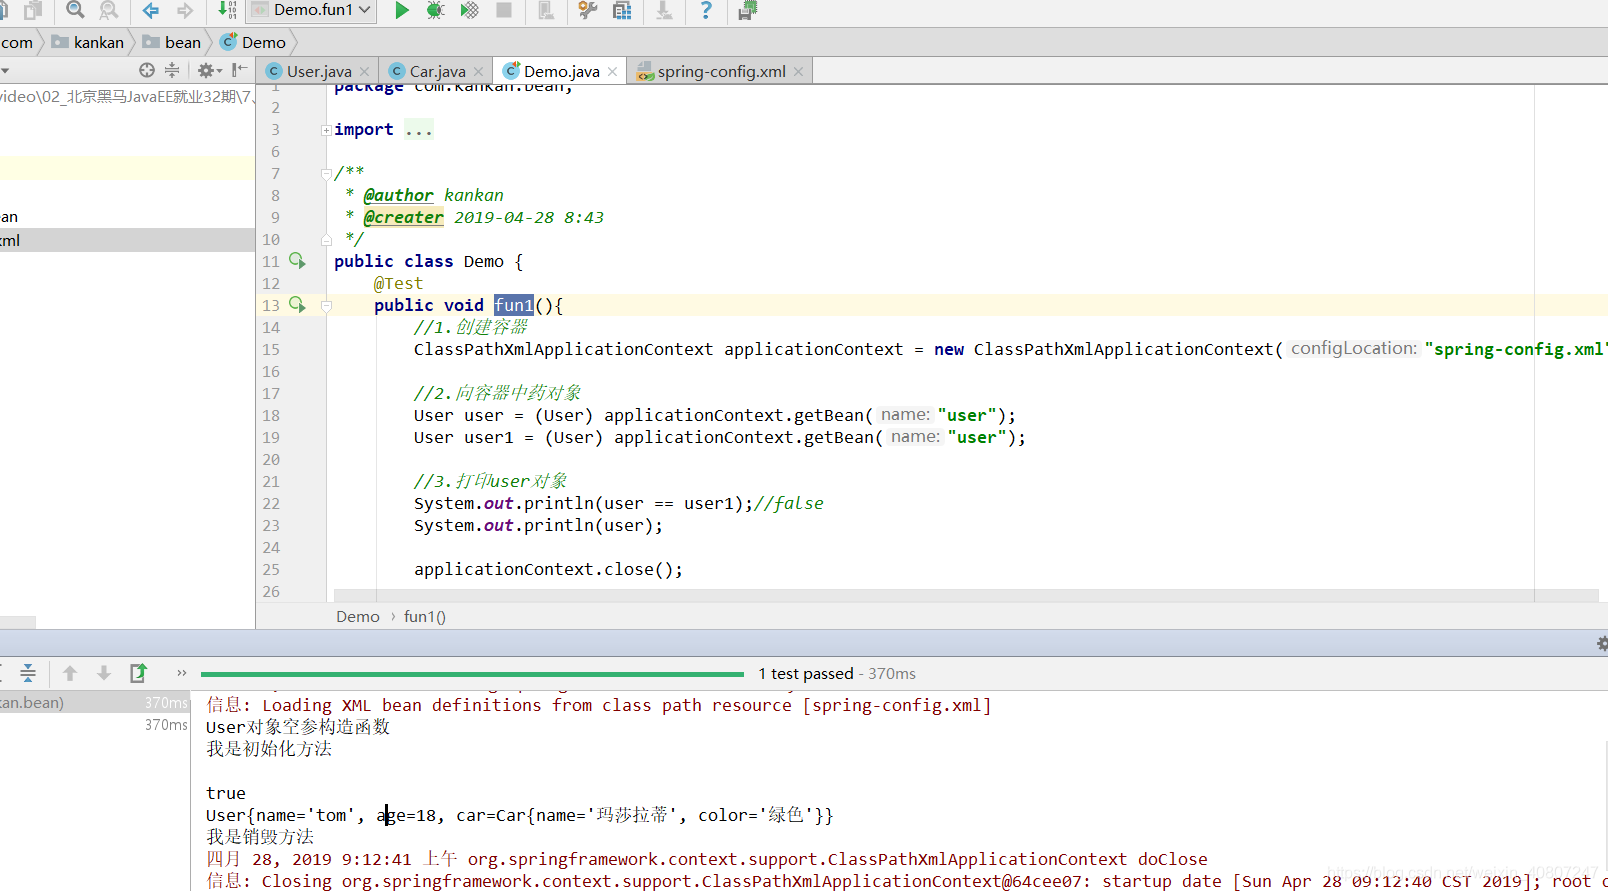
初始化|销毁方法
二、STS插件 IEDA里貌似自带有了
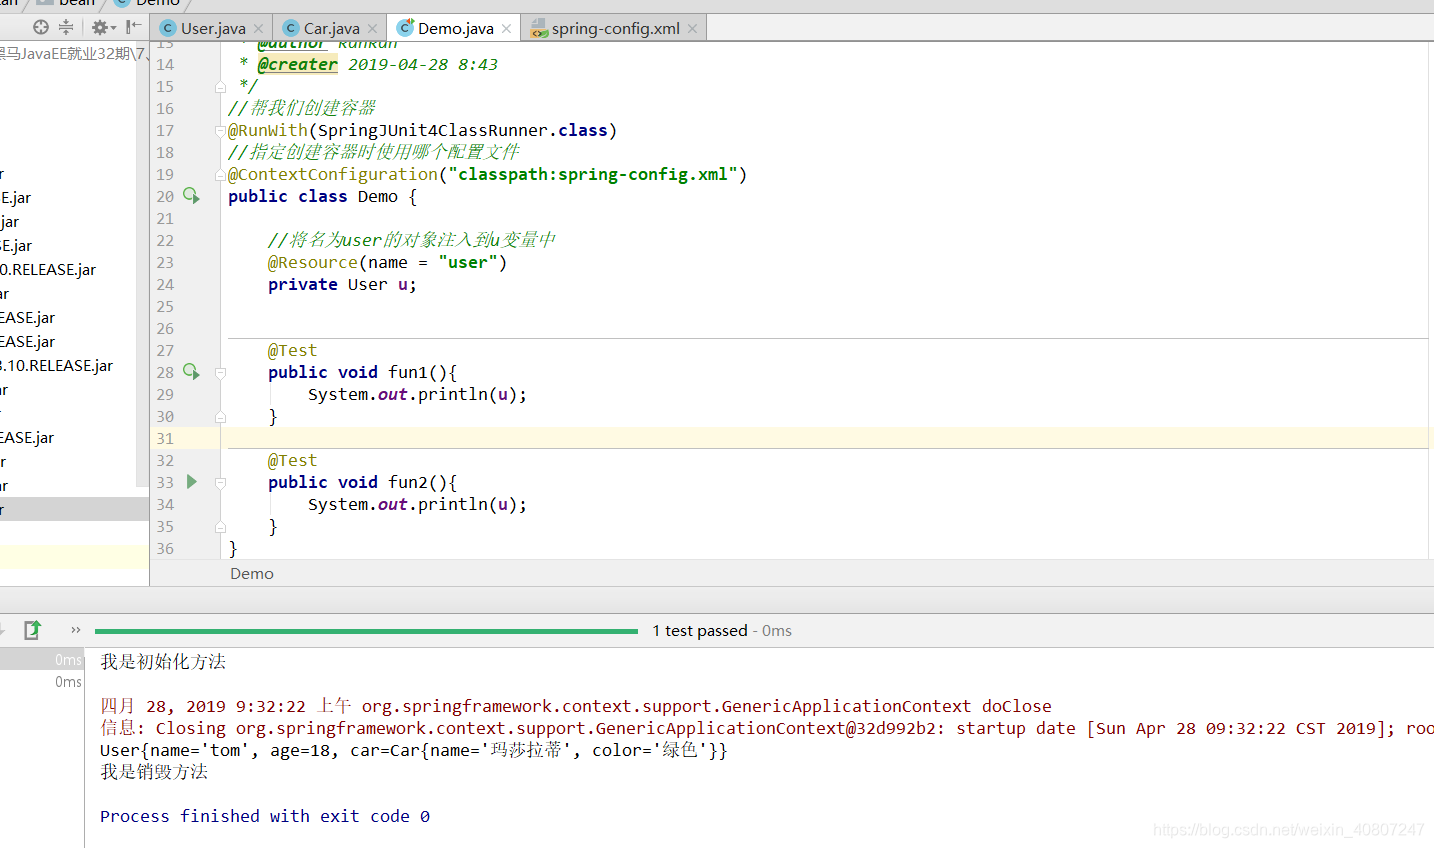
三、spring与junit整合测试
1.导包4+2+aop+test
2.配置注解
//帮我们创建容器
@RunWith(SpringJUnit4ClassRunner.class)
//指定创建容器时使用哪个配置文件
@ContextConfiguration("classpath:spring-config.xml")
public class Demo {

    //将名为user的对象注入到u变量中
    @Resource(name = "user")
    private User u;
3.测试
四、spring中的aop
1.aop思想介绍
2.spring中的aop概念
3.spring实现aop的原理
3.1 动态代理(优先)
被代理对象必须要实现接口,才能产生代理对象.如果没有接口将不能使用动态代理技术
3.2 cglib代理(没有接口)
第三方代理技术,cglib代理.可以对任何类生成代理.代理的原理是对目标对象进行继承代理. 如果目标对象被final修饰.那么该类无法被cglib代理.
4.aop名词学习
五、spring中的aop演示
1.步骤(xml配置)
1.1 导包4+2
spring的aop包:
spring-aspects-4.2.4.RELEASE.jar
spring-aop-4.2.4.RELEASE.jar
spring需要第三方aop包:
com.springsource.org.aopalliance-1.0.0.jar
com.springsource.org.aspectj.weaver-1.6.8.RELEASE.jar
1.2 准备目标对象
package com.kankan.service;

/**
 * @author kankan
 * @creater 2019-04-28 10:00
 */
public class UserServiceImpl implements UserService {

    @Override
    public void save() {
        System.out.println("save");
        int i = 1/0;
    }

    @Override
    public void delete() {
        System.out.println("delete");
    }

    @Override
    public void update() {
        System.out.println("update");
    }

    @Override
    public void find() {
        System.out.println("find");
    }
}
1.3 准备通知
package com.kankan.aspect;

import org.aspectj.lang.ProceedingJoinPoint;
import org.springframework.aop.aspectj.MethodInvocationProceedingJoinPoint;

public class MyAdvice {
    //前置通知
    //   |-目标方法运行之前调用
    //后置通知(如果出现异常不会调用)
    //   |-在目标方法运行之后调用
    //环绕通知
    //   |-在目标方法之前和之后都调用
    //异常拦截通知
    //   |-如果出现异常,就会调用
    //后置通知(无论是否出现 异常都会调用)
    //   |-在目标方法运行之后调用
    //----------------------------------------------------------------
    //前置通知
    public void before(){
        System.out.println("这是前置通知");
    }
    //后置通知(如果出现异常不会调用)
    public void afterReturning(){
        System.out.println("这是后置通知(如果出现异常不会调用)");
    }
    //环绕通知
    public Object around(ProceedingJoinPoint pjp) throws Throwable {
        System.out.println("这是环绕通知之前的部分!!");
        Object proceed = pjp.proceed();//调用目标方法
        System.out.println("这是环绕通知之后的部分!!");
        return proceed;
    }
    //异常通知
    public void afterException(){
        System.out.println("出事啦,发生异常");
    }
    //后置通知
    public void after(){
        System.out.println("这是后置通知(出现异常也会调用)!!");
    }
}
1.4 配置进行织入,将通知织入目标对象中
<?xml version="1.0" encoding="UTF-8"?>
<beans xmlns="http://www.springframework.org/schema/beans"
       xmlns:xsi="http://www.w3.org/2001/XMLSchema-instance" xmlns:aop="http://www.springframework.org/schema/aop"
       xsi:schemaLocation="http://www.springframework.org/schema/beans http://www.springframework.org/schema/beans/spring-beans.xsd http://www.springframework.org/schema/aop http://www.springframework.org/schema/aop/spring-aop.xsd">

    <!-- 准备工作: 导入aop(约束)命名空间 -->
    <!-- 1.配置目标对象 -->
    <bean name="userService" class="com.kankan.service.UserServiceImpl" ></bean>
    <!-- 2.配置通知对象 -->
    <bean name="myAdvice" class="com.kankan.aspect.MyAdvice" ></bean>
    <!-- 3.配置将通知织入目标对象 -->
    <aop:config>
        <!--配置切入点
            public void com.kankan.service.UserServiceImpl.save()
            void com.kankan.service.UserServiceImpl.save()
            * com.kankan.service.UserServiceImpl.save()
            * com.kankan.service.UserServiceImpl.*()

            * com.kankan.service.*ServiceImpl.*(..)
            * com.kankan.service..*ServiceImpl.*(..)
        -->
        <aop:pointcut id="pc" expression="execution(* com.kankan.service.*ServiceImpl.*(..))"/>
        <aop:aspect ref="myAdvice">
            <!-- 指定名为before方法作为前置通知 -->
            <aop:before method="before" pointcut-ref="pc" />
            <!-- 后置 -->
            <aop:after-returning method="afterReturning" pointcut-ref="pc" />
            <!-- 环绕通知 -->
            <aop:around method="around" pointcut-ref="pc" />
            <!-- 异常拦截通知 -->
            <aop:after-throwing method="afterException" pointcut-ref="pc"/>
            <!-- 后置 -->
            <aop:after method="after" pointcut-ref="pc"/>
        </aop:aspect>
    </aop:config>

</beans>
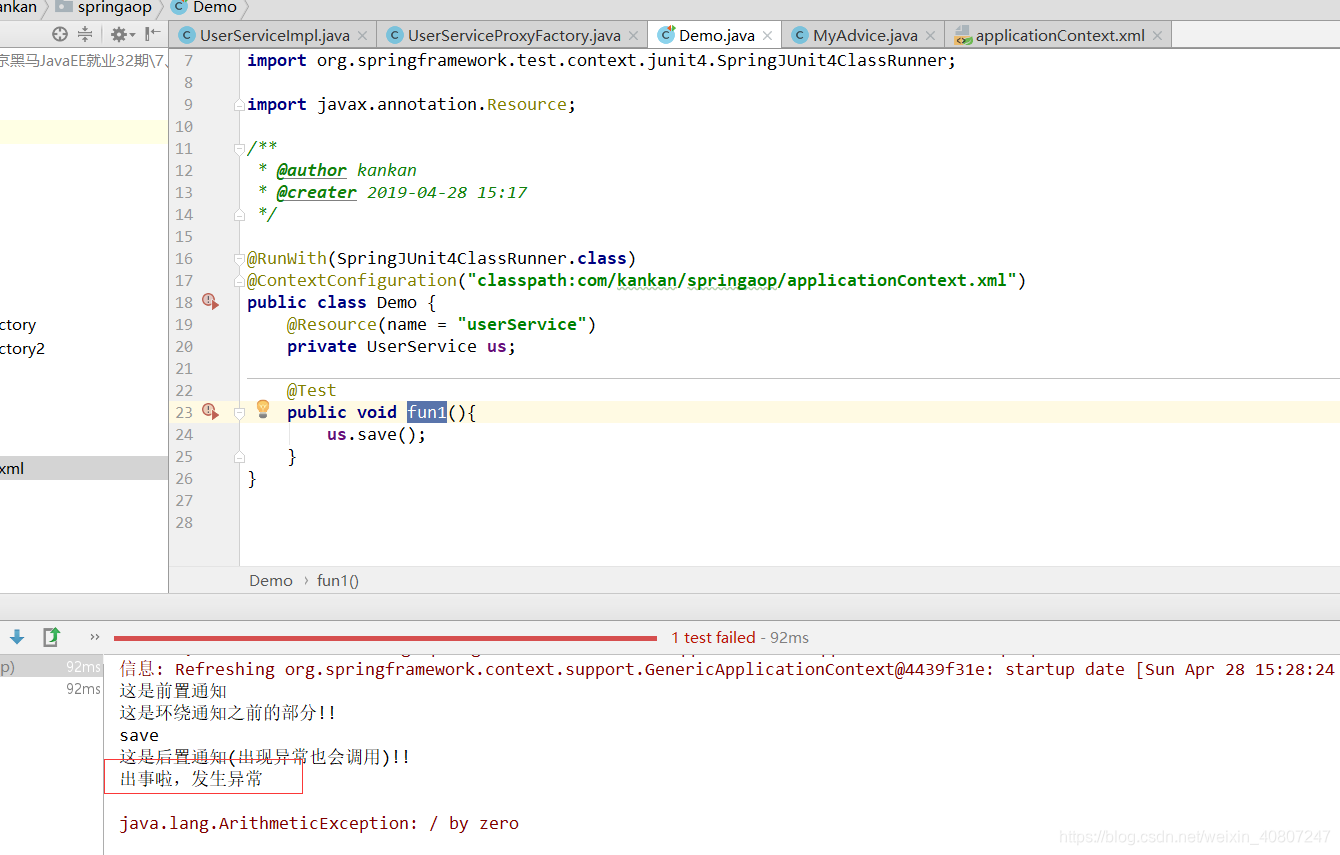
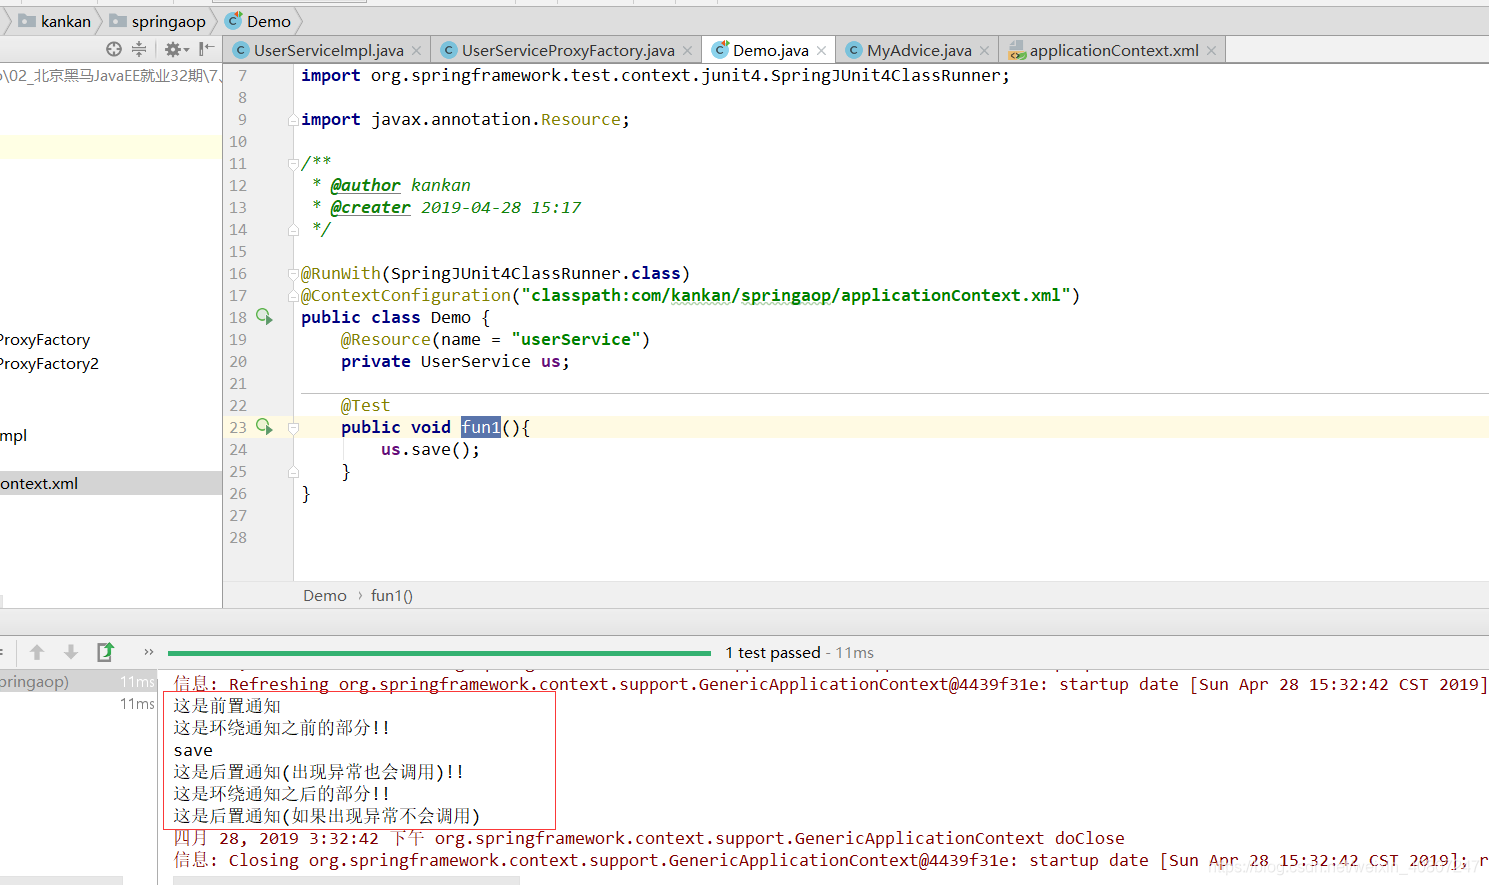
测试:
package com.kankan.springaop;

import com.kankan.service.UserService;
import org.junit.Test;
import org.junit.runner.RunWith;
import org.springframework.test.context.ContextConfiguration;
import org.springframework.test.context.junit4.SpringJUnit4ClassRunner;

import javax.annotation.Resource;

/**
 * @author kankan
 * @creater 2019-04-28 15:17
 */

@RunWith(SpringJUnit4ClassRunner.class)
@ContextConfiguration("classpath:com/kankan/springaop/applicationContext.xml")
public class Demo {
    @Resource(name = "userService")
    private UserService us;

    @Test
    public void fun1(){
        us.save();
    }
}
2.步骤(注解配置)
前面的1,2,3步和xml配置一样
2.4 配置进行织入,将通知织入目标对象中
applicationContext.xml:
<?xml version="1.0" encoding="UTF-8"?>
<beans xmlns="http://www.springframework.org/schema/beans"
       xmlns:xsi="http://www.w3.org/2001/XMLSchema-instance" xmlns:aop="http://www.springframework.org/schema/aop"
       xsi:schemaLocation="http://www.springframework.org/schema/beans http://www.springframework.org/schema/beans/spring-beans.xsd http://www.springframework.org/schema/aop http://www.springframework.org/schema/aop/spring-aop.xsd">

    <!-- 准备工作: 导入aop(约束)命名空间 -->
    <!-- 1.配置目标对象 -->
    <bean name="userService" class="com.kankan.service.UserServiceImpl" ></bean>
    <!-- 2.配置通知对象 -->
    <bean name="myAdvice" class="com.kankan.annotation.MyAdvice" ></bean>
    <!--3.开启使用注解完成织入-->
    <aop:aspectj-autoproxy></aop:aspectj-autoproxy>
</beans>
通知类:
package com.kankan.annotation;

import org.aspectj.lang.ProceedingJoinPoint;
import org.aspectj.lang.annotation.*;

//通知类
@Aspect
//表示该类是一个通知类
public class MyAdvice {

    @Pointcut("execution(* com.kankan.service.*ServiceImpl.*(..))")
    public void pc(){}
    //前置通知
    //指定该方法是前置通知,并指定切入点
    @Before("MyAdvice.pc()")
    public void before(){
        System.out.println("这是前置通知");
    }

    //后置通知(如果出现异常不会调用)
    @AfterReturning("MyAdvice.pc()")
    public void afterReturning(){
        System.out.println("这是后置通知(如果出现异常不会调用)");
    }

    //环绕通知
    @Around("MyAdvice.pc()")
    public Object around(ProceedingJoinPoint pjp) throws Throwable {
        System.out.println("这是环绕通知之前的部分!!");
        Object proceed = pjp.proceed();//调用目标方法
        System.out.println("这是环绕通知之后的部分!!");
        return proceed;
    }
    //异常通知
    @AfterThrowing("MyAdvice.pc()")
    public void afterException(){
        System.out.println("出事啦,发生异常");
    }

    //后置通知
    @After("MyAdvice.pc()")
    public void after(){
        System.out.println("这是后置通知(出现异常也会调用)!!");
    }
}
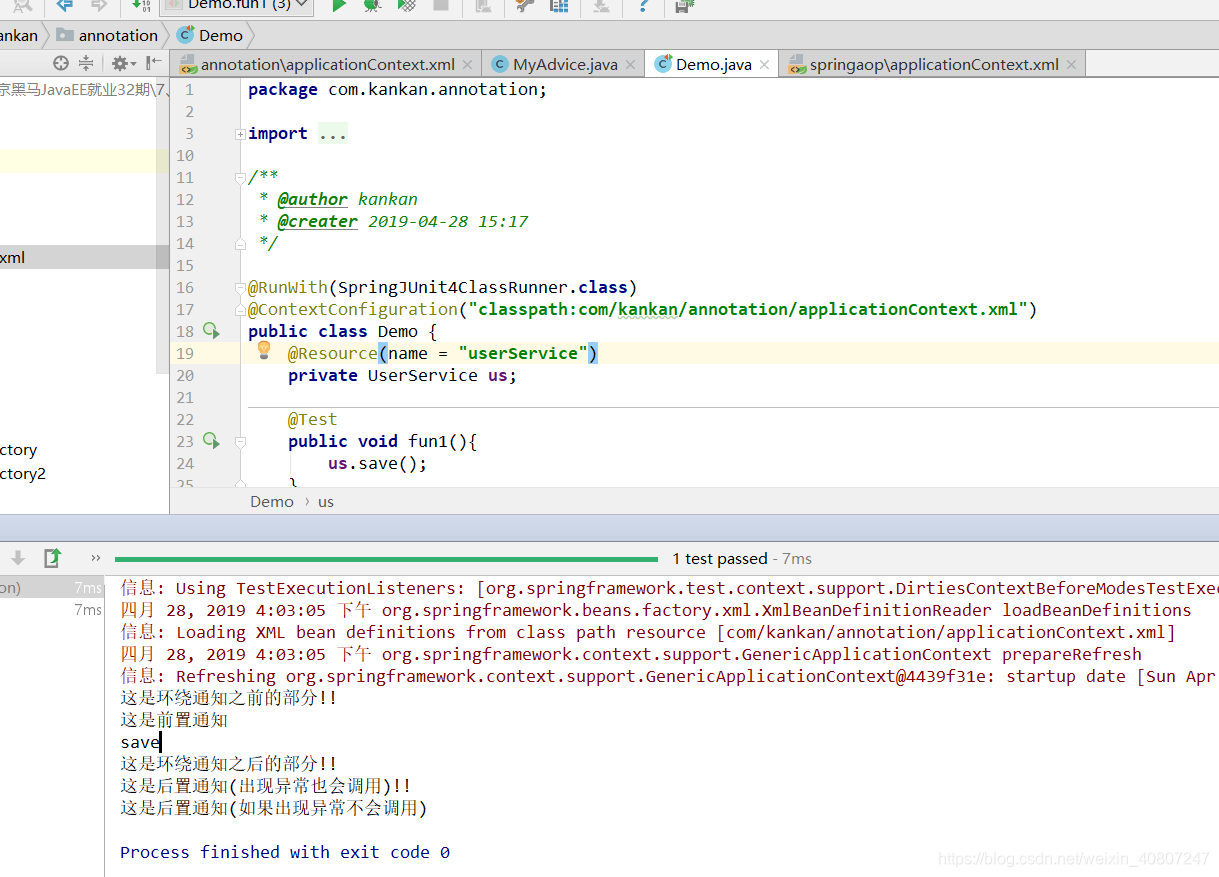
测试
package com.kankan.annotation;

import com.kankan.service.UserService;
import org.junit.Test;
import org.junit.runner.RunWith;
import org.springframework.test.context.ContextConfiguration;
import org.springframework.test.context.junit4.SpringJUnit4ClassRunner;

import javax.annotation.Resource;

/**
 * @author kankan
 * @creater 2019-04-28 15:17
 */

@RunWith(SpringJUnit4ClassRunner.class)
@ContextConfiguration("classpath:com/kankan/annotation/applicationContext.xml")
public class Demo {
    @Resource(name = "userService")
    private UserService us;

    @Test
    public void fun1(){
        us.save();
    }
}