入门SpringMVC框架,首先要了解SpringMVC的配置流程图。我们可以通过一个请求开始入门SpringMVC。
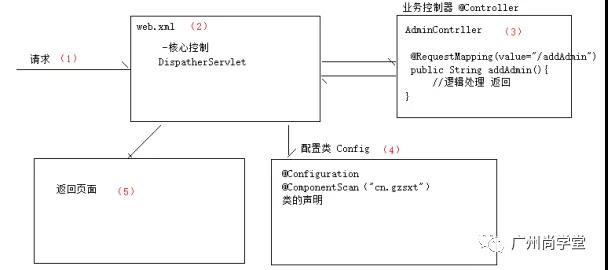
(配置流程图)
看到上面流程图,想必很多同学会有疑问,为什么需要一个核心控制器呢?
(SpringMVC需要实现一个请求对应一个方法,所以必须要拦截所有的请求才可以实现。)
SpringMVC配置步骤
-
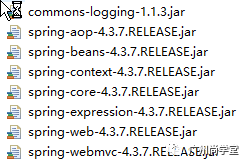
导入包:
(基本包5个,1日志依赖包,2webmvc支持包)
2. 构建一个请求:
<%@ page language="java" contentType="text/html; charset=UTF-8"
pageEncoding="UTF-8"%>
<!DOCTYPE html PUBLIC "-//W3C//DTD HTML 4.01 Transitional//EN" "http://www.w3.org/TR/html4/loose.dtd">
<html>
<head>
<meta http-equiv="Content-Type" content="text/html; charset=UTF-8">
<title>Insert title here</title>
</head>
<body>
<a href="${pageContext.request.contextPath }/say.mvc">say hello</a>
</body>
</html>
3. 编辑web.xml配置核心控制器
<?xml version="1.0" encoding="UTF-8"?>
<web-app xmlns:xsi="http://www.w3.org/2001/XMLSchema-instance" xmlns="http://java.sun.com/xml/ns/javaee" xsi:schemaLocation="http://java.sun.com/xml/ns/javaee http://java.sun.com/xml/ns/javaee/web-app_3_0.xsd" version="3.0">
<servlet>
<servlet-name>dispatcherServlet</servlet-name>
<servlet-class>org.springframework.web.servlet.DispatcherServlet</servlet-class>
</servlet>
<servlet-mapping>
<servlet-name>dispatcherServlet</servlet-name>
<url-pattern>*.mvc</url-pattern>
</servlet-mapping>
</web-app>
4. 编写业务控制器
package cn.gzsxt.controller;
import org.springframework.stereotype.Controller;
import org.springframework.web.bind.annotation.RequestMapping;
import org.springframework.web.servlet.ModelAndView;
/**
* 业务控制器
* 必须要加上存储类型注解@Controller,<context:component-scan>才可以将该类扫描到容器
* @author ranger
*
*/
@Controller
public class HelloController {
/**
* 将映射路径配置在执行方法的上面
* @return
*/
@RequestMapping(value="/say.mvc")
public ModelAndView say(){
System.out.println("-你好世界!-");
ModelAndView mv=new ModelAndView();
//设置返回的视图
mv.setViewName("/hello.jsp");
mv.addObject("msg", "张三");
return mv;
}
/**
* 将映射路径配置在执行方法的上面,返回也可以是一个字符串
* @return
*/
@RequestMapping(value="/say1.mvc")
public String say1(Model model ){
System.out.println("-你好世界!-");
//参数的内置对象,下一章
model.addAttribute("msg", "张三1");
return "/hello.jsp";
}
}
5. 编写配置类
package cn.gzsxt.config;
import org.springframework.context.annotation.Configuration;
import org.springframework.web.servlet.config.annotation.DefaultServletHandlerConfigurer;
import org.springframework.web.servlet.config.annotation.EnableWebMvc;
import org.springframework.web.servlet.config.annotation.WebMvcConfigurerAdapter;
@Configuration
@EnableWebMvc //<mvc:annotation-driver>
@ComponentScan(basePackages="cn.gzsxt")
public class MvcConfig extends WebMvcConfigurerAdapter {
//<mvc:default-servlet-hanlder>,开放静态资源访问
@Override
public void configureDefaultServletHandling(DefaultServletHandlerConfigurer configurer) {
configurer.enable();
}
}
6. 编写返回的页面
<%@ page language="java" contentType="text/html; charset=UTF-8"
pageEncoding="UTF-8"%>
<!DOCTYPE html PUBLIC "-//W3C//DTD HTML 4.01 Transitional//EN" "http://www.w3.org/TR/html4/loose.dtd">
<html>
<head>
<meta http-equiv="Content-Type" content="text/html; charset=UTF-8">
<title>Insert title here</title>
</head>
<body>
${msg },欢迎您!
</body>
</html>
