版权声明:本文为博主原创文章,未经博主允许不得转载。 https://blog.csdn.net/linxinfa/article/details/89516307
前言
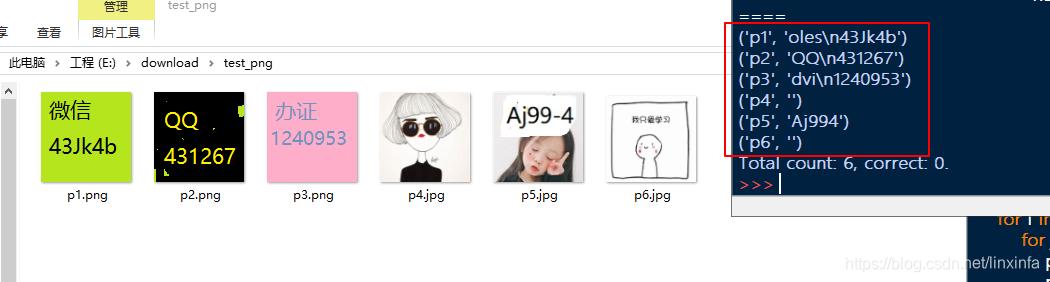
策划说,有一些玩家会在头像上面p自己的微信号或者QQ号之类的,可不可以把他们自动筛选出来,于是找了资料研究了下,这里分享一下
先看运行效果
环境准备:
(1) python版本3.x
(2) 安装插件,pip3 install pytesseract
(3) 安装tesseract-ocr,下载地址: https://digi.bib.uni-mannheim.de/tesseract/
(4) 配置环境变量TESSDATA_PREFIX,值为 C:\Program Files\Tesseract-OCR\tessdata
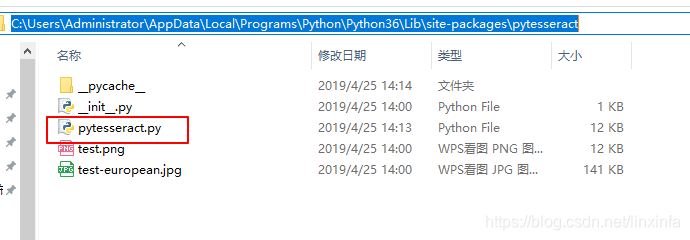
(5) 编辑文件 C:\Users\Administrator\AppData\Local\Programs\Python\Python36\Lib\site-packages\pytesseract\pytesseract.py
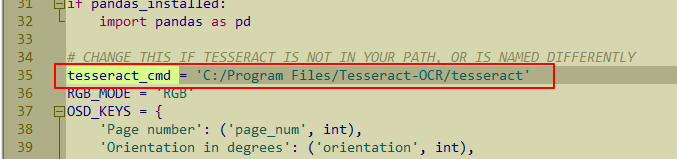
把
tesseract_cmd = 'tesseract'
改为:
tesseract_cmd = 'C:/Program Files/Tesseract-OCR/tesseract'
如下:
代码
保存以下代码为 test.py
注意修改两个地方:
(1) pytesseract.pytesseract.tesseract_cmd = ‘C:/Program Files/Tesseract-OCR/tesseract.exe’
这里要根据你安装的tesseract.exe的位置
(2) dir = ‘E://download/test_png’
这里要根据你的图片的目录
## test.py
import os
import pytesseract
from PIL import Image
from collections import defaultdict

# tesseract.exe所在的文件路径
pytesseract.pytesseract.tesseract_cmd = 'C:/Program Files/Tesseract-OCR/tesseract.exe'

# 获取图片中像素点数量最多的像素
def get_threshold(image):
    pixel_dict = defaultdict(int)

    # 像素及该像素出现次数的字典
    rows, cols = image.size
    for i in range(rows):
        for j in range(cols):
            pixel = image.getpixel((i, j))
            pixel_dict[pixel] += 1

    count_max = max(pixel_dict.values()) # 获取像素出现出多的次数
    pixel_dict_reverse = {v:k for k,v in pixel_dict.items()}
    threshold = pixel_dict_reverse[count_max] # 获取出现次数最多的像素点

    return threshold

# 按照阈值进行二值化处理
# threshold: 像素阈值
def get_bin_table(threshold):
    # 获取灰度转二值的映射table
    table = []
    for i in range(256):
        rate = 0.1 # 在threshold的适当范围内进行处理
        if threshold*(1-rate)<= i <= threshold*(1+rate):
            table.append(1)
        else:
            table.append(0)
    return table

# 去掉二值化处理后的图片中的噪声点
def cut_noise(image):

    rows, cols = image.size # 图片的宽度和高度
    change_pos = [] # 记录噪声点位置

    # 遍历图片中的每个点,除掉边缘
    for i in range(1, rows-1):
        for j in range(1, cols-1):
            # pixel_set用来记录该店附近的黑色像素的数量
            pixel_set = []
            # 取该点的邻域为以该点为中心的九宫格
            for m in range(i-1, i+2):
                for n in range(j-1, j+2):
                    if image.getpixel((m, n)) != 1: # 1为白色,0位黑色
                        pixel_set.append(image.getpixel((m, n)))

            # 如果该位置的九宫内的黑色数量小于等于4,则判断为噪声
            if len(pixel_set) <= 4:
                change_pos.append((i,j))

    # 对相应位置进行像素修改,将噪声处的像素置为1(白色)
    for pos in change_pos:
        image.putpixel(pos, 1)

    return image # 返回修改后的图片

# 识别图片中的数字加字母
# 传入参数为图片路径,返回结果为:识别结果
def OCR_lmj(img_path):

    image = Image.open(img_path) # 打开图片文件
    imgry = image.convert('L')  # 转化为灰度图

    # 获取图片中的出现次数最多的像素,即为该图片的背景
    max_pixel = get_threshold(imgry)

    # 将图片进行二值化处理
    # 注意,是否使用二值化要看具体情况,有些图片二值化之后,可能关键信息会丢失,反而识别不出来
    table = get_bin_table(threshold=max_pixel)
    out = imgry.point(table, '1')

    # 去掉图片中的噪声(孤立点)
    out = cut_noise(out)

    #保存图片
    # out.save('E://figures/img_gray.jpg')

    # 仅识别图片中的数字
    #text = pytesseract.image_to_string(out, config='digits')
    # 识别图片中的数字和字母
    text = pytesseract.image_to_string(out)

    # 去掉识别结果中的特殊字符
    exclude_char_list = ' .:\\|\'\"?![],()~@#$%^&*_+-={};<>/¥'
    text = ''.join([x for x in text if x not in exclude_char_list])
    #print(text)

    return text

def main():

    # 识别指定文件目录下的图片
    # 图片存放目录figures
    dir = 'E://download/test_png'

    correct_count = 0  # 图片总数
    total_count = 0    # 识别正确的图片数量

    # 遍历figures下的png,jpg文件
    for file in os.listdir(dir):
        if file.endswith('.png') or file.endswith('.jpg'):
            # print(file)
            image_path = '%s/%s'%(dir,file) # 图片路径

            answer = file.split('.')[0]  # 图片名称,即图片中的正确文字
            recognizition = OCR_lmj(image_path) # 图片识别的文字结果

            print((answer, recognizition))
            if recognizition == answer: # 如果识别结果正确,则total_count加1
                correct_count += 1

            total_count += 1

    print('Total count: %d, correct: %d.'%(total_count, correct_count))
    '''
    # 单张图片识别
    image_path = 'E://figures/code (1).jpg'
    OCR_lmj(image_path)
    '''

main()
运行test.py脚本即可
附
通过图片url下载保存图片的本地
import requests
image_url = "https://www.python.org/static/community_logos/python-logo-master-v3-TM.png"

r = requests.get(image_url) # create HTTP response object

with open("python_logo.png",'wb') as f:
    f.write(r.content)
多线程
# python3.x
import _thread as thread

def thread_func(p1,p2,p3):
	print(p1,p2,p3)

# 注意第二个参数必须用元祖
thread.start_new_thread(thread_func,(1,2,3))
thread.start_new_thread(thread_func,(4,5,6))