一个简单的duboo应用的demo,只使用springMVC、dubbo、zookeeper,在springMVC的框架上搭入dubbo:
1.建立简单的springMVC
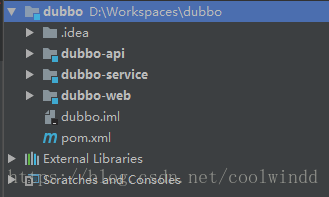
在这里将传统的结构拆分,将controller和service分别放入一个tomcat运行,所以将项目拆分为3个模块:web、service以及api。web为controller层,service为service层,api为双方都会使用的接口、实体类等等。
项目结构如下:
第一步:建立一个父项目dubbo
这是一个空项目,只有pom,负责引入所有项目相同的依赖,如spring、dubbo、zookeeper等:
<?xml version="1.0" encoding="UTF-8"?>

<project xmlns="http://maven.apache.org/POM/4.0.0" xmlns:xsi="http://www.w3.org/2001/XMLSchema-instance"
  xsi:schemaLocation="http://maven.apache.org/POM/4.0.0 http://maven.apache.org/xsd/maven-4.0.0.xsd">
  <modelVersion>4.0.0</modelVersion>

  <groupId>cn.coolwind.dubbo</groupId>
  <artifactId>dubbo-demo</artifactId>
    <packaging>pom</packaging>
    <version>1.0-SNAPSHOT</version>
    <modules>
        <module>dubbo-api</module>
        <module>dubbo-service</module>
        <module>dubbo-web</module>
    </modules>

    <name>dubbo-demo</name>


  <properties>
    <project.build.sourceEncoding>UTF-8</project.build.sourceEncoding>
    <maven.compiler.source>1.8</maven.compiler.source>
    <maven.compiler.target>1.8</maven.compiler.target>
  </properties>

  <dependencies>
    <dependency>
      <groupId>junit</groupId>
      <artifactId>junit</artifactId>
      <version>4.11</version>
      <scope>test</scope>
    </dependency>

      <dependency>
          <groupId>org.springframework</groupId>
          <artifactId>spring-webmvc</artifactId>
          <version>4.3.9.RELEASE</version>
      </dependency>
  </dependencies>

  <build>
    <pluginManagement><!-- lock down plugins versions to avoid using Maven defaults (may be moved to parent pom) -->
      <plugins>
        <plugin>
          <artifactId>maven-clean-plugin</artifactId>
          <version>3.0.0</version>
        </plugin>
        <!-- see http://maven.apache.org/ref/current/maven-core/default-bindings.html#Plugin_bindings_for_jar_packaging -->
        <plugin>
          <artifactId>maven-resources-plugin</artifactId>
          <version>3.0.2</version>
        </plugin>
        <plugin>
          <artifactId>maven-compiler-plugin</artifactId>
          <version>3.7.0</version>
        </plugin>
        <plugin>
          <artifactId>maven-surefire-plugin</artifactId>
          <version>2.20.1</version>
        </plugin>
        <plugin>
          <artifactId>maven-jar-plugin</artifactId>
          <version>3.0.2</version>
        </plugin>
        <plugin>
          <artifactId>maven-install-plugin</artifactId>
          <version>2.5.2</version>
        </plugin>
        <plugin>
          <artifactId>maven-deploy-plugin</artifactId>
          <version>2.8.2</version>
        </plugin>
      </plugins>
    </pluginManagement>
  </build>
</project>
第二步:在父项目dubbo里创建接口模块dubbo-api
创建后只需要写接口即可。
public interface TestService {
    String test(String name);
}
之后可以在父项目里maven:install一下,以方便后面引入api的jar包。
第三步:在父项目dubbo里创建业务的实现模块dubbo-service
创建的时候注意这是一个web项目
1.在pom里引入dubbo-api的依赖
        <dependency>
            <groupId>cn.coolwind.dubbo</groupId>
            <artifactId>dubbo-api</artifactId>
            <version>1.0-SNAPSHOT</version>
        </dependency>
2.编写service实现
@Service
public class TestServiceImpl implements TestService {
    @Override
    public String test(String name) {
        return "name is :" + name;
    }
}
3.配置spring,因为这个模块只提供服务,只配置spring即可。
applicationcontext:加入包扫描
<context:component-scan base-package="cn.coolwind.dubbo.service"/>web.xml:加入ContextLoaderListener
    <context-param>
        <param-name>contextConfigLocation</param-name>
        <param-value>classpath:applicationContext.xml</param-value>
    </context-param>
    <listener>
        <listener-class>org.springframework.web.context.ContextLoaderListener</listener-class>
    </listener>
第四步:创建dubbo-web模块
创建一个web项目。
1.同样在pom里引入dubbo-api的依赖
       <dependency>
            <groupId>cn.coolwind.dubbo</groupId>
            <artifactId>dubbo-api</artifactId>
            <version>1.0-SNAPSHOT</version>
        </dependency>
2.编写controller
@RestController
public class TestController {

    @Autowired
    private TestService testService;

    @GetMapping("/test")
    public Object test(String name) {
        return testService.test(name);
    }
}
3.配置springMVC
spring-mvc.xml:
    <context:component-scan base-package="cn.coolwind.dubbo.controller"/>

    <tx:annotation-driven/>
web.xml
     <servlet>
        <servlet-name>SpringMvc</servlet-name>
        <servlet-class>org.springframework.web.servlet.DispatcherServlet</servlet-class>
        <init-param>
            <param-name>contextConfigLocation</param-name>
            <param-value>classpath:spring-mvc.xml</param-value>
        </init-param>
        <load-on-startup>1</load-on-startup>
    </servlet>
    <servlet-mapping>
        <servlet-name>SpringMvc</servlet-name>
        <url-pattern>/</url-pattern>
    </servlet-mapping>
ok,至此整个springMVC的简单框架已经搭建完成,下面开始加入dubbo。
2.加入dubbo以及zookeeper
只需要简单的配置就好了,首先将dubbo和zookeeper的依赖引入父项目的pom里,之后分别在web和service的spring配置文件里配置dubbo即可。
1.引入依赖
      <dependency>
          <groupId>com.alibaba</groupId>
          <artifactId>dubbo</artifactId>
          <version>2.5.3</version>
          <exclusions>
              <exclusion>
                  <artifactId>spring</artifactId>
                  <groupId>org.springframework</groupId>
              </exclusion>
          </exclusions>
      </dependency>
      <dependency>
          <groupId>com.101tec</groupId>
          <artifactId>zkclient</artifactId>
          <version>0.4</version>
      </dependency>
      <dependency>
          <groupId>org.apache.zookeeper</groupId>
          <artifactId>zookeeper</artifactId>
          <version>3.4.6</version>
      </dependency>
2.在service里配置dubbo:
简单的配置只需要:应用名,zookeeper注册中心,暴露的端口以及声明服务接口
    <!-- 提供方应用信息,用于计算依赖关系 -->
    <dubbo:application name="dubbo_service"  />

    <!-- 使用zookeeper注册中心暴露服务地址 -->
    <dubbo:registry protocol="zookeeper" address="127.0.0.1:2181" />

    <!-- 用dubbo协议在20880端口暴露服务 -->
    <dubbo:protocol name="dubbo" port="20880" />

    <!-- 声明需要暴露的服务接口 -->
    <dubbo:service  interface="cn.coolwind.dubbo.service.TestService" ref="testService"/>
3.在web里配置dubbo
    <!-- 消费方应用名,用于计算依赖关系,不是匹配条件,不要与提供方一样 -->
    <dubbo:application name="dubbo_web" />
    <!-- 使用multicast广播注册中心暴露发现服务地址 -->
    <dubbo:registry  protocol="zookeeper" address="127.0.0.1:2181" />
    <!-- 生成远程服务代理,可以和本地bean一样使用demoService -->
    <dubbo:reference id="testService" interface="cn.coolwind.dubbo.service.TestService"/>
OK,现在所有的工作都已经完成,启动zookeeper,再将web和service两个模块分别放到两个tomcat里运行就可以将项目跑起来了。