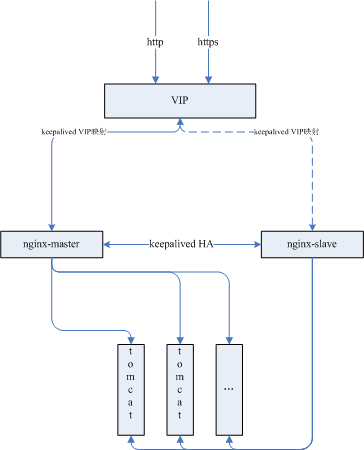
一、实验环境及拓扑
- Tomcat01:192.168.211.137:8080
- Tomcat02:192.168.211.136:8080
- nginx01:192.168.211.136
- nginx02:192.168.211.137
- keepalived主 keepalived备
二、实验步骤
01、部署Tomcat:
从Tomcat官网(https://tomcat.apache.org/download-90.cgi)下载部署包,解压压缩包到192.168.211.136,192.168.211.137。
为了实验效果,区分136和137的tomcat,我们对其主页进行自定义。例如 vi apache-tomcat-9.0.19/webapps/ROOT/index.jsp
例:
1 <html>
2 <title>page 136</title>
3 <html>
4 <body style="background-color:Bisque">
5 <h1 style="background-color:gray;color:blue;text-align:center" >There is Page 136</h1>
6 <div style="font-size:200px;text-align:center">Page 136</div>
7 </body>
8 </html>
9 </html>
两个tomcat修改完保存后,启动。
02、部署nginx(负载均衡)
a.添加源
默认情况Centos7中无Nginx的源,最近发现Nginx官网提供了Centos的源地址。因此可以如下执行命令添加源:
sudo rpm -Uvh http://nginx.org/packages/centos/7/noarch/RPMS/nginx-release-centos-7-0.el7.ngx.noarch.rpm
b.安装Nginx
通过yum search nginx看看是否已经添加源成功。如果成功则执行下列命令安装Nginx。
sudo yum install -y nginx
c.启动Nginx并设置开机自动运行
sudo systemctl start nginx.service
sudo systemctl enable nginx.service
d.配置 vi /etc/nginx/nginx.conf
 1 user  nginx;
 2 worker_processes  1;
 3
 4 error_log  /var/log/nginx/error.log warn;
 5 pid        /var/run/nginx.pid;
 6
 7
 8 events {
 9     worker_connections  1024;
10 }
11
12
13 http {
14     include       /etc/nginx/mime.types;
15     default_type  application/octet-stream;
16
17     log_format  main  '$remote_addr - $remote_user [$time_local] "$request" '
18                       '$status $body_bytes_sent "$http_referer" '
19                       '"$http_user_agent" "$http_x_forwarded_for"';
20
21     access_log  /var/log/nginx/access.log  main;
22
23     sendfile        on;
24     #tcp_nopush     on;
25
26     keepalive_timeout  65;
27
28     #gzip  on;
29
30     upstream tomcat{
31              #ip_hash;
32              server 192.168.211.136:8080 weight=1;
33              server 192.168.211.137:8080 weight=4;
34             }
35     server{
36         # 监听端口
37         listen 80;
38         server_name localhost;
39
40         location / {
41             proxy_pass http://tomcat;
42             proxy_set_header Host $host;
43             proxy_set_header  X-Real-IP $remote_addr;
44             proxy_set_header  X-Forwarded-For $proxy_add_x_forwarded_for;
45             root  html;
46             index  index.html index.htm;
47         }
48     }
49
50
51  #   include /etc/nginx/conf.d/*.conf;
52 }
主从nginx配置一样,可根据需要自己调整。配置完成后执行 nginx -s reload
效果:

03、部署keepalived(高可用)
master上的keepalived.conf内容如下:
global_defs {
    notification_email {
        [email protected]
    }
    notification_email_from [email protected]
    smtp_server smtp.hysec.com
    smtp_connect timeout 30
    router_id nginx_master        # 设置nginx master的id,在一个网络应该是唯一的
}
vrrp_script chk_http_port {
    script "/usr/local/src/check_nginx_pid.sh"    #最后手动执行下此脚本,以确保此脚本能够正常执行
    interval 2                          #(检测脚本执行的间隔,单位是秒)
    weight 2
}
vrrp_instance VI_1 {
    state MASTER            # 指定keepalived的角色,MASTER为主,BACKUP为备
    interface eth0            # 当前进行vrrp通讯的网络接口卡(当前centos的网卡)
    virtual_router_id 66        # 虚拟路由编号,主从要一直
    priority 100            # 优先级,数值越大,获取处理请求的优先级越高
    advert_int 1            # 检查间隔,默认为1s(vrrp组播周期秒数)
    authentication {
        auth_type PASS
        auth_pass 1111
    }
    track_script {
    chk_http_port            #(调用检测脚本)
    }
    virtual_ipaddress {
        192.168.211.200            # 定义虚拟ip(VIP),可多设,每行一个
    }
}
backup上的keepalived.conf内容如下:
global_defs {
    notification_email {
        [email protected]
    }
    notification_email_from [email protected]
    smtp_server smtp.hysec.com
    smtp_connect timeout 30
    router_id nginx_backup              # 设置nginx backup的id,在一个网络应该是唯一的
}
vrrp_script chk_http_port {
    script "/usr/local/src/check_nginx_pid.sh"
    interval 2                          #(检测脚本执行的间隔)
    weight 2
}
vrrp_instance VI_1 {
    state BACKUP                        # 指定keepalived的角色,MASTER为主,BACKUP为备
    interface eth0                      # 当前进行vrrp通讯的网络接口卡(当前centos的网卡)
    virtual_router_id 66                # 虚拟路由编号,主从要一直
    priority 99                         # 优先级,数值越大,获取处理请求的优先级越高
    advert_int 1                        # 检查间隔,默认为1s(vrrp组播周期秒数)
    authentication {
        auth_type PASS
        auth_pass 1111
    }
    track_script {
        chk_http_port                   #(调用检测脚本)
    }
    virtual_ipaddress {
        192.168.211.200                   # 定义虚拟ip(VIP),可多设,每行一个
    }
}
nginx检测脚本check_nginx_pid.sh内容如下:
#!/bin/bash
A=`ps -C nginx --no-header |wc -l`
if [ $A -eq 0 ];then
    /usr/local/nginx/sbin/nginx                #重启nginx
    if [ `ps -C nginx --no-header |wc -l` -eq 0 ];then    #nginx重启失败
        exit 1
    else
        exit 0
    fi
else
    exit 0
fi
启动keepalived
效果: