3. 1启用mysql
启动Mysql与停止服务
[root@host ~]# service mysqld start
[root@host ~]# systemctl stop mysqld.service
检查Mysql状态 :
[root@host ~]#  service mysqld status
* mysqld.service - MySQL Community Server
   Loaded: loaded (/usr/lib/systemd/system/mysqld.service; enabled; vendor preset: disabled)
   Active: active (running) since Mon 2019-04-15 09:27:12 CST; 21s ago
   ...
查看错误信息
[root@host ~]# mysqld --console
查看错误日志
[root@host ~]# vi /var/log/mysqld.log
查看错误日志占用容量
[root@host ~]# du -h /var/log/mysqld.log
118G    /var/log/mysqld.log
df -h
文件系统                 容量  已用  可用 已用% 挂载点
/dev/mapper/centos-root  265G  243G   23G   92% /
devtmpfs                  16G     0   16G    0% /dev
tmpfs                     16G     0   16G    0% /dev/shm
tmpfs                     16G   57M   16G    1% /run
tmpfs                     16G     0   16G    0% /sys/fs/cgroup
/dev/sda1                497M  125M  373M   25% /boot
tmpfs                    3.2G     0  3.2G    0% /run/user/0
清空错误日志,并再次查看
[root@host ~]# echo "" >mysqld.log
[root@host ~]# du -h mysqld.log
4.0K    mysqld.log
3.2 登录
mysql服务已经启动了,输入mysql -u root -p 登录mysql数据库
再次输入密码可登录
[root@host ~]# mysql -u root -p
Enter password:     # 初次安装mysql,root账户没有密码,回车登录
无密码则输入mysql -u root 回车登录数据库
[root@host ~]# mysql -u root
登录成功提示如下
Welcome to the MySQL monitor.  Commands end with ; or \g.
Your MySQL connection id is 3
Server version: 5.6.26 MySQL Community Server (GPL)
Copyright (c) 2000, 2015, Oracle and/or its affiliates. All rights reserved.
Oracle is a registered trademark of Oracle Corporation and/or its
affiliates. Other names may be trademarks of their respective
owners.
Type 'help;' or '\h' for help. Type '\c' to clear the current input statement.
查看当前主机配置信息
mysql> select host from user where user='root';
+-----------+
| host      |
+-----------+
| localhost |
+-----------+
可以看到当前主机配置信息为localhost.
执行update user set host = '%' where user ='root'将Host设置为通配符%。
mysql> update user set host = '%' where user ='root';
mysql> select host from user where user='root';
+-------+
| host  |
+-------+
|   %   |
+-------+
Host设置了“%”后便可以允许远程访问。
退出
mysql> \q #退出
3.2 新建及修改用户
3.2.1可通过# grep "password" /var/log/mysqld.log命令获取MySQL的临时密码
2016-01-19T05:16:36.218234Z 1 [Note] A temporary password is generated for root@localhost: waQ,qR%be2(5
用该密码登录到服务端后,必须马上修改密码,不然会报如下错误:
mysql> select user();
ERROR 1820 (HY000): You must reset your password using ALTER USER statement before executing this statement.
3.2.2查看Mysql密码
新版mysql安装之后会生成root用户的密码,该密码存储在 /var/log/mysqld.log中,使用grep命令查看密码。
[root@host ~]# mysql> grep 'temporary password' /var/log/mysqld.log
或者修改用户密码,设置用户名为“root”的密码为“password”。
[root@host ~]# mysql> set password for 'root'@'localhost' =password('password');
Query OK, 0 rows affected (0.00 sec)
mysql 8.0 通过alter修改
mysql> ALTER USER 'root'@'localhost' IDENTIFIED BY '123456';
Query OK, 0 rows affected (0.01 sec)
3.2.3 删除远程%用户“root”和密码“password”;删除host的,删除localhost,删除host.localdomain
[root@host ~]# mysql>drop user 'root'@'%' identified by 'password';
[root@host ~]# mysql>drop user 'root'@'host';
[root@host ~]# mysql> drop user 'root'@'localhost';
[root@host ~]# mysql> drop user 'root'@'host.localdomain';
一般可通过log_error设置
mysql> select @@log_error;
+-------------+
| @@log_error |
+-------------+
| mysqld.log      |
+-------------+
1 row in set (0.00 sec)
3.2.4 查看密码策略
show variables like '%password%';
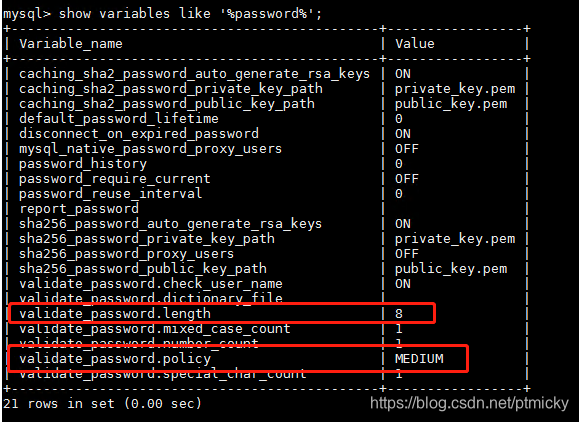
设置低密码等级的密码
mysql> set global validate_password.policy=0;
Query OK, 0 rows affected (0.00 sec)
3.2.5 新建用户
如果是新用户而不是root,则要先新建所有权限用户“username”和密码“123456”
新建本机用户“test_admin”和密码“admin@123_S”
[root@host ~]#  mysql>create user 'username'@'%' identified by '123456';
mysql>CREATE USER 'test_admin'@'localhost' IDENTIFIED BY 'admin@123_S';
其中
%——代表任何客户机都可以连接
localhost——代表只可以本机连接
3.2.6 查看所有用户和登录授权;
[root@host ~]# mysql>select user,host from mysql.user;
+------------------+-----------+
| user             | host      |
+------------------+-----------+
| mysql.infoschema | localhost |
| mysql.session    | localhost |
| mysql.sys        | localhost |
| root             | localhost |
+------------------+-----------+
查看当前所有数据库:show databases;
进入mysql数据库:use mysql;
查看mysql数据库中所有的表:show tables;
查看user表中的数据:SELECT Host,User,authentication_string FROM mysql.user;
修改user表中的Host:update user set Host='%' where User='root';
最后刷新一下:flush privileges;
3.2.7 查看用户的授权
[root@host ~]# mysql> SHOW GRANTS FOR 'root'@'%' ;
+--------------------------------------------------------------------------------------------------------------+
| Grants for root@%                                                                                            |
+--------------------------------------------------------------------------------------------------------------+
| GRANT ALL PRIVILEGES ON *.* TO 'root'@'%' IDENTIFIED BY PASSWORD '*DB215EC7F2EE3608D3C2430F2C2A15AFCB0B00B6' |
+--------------------------------------------------------------------------------------------------------------+
1 row in set (0.00 sec)
3.2.8 把在所有数据库的所有表的所有权限赋值给位于所有IP地址的root用户。
*需要新建可远程连接的root用户,然后再授权。直接授权会抛出异常。
[root@host ~]# mysql> grant all privileges on *.* to 'root'@'%'identified by 'password';
ERROR 1064 (42000): You have an error in your SQL syntax; check the manual that corresponds to your MySQL server version for the right syntax to use near 'identified by 'password'' at line 1

# 此版的的mysql版本把将创建账户和赋予权限分开了。
grant all privileges on *.* to 'root'@'%' with grant option
FLUSH PRIVILEGES;
3. 配置及修改
3.1 重新启动mysql服务
[root@host ~]# systemctl restart mysqld;
3.2 设置mysql编码配置;vi /etc/my.cnf;
在最下面一行加入default-character-set =utf8,操作如下
    # 按o进入新一行,输入
       default-character-set =utf8;
    # 按“ESC” 键进入【命令模式】
    # 然后输入“:”,进入【末行模式】
       :wq # 保存后退出;
[root@host ~]# vi /etc/my.cnf;
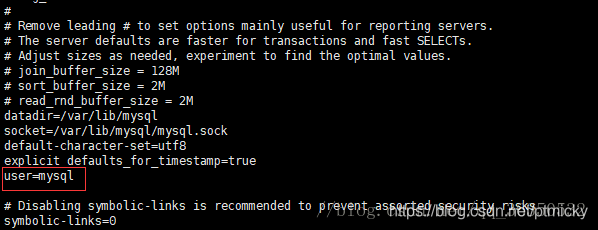
[root@qin-server ~]# cat /etc/my.cnf
datadir=/var/lib/mysql
socket=/var/lib/mysql/mysql.sock
character-set-server=UTF8
log-error=/var/log/mysqld.log
pid-file=/var/run/mysqld/mysqld.pid
安装完以后mariadb自动就被替换了,将不再生效。输入下面命令,提示mariadb未安装
[root@host ~]# rpm -qa |grep mariadb
退出mysql,在配置文件中注释跳过mysql权限
[root@host ~]# vi /etc/my.cnf

重启mysql服务
[root@host ~]# service mysqld restart
进入mysql,并正常重置密码
[root@host ~]# mysql -u root
mysql> set global validate_password.policy=LOW;
mysql> set global validate_password.length=6;
mysql> ALTER USER 'root'@'localhost' IDENTIFIED BY 'abc.123';
4. 错误排查
[ERROR] Fatal error: Please read “Security” section of the manual to find
out how to run mysqld as root!
1.通过在命令后面加上–user=root 进行强制使用root账号启动。这样是最快的。
[root@host ~]# cd /etc/init.d
mysqld --user=root
2.使用一个普通用户进行启动mysqld 。这个用户必须是属于mysqld用户组,且在my.cnf文件中。使用 vi /etc/my.cnf
[root@host ~]# vi /etc/my.cnf
3.加上user=mysql 进行指定mysql用户来启动mysql服务。这样是最好的。