转载自:https://www.jianshu.com/p/cab8f83b0f0e
代码实现:https://gitee.com/ccsoftlucifer/springCloud_Eureka_zuul
首先建立一个空的maven工程,作为项目的主工程.
在主工程的基础上,建立modul从工程.
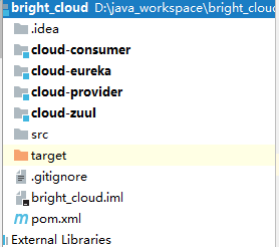
目录的结构是这样的的:

一 .注册中心
首先微服务是一个分布式服务,那么多服务需要协调统一维护肯定需要一个注册中心来维护.所以首先建立一个注册中心模块.
在创建的时候,选择spring Initializr , GroupID对应你的com.xxxx
Artifact对应着项目名.
选择 Cloude Discovery -> Eureka Server
启动类上加上@EnableEurekaServer注解
application.properties中添加注册中心端口号,注册中心名字
#端口号.
server.port=8070
#关闭自我保护.
eureka.server.enable-self-preservation=false
#清理服务器时间间隔[5s]
eureka.server.eviction-interval-timer-in-ms=5000

#主机名.
eureka.instance.hostname=localhost
#是否将自己作为客户端注册到Eureka Server[当前模块只是作为Eureka Server服务端所以设为false]
eureka.client.register-with-eureka=false
#是否从Eureka Server获取注册信息[当前是单点的Eureka Server所以不需要同步其它节点的数据]
eureka.client.fetch-registry=false

#Eureka Server[查询注册服务]地址.
eureka.client.serviceUrl.defaultZone=http://${eureka.instance.hostname}:${server.port}/eureka
直接访问 Locatlhost:8070就可以打开Eureka 的主界面,查看注册中心状态.当前是没有任何一个连接注册的,所以什么都没有显示.
二.服务提供者
服务的提供者也在主maven工程上创建一个modul,选择spring Initializr .
cloud Discovery -> Eureka Discovery
启动类上添加@EnableDiscoverClient注解.
application.properties中添加如下配置:
#应用名称.
spring.application.name=cloud-provider
#应用端口号.
server.port=8080
#Eureka Server服务器地址.
eureka.client.serviceUrl.defaultZone=http://localhost:8070/eureka/
定义一个controller向外暴露API
@RestController
public class MyController {

    @RequestMapping(value = "/info", method = RequestMethod.GET)
    public String info() {
        try {
            //休眠2秒,测试超时服务熔断[直接关闭服务提供者亦可]
            Thread.sleep(2000);
        } catch (InterruptedException e) {
            e.printStackTrace();
        }
        return "Hello, cloud-provider";
    }
}
三.服务消费者
服务的提供者也在主maven工程上创建一个modul,选择spring Initializr .
cloud Discovery -> Eureka Discovery
在启动类上添加@EnableFeignClients和@EnableEurekaClient注解\
添加application.properties
#应用名称.
spring.application.name=cloud-consumer
#端口号.
server.port=8081
#Eureka Server服务器地址.
eureka.client.serviceUrl.defaultZone=http://localhost:8070/eureka/

#高版本spring-cloud-openfeign请求分为两层,先ribbon控制,后hystrix控制.
#ribbon请求处理的超时时间.
ribbon.ReadTimeout=5000
#ribbon请求连接的超时时间
ribbon.ConnectionTimeout=5000

##设置服务熔断超时时间[默认1s]
hystrix.command.default.execution.isolation.thread.timeoutInMilliseconds=10000

#开启Hystrix以支持服务熔断[高版本默认false关闭],如果置为false,则请求超时交给ribbon控制.
#feign.hystrix.enabled=true
用Feign调用远程服务.
定义服务接口类:
//1.name为被调用的服务应用名称.
//2.InfoFallBack作为熔断实现,当请求cloud-provider失败时调用其中的方法.
//3.feign配置.
@FeignClient(name = "cloud-provider", fallback = InfoFallBack.class, configuration = MyFeignConfig.class)
public interface InfoClient {

    //被请求微服务的地址
    @RequestMapping("/info")
    String info();
}
定义熔断类,当远程调用失败的时候调用熔断类方法.
@Component
public class InfoFallBack implements InfoClient {
    @Override
    public String info() {
        return "fallback info";
    }
}
定义个性化feign
@Configuration
public class MyFeignConfig {

    /**
     * feign打印日志等级
     * @return
     */
    @Bean
    Logger.Level feignLoggerLeval(){
        return Logger.Level.FULL;
    }
}
定义服务调用类ConsumerController,通过本地方法入口调用远程服务:
@RestController
@Configuration
public class ConsumerController {

    @Autowired
    InfoClient infoClient;

    @RequestMapping(value = "/consumerInfo", method = RequestMethod.GET)
    public String consumerInfo(){
        return infoClient.info();
    }
}
访问http://127.0.0.1:8081/consumerInfo 就会找到远程微服务提供 的info
四 .路由Zuul
服务的提供者也在主maven工程上创建一个modul,选择spring Initializr .
cloud Discovery -> Eureka Discovery
启动类上添加@EnableZuulProxy和@EnableEurekaClient
添加application.properties配置
#应用名称.
spring.application.name=cloud-zuul
#应用端口号.
server.port=8071
#Eureka Server服务器地址.
eureka.client.serviceUrl.defaultZone=http://localhost:8070/eureka/

#通过指定URL配置了Zuul路由,则配置以下两个超时时间.
#zuul.host.connect-timeout-millis=5000
#zuul.host.socket-timeout-millis=5000

#zuul使用服务发现的方式[通过serviceId路由服务],得配置ribbon的超时时间.
#官网文档已说明:http://cloud.spring.io/spring-cloud-netflix/single/spring-cloud-netflix.html#_zuul_timeouts
#ribbon请求处理的超时时间.
ribbon.ReadTimeout=5000
#ribbon请求连接的超时时间.
ribbon.ConnectionTimeout=5000

##设置服务熔断超时时间[默认1s]
hystrix.command.default.execution.isolation.thread.timeoutInMilliseconds=10000

#只要访问以/api/开头的多层目录都可以路由到服务名为cloud-provider的服务上.
zuul.routes.cloud-provider=/api/**
定义网关过滤器用来过滤请求信息.
/**
 * 服务网关过滤器
 */
@Component
public class AccessFilter extends ZuulFilter {

    /**
     * 返回一个字符串代表过滤器的类型,在zuul中定义了四种不同生命周期的过滤器类型:
     *  pre:可以在请求被路由之前调用
     *  route:在路由请求时候被调用
     *  post:在route和error过滤器之后被调用
     *  error:处理请求时发生错误时被调用
     * @return
     */
    @Override
    public String filterType() {
        return "pre"; //前置过滤器
    }

    @Override
    public int filterOrder() {
        return 0; //过滤器的执行顺序,数字越大优先级越低
    }

    @Override
    public boolean shouldFilter() {
        return true;//是否执行该过滤器,此处为true,说明需要过滤
    }

    /**
     * 过滤器具体逻辑
     * @return
     * @throws ZuulException
     */
    @Override
    public Object run() throws ZuulException {
        RequestContext ctx = RequestContext.getCurrentContext();
        HttpServletRequest request = ctx.getRequest();
        System.out.println(String.format("%s demoFilter request to %s", request.getMethod(), request.getRequestURL().toString()));
        String username = request.getParameter("username");// 获取请求的参数
        if(!StringUtils.isEmpty(username)&&username.equals("bright")){//当请求参数username为“bright”时通过
            ctx.setSendZuulResponse(true);// 对该请求进行路由
            ctx.setResponseStatusCode(200);
            ctx.set("isSuccess", true);// 设值,让下一个Filter看到上一个Filter的状态
            return null;
        }else{
            ctx.setSendZuulResponse(false);// 过滤该请求,不对其进行路由
            ctx.setResponseStatusCode(401);// 返回错误码
            ctx.setResponseBody("{\"result\":\"username is not correct!\"}");// 返回错误内容
            ctx.set("isSuccess", false);
            return null;
        }
    }
}
访问http://127.0.0.1:8071/api/info 就会被拦截下来,过滤该请求.
访问http://127.0.0.1:8071/api/info?username=bright 就会被路由.调用远程微服务的接口.