在上一篇博客里我们讲解了如何用maven项目整合Springmvc,今天我们将围绕Spring Security 来介绍,Spring Security 提供了基于javaEE的企业应用软件全面的安全服务,如果你的项目对于安全和访问要求比较高,强烈轻易你在项目中使用Spring Security模块,这里是Spring Security的中文官网介绍https://springcloud.cc/spring-security-zhcn.html,下面我们就通过一个登录注销功能来揭开Spring Security的面纱,项目代码在上一篇博客的基础上实现。
第一步:修改pom.xml配置添加Spring Security所需要的核心jar包spring-security-web和spring-security-config,这里博主使用的是3.2.3的版本号。
<?xml version="1.0" encoding="UTF-8"?>

<project xmlns="http://maven.apache.org/POM/4.0.0" xmlns:xsi="http://www.w3.org/2001/XMLSchema-instance"
	xsi:schemaLocation="http://maven.apache.org/POM/4.0.0 http://maven.apache.org/xsd/maven-4.0.0.xsd">
	<modelVersion>4.0.0</modelVersion>

	<groupId>com.zds</groupId>
	<artifactId>MavenDemo</artifactId>
	<version>0.0.1-SNAPSHOT</version>
	<packaging>war</packaging>

	<name>MavenDemo Maven Webapp</name>
	<url>http://maven.apache.org</url>

	<properties>
		<project.build.sourceEncoding>UTF-8</project.build.sourceEncoding>
		<maven.compiler.source>1.7</maven.compiler.source>
		<maven.compiler.target>1.7</maven.compiler.target>
	</properties>

	<dependencies>
		<dependency>
			<groupId>junit</groupId>
			<artifactId>junit</artifactId>
			<version>4.11</version>
			<scope>test</scope>
		</dependency>
		<dependency>
			<groupId>javax</groupId>
			<artifactId>javaee-api</artifactId>
			<version>7.0</version>
			<scope>provided</scope>
		</dependency>
		<dependency>
			<groupId>jstl</groupId>
			<artifactId>jstl</artifactId>
			<version>1.2</version>
		</dependency>

		<dependency>
			<groupId>org.springframework</groupId>
			<artifactId>spring-webmvc</artifactId>
			<version>4.1.6.RELEASE</version>
			<type>jar</type>
			<scope>compile</scope>
		</dependency>
		<dependency>
			<groupId>org.springframework</groupId>
			<artifactId>spring-core</artifactId>
			<version>4.1.6.RELEASE</version>
		</dependency>
		<dependency>
			<groupId>org.springframework</groupId>
			<artifactId>spring-context</artifactId>
			<version>4.1.6.RELEASE</version>
		</dependency>
		<dependency>
			<groupId>org.springframework.security</groupId>
			<artifactId>spring-security-web</artifactId>
			<version>3.2.3.RELEASE</version>
		</dependency>
		<dependency>
			<groupId>org.springframework.security</groupId>
			<artifactId>spring-security-config</artifactId>
			<version>3.2.3.RELEASE</version>
		</dependency>
		<dependency>
			<groupId>org.springframework</groupId>
			<artifactId>spring-tx</artifactId>
			<version>4.1.6.RELEASE</version>
		</dependency>
		<dependency>
			<groupId>org.springframework</groupId>
			<artifactId>spring-jdbc</artifactId>
			<version>4.1.6.RELEASE</version>
		</dependency>
		<dependency>
			<groupId>org.springframework</groupId>
			<artifactId>spring-context-support</artifactId>
			<version>4.1.6.RELEASE</version>
		</dependency>
		<dependency>
			<groupId>log4j</groupId>
			<artifactId>log4j</artifactId>
			<version>1.2.15</version>
			<exclusions>
				<exclusion>
					<groupId>javax.jms</groupId>
					<artifactId>jms</artifactId>
				</exclusion>
				<exclusion>
					<groupId>com.sun.jdmk</groupId>
					<artifactId>jmxtools</artifactId>
				</exclusion>
				<exclusion>
					<groupId>com.sun.jmx</groupId>
					<artifactId>jmxri</artifactId>
				</exclusion>
			</exclusions>
		</dependency>
	</dependencies>
</project>
<beans:beans xmlns="http://www.springframework.org/schema/security"
	xmlns:beans="http://www.springframework.org/schema/beans"
	xmlns:context="http://www.springframework.org/schema/context"
	xmlns:xsi="http://www.w3.org/2001/XMLSchema-instance"
	xsi:schemaLocation="http://www.springframework.org/schema/beans
	http://www.springframework.org/schema/beans/spring-beans-4.1.xsd
	http://www.springframework.org/schema/context
	http://www.springframework.org/schema/context/spring-context-3.2.xsd
	http://www.springframework.org/schema/security
	http://www.springframework.org/schema/security/spring-security-3.2.xsd">

	<http auto-config="true">
	    <!--只用user和amdin角色才可访问/view -->
	    <intercept-url pattern="/view**" access="ROLE_USER,ROLE_ADMIN" />
	    <!--只用user和amdin角色才可访问/welcome -->
		<intercept-url pattern="/welcome**" access="ROLE_USER,ROLE_ADMIN" />
		<!--default-target-url表示登录成功后自动跳转的页面 -->
		<form-login
		    login-page="/login"
		    default-target-url="/welcome"
			authentication-failure-url="/login?error"
			username-parameter="username"
			password-parameter="password" />
		<!-- enable csrf protection -->
		<csrf/>
	</http>
	<!--为了方便这里直接用xml配置用户信息,也可用java代码实现该功能 -->
	 <authentication-manager>
	  <authentication-provider>
	    <user-service>
		<user name="user1" password="123456" authorities="ROLE_USER" />
		<user name="admin" password="123456" authorities="ROLE_ADMIN" />
	    </user-service>
	  </authentication-provider>
	</authentication-manager>

</beans:beans><%@ page language="java" contentType="text/html; charset=UTF-8"
pageEncoding="UTF-8"%>
<!DOCTYPE html PUBLIC "-//W3C//DTD HTML 4.01 Transitional//EN" "http://www.w3.org/TR/html4/loose.dtd">
<html>
<head>
<meta http-equiv="Content-Type" content="text/html; charset=UTF-8">
<title>Insert title here</title>
</head>
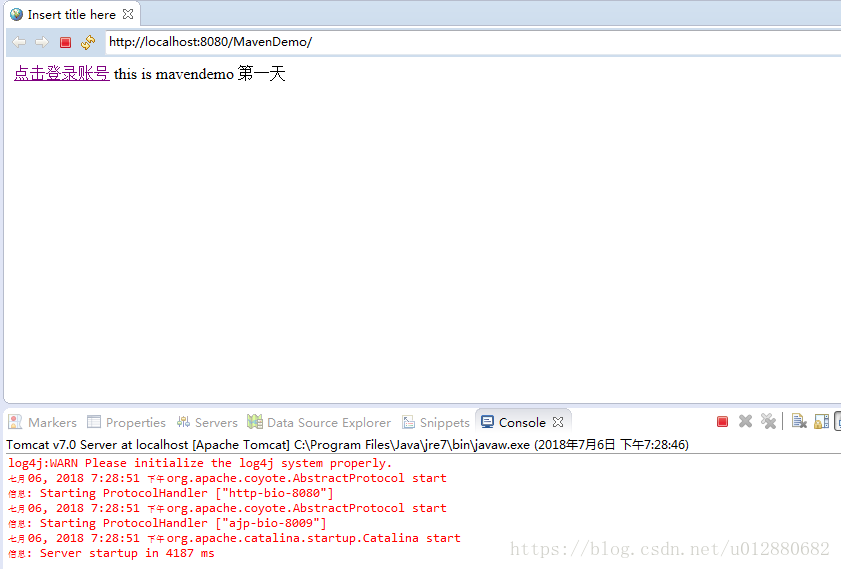
<body>
<a href="login" >点击登录账号</a>
this is mavendemo 第一天
</body>
</html>@RequestMapping(value = "/login", method = RequestMethod.GET)
public ModelAndView login(
@RequestParam(value = "error", required = false) String error,
@RequestParam(value = "logout", required = false) String logout) {
ModelAndView model = new ModelAndView();
if (error != null) {
model.addObject("error", "账号或密码错误");
}
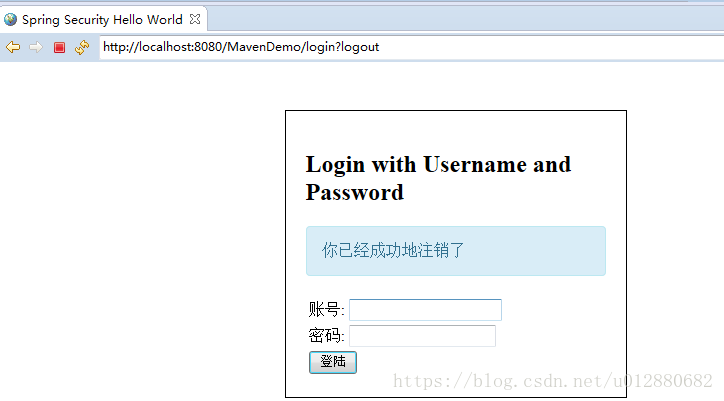
if (logout != null) {
model.addObject("msg", "你已经成功地注销了");
}
model.addObject("title", "Spring Security Hello World");
model.addObject("message", "This is login page!");
model.setViewName("login");
return model;
}添加完毕后,需要在WEB-INF的jsp文件夹下新建一个login.jsp,用来显示登陆表单,具体代码如下:
<%@ page language="java" contentType="text/html; charset=UTF-8" pageEncoding="UTF-8"%>
<%@ taglib prefix="c" uri="http://java.sun.com/jsp/jstl/core"%>
<!DOCTYPE html PUBLIC "-//W3C//DTD HTML 4.01 Transitional//EN" "http://www.w3.org/TR/html4/loose.dtd">
<html>
<head>
<meta http-equiv="Content-Type" content="text/html; charset=ISO-8859-1">
<title>${title}</title>
<style>
.error {
padding: 15px;
margin-bottom: 20px;
border: 1px solid transparent;
border-radius: 4px;
color: #a94442;
background-color: #f2dede;
border-color: #ebccd1;
}
.msg {
padding: 15px;
margin-bottom: 20px;
border: 1px solid transparent;
border-radius: 4px;
color: #31708f;
background-color: #d9edf7;
border-color: #bce8f1;
}
#login-box {
width: 300px;
padding: 20px;
margin: 100px auto;
background: #fff;
-webkit-border-radius: 2px;
-moz-border-radius: 2px;
border: 1px solid #000;
}
</style>
</head>
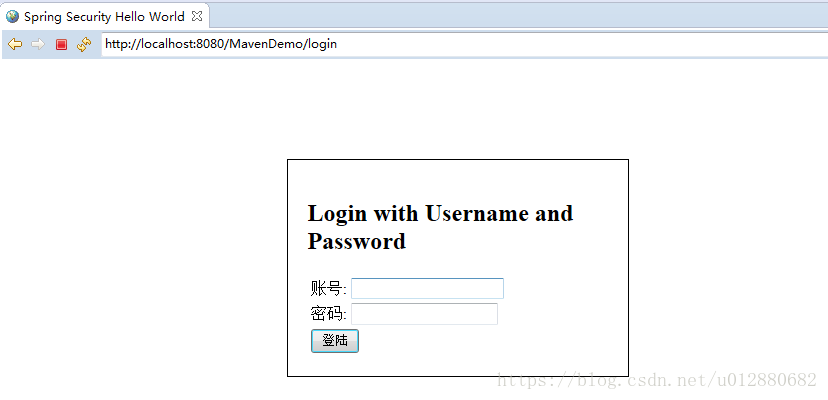
<body onload='document.loginForm.username.focus();'>
<div id="login-box">
<h2>Login with Username and Password</h2>
<c:if test="${not empty error}">
<div class="error">${error}</div>
</c:if>
<c:if test="${not empty msg}">
<div class="msg">${msg}</div>
</c:if>
<form name='loginForm'
action="<c:url value='j_spring_security_check' />" method='POST'>
<table>
<tr>
<td>账号:</td>
<td><input type='text' name='username' value=''></td>
</tr>
<tr>
<td>密码:</td>
<td><input type='password' name='password' /></td>
</tr>
<tr>
<td colspan='2'><input name="submit" type="submit"
value="登陆" /></td>
</tr>
</table>
<input type="hidden" name="${_csrf.parameterName}"
value="${_csrf.token}" />
</form>
</div>
</body>
</html>@RequestMapping("/welcome")
public ModelAndView demo(HttpServletRequest request){
ModelAndView mav = new ModelAndView();
String contextPath = request.getContextPath();
mav.addObject("contextPath" , contextPath);
mav.addObject("title", "Spring Security Hello World");
mav.addObject("message", "This is welcome page!");
mav.setViewName("welcome");
return mav;
}然后在WEB-INF的jsp文件夹下新建一个welcome.jsp,具体代码如下:
<%@ page language="java" contentType="text/html; charset=UTF-8"
pageEncoding="UTF-8"%>
<%@taglib prefix="c" uri="http://java.sun.com/jsp/jstl/core"%>
<%@page session="true"%>
<html>
<head>
<meta http-equiv="Content-Type" content="text/html; charset=UTF-8">
</head>
<body>
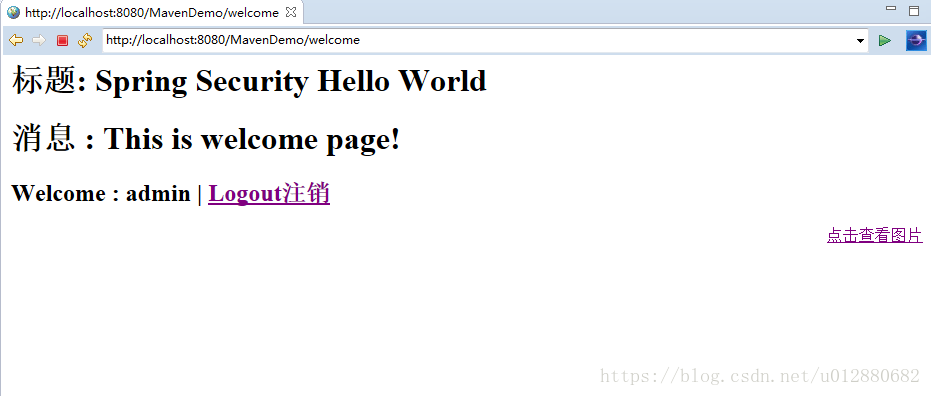
<h1>标题: ${title}</h1>
<h1>消息 : ${message}</h1>
<c:if test="${pageContext.request.userPrincipal.name != null}">
<h2>
Welcome : ${pageContext.request.userPrincipal.name} | <a
href="logout"> Logout注销</a>
</h2>
</c:if>
<div align="right">
<a href="view?path=demo" >点击查看图片</a>
</div>
</body>
<script>
</script>
</html>@RequestMapping(value="/logout", method = RequestMethod.GET)
public String logoutPage (HttpServletRequest request, HttpServletResponse response) {
Authentication auth = SecurityContextHolder.getContext().getAuthentication();
if (auth != null){
new SecurityContextLogoutHandler().logout(request, response, auth);
}
return "redirect:/login?logout";
}
这是比较符合spring规范的注销操作,注销调用执行以下操作:
-
HTTP的会话失效,那么解除绑定到它的任何对象;
-
将删除 SecurityContext 的身份验证,以防止并发请求的问题;
-
显式地清除当前线程上下文值;
package com.zds.controller;
import javax.servlet.http.HttpServletRequest;
import javax.servlet.http.HttpServletResponse;
import org.springframework.security.core.Authentication;
import org.springframework.security.core.context.SecurityContextHolder;
import org.springframework.security.web.authentication.logout.SecurityContextLogoutHandler;
import org.springframework.stereotype.Controller;
import org.springframework.web.bind.annotation.RequestMapping;
import org.springframework.web.bind.annotation.RequestMethod;
import org.springframework.web.bind.annotation.RequestParam;
import org.springframework.web.servlet.ModelAndView;
@Controller
public class LoginController {
@RequestMapping("/view")
public ModelAndView view(HttpServletRequest request){
//获取请求中的path参数
String path = request.getParameter("path") + "";
//新建视图变量
ModelAndView mav = new ModelAndView();
//获取web项目的根路径,方便我们取到Img下的图片
String contextPath = request.getContextPath();
//保存路径到内存中
mav.addObject("contextPath" , contextPath);
//设置跳转的页面名称
mav.setViewName(path);
return mav;
}
@RequestMapping(value = "/login", method = RequestMethod.GET)
	public ModelAndView login(
			@RequestParam(value = "error", required = false) String error,
			@RequestParam(value = "logout", required = false) String logout) {

			ModelAndView model = new ModelAndView();
			if (error != null) {
				model.addObject("error", "账号或密码错误");
			}

			if (logout != null) {
				model.addObject("msg", "你已经成功地注销了");
			}
			model.addObject("title", "Spring Security Hello World");
			model.addObject("message", "This is login page!");
			model.setViewName("login");
		return model;
	}
@RequestMapping("/welcome")
	public ModelAndView demo(HttpServletRequest request){
		ModelAndView mav = new ModelAndView();

		String contextPath = request.getContextPath();
		mav.addObject("contextPath" , contextPath);
		mav.addObject("title", "Spring Security Hello World");
		mav.addObject("message", "This is welcome page!");
		mav.setViewName("welcome");
		return mav;
	}
@RequestMapping(value="/logout", method = RequestMethod.GET)
	public String logoutPage (HttpServletRequest request, HttpServletResponse response) {
		Authentication auth = SecurityContextHolder.getContext().getAuthentication();
		if (auth != null){
			new SecurityContextLogoutHandler().logout(request, response, auth);
		}
		return "redirect:/login?logout";
	}
}
第二步:启动tomcat运行项目,浏览器输入http://localhost:8080/MavenDemo/显示页面如下
点击登陆账号,跳转页面如下:
登陆成功后welcome页面如下:
点击注销(即退出登陆)显示页面如下: