view:视图
一般的视图类型:HTML、jsp、freemarker、velocity、thymeleaf
课程中主要用freemarker,使用freemarker
直接转发视图
第一步:添加依赖
    <dependency>
        <groupId>org.springframework.boot</groupId>
        <artifactId>spring-boot-starter-freemarker</artifactId>
    </dependency>
第二步:资源文件配置
spring.freemarker.cache=false
#编码
spring.freemarker.charset=UTF-8
#媒体类型
spring.freemarker.content-type=text/html
#模板文件类型,.ftl是freemarker文件的扩展名
spring.freemarker.suffix=.ftl
#模板文件路径,根目录下的templates文件里
spring.freemarker.template-loader-path=classpath:/templates
spring.freemarker.request-context-attribute=request
第三步:创建模板文件
在resources(资源文件)文件夹下创建一个templates文件,在该文件夹下创建一个文件夹my,在my文件夹下创建myIndex.ftl文件
第四步:编辑模板文件
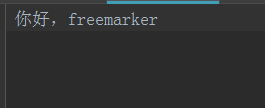
在模板文件myIndex.ftl中写“你好,freemarker”
第五步:controller返回视图
import org.springframework.stereotype.Controller;
import org.springframework.web.bind.annotation.*;
@Controller
@RequestMapping("/test")
public class SpringBootTest {
@RequestMapping("/test1")
public String test1(){
//返回的是视图文件名,扩展名.ftl不用写,存在多级目录要将目录写全
    return "/my/myIndex";
}
}
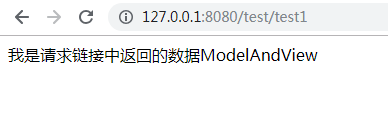
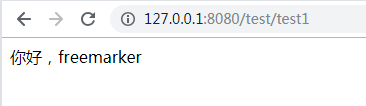
浏览器请求 http://127.0.0.1:8080/test/test1 返回视图文件内容
处理模型数据:ModelMap及Model
**Model:**在转发方法上添加一个Model类型的参数
import org.springframework.stereotype.Controller;
import org.springframework.ui.Model;
import org.springframework.web.bind.annotation.*;
@Controller
@RequestMapping("/test")
public class SpringBootTest {
@RequestMapping("/test1")
public String test1(Model model){
    model.addAttribute("name","我是请求链接中返回的数据" );
    return "/my/myIndex";
}
}
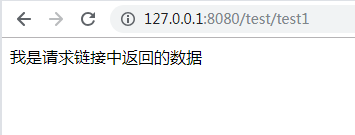
用model的addAttribute方法可以将服务器的值传入页面,return返回的必须是视图文件才行
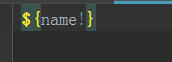
视图文件myIndex.ftl中用el表达式获取该值,${获取参数返回的key的名称}
浏览器请求 http://127.0.0.1:8080/test/test1 返回获取到的value
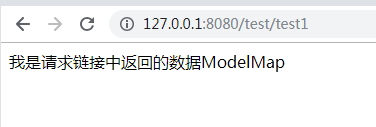
ModelMap:在转发方法上添加一个ModelMap类型的参数,用modelMap的put方法也可以
import org.springframework.stereotype.Controller;
import org.springframework.ui.ModelMap;
import org.springframework.web.bind.annotation.*;
@Controller
@RequestMapping("/test")
public class SpringBootTest {
@RequestMapping("/test1")
public String test1(ModelMap modelMap){
    modelMap.put("name","我是请求链接中返回的数据ModelMap");
    return "/my/myIndex";
}
}
ModelAndView:是将视图与数据模型合并在一起
使用ModelAndView类来存储处理完的结果数据以及显示该数据的视图
import org.springframework.stereotype.Controller;
import org.springframework.web.bind.annotation.*;
import org.springframework.web.servlet.ModelAndView;
@Controller
@RequestMapping("/test")
public class SpringBootTest {
@RequestMapping("/test1")
//方法返回的是一个对象,不是String
public ModelAndView test1(){
    ModelAndView modelAndView=new ModelAndView();
    //返回的模板文件路径
    modelAndView.setViewName("/my/myIndex");
    //添加的数据,模板文件中用el表达式用key获取value
    modelAndView.addObject("name", "我是请求链接中返回的数据ModelAndView");
    return modelAndView;
}
}
模板文件还是用el表达式写用key获取value,该value显示在请求页面${name!}