版权声明:本文为博主原创文章,未经博主允许不得转载。 https://blog.csdn.net/ITwuyang/article/details/77645170
1、引入thymeleaf
pom.xml
<!-- 01、thymeleaf模板 -->
        <dependency>
            <groupId>org.springframework.boot</groupId>
            <artifactId>spring-boot-starter-thymeleaf</artifactId>
        </dependency>
2、关闭缓存
application.properties
spring.thymeleaf.cache=false
#spring.thymeleaf.prefix=classpath:/templates/
#spring.thymeleaf.suffix=.html
#spring.thymeleaf.mode=HTML5
#spring.thymeleaf.encoding=UTF-8
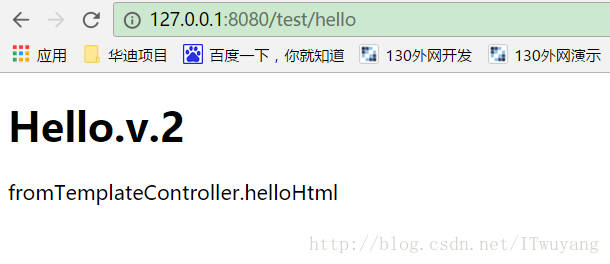
#spring.thymeleaf.content-type=text/html3、创建html文件
helloHtml.html
<!DOCTYPE html>
<html>
<head>
<title>Hello World!</title>
</head>
<body>
    <h1 th:inline="text">Hello.v.2</h1>

    <p th:text="${hello}"></p>

</body>
</html>
4、创建controller类
TemplateController.java
package cn.wuyang.springboot.controller;

import java.util.Map;

import org.springframework.stereotype.Controller;
import org.springframework.web.bind.annotation.RequestMapping;

@Controller
@RequestMapping("/test")
public class TemplateController {

    @RequestMapping("/hello")   //   http://127.0.0.1:8080/test/hello
    public String helloHtml(Map<String,Object> map) {
        map.put("hello","fromTemplateController.helloHtml");
        return "/helloHtml";
    }
}