一、SpringBoot 介绍
SpringBoot 是一个轻量级的快速开发框架,通过使用 Maven 继承关系能够快速整合的第三方框架,简化 XML 配置,全部注解化,内置 Tomcat 等容器,能够帮助开发者实现快速开发。其中 SpringBoot 默认集成 SpringMVC 作为 Web 组件。
二、第一个SpringBoot程序
学习 SpringBoot 之前,我们先来开始一个简单的 SpringBoot 应用来感受一下 SpringBoot 的魅力所在。
1. 创建一个 Maven 项目
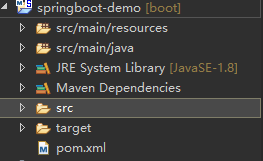
打开 Eclipse 右键新建一个 Maven 项目,选择创建模板为 maven-archetype-webapp ,这里不强制要求模板为 maven-archetype-webapp 也可以是其他,例如: maven-archetype-quickstart 。创建完后项目结构如下所示:
2. pom.xml 中加入 SpringBoot 依赖
打开 pom.xml 文件,加入如下配置:
<!-- 配置jdk版本 -->
<properties>
	<java.version>1.8</java.version>
</properties>
<!-- spring-boot-starter-parent 整合第三方常用框架依赖信息 -->
<parent>
	<groupId>org.springframework.boot</groupId>
	<artifactId>spring-boot-starter-parent</artifactId>
	<version>2.0.0.RELEASE</version>
</parent>

<dependencies>
	<!-- spring-boot-starter-web 是Springboot整合SpringMVC Web -->
	<dependency>
		<groupId>org.springframework.boot</groupId>
		<artifactId>spring-boot-starter-web</artifactId>
	</dependency>

	<!-- SpringBoot 外部tomcat支持 -->
	<dependency>
		<groupId>org.springframework.boot</groupId>
		<artifactId>spring-boot-starter-tomcat</artifactId>
	</dependency>
	<dependency>
		<groupId>org.apache.tomcat.embed</groupId>
		<artifactId>tomcat-embed-jasper</artifactId>
	</dependency>

	<!-- 集成lombok -->
	<dependency>
		<groupId>org.projectlombok</groupId>
		<artifactId>lombok</artifactId>
		<exclusions>
			<exclusion>
				<groupId>org.slf4j</groupId>
				<artifactId>slf4j-api</artifactId>
			</exclusion>
		</exclusions>
	</dependency>

	<!-- springboot-log4j -->
	<dependency>
		<groupId>org.springframework.boot</groupId>
		<artifactId>spring-boot-starter-log4j</artifactId>
		<version>1.3.8.RELEASE</version>
	</dependency>

	<dependency>
		<groupId>junit</groupId>
		<artifactId>junit</artifactId>
		<scope>test</scope>
	</dependency>
</dependencies>
3. 编写 application.properties 文件
application.properties 文件是 SpringBoot 中至关重要的文件,与 pom.xml 文件一同实现快速整合第三方框架。SpringBoot 的配置文件主要有application.properties 和 application.yml ,关于 YML 文件语法参考文章 SpringBoot学习——YML语法,网上大部分就是前者使用的居多,后者的使用需要遵循一定的编写规范。这里暂时设置服务端口为8080,设置方法是在 application.properties 中添加一行 server.port=8080,默认就是8080端口,这里只是作为演示说明一下 application.properties 文件的作用意义。
4. 编写第一个 Controller 文件
添加 Bean,Service,Controller ;.java 文件总览:
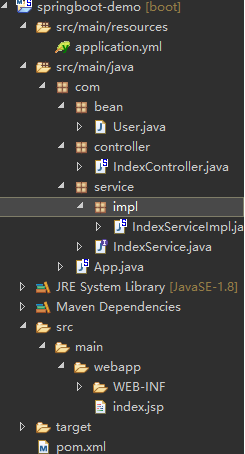
User bean 如下:
package com.bean;

import lombok.Getter;
import lombok.Setter;

/**
* @Description 类描述
* @author 欧阳
* @since 2019年4月7日 下午12:29:13
* @version V1.0
*/

@Getter
@Setter
public class User {
	private String id;
	private String name;
}
注意:这个用到了 lombok ,关于 lombok 的使用参考文章 lombok eclipse安装、lombok基本使用、深入理解lombok及坑坑详解,其次需要注意的是,不仅项目需要加入Lombok jar,Eclipse 也需要集成Lombok。
下面依次是 Service 及 ServiceImpl
public interface IndexService {

	/**
	 * 描述:获取用户信息
	 * @return
	 */
	public User getUser();
}
@Service
public class IndexServiceImpl implements IndexService {

	@Override
	public User getUser() {
		User user = new User();
		user.setId("U1001");
		user.setName("张三");
		return user;
	}

}
最后是Controller。
package com.controller;

import org.springframework.beans.factory.annotation.Autowired;
import org.springframework.web.bind.annotation.RequestMapping;
import org.springframework.web.bind.annotation.RestController;

import com.bean.User;
import com.service.IndexService;

/**
* @Description 第一个Controller
* @author 欧阳
* @since 2019年4月7日 下午12:27:08
* @version V1.0
*/

@RestController
public class IndexController {
	//@RestController 注解等同于 @Controller + @ResponseBody

	@Autowired
	private IndexService indexService;

	@RequestMapping("/index")
	public User index() {

		return indexService.getUser();
	}
}
5. 编写 SpringBoot 启动类
SpringBoot 的启动类需要编写在Controller、Service、Bean 等包之上,再加上注解 @SpringBootApplication ,然后在 main 方法中添加 SpringApplication.run(App.class, args);即可,代码如下:
注意:在启动类上加上@SpringBootApplication注解,扫包范围是当前包下或者子包下所有的类。
package com;

import org.springframework.boot.SpringApplication;
import org.springframework.boot.autoconfigure.SpringBootApplication;

/**
* @Description 第一个SpringBoot 应用启动类
* @author 欧阳
* @since 2019年4月3日 下午6:14:39
* @version V1.0
*/

@SpringBootApplication
public class App {

	public static void main(String[] args) {

		SpringApplication.run(App.class, args);
	}

}
6. 测试
在index.jsp 文件中添加链接 <a href="<%=request.getContextPath() %>/index">Hello SpringBoot</a> ;
访问地址 http://localhost:8080/index.jsp,点击链接地址后返回后端 Controller 结果。
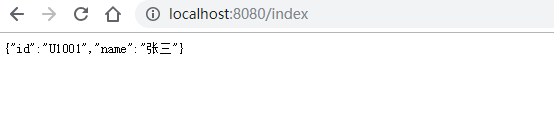
到这里第一个 SpringBoot 应用就结束了。