nginx:异步非阻塞模式,适用于门户型网站
apache:同步阻塞模式
默认发布文件:index.html
1.apache
企业中常用的web服务,用来提供http://(超文本传输协议)
2.apache的安装部署
yum install httpd -y						##安装apache软件
yum install httpd-manual					##安装apache的手册
systemctl start httpd
systemctl enable httpd
firewall-cmd --list-all						##列出防火墙信息
firewall-cmd --permanent --add-service=http	##永久允许http
firewall-cmd --reload						##防火墙重新加载使策略生效

/var/www/html								##apache的默认发布目录
var/www/html/index.html						##apache的默认发布文件
vim /var/www/html/index.html
<h1> hello world </h1>						##以html语言编辑apache的默认发布文件


测试:浏览器访问
http://172.25.254.226
http://172.25.254.226/manual

3.apache的基础信息
主配置目录: /etc/httpd/conf
子配置文件: /etc/httpd/conf/httpd.conf
子配置目录: /etc/httpd/conf.d/
子配置文件: /etc/httpd/conf.d/*.conf
默认发布目录: /var/www/html/
默认发布文件: index.html
默认端口:    80
默认安全上下文:httpd_sys_content_t
程序开启默认用户:apache
apache日志: /etc/httpd/logs/*
/etc/httpd/logs/access_log 		    ##登陆的用户信息日志
/etc/httpd/logs/error_log    		##错误的日志信息
修改默认端口:
vim /etc/httpd/conf/httpd.conf
 42 Listen 8080
systemctl restart httpd
firewall-cmd --permanent --add-port=8080/tcp	##永久修改防火墙允许此端口
firewall-cmd --reload

测试时,80端口无法访问,而8080端口可以访问


修改默认发布文件:
默认发布文件就是访问 apache时没有指定文件名称时默认访问的文件
这个文件可以指定多个,有访问的顺序
vim /etc/httpd/conf/httpd.conf
164     DirectoryIndex  index.html  hhh.html##当index.html不存在时,访问hhh.html
systemctl restart httpd
vim /var/www/html/hhh.html
<h1>test</h1>
vim /var/www/html/index.html
<h1>westos</h1>


修改默认发布目录
mkdir /westos/html/ -p
vim /westos/html/index.html
1 <h1>directory</h1>
vim /etc/httpd/conf/httpd.conf
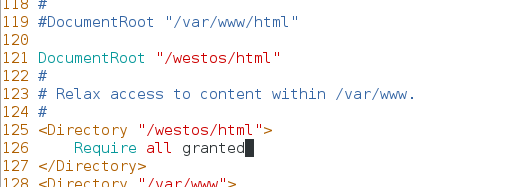
119 #DocumentRoot "/var/www/html"
120
121 DocumentRoot "/westos/html" ##这里设置的目录必须是已存在目录
122 #
123 # Relax access to content within /var/www.
124 #
125 <Directory "/westos/html">
126 Require all granted ##设置允许所有人访问
127 </Directory>
systemctl restart httpd
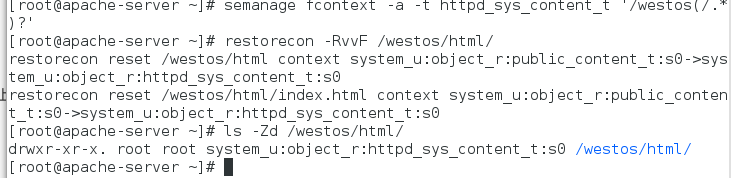
semanage fcontext -a -t httpd_sys_content_t '/westos(/.*)?' ##修改默认目录的安全上下文
restorecon -RvvF /westos/html/ ##刷新上下文

4.apache的虚拟主机
(1)环境配置
建立各自虚拟主机的默认文件目录,并编辑文件内容
mkdir /var/www/virtual/westos.com/music -p
mkdir /var/www/virtual/westos.com/news -p
vim /var/www/virtual/westos.com/news/index.html
1 this is news
vim /var/www/virtual/westos.com/music/index.html
1 this is music
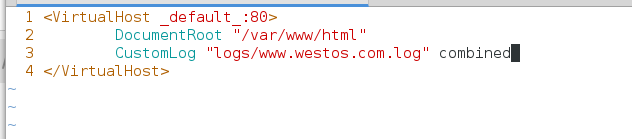
vim /etc/httpd/conf.d/adefault.conf
1 <VirtualHost _default_:80> ##设置虚拟主机所对的域名端口为80(默认)
2 DocumentRoot "/var/www/html" ##设置读取文件目录
3 CustomLog "logs/www.westos.com.log" combined##为新的虚拟主机设置日志目录,日志类型为combined(混合型),正确错误的日志都在此
4 </VirtualHost>
vim /etc/httpd/conf/httpd.conf
31 ServerRoot "/etc/httpd" ##上面的日志目录logs前之所以没有上级目录,是因为httpd配置文件中设置有默认文件,应该为/etc/httpd/logs/www.westos.com.log
vim /etc/httpd/conf.d/news.conf
1 <VirtualHost *:80> ##设置端口
2 ServerName "news.westos.com" ##设置所对应的访问域名
3 DocumentRoot "/var/www/virtual/westos.com/news"##访问域名时读取的文件
4 CustomLog logs/news.log combined##设置日志文件地址以及类型
5 </VirtualHost>
6 <Directory "/var/www/virtual/westos.com/news">
7 Require all granted ##设置访问限制
8 </Directory>
vim /etc/httpd/conf.d/music.conf
1 <VirtualHost *:80>
2 ServerName "music.westos.com"
3 DocumentRoot "/var/www/virtual/westos.com/music"
4 CustomLog logs/music.log combined
5 </VirtualHost>
6 <Directory "/var/www/virtual/westos.com/music">
7 Require all granted
8 </Directory>
(2)测试
vim /etc/hosts					##设置本地域名解析
172.25.254.126 www.westos.com news.westos.com music.westos.com login.westos.com


Ctrl+Shift+Delete 清除浏览器缓存
5.apache内部的访问控制
(1)针对于主机的访问控制—>基于ip
vim /etc/httpd/conf.d/adefault.conf
  1 <VirtualHost _default_:80>
  2         DocumentRoot "/var/www/html"
  3         CustomLog "logs/www.westos.com.log" combined
  4 </VirtualHost>
  5 <Directory "/var/www/html">
  6         Require all granted
  7         Order Deny,Allow					##读取策略顺序
  8         Allow from 172.25.254.226
  9         Deny from ALL
 10 </Directory>


设置除了本机都不可访问
vim /etc/httpd/conf.d/adefault.conf
  1 <VirtualHost _default_:80>
  2         DocumentRoot "/var/www/html"
  3         CustomLog "logs/www.westos.com.log" combined
  4 </VirtualHost>
  5 <Directory "/var/www/html">
  6         Require all granted
  7         Order Allow,Deny
  8         Allow from all
  9         Deny from 172.25.254.226
 10 </Directory>
设置除了本机都可以访问

(2)用户方式的访问控制—>基于用户名
htpasswd -cm /etc/httpd/userpass admin
htpasswd -m /etc/httpd/userpass admin1

mkdir /var/www/html/admin/
vim /var/www/html/admin/index.html
 1 <h1>this is test</h1>
systemctl restart httpd

浏览器查看172.25.254.226/admin

让所有admin用户都可登陆
vim /etc/httpd/conf.d/adefault.conf
 11 <Directory "/var/www/html/admin">
 12         AuthUserFile "/etc/httpd/userpass"		   ##用户认证时用的加密文件
 13         AuthName "Please input your name and password" ##提示信息
 14         AuthType basic							   ##用户认证类型
 15 #       Require   user admin					   ##指定可访问用户
 16         Require   valid-user
 17 </Directory>
systemctl restart httpd

测试访问http://172.25.254.226/admin切换用户登陆时先清除浏览器缓存
Ctrl+Shift+Delete 清除浏览器缓存


只让admin登陆
vim /etc/httpd/conf.d/adefault.conf
 11 <Directory "/var/www/html/admin">
 12         AuthUserFile "/etc/httpd/userpass"
 13         AuthName "Please input your name and password"
 14         AuthType basic
 15         Require   user admin
 16 #       Require   valid-user
 17 </Directory>
systemctl restart httpd

测试时admin1登陆不了


6.apache支持的语言
(1)html
vim /var/www/html/index.html
<h1>westos</h1>
测试  172.25.254.126/index.html

(2)php
yum install php -y
vim /var/www/html/index.php
<?php
	phpinfo();
?>

systemctl restart httpd

测试
172.25.254.126/index.php

(3)cgi
mkdir -p /var/www/html/cgi ##创建cgi默认文件目录
semanage fcontext -a -t httpd_sys_script_exec_t '/var/www/html/cgi(/.*)?'##修改上下文
restorecon -RvvF /var/www/html/cgi/ ##刷新安全上下文
ls -Zd /var/www/html/cgi/ ##查看安全上下文
vim /var/www/html/cgi/index.cgi
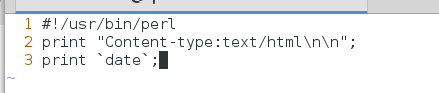
1 #!/usr/bin/perl
2 print "Content-type: text/html\n\n";
3 print `date`; ##``表示优先执行
chmod +x /var/www/html/cgi/index.cgi
vim /etc/httpd/conf.d/adefault.conf
19 <Directory "/var/www/html/cgi">
20 Options +ExecCGI ##文件类型
21 AddHandler cgi-script .cgi ##AddHandler##标识cgi文件格式
22 </Directory>
systemctl restart httpd


测试 http://172.25.254.226/cgi/index.cgi

(4)wsgi
yum install mod_wsgi -y

vim /var/www/html/cgi/westos.wsgi
  1 #!/usr/bin/env python
  2 import time
  3
  4 def application (environ, start_response):
  5   response_body = 'UNIX EPOCH time is now: %s\n' % time.time()
  6   status = '200 OK'
  7   response_headers = [('Content-Type', 'text/plain'),
  8                       ('Content-Length', '1'),
  9                       ('Content-Length', str(len(response_body)))]
 10   start_response(status, response_headers)
 11   return [response_body]
chmod +x /var/www/html/cgi/westos.wsgi

vim /etc/httpd/conf.d/adefault.conf
  1 <VirtualHost _default_:80>
  2         DocumentRoot "/var/www/html"
  3         CustomLog "logs/www.westos.com.log" combined
  4         WSGIScriptAlias /WSGI /var/www/html/cgi/westos.wsgi
  5 </VirtualHost>

systemctl restart httpd


测试 172.25.254.126/WSGI ---->EPOCH 检测系统负载

7.https用于加密网页,保证用户数据在互联网中不被泄露
yum install mod_ssl -y					##安装https插件服务
yum install crypto-utils -y				##安装配置加密软件
[root@apache-server ~]# genkey www.westos.com ##配置加密信息
/usr/bin/keyutil -c makecert -g 1024 -s “CN=www.westos.com, OU=Linux, O=westos, L=xi’an, ST=Shannxi, C=CN” -v 1 -a -z /etc/pki/tls/.rand.4672 -o /etc/pki/tls/certs/www.westos.com.crt -k /etc/pki/tls/private/www.westos.com.key
cmdstr: makecert
cmd_CreateNewCert
command: makecert
keysize = 1024 bits
subject = CN=www.westos.com, OU=Linux, O=westos, L=xi’an, ST=Shannxi, C=CN
valid for 1 months
random seed from /etc/pki/tls/.rand.4672
output will be written to /etc/pki/tls/certs/www.westos.com.crt
output key written to /etc/pki/tls/private/www.westos.com.key
Generating key. This may take a few moments…
Made a key
Opened tmprequest for writing
/usr/bin/keyutil Copying the cert pointer
Created a certificate
Wrote 882 bytes of encoded data to /etc/pki/tls/private/www.westos.com.key
Wrote the key to:
/etc/pki/tls/private/www.westos.com.key
cmd_CreateNewCert
command: makecert
keysize = 1024 bits
subject = CN=www.westos.com, OU=Linux, O=westos, L=xi’an, ST=shannxi, C=CN
valid for 1 months
random seed from /etc/pki/tls/.rand.7608
output will be written to /etc/pki/tls/certs/www.westos.com.crt
output key written to /etc/pki/tls/private/www.westos.com.key
Generating key. This may take a few moments…
Made a key
Opened tmprequest for writing
/usr/bin/keyutil Copying the cert pointer
Created a certificate
Wrote 882 bytes of encoded data to /etc/pki/tls/private/www.westos.com.key
Wrote the key to:
/etc/pki/tls/private/www.westos.com.key


vim /etc/httpd/conf.d/ssl.conf
100 #SSLCertificateFile /etc/pki/tls/certs/localhost.crt
101 SSLCertificateFile /etc/pki/tls/certs/www.westos.com.crt

108 #SSLCertificateKeyFile /etc/pki/tls/private/localhost.key
109 SSLCertificateKeyFile /etc/pki/tls/private/www.westos.com.key

测试:https://172.25.254.226 查看加密信息的变化情况


8.设定https虚拟主机并设定网页重写(在输入一个域名后,自动转跳到其https所属的加密网页)
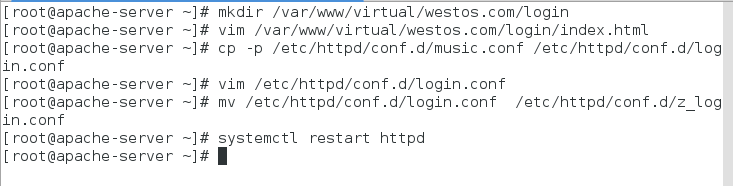
mkdir /var/www/virtual/westos.com/login
vim /var/www/virtual/westos.com/login/index.html
  https test
cp -p /etc/httpd/conf.d/music.conf  /etc/httpd/conf.d/login.conf

vim /etc/httpd/conf.d/login.conf
  1 <VirtualHost *:80>
  2         ServerName login.westos.com
  3         RewriteEngine on
  4         RewriteRule ^(/.*)$   https://%{HTTP_HOST}$1  [redirect=301]
  5 </VirtualHost>
  6 <VirtualHost *:443>
  7         ServerName "login.westos.com"
  8         DocumentRoot "/var/www/virtual/westos.com/login"
  9         CustomLog logs/login.log    combined
 10         SSLEngine on
 11         SSLCertificateFile /etc/pki/tls/certs/www.westos.com.crt
 12         SSLCertificateKeyFile /etc/pki/tls/private/www.westos.com.key
 13 </VirtualHost>
 14 <Directory "/var/www/virtual/westos.com/login">
 15         Require all granted
 16 </Directory>

mv login.conf z_login.conf 更改login读取的优先级,防止访问https://www.westos.com时直接访问https://login.westos.com
systemctl restart httpd