1、安装redis
【1】下载安装包
#准备安装文件夹

mkdir /usr/local/soft/redis

#进入文件夹

cd  /usr/local/soft/redis

#下载安装包

wget http://download.redis.io/releases/redis-4.0.11.tar.gz
【2】安装redis
#解压

tar zvxf redis-4.0.11.tar.gz

#编译

cd redis-4.0.11
make

#编译之后,提示可以'make test'

make test

【3】配置redis.conf
#复制两份redis.conf,分别是6378、6379的配置文件

cp redis.conf redis-6378.conf
cp redis.conf redis-6379.conf

#端口默认是6379,所以将redis-6378.conf的端口修改为6378

vim /usr/local/soft/redis/redis-4.0.11/redis-6378.conf

2、将启动做成服务
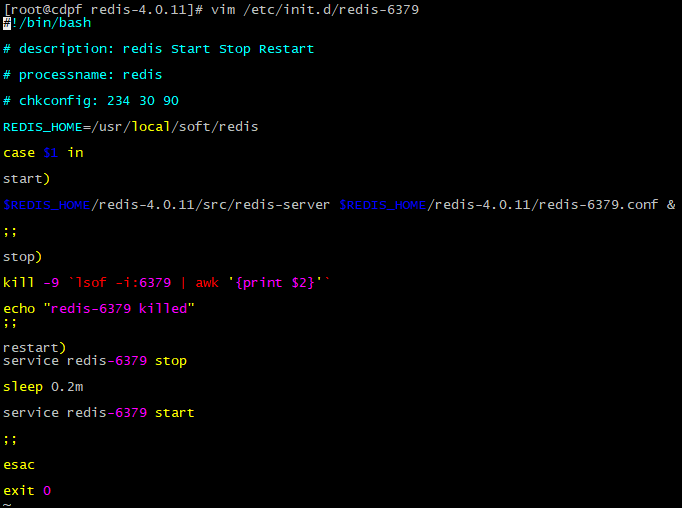
vim /etc/init.d/redis-6379
文本内添加:
#!/bin/bash

# description: redis Start Stop Restart

# processname: redis

# chkconfig: 234 30 90

REDIS_HOME=/usr/local/soft/redis

case $1 in

start)

$REDIS_HOME/redis-4.0.11/src/redis-server $REDIS_HOME/redis-4.0.11/redis-6379.conf &

;;

stop)

kill -9 `lsof -i:6379 | awk '{print $2}'`

echo "redis-6379 killed"
;;

restart)
service redis-6379 stop

sleep 0.2m

service redis-6379 start

;;

esac

exit 0
6378同理:

3、启动redis
service redis-6379 start
【1】根据提示解决报错
WARNING overcommit_memory is set to 0! Background save may fail under low memory condition.
To fix this issue add 'vm.overcommit_memory = 1' to /etc/sysctl.conf
and then reboot or run the command 'sysctl vm.overcommit_memory=1' for this to take effect.
15104:M 10 Apr 09:44:29.767 # WARNING you have Transparent Huge Pages (THP) support enabled in your kernel.
This will create latency and memory usage issues with Redis.
To fix this issue run the command 'echo never > /sys/kernel/mm/transparent_hugepage/enabled' as root, and add it to your /etc/rc.local
in order to retain the setting after a reboot. Redis must be restarted after THP is disabled.
15104:M 10 Apr 09:44:29.767 * Ready to accept connections
vim /etc/sysctl.conf
文本内加:
vm.overcommit_memory = 1

使之生效
sysctl vm.overcommit_memory=1

echo never > /sys/kernel/mm/transparent_hugepage/enabled

添加到文件使开机重启后继续生效
vi /etc/rc.local
文本内添加:
echo never > /sys/kernel/mm/transparent_hugepage/enabled

【2】再次启动
#启动6379

service redis-6379 start
#启动6378
service redis-6378 start

#查看进程

ps -ef | grep redis

4、配置环境变量
vim /etc/profile
文本中添加
export REDIS_HOME=/usr/local/soft/redis/redis-4.0.1

:$REDIS_HOME/src

使之生效
source /etc/profile
测试是否配置成功
redis-cli
5、本地连接
#默认连接6379,也可以指定端口

redis-cli

#连接6378,需要指定端口

redis-cli -p 6378

6、远程连接
【1】注释掉bind 127.0.0.1
可以使所有的ip访问redis,若是想指定多个ip访问,但并不是全部的ip访问,可以bind
【2】protected-mode yes 改为 protected-mode no
vim /usr/local/soft/redis/redis-4.0.11/redis-6379.conf

【3】测试远程连接,如果连接不上,重启一下
