60.61.62:JDBC MyBatis Spring Data JPA
使用对应的功能就要导入对应的starter,场景启动器。
整合最基本的JDBC:
代码的GitHub地址:https://github.com/FandyWw/spring-boot-06-data-jdbc
在创建项目的时候要指定引入哪些场景启动器:
 引入依赖。
引入依赖。
 引入web场景。
pom文件,加入了:
<dependency>
			<groupId>org.springframework.boot</groupId>
			<artifactId>spring-boot-starter-jdbc</artifactId>
		</dependency>
		<dependency>
			<groupId>mysql</groupId>
			<artifactId>mysql-connector-java</artifactId>
			<scope>runtime</scope>
		</dependency>
新建数据库:root
访问数据库的基本的yml文件:
spring:
  datasource:
    username: root
    password: 123456
    url: jdbc:mysql://192.168.244.130:3306/jdbc
    driver-class-name: com.mysql.jdbc.Driver
效果:
import org.springframework.boot.test.context.SpringBootTest;
import org.springframework.test.context.junit4.SpringRunner;
import javax.sql.DataSource;
import java.sql.Connection;
import java.sql.SQLException;

@RunWith(SpringRunner.class)
@SpringBootTest
public class SpringBoot06DataJdbcApplicationTests {

	@Autowired
	DataSource dataSource;

	@Test
	public void contextLoads() throws SQLException {
		//org.apache.tomcat.jdbc.pool.DataSource
		System.out.println(dataSource.getClass());
		Connection connection = dataSource.getConnection();
		System.out.println(connection);
		connection.close();
	}

}
使用的数据源------------查看数据源的配置文件:
默认的数据源:![]()
配置文件都在这个类里面,这里面是配置数据源的配置文件:

自动配置原理的源码解析:\org\springframework\boot\autoconfigure\jdbc
1.DataSourceConfiguration:这个配置文件是配置数据源的,根据配置创建数据源,默认是使用Tomcat连接池。可以使用红框里面的spring.datasource.type指定数据源。
springboot默认支持的数据源都在这里面。
org.apache.tomcat.jdbc.pool.DataSource、HikariDataSource、BasicDataSource
还可以自定义数据源:
/**
	 * Generic DataSource configuration.
	 */
	@ConditionalOnMissingBean(DataSource.class)
	@ConditionalOnProperty(name = "spring.datasource.type")
	static class Generic {

		@Bean
		public DataSource dataSource(DataSourceProperties properties) {
			return properties.initializeDataSourceBuilder().build();
		}

	}
如果是自定义的数据源是怎么创建出来的呢?注意上面的return方法和配置文件的关系。大体上就是使用DataSourceBuilder创建数据源,使用反射创建响应type的数据源,并绑定相关属性。
2.DataSourceAutoConfiguration

注意这个类在容器中添加了DataSourceInitializer。

点进去发现是一个监听器:
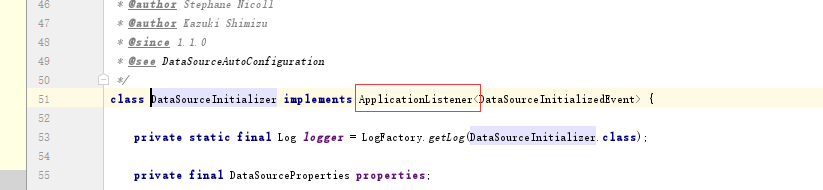
implements ApplicationListener:作用 1) 初始化时候帮我们加载
文件。
2)
@PostConstruct
	public void init() {
		if (!this.properties.isInitialize()) {
			logger.debug("Initialization disabled (not running DDL scripts)");
			return;
		}
		if (this.applicationContext.getBeanNamesForType(DataSource.class, false,
				false).length > 0) {
			this.dataSource = this.applicationContext.getBean(DataSource.class);
		}
		if (this.dataSource == null) {
			logger.debug("No DataSource found so not initializing");
			return;
		}
		runSchemaScripts();
	}
注意这个方法:作用在容器中拿到数据源运行建表语句。runSchemaScripts()。
	@Override
	public void onApplicationEvent(DataSourceInitializedEvent event) {
		if (!this.properties.isInitialize()) {
			logger.debug("Initialization disabled (not running data scripts)");
			return;
		}
		// NOTE the event can happen more than once and
		// the event datasource is not used here
		if (!this.initialized) {
			runDataScripts();
			this.initialized = true;
		}
	}
注意这个方法:runDataScripts()运行插入数据的sql语句
默认只需要将文件命名为:

建表:schema-*.sql 和 data-*.sql
进入运行建表语句的代码中:
private void runSchemaScripts() {
		List<Resource> scripts = getScripts("spring.datasource.schema",
				this.properties.getSchema(), "schema");
		if (!scripts.isEmpty()) {
			String username = this.properties.getSchemaUsername();
			String password = this.properties.getSchemaPassword();
			runScripts(scripts, username, password);
			try {
				this.applicationContext
						.publishEvent(new DataSourceInitializedEvent(this.dataSource));
				// The listener might not be registered yet, so don't rely on it.
				if (!this.initialized) {
					runDataScripts();
					this.initialized = true;
				}
			}
			catch (IllegalStateException ex) {
				logger.warn("Could not send event to complete DataSource initialization ("
						+ ex.getMessage() + ")");
			}
		}
	}
	private List<Resource> getScripts(String propertyName, List<String> resources,
			String fallback) {
		if (resources != null) {
			return getResources(propertyName, resources, true);
		}
		String platform = this.properties.getPlatform();
		List<String> fallbackResources = new ArrayList<String>();
		fallbackResources.add("classpath*:" + fallback + "-" + platform + ".sql");
		fallbackResources.add("classpath*:" + fallback + ".sql");
		return getResources(propertyName, fallbackResources, false);
	}
测试 : 根据规则默认加载的。根据代码fallback=schema platform=all。
自定义:![]()
/*
Navicat MySQL Data Transfer

Source Server         : 本地
Source Server Version : 50528
Source Host           : 127.0.0.1:3306
Source Database       : restful_crud

Target Server Type    : MYSQL
Target Server Version : 50528
File Encoding         : 65001

Date: 2018-03-05 10:41:40
*/

SET FOREIGN_KEY_CHECKS=0;

-- ----------------------------
-- Table structure for department
-- ----------------------------
DROP TABLE IF EXISTS `department`;
CREATE TABLE `department` (
  `id` int(11) NOT NULL AUTO_INCREMENT,
  `departmentName` varchar(255) DEFAULT NULL,
  PRIMARY KEY (`id`)
) ENGINE=InnoDB AUTO_INCREMENT=1 DEFAULT CHARSET=utf8;
在配置文件里面设置:
spring:
  datasource:
    username: root
    password: 123456
    url: jdbc:mysql://192.168.244.130:3306/jdbc
    driver-class-name: com.mysql.jdbc.Driver
    type: com.alibaba.druid.pool.DruidDataSource


#    initialSize: 5
#    minIdle: 5
#    maxActive: 20
#    maxWait: 60000
#    timeBetweenEvictionRunsMillis: 60000
#    minEvictableIdleTimeMillis: 300000
#    validationQuery: SELECT 1 FROM DUAL
#    testWhileIdle: true
#    testOnBorrow: false
#    testOnReturn: false
#    poolPreparedStatements: true
##   配置监控统计拦截的filters,去掉后监控界面sql无法统计,'wall'用于防火墙
#    filters: stat,wall,log4j
#    maxPoolPreparedStatementPerConnectionSize: 20
#    useGlobalDataSourceStat: true
#    connectionProperties: druid.stat.mergeSql=true;druid.stat.slowSqlMillis=500
    schema:
    - classpath:department.sql
建表成功: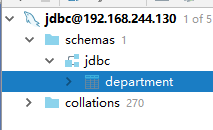
操作数据库crud使用这个类自动配置了JDBCTemplate:

写一个实验的controller:
package com.atguigu.springboot.controller;

import org.springframework.beans.factory.annotation.Autowired;
import org.springframework.jdbc.core.JdbcTemplate;
import org.springframework.stereotype.Controller;
import org.springframework.web.bind.annotation.GetMapping;
import org.springframework.web.bind.annotation.ResponseBody;

import java.util.List;
import java.util.Map;

@Controller
public class HelloController {

    @Autowired
    JdbcTemplate jdbcTemplate;


    @ResponseBody
    @GetMapping("/query")
    public Map<String,Object> map(){
        List<Map<String, Object>> list = jdbcTemplate.queryForList("select * FROM department");
        return list.get(0);
    }
}
启动项目查询:

整合时下流行的数据源:
首先引用数据源:
<!--引入druid数据源-->
		<!-- https://mvnrepository.com/artifact/com.alibaba/druid -->
		<dependency>
			<groupId>com.alibaba</groupId>
			<artifactId>druid</artifactId>
			<version>1.1.8</version>
		</dependency>
spring:
datasource:
username: root
password: 123456
url: jdbc:mysql://192.168.244.130:3306/jdbc
driver-class-name: com.mysql.jdbc.Driver
type: com.alibaba.druid.pool.DruidDataSource测试类测试:

数据源要配置属性:
spring:
  datasource:
    username: root
    password: 123456
    url: jdbc:mysql://192.168.244.130:3306/jdbc
    driver-class-name: com.mysql.jdbc.Driver
    type: com.alibaba.druid.pool.DruidDataSource
initialSize: 5
minIdle: 5
maxActive: 20
maxWait: 60000
timeBetweenEvictionRunsMillis: 60000
minEvictableIdleTimeMillis: 300000
validationQuery: SELECT 1 FROM DUAL
testWhileIdle: true
testOnBorrow: false
testOnReturn: false
poolPreparedStatements: true
# 配置监控统计拦截的filters,去掉后监控界面sql无法统计,'wall'用于防火墙
filters: stat,wall,log4jT
maxPoolPreparedStatementPerConnectionSize: 20
useGlobalDataSourceStat: true
connectionProperties: druid.stat.mergeSql=true;druid.stat.slowSqlMillis=500
# schema:
# - classpath:department.sql数据源的属性默认是不能生效的要在配置一下:
package com.atguigu.springboot.config;

import com.alibaba.druid.pool.DruidDataSource;
import com.alibaba.druid.support.http.StatViewServlet;
import com.alibaba.druid.support.http.WebStatFilter;
import org.springframework.boot.context.properties.ConfigurationProperties;
import org.springframework.boot.web.servlet.FilterRegistrationBean;
import org.springframework.boot.web.servlet.ServletRegistrationBean;
import org.springframework.context.annotation.Bean;
import org.springframework.context.annotation.Configuration;

import javax.sql.DataSource;
import java.util.Arrays;
import java.util.HashMap;
import java.util.Map;

@Configuration
public class DruidConfig {

    @ConfigurationProperties(prefix = "spring.datasource")
    @Bean
    public DataSource druid(){
       return  new DruidDataSource();
    }

    //配置Druid的监控
    //1、配置一个管理后台的Servlet
    @Bean
    public ServletRegistrationBean statViewServlet(){
        ServletRegistrationBean bean = new ServletRegistrationBean(new StatViewServlet(), "/druid/*");
        Map<String,String> initParams = new HashMap<>();

        initParams.put("loginUsername","admin");
        initParams.put("loginPassword","123456");
        initParams.put("allow","");//默认就是允许所有访问
        initParams.put("deny","192.168.15.21");

        bean.setInitParameters(initParams);
        return bean;
    }


    //2、配置一个web监控的filter
    @Bean
    public FilterRegistrationBean webStatFilter(){
        FilterRegistrationBean bean = new FilterRegistrationBean();
        bean.setFilter(new WebStatFilter());

        Map<String,String> initParams = new HashMap<>();
        initParams.put("exclusions","*.js,*.css,/druid/*");

        bean.setInitParameters(initParams);

        bean.setUrlPatterns(Arrays.asList("/*"));

        return  bean;
    }
}
数据源的配置类默认是@Configuration,new一个DruidDataSource,邦定配置文件的数据。
 绑定成功。
绑定成功。
1.配置。
public class StatViewServlet extends ResourceServlet {
    private static final Log LOG = LogFactory.getLog(StatViewServlet.class);
    private static final long serialVersionUID = 1L;
    public static final String PARAM_NAME_RESET_ENABLE = "resetEnable";
    public static final String PARAM_NAME_JMX_URL = "jmxUrl";
    public static final String PARAM_NAME_JMX_USERNAME = "jmxUsername";
    public static final String PARAM_NAME_JMX_PASSWORD = "jmxPassword";
    private DruidStatService statService = DruidStatService.getInstance();
    private String jmxUrl = null;
    private String jmxUsername = null;
    private String jmxPassword = null;
    private MBeanServerConnection conn = null;
配置管理后台的servlet的参数的。

配置成功。