SpringCloud 分布式配置中心
服务端
创建工程并完善结构
国际惯例,把maven工程创建完善
pom.xml
<?xml version="1.0" encoding="UTF-8"?>
<project xmlns="http://maven.apache.org/POM/4.0.0" xmlns:xsi="http://www.w3.org/2001/XMLSchema-instance"
         xsi:schemaLocation="http://maven.apache.org/POM/4.0.0 http://maven.apache.org/xsd/maven-4.0.0.xsd">
    <modelVersion>4.0.0</modelVersion>

    <parent>
        <groupId>com.outlook.liufei32</groupId>
        <artifactId>spring-cloud-dependencies</artifactId>
        <version>1.0.0-SNAPSHOT</version>
        <relativePath>../spring-cloud-dependencies/pom.xml</relativePath>
    </parent>

    <artifactId>spring-cloud-config</artifactId>
    <packaging>jar</packaging>

    <name>spring-cloud-config</name>
    <url></url>
    <inceptionYear>2019-Now</inceptionYear>

    <dependencies>
        <!-- Spring Boot Begin -->
        <dependency>
            <groupId>org.springframework.boot</groupId>
            <artifactId>spring-boot-starter-web</artifactId>
        </dependency>
        <dependency>
            <groupId>org.springframework.boot</groupId>
            <artifactId>spring-boot-starter-tomcat</artifactId>
        </dependency>
        <dependency>
            <groupId>org.springframework.boot</groupId>
            <artifactId>spring-boot-starter-actuator</artifactId>
        </dependency>
        <dependency>
            <groupId>org.springframework.boot</groupId>
            <artifactId>spring-boot-starter-test</artifactId>
            <scope>test</scope>
        </dependency>
        <!-- Spring Boot End -->

        <!-- Spring Cloud Begin -->
        <dependency>
            <groupId>org.springframework.cloud</groupId>
            <artifactId>spring-cloud-config-server</artifactId>
        </dependency>
        <dependency>
            <groupId>org.springframework.cloud</groupId>
            <artifactId>spring-cloud-starter-netflix-eureka-server</artifactId>
        </dependency>
        <!-- Spring Cloud End -->
    </dependencies>

    <build>
        <plugins>
            <plugin>
                <groupId>org.springframework.boot</groupId>
                <artifactId>spring-boot-maven-plugin</artifactId>
                <configuration>
                    <mainClass>com.outlook.liufei32.spring.cloud.config.ConfigApplication</mainClass>
                </configuration>
            </plugin>
        </plugins>
    </build>
</project>
application.yml
spring:
  application:
    name: spring-cloud-config
  cloud:
    config:
      label: master
      server:
        git:
          uri: https://github.com/Swagger-Ranger/spring-cloud-config   #仓库地址
          search-paths: respo                                          #仓库目录
          username: Swagger-Ranger
          password: lwx425876github

server:
  port: 8888    #注意这里的端口8888是默认的不能改,如果要修改端口则在相同目录下新建bootstrap.yml 设置端口server.port=PORT

eureka:
  client:
    serviceUrl:
      defaultZone: http://localhost:8761/eureka/
配置说明:
- spring.cloud.config.label:配置仓库的分支
- spring.cloud.config.server.git.uri:配置 Git 仓库地址(GitHub、GitLab、码云 ...)
- spring.cloud.config.server.git.search-paths:配置仓库路径(存放配置文件的目录)
- spring.cloud.config.server.git.username:访问 Git 仓库的账号
spring.cloud.config.server.git.password:访问 Git 仓库的密码
application.yml中配置中心端口8888是默认的不能改,如果要修改端口则在相同目录下新建bootstrap.yml 设置端口server.port=PORT。因为bootstrap.properties/yml是优先于application.properties/yml加载的。
启动类
package com.outlook.liufei32.spring.cloud.config;
import org.springframework.boot.SpringApplication;
import org.springframework.boot.autoconfigure.SpringBootApplication;
import org.springframework.cloud.config.server.EnableConfigServer;
import org.springframework.cloud.netflix.eureka.EnableEurekaClient;
@EnableConfigServer
@EnableEurekaClient
@SpringBootApplication
public class ConfigApplication {
public static void main( String[] args ) {
SpringApplication.run(ConfigApplication.class, args);
}
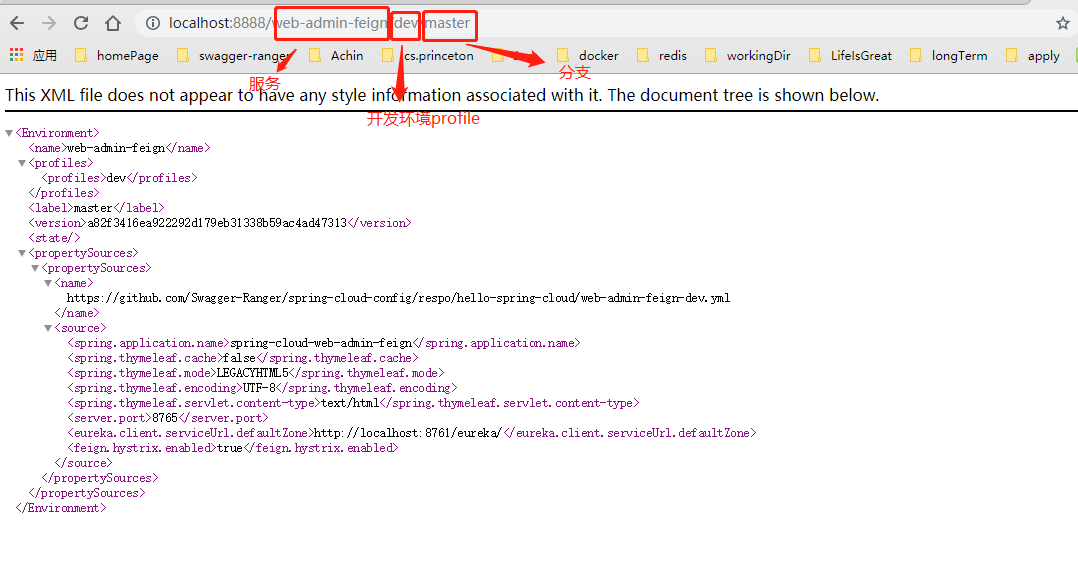
}启动查看配置
当配置完成,启动模块就能在浏览器中查看到配置文件
客户端
使用分布式配置客户端就是在原来的微服务project里使用云配置,即增加pom.xml依赖,然后将application.yml修改为链接分布式配置中心服务端的配置
pom.xml
<!--增加云配置依赖-->
        <dependency>
            <groupId>org.springframework.cloud</groupId>
            <artifactId>spring-cloud-starter-config</artifactId>
        </dependency>
修改application.yml来使用配置中心的云配置
spring:
  cloud:
    config:
      uri: http://localhost:8888      #配置中心的地址
      name: config-client             #服务名
      label: master                   #分支名
      profile: dev                    #使用哪个配置,就是云配置中文件名结尾后缀
然后启动服务就是使用的云配置
启用profiles
在开发的时候,生产环境和测试环境的一些配置可能会不一样,有时候一些功能也可能会不一样,所以我们可能会在上线的时候手工修改这些配置信息。但是 Spring 中为我们提供了 Profile 这个功能。我们只需要在启动的时候添加一个虚拟机参数,激活自己环境所要用的 Profile 就可以了,也就是在application.yml中使用云配置的参数profile可以直接在项目允许时直接指定,--spring.profiles.active=PROFILE,然后就会去使用在对应的 PROJECTNAME-PROFILE.yml配置
比如:
java -jar spring-cloud-web-admin-feign-1.0.0-SNAPSHOT.jar --spring.profiles.active=prod
具体步骤就是1.使用mvn clean package打包,然后允许指定PROFILE使用指定的配置运行:java -jar spring-cloud-web-admin-feign-1.0.0-SNAPSHOT.jar --spring.profiles.active=prod
本博客为Swagger-Ranger的笔记分享,文章会持续更新
文中源码地址: https://github.com/Swagger-Ranger
欢迎交流指正,如有侵权请联系作者确认删除: [email protected]