一、线程的创建和启动
1.三种创建线程的方法
- 使用继承Thread类的方法创建多线程;
优点:代码编写简单,得到当前线程名只需getName()就可以了;
缺点:不能继承其他父类,并且不能共享资源;
public class demo extends Thread {

    private int i;

    public void run() {
        for (; i < 100; i++) {
            //默认this当前线程调用方法,返回当前线程名称
            System.out.println(getName() + " " + i);
        }
    }

    public static void main(String[] args) {
        for (int i = 0; i < 100; i++) {
            //利用currentThread()方法获取当前线程名
            System.out.println(Thread.currentThread().getName() + " " + i);
            if (i == 20) {
                new demo().start();
                new demo().start();
            }
        }
    }
}
- 使用Runnable接口实现类作为target创建多线程;
优点:可以继承其他父类,可以共享资源;
缺点:编写稍复杂,访问当前线程需要使用Thread.currentThread()方法;
public class demo implements Runnable {

    private int i;

    public void run() {
        for (; i < 100; i++) {
            //默认this当前线程调用方法,返回当前线程名称
            System.out.println(Thread.currentThread().getName() + " " + i);
        }
    }

    public static void main(String[] args) {
        for (int i = 0; i < 100; i++) {
            //利用currentThread()方法获取当前线程名
            System.out.println(Thread.currentThread().getName() + " " + i);
            if (i == 20) {
                demo demo = new demo();
                new Thread(demo,"线程1").start();
                new Thread(demo,"线程2").start();
            }
        }
    }
}
- 使用Callable接口实现类作为target创建多线程;
Callable接口基本与Runnable接口基本类似,
不同点在于Callable可以由返回值,可以声明抛出异常;
public class demo {

    public static void main(String[] args) {

        FutureTask<Integer> futureTask = new FutureTask<Integer>((Callable<Integer>)() ->{
            int i = 0;
            for (; i < 100; i++) {
            //默认this当前线程调用方法,返回当前线程名称
            System.out.println(Thread.currentThread().getName() + " " + i);
            }
            return i;
        });


        for (int i = 0; i < 100; i++) {
            //利用currentThread()方法获取当前线程名
            System.out.println(Thread.currentThread().getName() + " " + i);
            if (i == 20) {
                new Thread(futureTask,"有返回值的线程").start();
            }
        }

        try {
            System.out.println("子线程的返回值" + futureTask.get());
        } catch (Exception e) {
            e.printStackTrace();
        }

    }
}
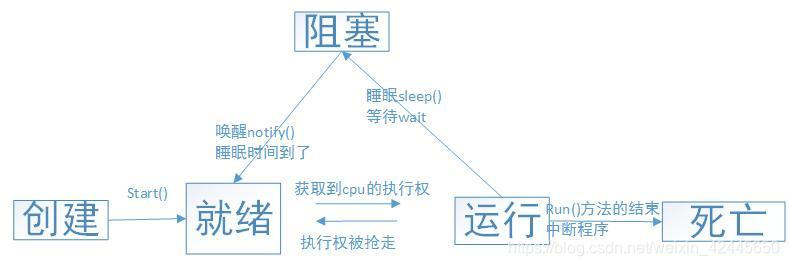
二、线程的生命周期
线程的生命周期要经过五个状态:新建,就绪,运行,阻塞,死亡
-
新建和就绪状态:用new关键字创建了一个线程之后线程就处于新建状态;
线程对象调用了start()方法之后线程就处于就绪状态;
ps.如果直接调用run()方法,则变成了单线程,不能再start线程对象; -
运行和阻塞状态:处于就绪状态的线程获得了cup,执行run()方法,此时线程就进入了运行状态;
ps.获取cup取决于底层平台所采用的策略,例如 抢占式调度策略;
当线程使用sleep()方法、调用了阻塞式的IO方法、试图获得同步监视器、等待通知、调用suspend()方法挂起 以上情况时,线程进入阻塞状态;
ps.当以上情况解决时,线程进入就绪状态。不是直接进入运行状态!! -
死亡状态:run()或call()方法执行完成,线程正常死亡;
线程抛出Error、未捕获的Exception时;
直接调用线程的stop()方法结束线程,容易导致死锁不建议使用;
ps.死亡的线程不能再用start()方法启动,否则将报异常;
线程的生命周期的五个状态如下图所示;
三、控制线程
join线程:
在A线程的执行流中,调用B线程的join()方法。只有当B执行流完成后才会重新开始运行A的执行流;
public class demo implements Runnable {

    private int i;

    public void run() {
        for (; i < 100; i++) {
            //默认this当前线程调用方法,返回当前线程名称
            System.out.println(Thread.currentThread().getName() + " " + i);
        }
    }

    public static void main(String[] args) throws Exception {
        for (int i = 0; i < 100; i++) {
            //利用currentThread()方法获取当前线程名
            System.out.println(Thread.currentThread().getName() + " " + i);
            if (i == 20) {
                demo demo = new demo();
                Thread thread = new Thread(demo,"线程1");
                thread.start();
                thread.join();
            }
        }
    }
}
2.后台线程
为其他线程提供服务,当所有的前台线程死亡,后台线程自动死亡;
public class demo implements Runnable {

    private int i;

    public void run() {
        for (; i < 1000; i++) {
            //默认this当前线程调用方法,返回当前线程名称
            System.out.println(Thread.currentThread().getName() + " " + i);
        }
    }

    public static void main(String[] args) throws Exception {

        demo demo = new demo();
        Thread thread = new Thread(demo, "新线程");
        thread.setDaemon(true);
        //启动的后台线程本应循环1000次
        thread.start();

        //当主线程循环十次死亡后,后台线程随之死亡
        for (int i = 0; i < 10; i++) {
            System.out.println(Thread.currentThread().getName() + " " + i);
        }
    }
}
3.睡眠线程
在某个线程的执行体中使用Thread.sleep(long m)方法后,线程进入阻塞状态,这个线程进入指定的睡眠失眠时间结束后进入就绪状态;
如下例子,主线程执行到20时,睡眠1毫秒,cpu开始执行线程1
public class demo extends Thread {

    private int i;

    public void run() {
        for (; i < 100; i++) {
            //默认this当前线程调用方法,返回当前线程名称
            System.out.println(getName() + " " + i);
        }
    }

    public static void main(String[] args) throws Exception {
        for (int i = 0; i < 100; i++) {
            //利用currentThread()方法获取当前线程名
            System.out.println(Thread.currentThread().getName() + " " + i);
            if (i == 20) {
                new demo().start();
                Thread.sleep(1);
                new demo().start();
            }
        }
    }
}
4.线程让步、改变优先级
Thread.yield()方法和Thread.sleep()方法类似; 不同点在于:
sleep在执行后会给其他线程机会,不用理会优先级。但是yield执行后只会给同优先级或更高优先级的线程机会;
sleep在执行后进入阻塞状态,sleep时间结束之后线程进入就绪状态。而yield在执行后强制进入就绪状态,可能让线程直接获得cup;
使用setPriorit()方法设置优先级,getPriorit()获得线程的优先级;
public class demo extends Thread {

    private int i;

    public demo(String name) {
        super(name);
    }

    public void run() {
        for (; i < 100; i++) {
            //默认this当前线程调用方法,返回当前线程名称
            System.out.println(getName() + " " + i);
            //当i等于20时使用yield方法,让当前线程让步
            if (i == 20){
                Thread.yield();
            }
        }
    }

    public static void main(String[] args) throws Exception {
        demo demo1 = new demo("高级");
        demo1.setPriority(MAX_PRIORITY);
        demo1.start();
        demo demo2 = new demo("低级");
        demo2.setPriority(MIN_PRIORITY);
        demo2.start();
    }
}
四、线程同步
1.同步代码块
Object i 就是同步监视器,在任何线程修改资源之前先对该资源加锁,在加锁期间其他线程无法修改该资源,修改完成后,该线程释放对该资源的锁定;
public void run() {

        synchronized ((Object) i) {
            for (; i < 100; i++) {
                //默认this当前线程调用方法,返回当前线程名称
                System.out.println(getName() + " " + i);
                //当i等于20时使用yield方法,让当前线程让步
                if (i == 20) {
                    Thread.yield();
                }
            }
        }
    }
2.同步方法
在方法定义之前加上关键词 synchronized ,此方法则是线程安全的。同步监视器就是this对象。也就是调用该方法的对象;
3.同步锁
public class demo extends Thread {

    public static void main(String[] args) throws Exception {
    	private static final Lock lock = new ReentrantLock();
        int account = 1000;
        int dreamacc = 500;
        if (account >= dreamacc){
            lock.lock();
            try {
                System.out.println("允许取钱");
                //多线程访问时可能导致出错;
                //使用了block则可以避免
                Thread.sleep(1);
            } finally {
                lock.unlock();
            }

        }
    }
}
4.死锁
两个线程互相等待对方释放同步监视器时就会发生死锁。
使用Thread.suspend()方法 stop()方法容易发生死锁。
五、线程通信
1.传统的线程通信
在synchronized ()同步代码块,或者synchronized关键字修饰的同步方法中。
可以使用同步监视器调用 wait()、notify()、notifyAll()方法对线程进行协调运行。
public void run() throws Exception{
        int i = 0;

        synchronized ((Object) i) {
            for (; i < 100; i++) {
                //默认this当前线程调用方法,返回当前线程名称
                System.out.println(getName() + " " + i);
                //当i等于20时使用yield方法,让当前线程让步
                if (i == 20) {
                    wait();
                }
                notify();
            }
        }
    }
2.使用Condition控制线程通信
在使用lock对线程进行同步控制时,可以用Condition类对象的方法进行线程协调
public class demo extends Thread {
    private static final Lock lock = new ReentrantLock();
    private static final Condition condition = lock.newCondition();
    public static void main(String[] args) throws Exception {
        int account = 1000;
        int dreamacc = 500;
        if (account >= dreamacc){
            lock.lock();
            try {
                System.out.println("允许取钱");
                //使线程进入等待状态
                condition.await();
            }
            	//唤醒该线程
                condition.signal();
        }
    }
}
3.使用阻塞队列进行线程通信
Java5提供了一个BlockingQueue接口,进行线程线程协调控制。当队列为空时take()方法导致线程阻塞,当队列时put()方法导致线程阻塞。
put(E)方法表示把E元素加入队列中;
take()方法表示从队列头部取出元素;
六、线程池
public class demo extends Thread {
    public static void main(String[] args) throws Exception {
        //创建一个具有固定线程数(6)的线程池
        ExecutorService pool = Executors.newFixedThreadPool(6);
        //使用lambda表达式创建Runnable对象
        Runnable target = () -> {
            for (int i = 0; i < 100; i++) {
                System.out.println(Thread.currentThread().getName());
            }
        };
        //向线程池提交两个线程
        pool.submit(target);
        pool.submit(target);
        //关闭线程池
        pool.shutdown();
    }
}
七、线程相关类
(不想写了,qwq)