spring boot 视图层技术有两种:Thymeleaf/////////////FreeMarker
Spring data JPA简介:Spring data JPA是Spring在ORM框架,以及JPA规范的基础上,封装的一套JPA应用框架,并提供了一整套的数据访问层解决方案。
另外附上spring data JPA官网网址:https://docs.spring.io/spring-data/jpa/docs/2.0.9.RELEASE/reference/html/
===========================分割线====================================
下面我们开始搭建Thymeleaf(此处附上项目类图)

1.创建spring boot 项目(这个不用我教了吧)-->在pom.xml文件配置
<dependency>
    <groupId>org.springframework.boot</groupId>
    <artifactId>spring-boot-starter-thymeleaf</artifactId>
</dependency>
<dependency>
    <groupId>org.springframework.boot</groupId>
    <artifactId>spring-boot-starter-web</artifactId>
</dependency>
2.在application.properties文件中配置(还有其他配置默认就可以了)
server.post=8000                                        #tomcat访问端口1000-15000之间都可
spring.thymeleaf.prefix=classpath:/templates/            #配置路径到templates文件下
spring.thymeleaf.suffix=.html                            #配置映射到.html文件
spring.thymeleaf.servlet.content-type=text/html
spring.thymeleaf.encoding=utf-8                          #文件字符格式
spring.thymeleaf.mode=LEGACYHTML5                        #HTML5
spring.thymeleaf.cache=false                             #是否支持缓存,这里就不支持了
spring.mvc.static-path-pattern=/**        #这下面两条可配置可不配,如果项目复杂的话可以进行配置
spring.resources.static-locations=classpath:/static/
3.创建实体类(实体类这边我直接是添加了jpa的注解,一会结合jpa的时候需要使用)
package com.example.demo.pojo.dao;
public class Student {
    private int sId;
    private String sName;
    private long sSex;
    private long sAge;

//get / set此处就不写了,大家要写上
4.在控制类Main中编写对外接收的代码
@RestController
public class Main {

    @RequestMapping("student")
    public ModelAndView studennt() {
        Student student = new Student();//创建学生类
        student.setSId(2);              //添加值
        student.setSName("zhq");
        student.setSAge(12);
        student.setSSex(1);
        ModelAndView modelAndView = new ModelAndView("index");//创建ModelAndView并添加映射
        modelAndView.addObject("s",student);
        return modelAndView;
    }
}
5.下面编写前端代码index.html
<!DOCTYPE html>
<html lang="en" xmlns:th="http://www.thymeleaf.org">
<head>
    <meta charset="UTF-8">
    <title>Title</title>
</head>
<body>

<table border="1">
    <tr>
        <td>学生唯一id</td>
        <td>学生姓名</td>
        <td>学生性别</td>
        <td>学生年龄</td>
    </tr>
    <!--<tr th:each="ss:${s}">-->
        <!--<td th:text="${ss.getSId()}"></td>-->
        <!--<td th:text="${ss.getSName()}"></td>-->
        <!--<td th:text="${ss.getSSex()}"></td>-->
        <!--<td th:text="${ss.getSAge()}"></td>-->
    <!--</tr>-->
    <tr>
        <td th:text="${s.getSId()}"></td>
        <td th:text="${s.getSName()}"></td>
        <td th:text="${s.getSSex()}"></td>
        <td th:text="${s.getSAge()}"></td>
    </tr>
</table>

</body>
</html>
6.ok了,下面我们启动springboot在游览器中访问localhost:8000/student

一个简单的Thymeleaf视图层映射就ok了
==================================分割线==========================================
2.Spring data jpa
首先我并不推荐使用jpa作为ORM框架,毕竟对于负责查询的时候还是不太灵活,还是建议使用mybatis,自己写sql比较好.但是如果公司用这个就没办法了,可以学习一下,对于简单查询还是非常好用的.
下面我们在Thymeleaf上继续整合jpa
1.添加任何框架前一定的导入jar包在,在pom.xml中配置
        <!--jpa-->
        <dependency>
            <groupId>org.springframework.boot</groupId>
            <artifactId>spring-boot-starter-data-jpa</artifactId>
        </dependency>
        <!--因为对接mysql所以导入mysql包-->
        <dependency>
            <groupId>mysql</groupId>
            <artifactId>mysql-connector-java</artifactId>
            <scope>runtime</scope>
        </dependency>
      <!--都行,可不要-->
        <dependency>
            <groupId>net.sf.json-lib</groupId>
            <artifactId>json-lib</artifactId>
            <version>2.4</version>
            <classifier>jdk15</classifier>
        </dependency>
2.配置application.properties
spring.datasource.url=jdbc:mysql://localhost:3306/school_test?serverTimezone=GMT%2B8&characterEncoding=utf8&useSSL=true
spring.datasource.username=root
spring.datasource.password=root
spring.datasource.driver-class-name=com.mysql.jdbc.Driver

spring.jpa.hibernate.ddl-auto=update
spring.jpa.show-sql=true
spring.jackson.serialization.indent-output=true

spring.jpa.hibernate.naming.implicit-strategy=org.hibernate.boot.model.naming.ImplicitNamingStrategyLegacyJpaImpl
spring.jpa.hibernate.naming.physical-strategy=org.hibernate.boot.model.naming.PhysicalNamingStrategyStandardImpl
spring.main.allow-bean-definition-overriding=true
3.创建实体类,在原先的实体类中添加@注解(具体代码如下)(使用jpa不需要编写sql代码原因在于约定大于配置)
package com.example.demo.pojo.dao;
//注意,这里添加这员工javax.persistence.*就可以了,
//不用添加import org.springframework.data.annotation.Id;,不然会引用出错
import javax.persistence.*;
@Entity
@Table(name = "student")
public class Student {
    @Id
    @GeneratedValue(strategy = GenerationType.IDENTITY)
    @Column(name = "s_id" ,nullable = false)
    private int sId;
    @Column(name = "s_name")
    private String sName;
    @Column(name = "s_sex")
    private long sSex;
    @Column(name = "s_age")
    private long sAge;
这里需要注意的注解
@Entity使用JPA @Entity注释进行注释,因此该存储库显然属于Spring Data JPA
@Table表示要映射的数据库中的表
@id表示主键
@Column表示对于的字段名
4.创建对接mapper数据库的接口StudentMapper
package com.example.demo.mapper;
import com.example.demo.pojo.dao.Student;
import org.springframework.data.jpa.repository.JpaRepository;
import java.util.Optional;

public interface StudentMapper extends JpaRepository<Student, Integer> {
    @Override
    Student saveAndFlush(Student student);
    //对外定义接口,接收一个integer并查询出结果
    //findById表示通过id查询全部
    //jpa递出sql语句的关键就是方法名的规范
    //具体可以看下方小编提供的文章
    @Override
    Optional<Student> findById(Integer integer);
}
这里如果有看不懂的可以查看下面文章,小编看了这篇文章,写的很详细
https://blog.csdn.net/qq_30054997/article/details/79420141
5.好了,基本的配置jpa已经完成了,下面我们编写服务层,
//接口
package com.example.demo.service;
import com.example.demo.pojo.dao.Student;
public interface StudentService {
    Student studentAll (Integer i);
    boolean studentAdd(Student student);
}
//实现
package com.example.demo.service.impl;
import com.example.demo.mapper.StudentMapper;
import com.example.demo.pojo.dao.Student;
import com.example.demo.service.StudentService;
import org.springframework.stereotype.Service;
import javax.annotation.Resource;
import javax.transaction.Transactional;
import java.util.Optional;
@Transactional
@Service
public class StudentServiceImpl implements StudentService {
    @Resource
    StudentMapper studentMapper;
    @Override
    public Student studentAll(Integer i) {
        Optional<Student> student = studentMapper.findById(i);
        return student.get();
    }
    @Override
    public boolean studentAdd(Student student) {
       return false;
    }
}
6.ok,编写控制层在Main类中添加一下代码
   @Autowired
    StudentService studentService;
    @RequestMapping("/allStudent")
    public ModelAndView studentsAll(){
        Student student1 = studentService.studentAll(1);
        ModelAndView modelAndView = new ModelAndView();
        modelAndView.addObject("s",student1);
        modelAndView.setViewName("index");
        return modelAndView;
    }
7.视图层使用刚刚的就可以了,下面我们启动试试,访问localost:8000/allStudent
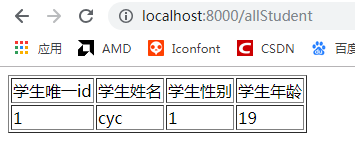
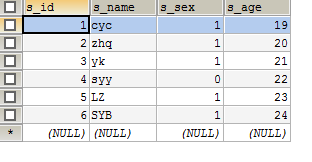
ok,是我数据库中存放的信息(我数据库中的id为1的信息已经被查到了)
在这个demo中我们未编写一条sql语句,就可以查找数据库中的内容,这就是jpa的强大
-------------------------------------------------------------------------------------------------------------------------------
在测试的时候小编也出现了几个错误,这个错误的小编粗心大意造成的,一般是不会出错的