一、Django介绍
1、简介
Django是一个开放源代码的Web应用框架,由Python写成。采用了MVC的框架模式,即模型M,视图V和控制器C。它最初是被开发来用于管理劳伦斯出版集团旗下的一些以新闻内容为主的网站的,即是CMS(内容管理系统)软件。
2、Django生命周期
Client --->> URL对应关系匹配  --->> 视图函数  --->> 返回用户字符串
Client --->> URL对应关系匹配  --->> 视图函数  --->> 返回HTML文件内容
二、Django安装
操作系统:rhel7.3
Python版本:python3.6
Django版本:Django-2.1.5
下面我们先讲解下web的原理!!!
1、WSGI
WSGI是Web Server Gateway Interface的缩写。以层的角度来看,WSGI所在层的位置低于CGI。但与CGI不同的是WSGI具有很强的伸缩性且能运行于多线程或多进程的环境下,这是因为WSGI只是一份标准并没有定义如何去实现。实际上WSGI并非CGI,因为其位于web应用程序与web服务器之间,而web服务器可以是CGI,mod_python(注:现通常使用mod_wsgi代替),FastCGI或者是一个定义了WSGI标准的web服务器就像python标准库提供的独立WSGI服务器称为wsgiref。
[root@python web]# vim test1.py
#!/usr/bin/env python
#coding:utf-8
from wsgiref.simple_server import  make_server
def RunServer(environ,start_response):
    # envirn 客服端发来的所有数据
    # start_response 封装要返回给用户的数据、响应头、状态码
    start_response('200 ok',[('Content-Type','text/html')])

    # python2的话直接return 'Hello, Dream'就可以
    # 返回内容
    return ['Hello, Dream'.encode('utf-8')]

if __name__ == '__main__':
    httpd = make_server('',8080,RunServer)
    print ("server Http on port 8080")
    httpd.serve_forever()
浏览器访问:
http://10.10.10.111:8080/
2、自定义WEB框架
(1)自定义代码
[root@python web]# vim test2.py
#!/usr/bin/env python
# coding:utf-8
from wsgiref.simple_server import make_server

def handle_index():
    return ['<h1>HTML: index</h1>'.encode('utf-8')]

def handle_date():
    return ['<h1>HTML: date</h1>'.encode('utf-8')]

def RunServer(environ, start_response):
    # envirn 客服端发来的所有数据
    # start_response 封装要返回给用户的数据、响应头、状态码
    start_response('200 ok', [('Content-Type', 'text/html')])
    current_url = environ['PATH_INFO']
    if current_url == '/index':
        return handle_index()
    elif current_url == '/date':
        return handle_date()
    else:
        return ['<h1>404 Not Found</h1>'.encode('utf-8')]

if __name__ == '__main__':
    httpd = make_server('', 8080, RunServer)
    print ("server Http on port 8080")
    httpd.serve_forever()
浏览器访问:
http://10.10.10.111:8080/
http://10.10.10.111:8080/index
http://10.10.10.111:8080/date
(2)MVC写法
MVC和MTV区别:
MVC的全名是Model View Controller,是模型(model)-视图(view)-控制器(controller)的缩写
MVC:
	Model     View     Controller
	数据库    模板文件     业务处理
MTV(Django):
	Model     Template     View
    数据库     模板文件    业务处理

[root@python web]# vim access.py
#!/usr/bin/env python
# coding:utf-8
from wsgiref.simple_server import make_server
from Controller import account

URL_DICT = {
    '/index': account.handle_index,
    '/date': account.handle_date,
}

def RunServer(environ, start_response):
    # envirn 客服端发来的所有数据
    # start_response 封装要返回给用户的数据、响应头、状态码
    start_response('200 ok', [('Content-Type', 'text/html')])
    current_url = environ['PATH_INFO']
    func = None
    if current_url in URL_DICT:
        func = URL_DICT[current_url]
    if func:
        return func()
    else:
        return ['<h1>404 Not Found</h1>'.encode('utf-8')]

if __name__ == '__main__':
    httpd = make_server('', 8080, RunServer)
    print ("server Http on port 8080")
    httpd.serve_forever()
[root@python web]# vim Controller/account.py
#!/usr/bin/env python
# coding:utf-8
def handle_index():
    f = open('View/index.html', mode='rb')
    data = f.read()
    f.close()
    return [data, ]

def handle_date():
    return ['<h1>HTML: date</h1>'.encode('utf-8')]
配置index.html:
[root@python web]# vim View/index.html
<!DOCTYPE html>
<html lang="en">
<head>
    <meta charset="UTF-8">
    <title>INDEX</title>
</head>
<body>
    <h1>Index</h1>
</body>
</html>
3、Linux下Django安装
下载地址:https://www.djangoproject.com/download/
编译安装python链接:https://blog.csdn.net/Dream_ya/article/details/83104374
Django网盘链接(源码):https://pan.baidu.com/s/15YM62zDH2b3Ss8uc1ME17A 提取码: j74d
[root@python ~]# wget https://www.djangoproject.com/m/releases/2.1/Django-2.1.5.tar.gz
[root@python ~]# tar xf Django-2.1.5.tar.gz
[root@python ~]# cd Django-2.1.5/

### 如果报错:error: Could not find suitable distribution for Requirement.parse('pytz')
### 解决方法:yum install -y openssl-devel后在编译安装python即可
[root@python Django-2.1.5]# python setup.py install
三、Django工程基础操作
1、创建Django工程
[root@python _Django]# django-admin.py startproject Dream
[root@python _Django]# cd Dream/
[root@python Dream]# ls
Dream  manage.py
[root@python Dream]# tree
.
├── Dream
│   ├── __init__.py
│   ├── settings.py
│   ├── urls.py
│   └── wsgi.py
└── manage.py

[root@python Dream]# python manage.py runserver 10.10.10.111:8000
2、sqlite报错解决
(1)启动报错
Traceback (most recent call last):
  File "manage.py", line 15, in <module>
    execute_from_command_line(sys.argv)
  File "/usr/local/lib/python3.6/site-packages/Django-2.1.5-py3.6.egg/django/core/management/__init__.py", line 381, in execute_from_command_line
    utility.execute()
  File "/usr/local/lib/python3.6/site-packages/Django-2.1.5-py3.6.egg/django/core/management/__init__.py", line 357, in execute
    django.setup()
  File "/usr/local/lib/python3.6/site-packages/Django-2.1.5-py3.6.egg/django/__init__.py", line 24, in setup
    apps.populate(settings.INSTALLED_APPS)
  File "/usr/local/lib/python3.6/site-packages/Django-2.1.5-py3.6.egg/django/apps/registry.py", line 112, in populate
    app_config.import_models()
  File "/usr/local/lib/python3.6/site-packages/Django-2.1.5-py3.6.egg/django/apps/config.py", line 198, in import_models
    self.models_module = import_module(models_module_name)
  File "/usr/local/lib/python3.6/importlib/__init__.py", line 126, in import_module
    return _bootstrap._gcd_import(name[level:], package, level)
  File "<frozen importlib._bootstrap>", line 978, in _gcd_import
  File "<frozen importlib._bootstrap>", line 961, in _find_and_load
  File "<frozen importlib._bootstrap>", line 950, in _find_and_load_unlocked
  File "<frozen importlib._bootstrap>", line 655, in _load_unlocked
  File "<frozen importlib._bootstrap_external>", line 678, in exec_module
  File "<frozen importlib._bootstrap>", line 205, in _call_with_frames_removed
  File "/usr/local/lib/python3.6/site-packages/Django-2.1.5-py3.6.egg/django/contrib/auth/models.py", line 2, in <module>
    from django.contrib.auth.base_user import AbstractBaseUser, BaseUserManager
  File "/usr/local/lib/python3.6/site-packages/Django-2.1.5-py3.6.egg/django/contrib/auth/base_user.py", line 47, in <module>
    class AbstractBaseUser(models.Model):
  File "/usr/local/lib/python3.6/site-packages/Django-2.1.5-py3.6.egg/django/db/models/base.py", line 101, in __new__
    new_class.add_to_class('_meta', Options(meta, app_label))
  File "/usr/local/lib/python3.6/site-packages/Django-2.1.5-py3.6.egg/django/db/models/base.py", line 305, in add_to_class
    value.contribute_to_class(cls, name)
  File "/usr/local/lib/python3.6/site-packages/Django-2.1.5-py3.6.egg/django/db/models/options.py", line 203, in contribute_to_class
    self.db_table = truncate_name(self.db_table, connection.ops.max_name_length())
  File "/usr/local/lib/python3.6/site-packages/Django-2.1.5-py3.6.egg/django/db/__init__.py", line 33, in __getattr__
    return getattr(connections[DEFAULT_DB_ALIAS], item)
  File "/usr/local/lib/python3.6/site-packages/Django-2.1.5-py3.6.egg/django/db/utils.py", line 202, in __getitem__
    backend = load_backend(db['ENGINE'])
  File "/usr/local/lib/python3.6/site-packages/Django-2.1.5-py3.6.egg/django/db/utils.py", line 110, in load_backend
    return import_module('%s.base' % backend_name)
  File "/usr/local/lib/python3.6/importlib/__init__.py", line 126, in import_module
    return _bootstrap._gcd_import(name[level:], package, level)
  File "/usr/local/lib/python3.6/site-packages/Django-2.1.5-py3.6.egg/django/db/backends/sqlite3/base.py", line 10, in <module>
    from sqlite3 import dbapi2 as Database
  File "/usr/local/lib/python3.6/sqlite3/__init__.py", line 23, in <module>
    from sqlite3.dbapi2 import *
  File "/usr/local/lib/python3.6/sqlite3/dbapi2.py", line 27, in <module>
    from _sqlite3 import *
ModuleNotFoundError: No module named '_sqlite3'
(2)报错解决
可以发现sqlite没有安装!!!
[root@python Dream]# python
Python 3.6.0 (default, Nov  6 2018, 18:56:33)
[GCC 4.8.5 20150623 (Red Hat 4.8.5-11)] on linux
Type "help", "copyright", "credits" or "license" for more information.
>>> import sqlite3
Traceback (most recent call last):
  File "<stdin>", line 1, in <module>
  File "/usr/local/lib/python3.6/sqlite3/__init__.py", line 23, in <module>
    from sqlite3.dbapi2 import *
  File "/usr/local/lib/python3.6/sqlite3/dbapi2.py", line 27, in <module>
    from _sqlite3 import *
ModuleNotFoundError: No module named '_sqlite3'
yum安装完后再
编译安装python即可。
# yum install -y sqlite-devel
# 编译安装python
3、访问报错
[root@python _Django]# django-admin startproject Dream
[root@python _Django]# cd Dream/
[root@python Dream]# ls
Dream  manage.py

###此时通过http://10.10.10.111:8000/便可以访问
[root@python Dream]# python manage.py runserver 10.10.10.111:8000
(1)访问报错
Invalid HTTP_HOST header: '10.10.10.111:8000'. You may need to add '10.10.10.111' to ALLOWED_HOSTS.
Request Method:	GET
Request URL:	http://10.10.10.111:8000/
Django Version:	2.1.5
Exception Type:	DisallowedHost
Exception Value:
Invalid HTTP_HOST header: '10.10.10.111:8000'. You may need to add '10.10.10.111' to ALLOWED_HOSTS.
Exception Location:	/usr/local/lib/python3.6/site-packages/Django-2.1.5-py3.6.egg/django/http/request.py in get_host, line 106
Python Executable:	/usr/local/bin/python
Python Version:	3.6.0
Python Path:
['/python/Python3/_Django/Dream',
 '/usr/local/lib/python36.zip',
 '/usr/local/lib/python3.6',
 '/usr/local/lib/python3.6/lib-dynload',
 '/usr/local/lib/python3.6/site-packages',
 '/usr/local/lib/python3.6/site-packages/paramiko-1.17.1-py3.6.egg',
 '/usr/local/lib/python3.6/site-packages/setuptools-33.1.1-py3.6.egg',
 '/usr/local/lib/python3.6/site-packages/ecdsa-0.13-py3.6.egg',
 '/usr/local/lib/python3.6/site-packages/pycrypto-2.6.1-py3.6-linux-x86_64.egg',
 '/usr/local/lib/python3.6/site-packages/xlrd-1.1.0-py3.6.egg',
 '/usr/local/lib/python3.6/site-packages/xlwt-1.3.0-py3.6.egg',
 '/usr/local/lib/python3.6/site-packages/python3_pika-0.9.14-py3.6.egg',
 '/usr/local/lib/python3.6/site-packages/redis-3.0.1-py3.6.egg',
 '/usr/local/lib/python3.6/site-packages/pip-1.5.4-py3.6.egg',
 '/usr/local/lib/python3.6/site-packages/Django-2.1.5-py3.6.egg',
 '/usr/local/lib/python3.6/site-packages/pytz-2018.9-py3.6.egg']
Server time:	Wed, 9 Jan 2019 05:28:40 +0000
(2)解决方案
<1> 修改setting.py:
ALLOWED_HOSTS = ["*"] ###添加一个'*'
http://10.10.10.111:8000/admin ###浏览器登陆

<2> 创建访问角色:
### 没有生成迁移表,所以Django找不到table
[root@python Dream]# python manage.py migrate
[root@python Dream]# python manage.py createsuperuser
Username (leave blank to use 'root'): root
Email address: [email protected]
Password:
Password (again):
Superuser created successfully.
通过新建的账号和密码便可进行登陆!!!
4、工程目录说明
工程名称
	- 工程名称            ###对整个程序运行配置
		-	init
		-	settings     ###配置文件
		-	url    	     ###URL对应关系
		-	wsgi         ###遵循WSGI规范,生产(uwsgi+nginx)
	- manage.py          ###管理Django程序:
		                     - python manage.py +命令
		              		 - python manage.py startapp XX
		                     - python manage.py makemigrations
		                     - python manage.py migrate
5、自定义访问页面urls.py
[root@python Dream]# vim Dream/urls.py
from django.contrib import admin
from django.urls import path
from django.shortcuts import HttpResponse

def home(request):                           ###自定义一个home函数
    return HttpResponse('<h1>Home!!!</h1>')

urlpatterns = [
    path('admin/', admin.site.urls),
    path('home/', home),                     ###指定我们的home函数
]
[root@python Dream]# python manage.py runserver 10.10.10.111:8000 ###运行
http://10.10.10.111:8000/home/ ###通过访问此地址可以访问到我们写的页面
四、创建app
1、创建并访问
[root@python Dream]# python manage.py startapp cmdb
[root@python Dream]# ls                                 ###可以发现多了个cmdb目录
cmdb  db.sqlite3  Dream  manage.py
这样我们便可以把我们写的页面放在cmdb中views.py且页面能正常进行访问!!!
[root@python Dream]# vim Dream/urls.py
from django.contrib import admin
from django.urls import path
from cmdb import views
urlpatterns = [
    path('admin/', admin.site.urls),
    path('home/', views.home),
]

[root@python Dream]# cat cmdb/views.py
from django.shortcuts import render

# Create your views here.
from django.shortcuts import HttpResponse

def home(request):
    return HttpResponse('<h1>Home!!!</h1>')
2、app目录说明
app:
	- migrations     ###数据库修改表结构记录(插入数据之类的就不会做记录)
	- admin          ###Django自带的后台管理
	- apps           ###配置当前app
	- models         ###ORM,写指定的类,通过命令可以创建数据库结构
	- tests          ###单元测试
	- views          ###业务代码
3、配置模板路径
在cmdb和Dream同级目录下新建个目录
templates,此目录为Django默认目录,我们可以在setting.py中进行修改,新版需要自己进行设置:os.path.join(BASE_DIR, 'templates')!!!
[root@python Dream]# vim Dream/settings.py ###设置默认发布目录

4、登陆注册页面
(1)配置urls.py
[root@python Dream]# vim Dream/urls.py      ###添加login
from django.contrib import admin
from django.urls import path
from cmdb import views
urlpatterns = [
    path('admin/', admin.site.urls),
    path('home/', views.home),
    path('login/', views.login),
]
(2)配置views.py
[root@python Dream]# vim cmdb/views.py
from django.shortcuts import render
from django.shortcuts import HttpResponse
def home(request):
    return HttpResponse('<h1>Home!!!</h1>')

def login(request):
    # with open('templates/login.html') as f:
    #     data = f.read()
    # return HttpResponse(data)
    # 下面这条命令可以理解为上面的命令
    return render(request, "login.html")
(3)配置Html页面
[root@python Dream]# vim templates/login.html
<!DOCTYPE html>
<html lang="en">
<head>
    <meta charset="UTF-8">
    <title>Title</title>
    <style>
        .label{
            width: 80px;
            text-align: right;
            display: inline-block;
        }
    </style>
</head>
<body>
<form action="/login" method="post">
    <p>
        <label class="label" for="username">用户名:</label>
        <input id="username" name="user" type="text" />
    </p>
    <p>
        <label class="label" for="password">密码:</label>
        <input id="password" name="pwd" type="password" />
        <input  type="submit" value="提交" />
    </p>
</form>
</body>
五、配置静态目录(static)
在cmdb和Dream同级目录下新建个目录
static,此目录主要存放css文件、jquery等一些静态文件!!!
1、指定静态目录
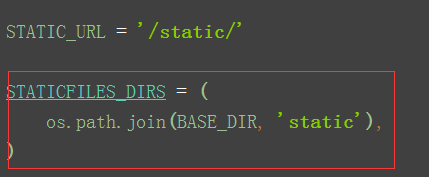
[root@python Dream]# vim Dream/settings.py          ###末尾加入
STATICFILES_DIRS = (
    os.path.join(BASE_DIR, 'static'),
)
2、static目录配置
[root@python Dream]# ls static/              ###并放入jquery文件
commons.css  jquery-1.12.4.min.js

[root@python Dream]# cat static/commons.css
body{
    background-color: blanchedalmond;
}
3、修改login.html
[root@python Dream]# vim templates/login.html
<!DOCTYPE html>
<html lang="en">
<head>
<meta charset="UTF-8">
<title>Title</title>
<link rel="stylesheet" href="/static/commons.css">
<style>
.label{
width: 80px;
text-align: right;
display: inline-block;
}
</style>
</head>
<body>
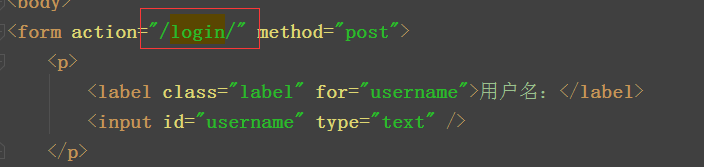
<form action="/login" method="post">
<p>
<label class="label" for="username">用户名:</label>
<input id="username" name="user" type="text" />
</p>
<p>
<label class="label" for="password">密码:</label>
<input id="password" name="pwd" type="password" />
<input type="submit" value="提交" />
</p>
</form>
<script src="/static/jquery-1.12.4.min.js"></script>
</body>
</html>
4、提交报错解决
(1)提交时报错
You called this URL via POST, but the URL doesn't end in a slash and you have APPEND_SLASH set. Djan
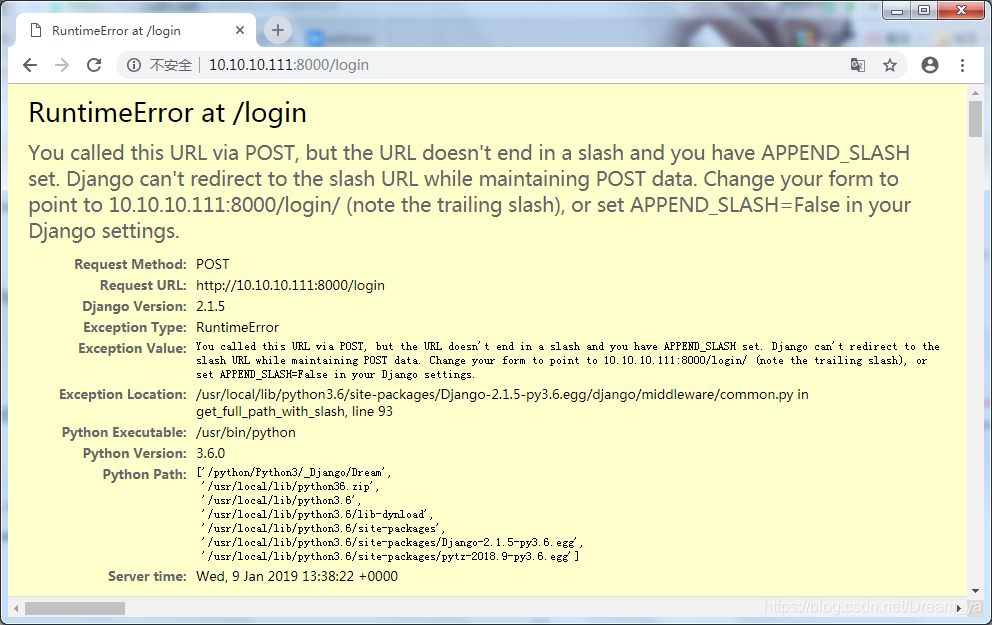
(2)解决方案
 ### 因为我们urls.py的路径后面写了'/',那边的去掉也可以
[root@python Dream]# vim templates/login.html
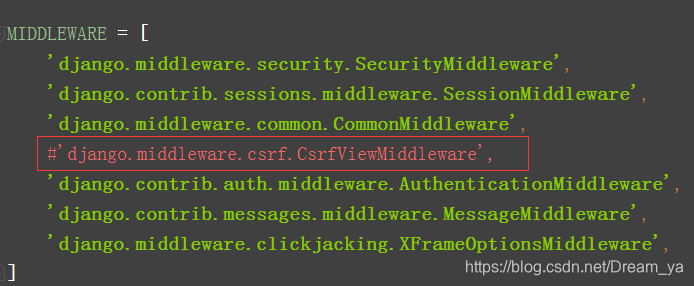
5、CSRF报错
(1)报错
Forbidden (403)
CSRF verification failed. Request aborted.

(2)解决方案
[root@python Dream]# vim Dream/settings.py ###注释CSRF
6、登陆注册
(1)配置views.py
[root@python Dream]# vim cmdb/views.py
from django.shortcuts import render
from django.shortcuts import HttpResponse
from django.shortcuts import redirect
def home(request):
    return HttpResponse('<h1>Home!!!</h1>')

def login(request):
    ### 包含用户提交的所有信息
    ### 获取用户提交方法:request.method
    error_msg = ''
    if request.method == 'POST':
        user = request.POST.get('user',None)
        pwd = request.POST.get('pwd',None)
        if user == 'dream' and pwd == '1':
            ### 重定向到其他
            return redirect('http://www.baidu.com')
        else:
            ### 不匹配
            error_msg = '用户名或密码有误!!!'
        ### 可以通过下面注释的方法获取,但是不小心把user写成其他,页面就会报错:MultiValueDictKeyError at /login/
        # user = request.POST['user']
        # pwd = request.POST['2pwd']
        # print (user,pwd)
    ### 通过error_msg可以实现HTML(login)页面的值替换
    return render(request, "login.html",{'error_msg':error_msg})
(2)修改login.html
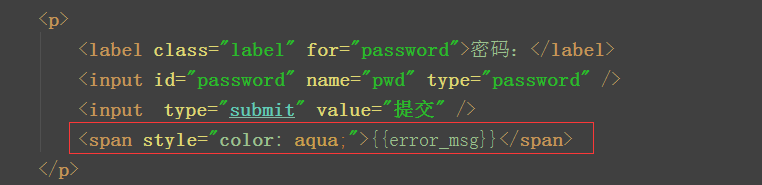
[root@python Dream]# vim templates/login.html ###添加此条
7、模板语言for循环列表
(1)配置views.py
[root@python Dream]# vim cmdb/views.py
from django.shortcuts import render
from django.shortcuts import HttpResponse
from django.shortcuts import redirect

UserList = [
    {'username':'dream', 'email':'[email protected]', 'gender': 'boy',},
    {'username':'dreamya', 'email':'[email protected]', 'gender': 'boy',},
    {'username':'dream1', 'email':'[email protected]', 'gender': 'boy',},
]

def home(request):
    ### 获取我们提交的数据
    if request.method == 'POST':
        u = request.POST.get('username')
        e = request.POST.get('email')
        g = request.POST.get('gender')
        temp = {'username': u, 'email': e, 'gender': g}
        UserList.append(temp)
    return render(request,'home.html',{'userList': UserList})

def login(request):
    ### 包含用户提交的所有信息
    ### 获取用户提交方法:request.method
    error_msg = ''
    if request.method == 'POST':
        user = request.POST.get('user',None)
        pwd = request.POST.get('pwd',None)
        if user == 'dream' and pwd == '1':
            ### 重定向到其他
            return redirect('http://www.baidu.com')
        else:
            ### 不匹配
            error_msg = '用户名或密码有误!!!'
        ### 可以通过下面注释的方法获取,但是不小心把user写成其他,页面就会报错:MultiValueDictKeyError at /login/
        # user = request.POST['user']
        # pwd = request.POST['2pwd']
        # print (user,pwd)
    return render(request, "login.html",{'error_msg':error_msg})
(2)配置home.html
[root@python Dream]# vim templates/home.html
<!DOCTYPE html>
<html lang="en">
<head>
    <meta charset="UTF-8">
    <title>Title</title>
</head>
<body>
    <div>
        <!--提交表单数据-->
        <form action="/home/" method="post">
            <input type="text" name="username" placeholder="用户名">
            <input type="text" name="email" placeholder="邮箱">
            <input type="text" name="gender" placeholder="性别">
            <input type="submit" value="添加">
        </form>
    </div>
    <div>
        <!--通过for循环获得列表里面的字典数据-->
        <table>
            {% for row in userList %}
            <tr>
                <td>{{ row.username }}</td>
                <td>{{ row.email }}</td>
                <td>{{ row.gender }}</td>
            </tr>
            {% endfor %}
        </table>
    </div>
</body>
</html>
通过浏览器进行访问,可以发现我们便可以进行表单的提交!!!
8、模板语言for循环字典
(1)配置views.py
[root@python Dream]# vim cmdb/views.py
USER_DICT = {
    '1': 'dream',
    '2': 'dreamya',
    '3': 'dreamya1',
}
def dict(request):
    return render(request,'dict.html', {'userDict':USER_DICT})
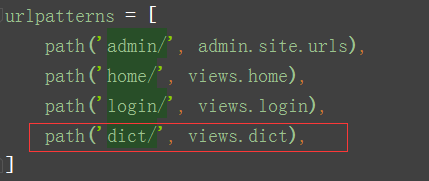
(2)配置urls.py
[root@python Dream]# vim Dream/urls.py
(3)配置html
通过http://10.10.10.111:8000/dict/进行访问!!!
<!DOCTYPE html>
<html lang="en">
<head>
    <meta charset="UTF-8">
    <title>Title</title>
</head>
<body>
    {{ userDict.1 }}
    <!--获取key-->
    <ul>
        {% for index in userDict.keys %}
        <li>{{ index }}</li>
        {% endfor %}
    </ul>
    <!--获取value值-->
    <ul>
        {% for value in userDict.values %}
        <li>{{ value }}</li>
        {% endfor %}
    </ul>
    <!--获取键对值-->
    <ul>
        {% for index,value in userDict.items %}
        <li>{{ index }},{{ value }}</li>
        {% endfor %}
    </ul>
</body>
</html>