【spring基础】spring与jdbc整合详解
先上一段简单示例

public class MyTemplate {

    private DataSource dataSource;

    public DataSource getDataSource() {
        return dataSource;
    }

    public void setDataSource(DataSource dataSource) {
        this.dataSource = dataSource;
    }

    public void insert(String sql) throws SQLException{
        Connection conn = this.dataSource.getConnection();
        Statement stmt = conn.createStatement();
        stmt.executeUpdate(sql);
        stmt.close();
        conn.close();
    }
}
Dao类
public class PersonDao extends MyTemplate{

    public void savePerson() throws Exception{
        this.insert("insert into person(pid,pname) values(3,'aaa')");
    }
}
spring配置文件
    <!--
        引入properties配置文件
     -->
    <bean class="org.springframework.beans.factory.config.PropertyPlaceholderConfigurer">
        <property name="locations">
            <value>classpath:jdbc.properties</value>
        </property>
    </bean>

    <bean id="dataSource" destroy-method="close" class="org.apache.commons.dbcp.BasicDataSource">
        <property name="driverClassName" value="${jdbc.driverClassName}" />
        <property name="url" value="${jdbc.url}" />
        <property name="username" value="${jdbc.username}" />
        <property name="password" value="${jdbc.password}" />
    </bean>

    <bean id="myTemplate" class="cn.qjc.jdbc.dao.MyTemplate">
        <!-- setter注入 -->
        <property name="dataSource">
            <ref bean="dataSource"/>
        </property>
    </bean>

    <bean id="personDao" class="cn.qjc.jdbc.dao.PersonDao">
        <property name="dataSource">
            <ref bean="dataSource"/>
        </property>
    </bean>

</beans>
测试类
public class PersonDaoTest {

    @Test
    public void testPersonDao() throws Exception{
        ApplicationContext context = new ClassPathXmlApplicationContext("cn/qjc/jdbc/applicationContext.xml");
        PersonDao personDao = (PersonDao)context.getBean("personDao");
        personDao.savePerson();
    }
}
以上代码将DataSource注入给MyTemplate,再把DataSource注入给PersonDao,因为personDao继承MyTemplate,所以拥有Datasource属性。既然PersonDao继承MyTemplate,所以PersonDao类注入可以改为
<bean id="personDao" class="cn.qjc.jdbc.dao.PersonDao" parent="myTemplate"></bean>
以上例子中MyTemplate类似于设计模式中的模板模式也叫模板方法模式,模板方法模式是所有模式中最为常见的几个模式之一,是基于继承的代码复用的基本技术。
模板模式 = 静态代码+动态变量
在spring中动态变量可以用注入的形式给予。这样的编程方式适合包装成模板。静态代码构成了模板,而动态变量则是需要传入的参数。
spring与jdbc结合核心类JdbcTemplate
1、基于模板的设置(为什么可以设置成基于模板的形式)
2、完成了资源的创建和释放的工作
3、简化为我们对JDBC的操作
4、完成了对JDBC的核心流程的工作,包括SQL语句的创建和执行
5、仅需要传递DataSource就可以把它实例化
6、JdbcTemplate只需要创建一次
7、JdbcTemplate是线程安全类
使用spring+jdbc修改上面例子(myTemplate类去掉)
public class PersonDao extends JdbcDaoSupport {
    public void savePerson(String sql){
        this.getJdbcTemplate().execute(sql);
    }
}
spring配置文件改为
<bean id="personDao" class="cn.qjc.jdbc.dao.PersonDao">
        <property name="dataSource">
            <ref bean="dataSource"/>
        </property>
</bean>
JdbcTemplate类结构图
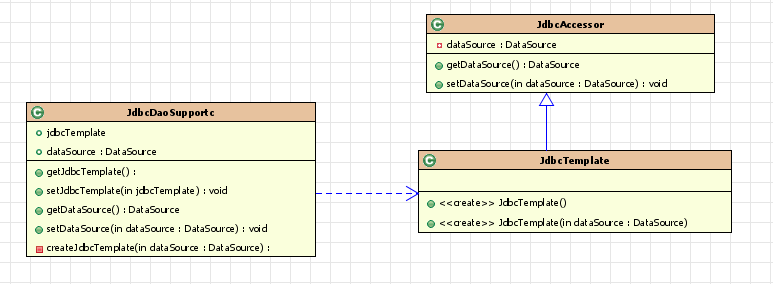
执行过程
说明:
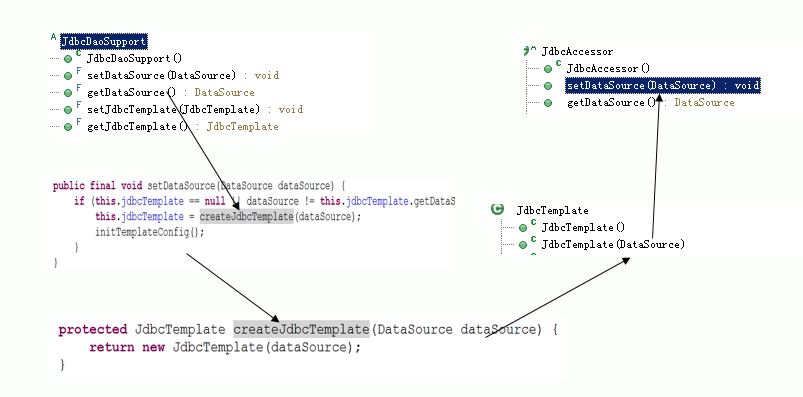
1、执行数据的操作的是JdbcTemplate
2、最根本的步骤就是要把dataSource注入到JdbcTemplate
3、通过给JdbcTemplate注入dataSource
a、采用构造器的形式注入
b、采用setter方法进行注入
4、可以给JdbcDaoSupport注入dataSource
5、可以给JdbcDaoSupport注入JdbcTemplate
所以spring与jdbc整合有三种方法,但实际上核心类为JdbcTemplate
1、使用JdbcTemplate
在Dao类中,用JdbcTemplate作为属性,用spring对JdbcTemplate进行注入。再对JdbcTemplate进行DataSource注入。
注:为什么只要对JdbcTemplate注入DataSource就可以了?
2、继承jdbcDaoSupport
在Dao类中,继承JdbcDaoSupport。因为JdbcDaoSupport已经有了JdbcTemplate的引用,所以只要继承JdbcDaoSupport就相当于有了JdbcTemplate属性。
3、继承JdbcTemplate
spring还提供了其他ORM框架整合模式都差不多,完全可直接套用。
spring+hibernate
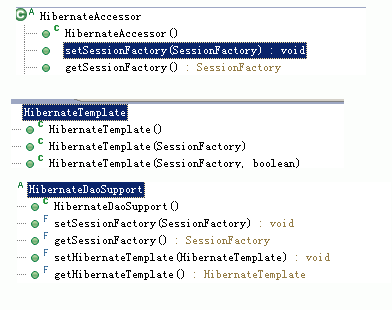
spring+Jdo

由此可看出spring IOC 和 DI 的强大,IOC和DI 完成了从接口到类的对应。利用spring容器程序员很容易的在客户端实现面向接口编程,而且很容易给接口装配,结构也可以设置的很灵活。因为接口是自己写的,类也是自己写的,配置文件也是自己写的。spring实际完成了创建对象和装配的工作,它会自动的对应起来。