本篇博客将教您从头开始构建神经网络,包括图像数据的生成,模型的构建,到训练以及测试。文件的结构如下所示:
CNN-------|datasets
--------------|logs
--------------|generate.py(产生图片)
--------------|model.py(模型)
--------------|train.py(训练)
--------------|eval.py(测试)
一、图片生成
使用captcha这个模块生成图片,生成了大约5000张进行训练
###生成一定数量的图片
import cv2
import numpy as np
from captcha.image import ImageCaptcha

def generate_captcha(text='1'):
    capt = ImageCaptcha(width=100, height=100, font_sizes=[24])
    image=capt.generate_image(text)
    image=np.array(image,dtype=np.uint8)
    return image

if __name__ == '__main__':
    output_dir="dataset/"
    # 生成5000张图片用于计算
    for i in range(5000):
        label=np.random.randint(0,10)
        image=generate_captcha(str(label))
        image_name="image{}_{}.jpg".format(i+1,label)
        path=output_dir+image_name
        cv2.imwrite(path,image)
二、创建CNN模型
我们完全是随心所欲,想创造多少层就创造多少层,在本实验中,我们采用的是四个卷积层+三个全连接层;
以下文件命名为model.py
import tensorflow as tf

class Model():
    def __init__(self,is_training,num_classes):
        self.is_training=is_training
        self.num_classes=num_classes
    ###预处理函数
    def preprocess(self,input_data):
        preprocessed_inputs=tf.to_float(input_data)
        preprocessed_inputs=tf.subtract(preprocessed_inputs,128.0)
        preprocessed_inputs=tf.div(preprocessed_inputs,128.0)
        return preprocessed_inputs

    def forward(self,preprocessed_inputs):
        """
        开始前向传播,输出数值也就是预测值

        """
        #开始分配参数变量
        shape = preprocessed_inputs.get_shape().as_list()
        height, width, num_channels = shape[1:]
        conv1_weights=tf.get_variable("conv1_weights",shape=[3,3,num_channels,64],dtype=tf.float32)
        conv1_bias=tf.get_variable("conv1_bias",shape=[64],dtype=tf.float32)
        conv2_weights=tf.get_variable("conv2_weights",shape=[3,3,64,64],dtype=tf.float32)
        conv2_bias=tf.get_variable("conv2_bias",shape=[64],dtype=tf.float32)
        conv3_weights=tf.get_variable("conv3_weights",shape=[3,3,64,128],dtype=tf.float32)
        conv3_bias=tf.get_variable("conv3_bias",shape=[128],dtype=tf.float32)
        conv4_weights=tf.get_variable("conv4_weights",shape=[3,3,128,64],dtype=tf.float32)
        conv4_bias=tf.get_variable("conv4_bias",shape=[64],dtype=tf.float32)
        fc5_weights=tf.get_variable("fc5_weights",shape=[6*6*64,512],dtype=tf.float32)
        fc5_bias=tf.get_variable("fc5_bias",shape=[512],dtype=tf.float32)
        fc6_weights=tf.get_variable("fc6_weights",shape=[512,128],dtype=tf.float32)
        fc6_bias=tf.get_variable("fc6_bias",shape=[128],dtype=tf.float32)
        fc7_weights=tf.get_variable("fc7_weights",shape=[128,self.num_classes],dtype=tf.float32)
        fc7_bias=tf.get_variable("fc7_bias",shape=[self.num_classes],dtype=tf.float32)
        nets=preprocessed_inputs
        # 第一层,得到100*100*64
        nets=tf.nn.conv2d(nets,conv1_weights,strides=[1,1,1,1],padding="SAME")
        nets=tf.nn.relu(tf.nn.bias_add(nets,conv1_bias))
        print("1:",nets.get_shape())
        #第二层,得到50*50*64
        nets=tf.nn.conv2d(nets,conv2_weights,strides=[1,2,2,1],padding="SAME")
        nets=tf.nn.relu(tf.nn.bias_add(nets,conv2_bias))
        print("2:",nets.get_shape())
        # 第三层,有最大池化,得到25*25*128
        nets=tf.nn.conv2d(nets,conv3_weights,strides=[1,1,1,1],padding="SAME")
        nets=tf.nn.relu(tf.nn.bias_add(nets,conv3_bias))
        print("3.1:",nets.get_shape())
        nets=tf.nn.max_pool(nets,ksize=[1,2,2,1],strides=[1,2,2,1],padding="SAME")
        print("3.2:",nets.get_shape())
        # 第四层,得到6*6*64
        nets=tf.nn.conv2d(nets,conv4_weights,strides=[1,2,2,1],padding="VALID")
        nets=tf.nn.relu(tf.nn.bias_add(nets,conv4_bias))
        print("4.1:",nets.get_shape())
        nets=tf.nn.max_pool(nets,ksize=[1,2,2,1],strides=[1,2,2,1],padding="SAME")
        print("4.2:",nets.get_shape())
        ##开始全连接层
        nets=tf.reshape(nets,shape=[-1,6*6*64])
        print("flat:",nets.get_shape())
        nets=tf.nn.relu(tf.add(tf.matmul(nets,fc5_weights),fc5_bias))
        print("5:",nets.get_shape())
        nets=tf.nn.relu(tf.add(tf.matmul(nets,fc6_weights),fc6_bias))
        print("6:",nets.get_shape())
        nets=tf.add(tf.matmul(nets,fc7_weights),fc7_bias)
        print("7",nets.get_shape())
        prediction=nets
        #这表示一个tensor
        return prediction
    # 表示后处理,返回预测结果对应的类别
    def postprocess(self,prediction):
        logits=tf.nn.softmax(prediction)
        pre_cls=tf.cast(tf.argmax(logits,axis=1),dtype=tf.int32)
        return pre_cls
    def loss(self,prediction,truth_list):
        logits=prediction # 表示正确的结果张量
        loss=tf.reduce_mean(tf.nn.sparse_softmax_cross_entropy_with_logits(logits=logits,
                                                                           labels=truth_list))
        return loss
    ##这个返回的结果就表示一个数值
其中添加了很多print,是为了验证每一层的维数是不是和设计的一样。
输出:
1: (?, 100, 100, 64)
2: (?, 50, 50, 64)
3.1: (?, 50, 50, 128)
3.2: (?, 25, 25, 128)
4.1: (?, 12, 12, 64)
4.2: (?, 6, 6, 64)
flat: (?, 2304)
5: (?, 512)
6: (?, 128)
7 (?, 10)
和预想的维数一样,可以继续进行,在这里由于没有session,所以变量没有任何取值。此时我们可以将我们的模型理解成是一个空的会场,每一个变量相当于是会场里面的凳子,变量的具体取值也就是凳子上坐的人,可能坐小王或者小张,这是不确定的。但是会场凳子的摆放是确定的,这相当于模型的架构,也就相当于是一系列卷积核的维度,是确定的。一旦开始sess会话,就相当于所有的人员入场,凳子上开始坐人。变量开始有值。
三、进行训练
from model import Model
import cv2
import glob
import numpy as np
import os
import tensorflow as tf
import time
# 输出时间
import matplotlib.pyplot as plt
def get_train_data(images_path):
if not os.path.exists(images_path):
raise ValueError("image path is not exist!")
images = []
labels = []
images_path = os.path.join(images_path + "*.jpg")
count = 0
for image_file in glob.glob(images_path):
count += 1
if count % 1000 == 0:
print("Load {} images".format(count))
image = cv2.imread(image_file)
image = cv2.cvtColor(image, cv2.COLOR_BGR2RGB)
label = int(image_file.strip().split('_')[1].split('.')[0])
images.append(image)
labels.append(label)
##全部转变成array
images = np.array(images, dtype=np.float32)
labels = np.array(labels, dtype=np.int32)
return images, labels
###定义批量加载的函数
def next_batch_set(images,labels,batch_size):
index=np.random.choice(len(images),batch_size);
batch_images=images[index];
batch_labels=labels[index]
# print(batch_images.shape)
return batch_images,batch_labels
def haha():
tf.reset_default_graph()
inputs = tf.placeholder(tf.float32, shape=[None, 100, 100, 3], name='inputs')
targets = tf.placeholder(tf.int32, shape=[None], name='targets')
cls_model = Model(is_training=True, num_classes=10)
preprocessed_inputs = cls_model.preprocess(inputs)
prediction = cls_model.forward(preprocessed_inputs)
loss = cls_model.loss(prediction, targets)
# pre_cls表示预测的类别
pre_cls = cls_model.postprocess(prediction)
# print(pre_cls.shape)
# print(targets.shape)
acc = tf.reduce_mean(tf.cast(tf.equal(pre_cls, targets), 'float'))
global_step = tf.Variable(0, trainable=False)
learning_rate = tf.train.exponential_decay(0.1, global_step, 150, 0.9)
optimizer = tf.train.MomentumOptimizer(learning_rate, 0.9)
train_step = optimizer.minimize(loss, global_step)
saver = tf.train.Saver()
init = tf.global_variables_initializer()
# 全部进行初始化
images_path = "./dataset1/"
images, labels = get_train_data(images_path)
batch_size = 128
acc_list=[]
##为了最后画图进行分析
with tf.Session() as sess:
sess.run(init)
# 初始化全部变量
print("Start time:",time.strftime('%Y-%m-%d %H:%M:%S'))
for i in range(6000):
batch_inputs, batch_targets = next_batch_set(images, labels, batch_size)
train_dict = {inputs: batch_inputs, targets: batch_targets}
sess.run(train_step, feed_dict=train_dict)
loss_, acc_ = sess.run([loss, acc], feed_dict=train_dict)
acc_list.append(acc_)
if (i+1)%500==0:
print("No.{}:loss is {},acc is {}.".format((i + 1), loss_, acc_))
print("End time:",time.strftime('%Y-%m-%d %H:%M:%S'))
# 开始画图
x_list=np.linspace(1,6000,6000)
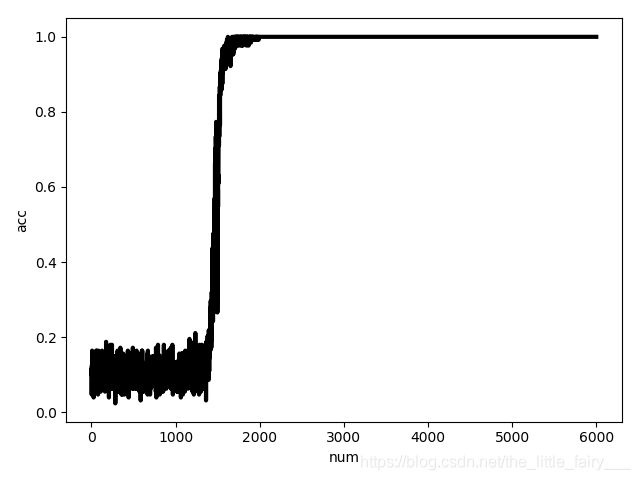
plt.plot(x_list,acc_list,c="k",lw=3.0,ls="-")
plt.xlabel("num")
plt.ylabel("acc")
plt.show()
saver.save(sess, "save_path/")
###进行可视化
writer = tf.summary.FileWriter("logs", tf.get_default_graph())
writer.close()
if __name__=="__main__":
haha()
输出:
Start time: 2019-03-23 07:00:11
No.500:loss is 2.3053460121154785,acc is 0.109375.
No.1000:loss is 2.3189380168914795,acc is 0.09375.
No.1500:loss is 1.6231390237808228,acc is 0.4140625.
No.2000:loss is 0.006314536090940237,acc is 1.0.
No.2500:loss is 0.00019023072673007846,acc is 1.0.
No.3000:loss is 0.00010880577610805631,acc is 1.0.
No.3500:loss is 3.276666029705666e-05,acc is 1.0.
No.4000:loss is 5.921469710301608e-05,acc is 1.0.
No.4500:loss is 2.993835551023949e-05,acc is 1.0.
No.5000:loss is 6.710660818498582e-05,acc is 1.0.
No.5500:loss is 6.0413891333155334e-05,acc is 1.0.
No.6000:loss is 5.594132289843401e-06,acc is 1.0.
End time: 2019-03-23 07:10:29
可以发现在两千多次的时候就已经收敛了
准确率如图所示:
四、验证
验证程序在eval.py中
import tensorflow as tf


def generate_captcha(text='1'):
    capt = ImageCaptcha(width=100, height=100, font_sizes=[24])
    image = capt.generate_image(text)
    image = np.array(image, dtype=np.uint8)
    return image

ckpt_path="save_path/"
with tf.Session() as sess:
    Saver=tf.train.import_meta_graph("save_path/.meta");
    Saver.restore(sess,ckpt_path)
    inputs = tf.get_default_graph().get_tensor_by_name('inputs:0')
    pre_cls = tf.get_default_graph().get_tensor_by_name('pre_cls:0')
    for i in range(10):
        label=np.random.randint(0,10)
        image=generate_captcha(str(label))
        image=np.expand_dims(image,axis=0)
        pre_cls=sess.run(targets,feed_dict={inputs:image})
        print(label+" VS "+pre_cls)
可以大概观察出来模型验证效果
补充知识点:
1、np.expand_dims()
a=[1,2]
a=np.expand_dims(a,axis=0)
a
输出:
array([[1, 2]])
2、.format()的输出形式
a=1.23456
print("{:.3f}".format(a))
#  意味着保留三位小数
print("{:.3}".format(a))
# 意味着保留三位数字
3、time模块的使用
import time
time.strftime('%Y-%m-%d %H:%M:%S')
##输出:'2019-03-23 14:29:02'
4、关于计算图
import tensorflow as tf
a=tf.constant([1.0,2.0],name="a")
b=tf.constant([2.0,3.0],name="b")
result=a+b
print(tf.get_default_graph())
print(a.graph)

"""
输出:
<tensorflow.python.framework.ops.Graph object at 0x000001A445DAD940>
<tensorflow.python.framework.ops.Graph object at 0x000001A445DAD940>
"""
5、使用tensorboard
tnesorboard --logdir=logs(logs表示存放日志文件的目录)