Java 并发编程:核心理论
并发编程是Java程序员最重要的技能之一,也是最难掌握的一种技能。它要求编程者对计算机最底层的运作原理有深刻的理解,同时要求编程者逻辑清晰、思维缜密,这样才能写出高效、安全、可靠的多线程并发程序。本系列会从线程间协调的方式(wait、notify、notifyAll)、Synchronized及Volatile的本质入手,详细解释JDK为我们提供的每种并发工具和底层实现机制。在此基础上,我们会进一步分析java.util.concurrent包的工具类,包括其使用方式、实现源码及其背后的原理。本文是该系列的第一篇文章,是这系列中最核心的理论部分,之后的文章都会以此为基础来分析和解释。
一、共享性
数据共享性是线程安全的主要原因之一。如果所有的数据只是在线程内有效,那就不存在线程安全性问题,这也是我们在编程的时候经常不需要考虑线程安全的主要原因之一。但是,在多线程编程中,数据共享是不可避免的。最典型的场景是数据库中的数据,为了保证数据的一致性,我们通常需要共享同一个数据库中数据,即使是在主从的情况下,访问的也同一份数据,主从只是为了访问的效率和数据安全,而对同一份数据做的副本。我们现在,通过一个简单的示例来演示多线程下共享数据导致的问题:
public class ShareData {
    public static int count = 0;

    public static void main(String[] args) {
        final ShareData data = new ShareData();
        for (int i = 0; i < 10; i++) {
            new Thread(new Runnable() {
                @Override
                public void run() {
                    try {
                        // 进入的时候暂停1毫秒,增加并发问题出现的几率
                        Thread.sleep(1);
                    } catch (InterruptedException e) {
                        e.printStackTrace();
                    }
                    for (int j = 0; j < 100; j++) {
                        data.addCount();
                    }
                    System.out.print(count + " ");
                }
            }).start();

        }
        try {
            // 主程序暂停3秒,以保证上面的程序执行完成
            Thread.sleep(3000);
        } catch (InterruptedException e) {
            e.printStackTrace();
        }
        System.out.println("count=" + count);
    }

    public void addCount() {
        count++;
    }
}
上述代码的目的是对count进行加一操作,执行1000次,不过这里是通过10个线程来实现的,每个线程执行100次,正常情况下,应该输出1000。不过,如果你运行上面的程序,你会发现结果却不是这样。每次运行的结果不一定相同,有时候也可能获取到正确的结果。
可以看出,对共享变量操作,在多线程环境下很容易出现各种意想不到的的结果。
二、互斥性
资源互斥是指同时只允许一个访问者对其进行访问,具有唯一性和排它性。我们通常允许多个线程同时对数据进行读操作,但同一时间内只允许一个线程对数据进行写操作。所以我们通常将锁分为共享锁和排它锁,也叫做读锁和写锁。如果资源不具有互斥性,即使是共享资源,我们也不需要担心线程安全。例如,对于不可变的数据共享,所有线程都只能对其进行读操作,所以不用考虑线程安全问题。但是对共享数据的写操作,一般就需要保证互斥性,上述例子中就是因为没有保证互斥性才导致数据的修改产生问题。Java 中提供多种机制来保证互斥性,最简单的方式是使用Synchronized。现在我们在上面程序中加上Synchronized再执行:
public class ShareData {
    public static int count = 0;

    public static void main(String[] args) {
        final ShareData data = new ShareData();
        for (int i = 0; i < 10; i++) {
            new Thread(new Runnable() {
                @Override
                public void run() {
                    try {
                        //进入的时候暂停1毫秒,增加并发问题出现的几率
                        Thread.sleep(1);
                    } catch (InterruptedException e) {
                        e.printStackTrace();
                    }
                    for (int j = 0; j < 100; j++) {
                        data.addCount();
                    }
                    System.out.print(count + " ");
                }
            }).start();

        }
        try {
            //主程序暂停3秒,以保证上面的程序执行完成
            Thread.sleep(3000);
        } catch (InterruptedException e) {
            e.printStackTrace();
        }
        System.out.println("count=" + count);
    }

    /**
     * 增加 synchronized 关键字
     */
    public synchronized void addCount() {
        count++;
    }
}
现在再执行上述代码,会发现无论执行多少次,返回的最终结果都是1000。
三、原子性
原子性就是指对数据的操作是一个独立的、不可分割的整体。换句话说,就是一次操作,是一个连续不可中断的过程,数据不会执行的一半的时候被其他线程所修改。保证原子性的最简单方式是操作系统指令,就是说如果一次操作对应一条操作系统指令,这样肯定可以能保证原子性。但是很多操作不能通过一条指令就完成。例如,对long类型的运算,很多系统就需要分成多条指令分别对高位和低位进行操作才能完成。还比如,我们经常使用的整数 i++ 的操作,其实需要分成三个步骤:(1)读取整数 i 的值;(2)对 i 进行加一操作;(3)将结果写回内存。这个过程在多线程下就可能出现如下现象:
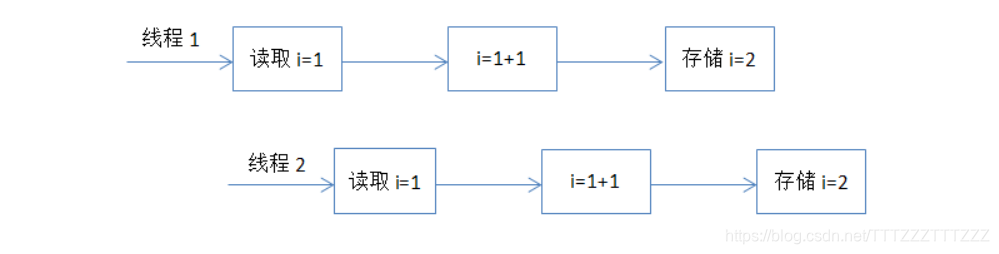
这也是代码段一执行的结果为什么不正确的原因。对于这种组合操作,要保证原子性,最常见的方式是加锁,如Java中的Synchronized或Lock都可以实现,代码段二就是通过Synchronized实现的。除了锁以外,还有一种方式就是CAS(Compare And Swap),即修改数据之前先比较与之前读取到的值是否一致,如果一致,则进行修改,如果不一致则重新执行,这也是乐观锁的实现原理。不过CAS在某些场景下不一定有效,比如另一线程先修改了某个值,然后再改回原来值,这种情况下,CAS是无法判断的。
四、可见性
要理解可见性,需要先对JVM的内存模型有一定的了解,JVM的内存模型与操作系统类似,如图所示:
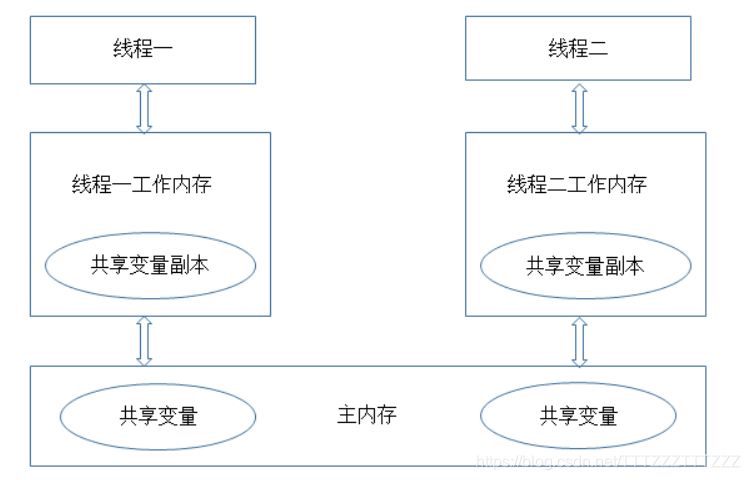
从这个图中我们可以看出,每个线程都有一个自己的工作内存(相当于CPU高级缓冲区,这么做的目的还是在于进一步缩小存储系统与CPU之间速度的差异,提高性能),对于共享变量,线程每次读取的是工作内存中共享变量的副本,写入的时候也直接修改工作内存中副本的值,然后在某个时间点上再将工作内存与主内存中的值进行同步。这样导致的问题是,如果线程1对某个变量进行了修改,线程2却有可能看不到线程1对共享变量所做的修改。通过下面这段程序我们可以演示一下不可见的问题:
public class VisibilityTest {
	private static boolean ready;
	private static int number;

	private static class ReaderThread extends Thread {
		public void run() {
			try {
				Thread.sleep(10);
			} catch (InterruptedException e) {
				e.printStackTrace();
			}
			if (!ready) {
				System.out.println(ready);
			}
			System.out.println(number);
		}
	}

	private static class WriterThread extends Thread {
		public void run() {
			try {
				Thread.sleep(10);
			} catch (InterruptedException e) {
				e.printStackTrace();
			}
			number = 100;
			ready = true;
		}
	}

	public static void main(String[] args) {
		new WriterThread().start();
		new ReaderThread().start();
	}
}
从直观上理解,这段程序应该只会输出100,ready的值是不会打印出来的。实际上,如果多次执行上面代码的话,可能会出现多种不同的结果
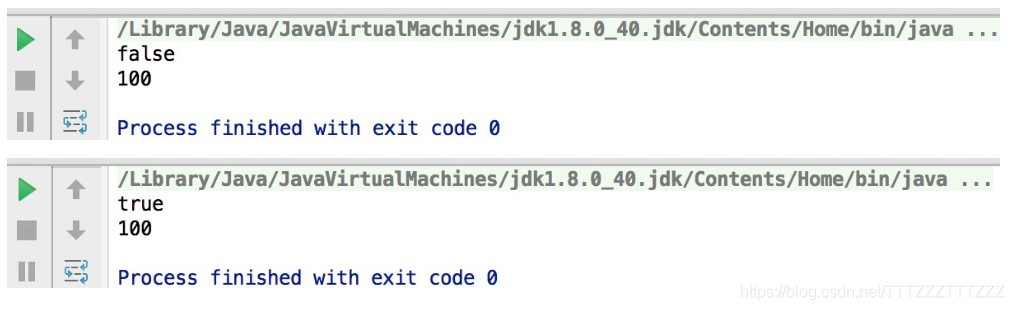
当然,这个结果也只能说是有可能是可见性造成的,当写线程(WriterThread)设置ready=true后,读线程(ReaderThread)看不到修改后的结果,所以会打印false,对于第二个结果,也就是执行if (!ready)时还没有读取到写线程的结果,但执行System.out.println(ready)时读取到了写线程执行的结果。不过,这个结果也有可能是线程的交替执行所造成的。Java 中可通过Synchronized或Volatile来保证可见性
五、有序性
为了提高性能,编译器和处理器可能会对指令做重排序。重排序可以分为三种:
(1)编译器优化的重排序。编译器在不改变单线程程序语义的前提下,可以重新安排语句的执行顺序。
(2)指令级并行的重排序。现代处理器采用了指令级并行技术(Instruction-Level Parallelism, ILP)来将多条指令重叠执行。如果不存在数据依赖性,处理器可以改变语句对应机器指令的执行顺序。
(3)内存系统的重排序。由于处理器使用缓存和读/写缓冲区,这使得加载和存储操作看上去可能是在乱序执行。
我们可以直接参考一下JSR 133 中对重排序问题的描述:
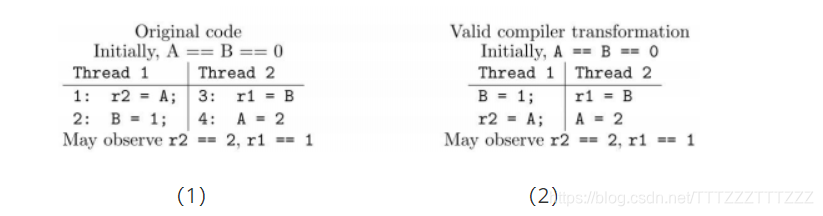
先看上图中的(1)源码部分,从源码来看,要么指令 1 先执行要么指令 3先执行。如果指令 1 先执行,r2不应该能看到指令 4 中写入的值。如果指令 3 先执行,r1不应该能看到指令 2 写的值。但是运行结果却可能出现r2==2,r1==1的情况,这就是“重排序”导致的结果。上图(2)即是一种可能出现的合法的编译结果,编译后,指令1和指令2的顺序可能就互换了。因此,才会出现r2==2,r1==1的结果。Java 中也可通过Synchronized或Volatile来保证顺序性。
Java并发编程:Synchronized及其实现原理
一、Synchronized的基本使用
Synchronized是Java中解决并发问题的一种最常用的方法,也是最简单的一种方法。Synchronized的作用主要有三个:(1)确保线程互斥的访问同步代码(2)保证共享变量的修改能够及时可见(3)有效解决重排序问题。从语法上讲,Synchronized总共有三种用法:
(1)修饰普通方法
(2)修饰静态方法
(3)修饰代码块
接下来我就通过几个例子程序来说明一下这三种使用方式(为了便于比较,三段代码除了Synchronized的使用方式不同以外,其他基本保持一致)。
1、没有同步的情况:
public class SynchronizedTest {
	public void method1() {
		System.out.println("Method 1 start");
		try {
			System.out.println("Method 1 execute");
			Thread.sleep(3000);
		} catch (InterruptedException e) {
			e.printStackTrace();
		}
		System.out.println("Method 1 end");
	}

	public void method2() {
		System.out.println("Method 2 start");
		try {
			System.out.println("Method 2 execute");
			Thread.sleep(1000);
		} catch (InterruptedException e) {
			e.printStackTrace();
		}
		System.out.println("Method 2 end");
	}

	public static void main(String[] args) {
		final SynchronizedTest test = new SynchronizedTest();

		new Thread(new Runnable() {
			@Override
			public void run() {
				test.method1();
			}
		}).start();

		new Thread(new Runnable() {
			@Override
			public void run() {
				test.method2();
			}
		}).start();
	}
}
执行结果如下,线程1和线程2同时进入执行状态,线程2执行速度比线程1快,所以线程2先执行完成,这个过程中线程1和线程2是同时执行的。
Method 1 start
Method 1 execute
Method 2 start
Method 2 execute
Method 2 end
Method 1 end
2、对普通方法同步:
public class SynchronizedTest {
	public synchronized void method1(){
		System.out.println("Method 1 start");
		try {
			System.out.println("Method 1 execute");
			Thread.sleep(3000);
		} catch (InterruptedException e) {
			e.printStackTrace();
		}
		System.out.println("Method 1 end");
	}

	public synchronized void method2(){
		System.out.println("Method 2 start");
		try {
			System.out.println("Method 2 execute");
			Thread.sleep(1000);
		} catch (InterruptedException e) {
			e.printStackTrace();
		}
		System.out.println("Method 2 end");
	}

	public static void main(String[] args) {
		final SynchronizedTest test = new SynchronizedTest();

		new Thread(new Runnable() {
			@Override
			public void run() {
				test.method1();
			}
		}).start();

		new Thread(new Runnable() {
			@Override
			public void run() {
				test.method2();
			}
		}).start();
	}
}
执行结果如下,跟代码段一比较,可以很明显的看出,线程2需要等待线程1的method1执行完成才能开始执行method2方法。
Method 1 start
Method 1 execute
Method 1 end
Method 2 start
Method 2 execute
Method 2 end
3、静态方法(类)同步
public class SynchronizedTest {
     public static synchronized void method1(){
         System.out.println("Method 1 start");
         try {
             System.out.println("Method 1 execute");
             Thread.sleep(3000);
         } catch (InterruptedException e) {
             e.printStackTrace();
         }
         System.out.println("Method 1 end");
     }

     public static synchronized void method2(){
         System.out.println("Method 2 start");
         try {
             System.out.println("Method 2 execute");
             Thread.sleep(1000);
         } catch (InterruptedException e) {
             e.printStackTrace();
         }
         System.out.println("Method 2 end");
     }

     public static void main(String[] args) {
         final SynchronizedTest test = new SynchronizedTest();
         final SynchronizedTest test2 = new SynchronizedTest();

         new Thread(new Runnable() {
             @Override
             public void run() {
                 test.method1();
             }
         }).start();

         new Thread(new Runnable() {
             @Override
             public void run() {
                 test2.method2();
             }
         }).start();
     }
 }
执行结果如下,对静态方法的同步本质上是对类的同步(静态方法本质上是属于类的方法,而不是对象上的方法),所以即使test和test2属于不同的对象,但是它们都属于SynchronizedTest类的实例,所以也只能顺序的执行method1和method2,不能并发执行。
Method 1 start
Method 1 execute
Method 1 end
Method 2 start
Method 2 execute
Method 2 end
4、代码块同步
public class SynchronizedTest {
	public void method1() {
		System.out.println("Method 1 start");
		try {
			synchronized (this) {
				System.out.println("Method 1 execute");
				Thread.sleep(3000);
			}
		} catch (InterruptedException e) {
			e.printStackTrace();
		}
		System.out.println("Method 1 end");
	}

	public void method2() {
		System.out.println("Method 2 start");
		try {
			synchronized (this) {
				System.out.println("Method 2 execute");
				Thread.sleep(1000);
			}
		} catch (InterruptedException e) {
			e.printStackTrace();
		}
		System.out.println("Method 2 end");
	}

	public static void main(String[] args) {
		final SynchronizedTest test = new SynchronizedTest();

		new Thread(new Runnable() {
			@Override
			public void run() {
				test.method1();
			}
		}).start();

		new Thread(new Runnable() {
			@Override
			public void run() {
				test.method2();
			}
		}).start();
	}
}
执行结果如下,虽然线程1和线程2都进入了对应的方法开始执行,但是线程2在进入同步块之前,需要等待线程1中同步块执行完成
Method 1 start
Method 1 execute
Method 2 start
Method 1 end
Method 2 execute
Method 2 end
二、Synchronized 原理
如果对上面的执行结果还有疑问,也先不用急,我们先来了解Synchronized的原理,再回头上面的问题就一目了然了。我们先通过反编译下面的代码来看看Synchronized是如何实现对代码块进行同步的:
public class SynchronizedDemo {
    public void method() {
        synchronized (this) {
            System.out.println("Method 1 start");
        }
    }
}
反编译结果

关于这两条指令的作用,我们直接参考JVM规范中描述:
monitorenter :
Each object is associated with a monitor. A monitor is locked if and only if it has an owner. The thread that executes monitorenter attempts to gain ownership of the monitor associated with objectref, as follows:
• If the entry count of the monitor associated with objectref is zero, the thread enters the monitor and sets its entry count to one. The thread is then the owner of the monitor.
• If the thread already owns the monitor associated with objectref, it reenters the monitor, incrementing its entry count.
• If another thread already owns the monitor associated with objectref, the thread blocks until the monitor’s entry count is zero, then tries again to gain ownership.
这段话的大概意思为:
每个对象有一个监视器锁(monitor)。当monitor被占用时就会处于锁定状态,线程执行monitorenter指令时尝试获取monitor的所有权,过程如下:
1、如果monitor的进入数为0,则该线程进入monitor,然后将进入数设置为1,该线程即为monitor的所有者。
2、如果线程已经占有该monitor,只是重新进入,则进入monitor的进入数加1.
3.如果其他线程已经占用了monitor,则该线程进入阻塞状态,直到monitor的进入数为0,再重新尝试获取monitor的所有权。
monitorexit:
The thread that executes monitorexit must be the owner of the monitor associated with the instance referenced by objectref.
The thread decrements the entry count of the monitor associated with objectref. If as a result the value of the entry count is zero, the thread exits the monitor and is no longer its owner. Other threads that are blocking to enter the monitor are allowed to attempt to do so.
这段话的大概意思为:
执行monitorexit的线程必须是objectref所对应的monitor的所有者。
指令执行时,monitor的进入数减1,如果减1后进入数为0,那线程退出monitor,不再是这个monitor的所有者。其他被这个monitor阻塞的线程可以尝试去获取这个 monitor 的所有权。
通过这两段描述,我们应该能很清楚的看出Synchronized的实现原理,Synchronized的语义底层是通过一个monitor的对象来完成,其实wait/notify等方法也依赖于monitor对象,这就是为什么只有在同步的块或者方法中才能调用wait/notify等方法,否则会抛出java.lang.IllegalMonitorStateException的异常的原因。
我们再来看一下同步方法的反编译结果:
源代码:
public class SynchronizedMethod {
    public synchronized void method() {
        System.out.println("Hello World!");
    }
}
反编译结果:
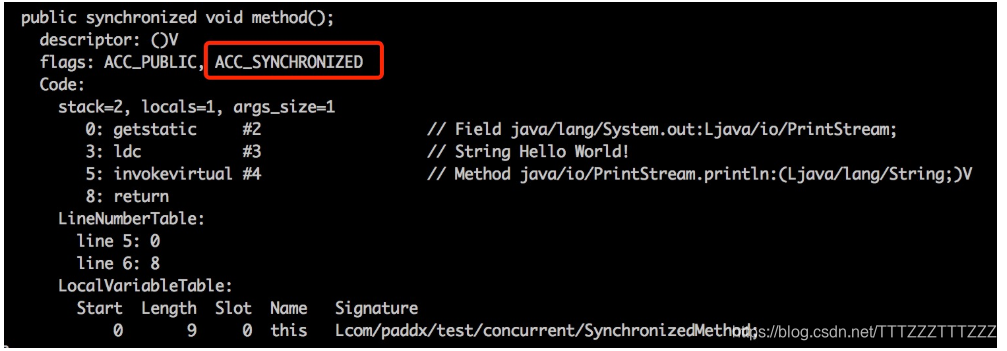
从反编译的结果来看,方法的同步并没有通过指令monitorenter和monitorexit来完成(理论上其实也可以通过这两条指令来实现),不过相对于普通方法,其常量池中多了ACC_SYNCHRONIZED标示符。JVM就是根据该标示符来实现方法的同步的:当方法调用时,调用指令将会检查方法的 ACC_SYNCHRONIZED 访问标志是否被设置,如果设置了,执行线程将先获取monitor,获取成功之后才能执行方法体,方法执行完后再释放monitor。在方法执行期间,其他任何线程都无法再获得同一个monitor对象。 其实本质上没有区别,只是方法的同步是一种隐式的方式来实现,无需通过字节码来完成。
三、运行结果解释
有了对Synchronized原理的认识,再来看上面的程序就可以迎刃而解了。
1、代码段2结果:
虽然method1和method2是不同的方法,但是这两个方法都进行了同步,并且是通过同一个对象去调用的,所以调用之前都需要先去竞争同一个对象上的锁(monitor),也就只能互斥的获取到锁,因此,method1和method2只能顺序的执行。
2、代码段3结果:
虽然test和test2属于不同对象,但是test和test2属于同一个类的不同实例,由于method1和method2都属于静态同步方法,所以调用的时候需要获取同一个类上monitor(每个类只对应一个class对象),所以也只能顺序的执行。
3、代码段4结果:
对于代码块的同步实质上需要获取Synchronized关键字后面括号中对象的monitor,由于这段代码中括号的内容都是this,而method1和method2又是通过同一的对象去调用的,所以进入同步块之前需要去竞争同一个对象上的锁,因此只能顺序执行同步块。
四、总结
Synchronized是Java并发编程中最常用的用于保证线程安全的方式,其使用相对也比较简单。但是如果能够深入了解其原理,对监视器锁等底层知识有所了解,一方面可以帮助我们正确的使用Synchronized关键字,另一方面也能够帮助我们更好的理解并发编程机制,有助我们在不同的情况下选择更优的并发策略来完成任务。对平时遇到的各种并发问题,也能够从容的应对。
Java并发编程:Synchronized底层优化(偏向锁、轻量级锁)
一、重量级锁
上篇文章中向大家介绍了Synchronized的用法及其实现的原理。现在我们应该知道,Synchronized是通过对象内部的一个叫做监视器锁(monitor)来实现的。但是监视器锁本质又是依赖于底层的操作系统的Mutex Lock来实现的。而操作系统实现线程之间的切换这就需要从用户态转换到核心态,这个成本非常高,状态之间的转换需要相对比较长的时间,这就是为什么Synchronized效率低的原因。因此,这种依赖于操作系统Mutex Lock所实现的锁我们称之为“重量级锁”。JDK中对Synchronized做的种种优化,其核心都是为了减少这种重量级锁的使用。JDK1.6以后,为了减少获得锁和释放锁所带来的性能消耗,提高性能,引入了“轻量级锁”和“偏向锁”。
二、轻量级锁
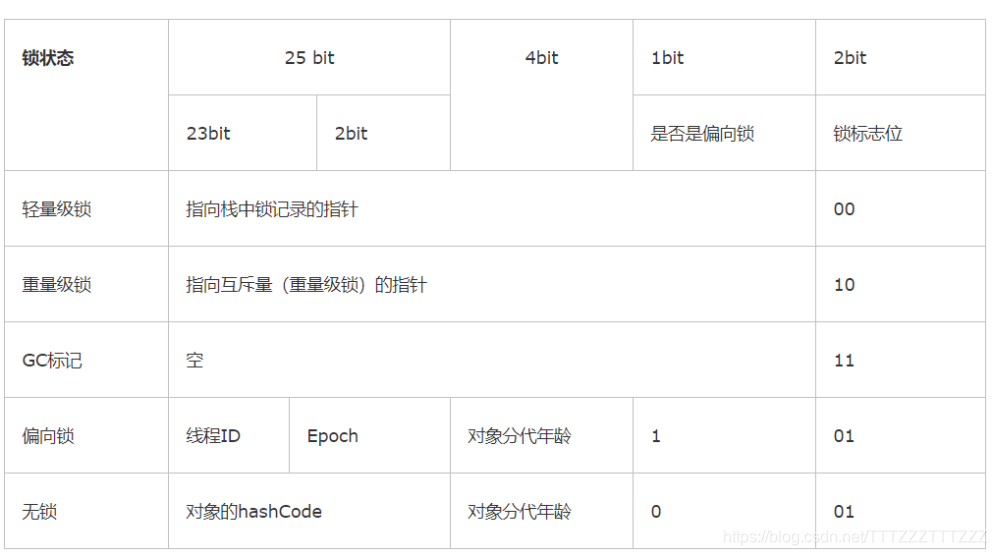
锁的状态总共有四种:无锁状态、偏向锁、轻量级锁和重量级锁。随着锁的竞争,锁可以从偏向锁升级到轻量级锁,再升级的重量级锁(但是锁的升级是单向的,也就是说只能从低到高升级,不会出现锁的降级)。JDK 1.6中默认是开启偏向锁和轻量级锁的,我们也可以通过-XX:-UseBiasedLocking来禁用偏向锁。锁的状态保存在对象的头文件中,以32位的JDK为例:
“轻量级”是相对于使用操作系统互斥量来实现的传统锁而言的。但是,首先需要强调一点的是,轻量级锁并不是用来代替重量级锁的,它的本意是在没有多线程竞争的前提下,减少传统的重量级锁使用产生的性能消耗。在解释轻量级锁的执行过程之前,先明白一点,轻量级锁所适应的场景是线程交替执行同步块的情况,如果存在同一时间访问同一锁的情况,就会导致轻量级锁膨胀为重量级锁。
1、轻量级锁的加锁过程
(1)在代码进入同步块的时候,如果同步对象锁状态为无锁状态(锁标志位为“01”状态,是否为偏向锁为“0”),虚拟机首先将在当前线程的栈帧中建立一个名为锁记录(Lock Record)的空间,用于存储锁对象目前的Mark Word的拷贝,官方称之为 Displaced Mark Word。这时候线程堆栈与对象头的状态如图所示。

(2)拷贝对象头中的Mark Word复制到锁记录中。
(3)拷贝成功后,虚拟机将使用CAS操作尝试将对象的Mark Word更新为指向Lock Record的指针,并将Lock record里的owner指针指向object mark word。如果更新成功,则执行步骤(3),否则执行步骤(4)。
(4)如果这个更新动作成功了,那么这个线程就拥有了该对象的锁,并且对象Mark Word的锁标志位设置为“00”,即表示此对象处于轻量级锁定状态,这时候线程堆栈与对象头的状态如图2.2所示。
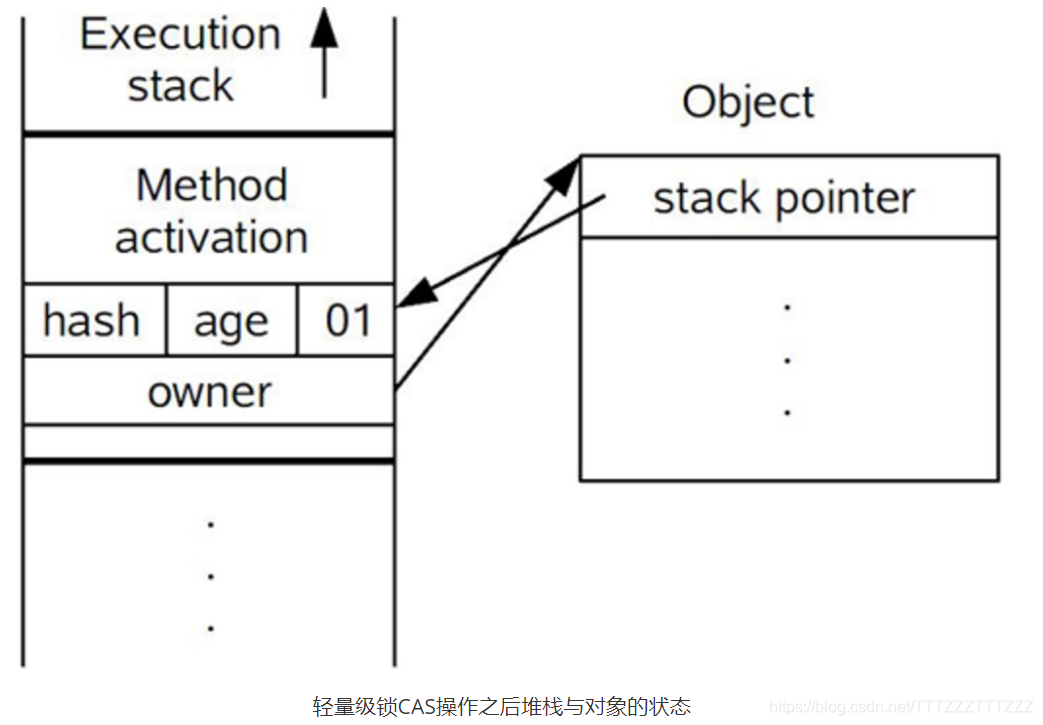
轻量级锁CAS操作之后堆栈与对象的状态
2、轻量级锁的解锁过程:
(1)通过CAS操作尝试把线程中复制的Displaced Mark Word对象替换当前的Mark Word。
(2)如果替换成功,整个同步过程就完成了。
(3)如果替换失败,说明有其他线程尝试过获取该锁(此时锁已膨胀),那就要在释放锁的同时,唤醒被挂起的线程。
三、偏向锁
引入偏向锁是为了在无多线程竞争的情况下尽量减少不必要的轻量级锁执行路径,因为轻量级锁的获取及释放依赖多次CAS原子指令,而偏向锁只需要在置换ThreadID的时候依赖一次CAS原子指令(由于一旦出现多线程竞争的情况就必须撤销偏向锁,所以偏向锁的撤销操作的性能损耗必须小于节省下来的CAS原子指令的性能消耗)。上面说过,轻量级锁是为了在线程交替执行同步块时提高性能,而偏向锁则是在只有一个线程执行同步块时进一步提高性能。
1、偏向锁获取过程:
(1)访问Mark Word中偏向锁的标识是否设置成1,锁标志位是否为01——确认为可偏向状态。
(2)如果为可偏向状态,则测试线程ID是否指向当前线程,如果是,进入步骤(5),否则进入步骤(3)。
(3)如果线程ID并未指向当前线程,则通过CAS操作竞争锁。如果竞争成功,则将Mark Word中线程ID设置为当前线程ID,然后执行(5);如果竞争失败,执行(4)。
(4)如果CAS获取偏向锁失败,则表示有竞争。当到达全局安全点(safepoint)时获得偏向锁的线程被挂起,偏向锁升级为轻量级锁,然后被阻塞在安全点的线程继续往下执行同步代码。
(5)执行同步代码。
2、偏向锁的释放:
偏向锁的撤销在上述第四步骤中有提到**。**偏向锁只有遇到其他线程尝试竞争偏向锁时,持有偏向锁的线程才会释放锁,线程不会主动去释放偏向锁。偏向锁的撤销,需要等待全局安全点(在这个时间点上没有字节码正在执行),它会首先暂停拥有偏向锁的线程,判断锁对象是否处于被锁定状态,撤销偏向锁后恢复到未锁定(标志位为“01”)或轻量级锁(标志位为“00”)的状态。
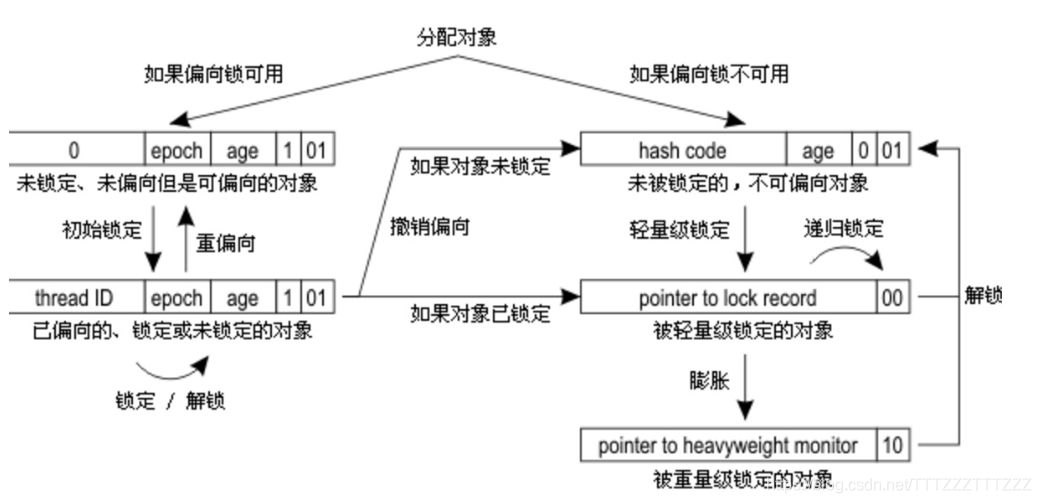
四、重量级锁、轻量级锁和偏向锁之间转换
五、其他优化
1、适应性自旋(Adaptive Spinning):
从轻量级锁获取的流程中我们知道**,**当线程在获取轻量级锁的过程中执行CAS操作失败时,是要通过自旋来获取重量级锁的。问题在于,自旋是需要消耗CPU的,如果一直获取不到锁的话,那该线程就一直处在自旋状态,白白浪费CPU资源。解决这个问题最简单的办法就是指定自旋的次数,例如让其循环10次,如果还没获取到锁就进入阻塞状态。但是JDK采用了更聪明的方式——适应性自旋,简单来说就是线程如果自旋成功了,则下次自旋的次数会更多,如果自旋失败了,则自旋的次数就会减少。
2、锁粗化(Lock Coarsening):
锁粗化的概念应该比较好理解,就是将多次连接在一起的加锁、解锁操作合并为一次,将多个连续的锁扩展成一个范围更大的锁。举个例子:
public class StringBufferTest {
    StringBuffer stringBuffer = new StringBuffer();

    public void append(){
        stringBuffer.append("a");
        stringBuffer.append("b");
        stringBuffer.append("c");
    }
}
这里每次调用stringBuffer.append方法都需要加锁和解锁,如果虚拟机检测到有一系列连串的对同一个对象加锁和解锁操作,就会将其合并成一次范围更大的加锁和解锁操作,即在第一次append方法时进行加锁,最后一次append方法结束后进行解锁。
3、锁消除(Lock Elimination):
锁消除即删除不必要的加锁操作。根据代码逃逸技术,如果判断到一段代码中,堆上的数据不会逃逸出当前线程,那么可以认为这段代码是线程安全的,不必要加锁。看下面这段程序:
public class SynchronizedTest02 {

    public static void main(String[] args) {
        SynchronizedTest02 test02 = new SynchronizedTest02();
        //启动预热
        for (int i = 0; i < 10000; i++) {
            i++;
        }
        long start = System.currentTimeMillis();
        for (int i = 0; i < 100000000; i++) {
            test02.append("abc", "def");
        }
        System.out.println("Time=" + (System.currentTimeMillis() - start));
    }

    public void append(String str1, String str2) {
        StringBuffer sb = new StringBuffer();
        sb.append(str1).append(str2);
    }
}
虽然StringBuffer的append是一个同步方法,但是这段程序中的StringBuffer属于一个局部变量,并且不会从该方法中逃逸出去,所以其实这过程是线程安全的,可以将锁消除。下面是我本地执行的结果:
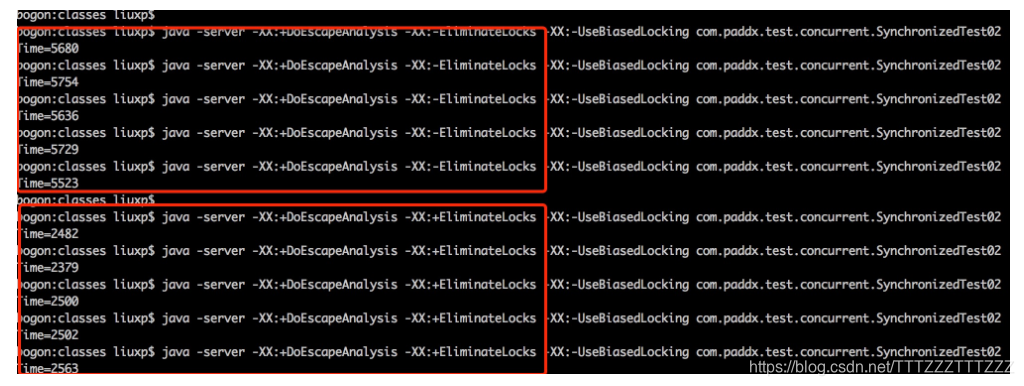
为了尽量减少其他因素的影响,这里禁用了偏向锁(-XX:-UseBiasedLocking)。通过上面程序,可以看出消除锁以后性能还是有比较大提升的。
注:可能JDK各个版本之间执行的结果不尽相同,我这里采用的JDK版本为1.6。
六、总结
本文重点介绍了JDk中采用轻量级锁和偏向锁等对Synchronized的优化,但是这两种锁也不是完全没缺点的,比如竞争比较激烈的时候,不但无法提升效率,反而会降低效率,因为多了一个锁升级的过程,这个时候就需要通过-XX:-UseBiasedLocking来禁用偏向锁。下面是这几种锁的对比:
| 锁 | 优点 | 缺点 | 适用场景 |
|---|---|---|---|
| 偏向锁 | 加锁和解锁不需要额外的消耗,和执行非同步方法比仅存在纳秒级的差距。 | 如果线程间存在锁竞争,会带来额外的锁撤销的消耗。 | 适用于只有一个线程访问同步块场景。 |
| 轻量级锁 | 竞争的线程不会阻塞,提高了程序的响应速度。 | 如果始终得不到锁竞争的线程使用自旋会消耗CPU。 | 追求响应时间。同步块执行速度非常快。 |
| 重量级锁 | 线程竞争不使用自旋,不会消耗CPU。 | 线程阻塞,响应时间缓慢。 | 追求吞吐量。同步块执行速度较长。 |
Java 并发编程:线程间的协作(wait/notify/sleep/yield/join)
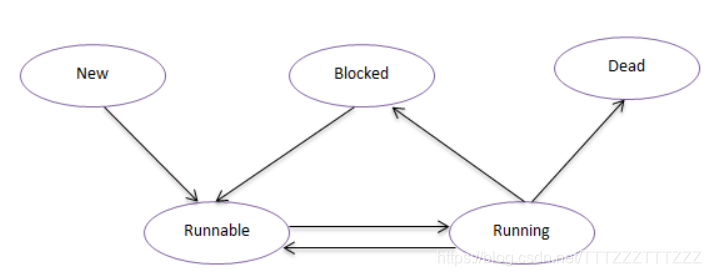
一、线程的状态
Java中线程中状态可分为五种:New(新建状态),Runnable(就绪状态),Running(运行状态),Blocked(阻塞状态),Dead(死亡状态)。
New:新建状态,当线程创建完成时为新建状态,即new Thread(…),还没有调用start方法时,线程处于新建状态。
Runnable:就绪状态,当调用线程的的start方法后,线程进入就绪状态,等待CPU资源。处于就绪状态的线程由Java运行时系统的线程调度程序(thread scheduler)来调度。
Running:运行状态,就绪状态的线程获取到CPU执行权以后进入运行状态,开始执行run方法。
Blocked:阻塞状态,线程没有执行完,由于某种原因(如,I/O操作等)让出CPU执行权,自身进入阻塞状态。
Dead:死亡状态,线程执行完成或者执行过程中出现异常,线程就会进入死亡状态。
这五种状态之间的转换关系如下图所示:
有了对这五种状态的基本了解,现在我们来看看Java中是如何实现这几种状态的转换的。
二、wait/notify/notifyAll方法的使用
1、wait方法:
| void wait() | Causes the current thread to wait until another thread invokes the notify() method or the notifyAll() method for this object. |
|---|---|
| void wait(long timeout) | Causes the current thread to wait until either another thread invokes the notify() method or the notifyAll() method for this object, or a specified amount of time has elapsed. |
| void wait(long timeout, int nanos) | Causes the current thread to wait until another thread invokes the notify() method or the notifyAll() method for this object, or some other thread interrupts the current thread, or a certain amount of real time has elapsed. |
JDK中一共提供了这三个版本的方法,
(1)wait()方法的作用是将当前运行的线程挂起(即让其进入阻塞状态),直到notify或notifyAll方法来唤醒线程.
(2)wait(long timeout),该方法与wait()方法类似,唯一的区别就是在指定时间内,如果没有notify或notifAll方法的唤醒,也会自动唤醒。
(3)至于wait(long timeout,long nanos),本意在于更精确的控制调度时间,不过从目前版本来看,该方法貌似没有完整的实现该功能,其源码(JDK1.8)如下:
public final void wait(long timeout, int nanos) throws InterruptedException {
        if (timeout < 0) {
            throw new IllegalArgumentException("timeout value is negative");
        }

        if (nanos < 0 || nanos > 999999) {
            throw new IllegalArgumentException(
                                "nanosecond timeout value out of range");
        }

        if (nanos >= 500000 || (nanos != 0 && timeout == 0)) {
            timeout++;
        }

        wait(timeout);
    }
从源码来看,JDK8中对纳秒的处理,只做了四舍五入,所以还是按照毫秒来处理的,可能在未来的某个时间点会用到纳秒级别的精度。虽然JDK提供了这三个版本,其实最后都是调用wait(long timeout)方法来实现的,wait()方法与wait(0)等效,而wait(long timeout,int nanos)从上面的源码可以看到也是通过wait(long timeout)来完成的。下面我们通过一个简单的例子来演示wait()方法的使用:
public class WaitTest {

    public void testWait(){
        System.out.println("Start-----");
        try {
            wait(1000);
        } catch (InterruptedException e) {
            e.printStackTrace();
        }
        System.out.println("End-------");
    }

    public static void main(String[] args) {
        final WaitTest test = new WaitTest();
        new Thread(new Runnable() {
            @Override
            public void run() {
                test.testWait();
            }
        }).start();
    }
}
这段代码的意图很简单,就是程序执行以后,让其暂停一秒,然后再执行。运行上述代码,查看结果:
Start-----
Exception in thread "Thread-0" java.lang.IllegalMonitorStateException
    at java.lang.Object.wait(Native Method)
    at com.paddx.test.concurrent.WaitTest.testWait(WaitTest.java:8)
    at com.paddx.test.concurrent.WaitTest$1.run(WaitTest.java:20)
    at java.lang.Thread.run(Thread.java:745)
这段程序并没有按我们的预期输出相应结果,而是抛出了一个异常。大家可能会觉得奇怪为什么会抛出异常?而抛出的IllegalMonitorStateException异常又是什么?我们可以看一下JDK中对IllegalMonitorStateException的描述:
Thrown to indicate that a thread has attempted to wait on an object``'s monitor or to notify other threads waiting on an object'``s monitor without owning the specified monitor.
这句话的意思大概就是:线程试图等待对象的监视器或者试图通知其他正在等待对象监视器的线程,但本身没有对应的监视器的所有权。其实这个问题在《Java并发编程:Synchronized及其实现原理》一文中有提到过,wait方法是一个本地方法,其底层是通过一个叫做监视器锁的对象来完成的。所以上面之所以会抛出异常,是因为在调用wait方式时没有获取到monitor对象的所有权,那如何获取monitor对象所有权?Java中只能通过Synchronized关键字来完成,修改上述代码,增加Synchronized关键字:
public class WaitTest {
	/**
	 * 增加Synchronized关键字
	 */
	public synchronized void testWait() {
		System.out.println("Start-----");
		try {
			wait(1000);
		} catch (InterruptedException e) {
			e.printStackTrace();
		}
		System.out.println("End-------");
	}

	public static void main(String[] args) {
		final WaitTest test = new WaitTest();
		new Thread(new Runnable() {
			@Override
			public void run() {
				test.testWait();
			}
		}).start();
	}
}
现在再运行上述代码,就能看到预期的效果了:
Start-----
End-------
所以,通过这个例子,大家应该很清楚,wait方法的使用必须在同步的范围内,否则就会抛出IllegalMonitorStateException异常,wait方法的作用就是阻塞当前线程等待notify/notifyAll方法的唤醒,或等待超时后自动唤醒。
2、notify/notifyAll方法
| void notify() | Wakes up a single thread that is waiting on this object’s monitor. |
|---|---|
| void notifyAll() | Wakes up all threads that are waiting on this object’s monitor. |
有了对wait方法原理的理解,notify方法和notifyAll方法就很容易理解了。既然wait方式是通过对象的monitor对象来实现的,所以只要在同一对象上去调用notify/notifyAll方法,就可以唤醒对应对象monitor上等待的线程了。notify和notifyAll的区别在于前者只能唤醒monitor上的一个线程,对其他线程没有影响,而notifyAll则唤醒所有的线程,看下面的例子很容易理解这两者的差别:
public class NotifyTest {
    public synchronized void testWait(){
        System.out.println(Thread.currentThread().getName() +" Start-----");
        try {
            wait(0);
        } catch (InterruptedException e) {
            e.printStackTrace();
        }
        System.out.println(Thread.currentThread().getName() +" End-------");
    }

    public static void main(String[] args) throws InterruptedException {
        final NotifyTest test = new NotifyTest();
        for(int i=0;i<5;i++) {
            new Thread(new Runnable() {
                @Override
                public void run() {
                    test.testWait();
                }
            }).start();
        }

        synchronized (test) {
            test.notify();
        }

        Thread.sleep(3000);
        System.out.println("-----------分割线-------------");

        synchronized (test) {
            test.notifyAll();
        }
    }
}
输出结果如下:
Thread-0 Start-----
Thread-1 Start-----
Thread-2 Start-----
Thread-3 Start-----
Thread-4 Start-----
Thread-0 End-------
-----------分割线-------------
Thread-4 End-------
Thread-3 End-------
Thread-2 End-------
Thread-1 End-------
从结果可以看出:调用notify方法时只有线程Thread-0被唤醒,但是调用notifyAll时,所有的线程都被唤醒了。
最后,有两点需要注意:
(1)调用wait方法后,线程是会释放对monitor对象的所有权的。
(2)一个通过wait方法阻塞的线程,必须同时满足以下两个条件才能被真正执行:
- 线程需要被唤醒(超时唤醒或调用notify/notifyll)。
- 线程唤醒后需要竞争到锁(monitor)。
三、sleep/yield/join方法解析
上面我们已经清楚了wait和notify方法的使用和原理,现在我们再来看另外一组线程间协作的方法。这组方法跟上面方法的最明显区别是:这几个方法都位于Thread类中,而上面三个方法都位于Object类中。至于为什么,大家可以先思考一下。现在我们逐个分析sleep/yield/join方法:
1、sleep
sleep方法的作用是让当前线程暂停指定的时间(毫秒),sleep方法是最简单的方法,在上述的例子中也用到过,比较容易理解。唯一需要注意的是其与wait方法的区别。最简单的区别是,wait方法依赖于同步,而sleep方法可以直接调用。而更深层次的区别在于sleep方法只是暂时让出CPU的执行权,并不释放锁。而wait方法则需要释放锁。
public class SleepTest {
    public synchronized void sleepMethod(){
        System.out.println("Sleep start-----");
        try {
            Thread.sleep(1000);
        } catch (InterruptedException e) {
            e.printStackTrace();
        }
        System.out.println("Sleep end-----");
    }

    public synchronized void waitMethod(){
        System.out.println("Wait start-----");
        synchronized (this){
            try {
                wait(1000);
            } catch (InterruptedException e) {
                e.printStackTrace();
            }
        }
        System.out.println("Wait end-----");
    }

    public static void main(String[] args) {
        final SleepTest test1 = new SleepTest();

        for(int i = 0;i<3;i++){
            new Thread(new Runnable() {
                @Override
                public void run() {
                    test1.sleepMethod();
                }
            }).start();
        }


        try {
            // 暂停十秒,等上面程序执行完成
            Thread.sleep(10000);
        } catch (InterruptedException e) {
            e.printStackTrace();
        }
        System.out.println("-----分割线-----");

        final SleepTest test2 = new SleepTest();

        for(int i = 0;i<3;i++){
            new Thread(new Runnable() {
                @Override
                public void run() {
                    test2.waitMethod();
                }
            }).start();
        }

    }
}
执行结果:
Sleep start-----
Sleep end-----
Sleep start-----
Sleep end-----
Sleep start-----
Sleep end-----
-----分割线-----
Wait start-----
Wait start-----
Wait start-----
Wait end-----
Wait end-----
Wait end-----
这个结果的区别很明显,通过sleep方法实现的暂停,程序是顺序进入同步块的,只有当上一个线程执行完成的时候,下一个线程才能进入同步方法,sleep暂停期间一直持有monitor对象锁,其他线程是不能进入的。而wait方法则不同,当调用wait方法后,当前线程会释放持有的monitor对象锁,因此,其他线程还可以进入到同步方法,线程被唤醒后,需要竞争锁,获取到锁之后再继续执行。
2、yield方法
yield方法的作用是暂停当前线程,以便其他线程有机会执行,不过不能指定暂停的时间,并且也不能保证当前线程马上停止。yield方法只是将Running状态转变为Runnable状态。我们还是通过一个例子来演示其使用:
public class YieldTest implements Runnable {
    @Override
    public void run() {
        try {
            Thread.sleep(100);
        } catch (InterruptedException e) {
            e.printStackTrace();
        }
        for(int i=0;i<5;i++){
            System.out.println(Thread.currentThread().getName() + ": " + i);
            Thread.yield();
        }
    }

    public static void main(String[] args) {
        YieldTest runn = new YieldTest();
        Thread t1 = new Thread(runn,"FirstThread");
        Thread t2 = new Thread(runn,"SecondThread");

        t1.start();
        t2.start();

    }
}
运行结果如下:
FirstThread: 0
SecondThread: 0
FirstThread: 1
SecondThread: 1
FirstThread: 2
SecondThread: 2
FirstThread: 3
FirstThread: 4
SecondThread: 3
SecondThread: 4
这个例子就是通过yield方法来实现两个线程的交替执行。不过请注意:这种交替并不一定能得到保证,源码中也对这个问题进行说明:
/**
 * A hint to the scheduler that the current thread is willing to yield
 * its current use of a processor. The scheduler is free to ignore this
 * hint.
 *
 * <p> Yield is a heuristic attempt to improve relative progression
 * between threads that would otherwise over-utilise a CPU. Its use
 * should be combined with detailed profiling and benchmarking to
 * ensure that it actually has the desired effect.
 *
 * <p> It is rarely appropriate to use this method. It may be useful
 * for debugging or testing purposes, where it may help to reproduce
 * bugs due to race conditions. It may also be useful when designing
 * concurrency control constructs such as the ones in the
 * {@link java.util.concurrent.locks} package.
*/
这段话主要说明了三个问题:
- 调度器可能会忽略该方法。
- 使用的时候要仔细分析和测试,确保能达到预期的效果。
- 很少有场景要用到该方法,主要使用的地方是调试和测试。
3、join方法
| void join() | Waits for this thread to die. |
|---|---|
| void join(long millis) | Waits at most millis milliseconds for this thread to die. |
| void join(long millis, int nanos) | Waits at most millis milliseconds plus nanos nanoseconds for this thread to die. |
join方法的作用是父线程等待子线程执行完成后再执行,换句话说就是将异步执行的线程合并为同步的线程。JDK中提供三个版本的join方法,其实现与wait方法类似,join()方法实际上执行的join(0),而join(long millis, int nanos)也与wait(long millis, int nanos)的实现方式一致,暂时对纳秒的支持也是不完整的。我们可以看下join方法的源码,这样更容易理解:
public final void join() throws InterruptedException {
        join(0);
    }

 public final synchronized void join(long millis)
    throws InterruptedException {
        long base = System.currentTimeMillis();
        long now = 0;

        if (millis < 0) {
            throw new IllegalArgumentException("timeout value is negative");
        }

        if (millis == 0) {
            while (isAlive()) {
                wait(0);
            }
        } else {
            while (isAlive()) {
                long delay = millis - now;
                if (delay <= 0) {
                    break;
                }
                wait(delay);
                now = System.currentTimeMillis() - base;
            }
        }
    }

public final synchronized void join(long millis, int nanos)
    throws InterruptedException {

        if (millis < 0) {
            throw new IllegalArgumentException("timeout value is negative");
        }

        if (nanos < 0 || nanos > 999999) {
            throw new IllegalArgumentException(
                                "nanosecond timeout value out of range");
        }

        if (nanos >= 500000 || (nanos != 0 && millis == 0)) {
            millis++;
        }

        join(millis);
    }
大家重点关注一下join(long millis)方法的实现,可以看出join方法就是通过wait方法来将线程的阻塞,如果join的线程还在执行,则将当前线程阻塞起来,直到join的线程执行完成,当前线程才能执行。不过有一点需要注意,这里的join只调用了wait方法,却没有对应的notify方法,原因是Thread的start方法中做了相应的处理,所以当join的线程执行完成以后,会自动唤醒主线程继续往下执行。下面我们通过一个例子来演示join方法的作用:
(1)不使用join方法:
public class JoinTest implements Runnable {
	@Override
	public void run() {

		try {
			System.out.println(Thread.currentThread().getName() + " start-----");
			Thread.sleep(1000);
			System.out.println(Thread.currentThread().getName() + " end------");
		} catch (InterruptedException e) {
			e.printStackTrace();
		}
	}

	public static void main(String[] args) {
		for (int i = 0; i < 5; i++) {
			Thread test = new Thread(new JoinTest());
			test.start();
		}

		System.out.println("Finished~~~");
	}
}
执行结果如下:
Finished~~~
Thread-0 start-----
Thread-1 start-----
Thread-2 start-----
Thread-3 start-----
Thread-4 start-----
Thread-4 end------
Thread-3 end------
Thread-2 end------
Thread-1 end------
Thread-0 end------
(2)使用join方法:
public class JoinTest implements Runnable{
	@Override
	public void run() {

		try {
			System.out.println(Thread.currentThread().getName() + " start-----");
			Thread.sleep(1000);
			System.out.println(Thread.currentThread().getName() + " end------");
		} catch (InterruptedException e) {
			e.printStackTrace();
		}
	}

	public static void main(String[] args) {
		for (int i=0;i<5;i++) {
			Thread test = new Thread(new JoinTest());
			test.start();
			try {
				// 调用join方法
				test.join();
			} catch (InterruptedException e) {
				e.printStackTrace();
			}
		}

		System.out.println("Finished~~~");
	}
}
执行结果如下:
Thread-0 start-----
Thread-0 end------
Thread-1 start-----
Thread-1 end------
Thread-2 start-----
Thread-2 end------
Thread-3 start-----
Thread-3 end------
Thread-4 start-----
Thread-4 end------
Finished~~~
对比两段代码的执行结果很容易发现,在没有使用join方法之间,线程是并发执行的,而使用join方法后,所有线程是顺序执行的。
四、总结
本文主要详细讲解了wait/notify/notifyAll和sleep/yield/join方法。最后回答一下上面提出的问题:wait/notify/notifyAll方法的作用是实现线程间的协作,那为什么这三个方法不是位于Thread类中,而是位于Object类中?位于Object中,也就相当于所有类都包含这三个方法(因为Java中所有的类都继承自Object类)。要回答这个问题,还是得回过来看wait方法的实现原理,大家需要明白的是,wait等待的到底是什么东西?如果对上面内容理解的比较好的话,我相信大家应该很容易知道wait等待其实是对象monitor,由于Java中的每一个对象都有一个内置的monitor对象,自然所有的类都理应有wait/notify方法。
Java 并发编程:volatile的使用及其原理
一、volatile的作用
在《Java并发编程:核心理论》一文中,我们已经提到过可见性、有序性及原子性问题,通常情况下我们可以通过Synchronized关键字来解决这些个问题,不过如果对Synchronized原理有了解的话,应该知道Synchronized是一个比较重量级的操作,对系统的性能有比较大的影响,所以,如果有其他解决方案,我们通常都避免使用Synchronized来解决问题。而volatile关键字就是Java中提供的另一种解决可见性和有序性问题的方案。对于原子性,需要强调一点,也是大家容易误解的一点:对volatile变量的单次读/写操作可以保证原子性的,如long和double类型变量,但是并不能保证i++这种操作的原子性,因为本质上i++是读、写两次操作。
二、volatile的使用
关于volatile的使用,我们可以通过几个例子来说明其使用方式和场景。
1、防止重排序
我们从一个最经典的例子来分析重排序问题。大家应该都很熟悉单例模式的实现,而在并发环境下的单例实现方式,我们通常可以采用双重检查加锁(DCL)的方式来实现。其源码如下:
public class Singleton {
    public static volatile Singleton singleton;

    /**
     * 构造函数私有,禁止外部实例化
     */
    private Singleton() {};

    public static Singleton getInstance() {
        if (singleton == null) {
            synchronized (singleton) {
                if (singleton == null) {
                    singleton = new Singleton();
                }
            }
        }
        return singleton;
    }
}
现在我们分析一下为什么要在变量singleton之间加上volatile关键字。要理解这个问题,先要了解对象的构造过程,实例化一个对象其实可以分为三个步骤:
(1)分配内存空间。
(2)初始化对象。
(3)将内存空间的地址赋值给对应的引用。
但是由于操作系统可以对指令进行重排序,所以上面的过程也可能会变成如下过程:
(1)分配内存空间。
(2)将内存空间的地址赋值给对应的引用。
(3)初始化对象
如果是这个流程,多线程环境下就可能将一个未初始化的对象引用暴露出来,从而导致不可预料的结果。因此,为了防止这个过程的重排序,我们需要将变量设置为volatile类型的变量。
2、实现可见性
可见性问题主要指一个线程修改了共享变量值,而另一个线程却看不到。引起可见性问题的主要原因是每个线程拥有自己的一个高速缓存区——线程工作内存。volatile关键字能有效的解决这个问题,我们看下面的例子,就可以知道其作用:
public class VolatileTest {
	int a = 1;
	int b = 2;

	public void change() {
		a = 3;
		b = a;
	}

	public void print() {
		System.out.println("b=" + b + ";a=" + a);
	}

	public static void main(String[] args) {
		while (true) {
			final VolatileTest test = new VolatileTest();
			new Thread(new Runnable() {
				@Override
				public void run() {
					try {
						Thread.sleep(10);
					} catch (InterruptedException e) {
						e.printStackTrace();
					}
					test.change();
				}
			}).start();

			new Thread(new Runnable() {
				@Override
				public void run() {
					try {
						Thread.sleep(10);
					} catch (InterruptedException e) {
						e.printStackTrace();
					}
					test.print();
				}
			}).start();

		}
	}
}
直观上说,这段代码的结果只可能有两种:b=3;a=3 或 b=2;a=1。不过运行上面的代码(可能时间上要长一点),你会发现除了上两种结果之外,还出现了第三种结果:
......
b=2;a=1
b=2;a=1
b=3;a=3
b=3;a=3
----b=3;a=1----
b=3;a=3
b=2;a=1
b=3;a=3
b=3;a=3
......
为什么会出现b=3;a=1这种结果呢?正常情况下,如果先执行change方法,再执行print方法,输出结果应该为b=3;a=3。相反,如果先执行的print方法,再执行change方法,结果应该是 b=2;a=1。那b=3;a=1的结果是怎么出来的?原因就是第一个线程将值a=3修改后,但是对第二个线程是不可见的,所以才出现这一结果。如果将a和b都改成volatile类型的变量再执行,则再也不会出现b=3;a=1的结果了。
3、保证原子性
关于原子性的问题,上面已经解释过。volatile只能保证对单次读/写的原子性。这个问题可以看下JLS中的描述:
17.7 Non-Atomic Treatment of double and long
For the purposes of the Java programming language memory model, a single write to a non-volatile long or double value is treated as two separate writes: one to each 32-bit half. This can result in a situation where a thread sees the first 32 bits of a 64-bit value from one write, and the second 32 bits from another write.
Writes and reads of volatile long and double values are always atomic.
Writes to and reads of references are always atomic, regardless of whether they are implemented as 32-bit or 64-bit values.
Some implementations may find it convenient to divide a single write action on a 64-bit long or double value into two write actions on adjacent 32-bit values. For efficiency’s sake, this behavior is implementation-specific; an implementation of the Java Virtual Machine is free to perform writes to long and double values atomically or in two parts.
Implementations of the Java Virtual Machine are encouraged to avoid splitting 64-bit values where possible. Programmers are encouraged to declare shared 64-bit values as volatile or synchronize their programs correctly to avoid possible complications.
这段话的内容跟我前面的描述内容大致类似。因为long和double两种数据类型的操作可分为高32位和低32位两部分,因此普通的long或double类型读/写可能不是原子的。因此,鼓励大家将共享的long和double变量设置为volatile类型,这样能保证任何情况下对long和double的单次读/写操作都具有原子性。
关于volatile变量对原子性保证,有一个问题容易被误解。现在我们就通过下列程序来演示一下这个问题:
public class VolatileTest01 {
    volatile int i;

    public void addI(){
        i++;
    }

    public static void main(String[] args) throws InterruptedException {
        final  VolatileTest01 test01 = new VolatileTest01();
        for (int n = 0; n < 1000; n++) {
            new Thread(new Runnable() {
                @Override
                public void run() {
                    try {
                        Thread.sleep(10);
                    } catch (InterruptedException e) {
                        e.printStackTrace();
                    }
                    test01.addI();
                }
            }).start();
        }

        Thread.sleep(10000);//等待10秒,保证上面程序执行完成

        System.out.println(test01.i);
    }
}
大家可能会误认为对变量i加上关键字volatile后,这段程序就是线程安全的。大家可以尝试运行上面的程序。下面是我本地运行的结果:

可能每个人运行的结果不相同。不过应该能看出,volatile是无法保证原子性的(否则结果应该是1000)。原因也很简单,i++其实是一个复合操作,包括三步骤:
(1)读取i的值。
(2)对i加1。
(3)将i的值写回内存
volatile是无法保证这三个操作是具有原子性的,我们可以通过AtomicInteger或者Synchronized来保证+1操作的原子性。
注:上面几段代码中多处执行了Thread.sleep()方法,目的是为了增加并发问题的产生几率,无其他作用。
三、volatile的原理
通过上面的例子,我们基本应该知道了volatile是什么以及怎么使用。现在我们再来看看volatile的底层是怎么实现的。
1、有序性实现:
在解释这个问题前,我们先来了解一下Java中的happen-before规则,JSR 133中对Happen-before的定义如下:
Two actions can be ordered by a happens-before relationship.If one action happens before another, then the first is visible to and ordered before the second.
通俗一点说就是如果a happen-before b,则a所做的任何操作对b是可见的。(这一点大家务必记住,因为happen-before这个词容易被误解为是时间的前后)。我们再来看看JSR 133中定义了哪些happen-before规则:
• Each action in a thread happens before every subsequent action in that thread.
• An unlock on a monitor happens before every subsequent lock on that monitor.
• A write to a volatile field happens before every subsequent read of that volatile.
• A call to start() on a thread happens before any actions in the started thread.
• All actions in a thread happen before any other thread successfully returns from a join() on that thread.
• If an action a happens before an action b, and b happens before an action c, then a happens before c.
翻译过来为:
- 同一个线程中的,前面的操作 happen-before 后续的操作。(即单线程内按代码顺序执行。但是,在不影响在单线程环境执行结果的前提下,编译器和处理器可以进行重排序,这是合法的。换句话说,这一是规则无法保证编译重排和指令重排)。
- 监视器上的解锁操作 happen-before 其后续的加锁操作。(Synchronized 规则)
- 对volatile变量的写操作 happen-before 后续的读操作。(volatile 规则)
- 线程的start() 方法 happen-before 该线程所有的后续操作。(线程启动规则)
- 线程所有的操作 happen-before 其他线程在该线程上调用 join 返回成功后的操作。
- 如果 a happen-before b,b happen-before c,则a happen-before c(传递性)。
这里我们主要看下第三条:volatile变量的保证有序性的规则。《Java并发编程:核心理论》一文中提到过重排序分为编译器重排序和处理器重排序。为了实现volatile内存语义,JMM会对volatile变量限制这两种类型的重排序。下面是JMM针对volatile变量所规定的重排序规则表:
| Can Reorder | 2nd operation | ||
|---|---|---|---|
| 1st operation | Normal Load Normal Store | Volatile Load | Volatile Store |
| Normal Load Normal Store | No | ||
| Volatile Load | No | No | No |
| Volatile store | No | No |
2、可见性实现:
在前文中已经提及过,线程本身并不直接与主内存进行数据的交互,而是通过线程的工作内存来完成相应的操作。这也是导致线程间数据不可见的本质原因。因此要实现volatile变量的可见性,直接从这方面入手即可。对volatile变量的写操作与普通变量的主要区别有两点:
(1)修改volatile变量时会强制将修改后的值刷新的主内存中。
(2)修改volatile变量后会导致其他线程工作内存中对应的变量值失效。因此,再读取该变量值的时候就需要重新从读取主内存中的值。
通过这两个操作,就可以解决volatile变量的可见性问题。
3、内存屏障
为了实现volatile可见性和happen-befor的语义。JVM底层是通过一个叫做“内存屏障”的东西来完成。内存屏障,也叫做内存栅栏,是一组处理器指令,用于实现对内存操作的顺序限制。下面是完成上述规则所要求的内存屏障:
| Required barriers | 2nd operation | |||
|---|---|---|---|---|
| 1st operation | Normal Load | Normal Store | Volatile Load | Volatile Store |
| Normal Load | LoadStore | |||
| Normal Store | StoreStore | |||
| Volatile Load | LoadLoad | LoadStore | LoadLoad | LoadStore |
| Volatile Store | StoreLoad | StoreStore |
(1)LoadLoad 屏障
执行顺序:Load1—>Loadload—>Load2
确保Load2及后续Load指令加载数据之前能访问到Load1加载的数据。
(2)StoreStore 屏障
执行顺序:Store1—>StoreStore—>Store2
确保Store2以及后续Store指令执行前,Store1操作的数据对其它处理器可见。
(3)LoadStore 屏障
执行顺序: Load1—>LoadStore—>Store2
确保Store2和后续Store指令执行前,可以访问到Load1加载的数据。
(4)StoreLoad 屏障
执行顺序: Store1—> StoreLoad—>Load2
确保Load2和后续的Load指令读取之前,Store1的数据对其他处理器是可见的。
最后我可以通过一个实例来说明一下JVM中是如何插入内存屏障的:
public class MemoryBarrier {
    int a, b;
    volatile int v, u;

    void f() {
        int i, j;

        i = a;
        j = b;
        i = v;
        // LoadLoad
        j = u;
        // LoadStore
        a = i;
        b = j;
        // StoreStore
        v = i;
        // StoreStore
        u = j;
        // StoreLoad
        i = u;
        // LoadLoad
        // LoadStore
        j = b;
        a = i;
    }
}
四、总结
总体上来说volatile的理解还是比较困难的,如果不是特别理解,也不用急,完全理解需要一个过程,在后续的文章中也还会多次看到volatile的使用场景。这里暂且对volatile的基础知识和原来有一个基本的了解。总体来说,volatile是并发编程中的一种优化,在某些场景下可以代替Synchronized。但是,volatile的不能完全取代Synchronized的位置,只有在一些特殊的场景下,才能适用volatile。总的来说,必须同时满足下面两个条件才能保证在并发环境的线程安全:
(1)对变量的写操作不依赖于当前值。
(2)该变量没有包含在具有其他变量的不变式中。