小菜鸡的第七篇博客
本系列文章仅仅是对基础的HTML5以及CSS进行讲解,更加详细的内容均会附上链接,以便查阅和版权保护。
今天周六了,明天中午带小部委去吃个饭,老四川菜馆,嘻嘻嘻。
我觉得我很有可能今天晚上就更新关于数据结构的试题解析,因为我昨天把那本书跑完了。。(因为基础太差了,学完数据结构就要去学C语言基础,哭了)
言归正传
本章讲的是怎么创建表单,就是类似登陆界面的那种表单。
- HTML5对表单的改进
- 创建表单
- 处理表单
- 对表单元素进行组织
- 创建文本框
- 为表单组件添加说明标签
- 创建密码框
- 创建电子邮件框,搜索框,电话框和URL框
- 创建单选按钮
- 创建复选框
- 创建文本区域
- 创建选择框
- 让访问者上传文件
- 创建隐藏字段
- 创建提交按钮
- 禁用表单元素
- 根据状态为表单设置样式
1.HTML5对表单的改进
这里讲的是关于HTML5和以前的版本之间的兼容性,因为我这个是专门讲HTML5的,故本小节不做讲解
2. 创建表单
多代码预警,下面的代码就是你在学完这个章节之后能够掌握的所有的东西
@charset "utf-8";
/* CSS Document */

body {
	font-size: 100%;
	font-family: arial, sans-serif;
	padding-bottom: 1em;
}

.wrapper {
	width: 600px;
}

h2 {
	background-color: #dedede;
	border-bottom: 1px solid #d4d4d4;
	border-top: 1px solid #d4d4d4;
	border-radius: 5px;
	box-shadow: 3px 3px 3px #ccc;
	color: #fff;
	font-size: 1.1em;
	margin: 12px;
	padding: 0.3em 1em;
	text-shadow: #9FBEB9 1px 1px 1px;
	text-transform: uppercase;
}

.hdr-account 				{ background-color: #0B5586; }
.hdr-address 				{ background-color: #4494C9; }
.hdr-public-profile 		{ background-color: #377D87; }
.hdr-emails 				{ background-color: #717F88; }

fieldset {
	background-color: #f1f1f1;
	border: none;
	border-radius: 2px;
	margin-bottom: 12px;
	overflow: hidden;
	padding: 0 .625em; /* 10px/16px */
}

.fields {
	background-color: #fff;
	border: 1px solid #eaeaea;
	margin: .75em;
	padding: .75em;
}

.fields .row {
	margin: 0.5em 0;
}

label {
	cursor: pointer;
	display: inline-block;
	padding: 3px 6px;
	text-align: right;
	width: 150px;
	vertical-align: top;
}

.required { /* the asterisk */
	color: red;
display: none;
}

input,
select,
button {
	font: inherit;
}

.field-small {
	width: 75px;
}

.field-medium {
	width: 150px;
}

.field-large {
	width: 250px;
}

select {
	padding-right: 1em;
}

textarea {
	font: inherit;
	padding: 2px;
}

.instructions {
	font-size: .75em;
	padding-left: 167px;
	font-style: italic;
		margin: .5em 0 1.2em;
}

.instructions kbd {
	font-size: 1.23em;
	font-style: normal;
}

.btn {
	background-color: #da820a;
	border: none;
	border-radius: 4px;
	box-shadow: 2px 2px 2px #333;
	color: #fff;
	margin: 12px 0 0 26px;
	padding: 8px;
	text-shadow: 1px 1px 0px #777;
}

.btn-reset {
	background-color: #8e5303;
	color: #eee;
	margin-left: 35px;
}

/* :::: Radio Buttons :::: */
.radios {
	background-color: transparent;
	position: relative;
	margin-bottom: 0;
}

.radios .row {
	margin: 0 0 0 150px;
}

.radios legend {
	left: 0;
	padding: 0 6px;
	position: absolute;
	text-align: right;
	top: 2px;
	width: 148px;
	*width: 143px; /* a hack for IE7 */
}

.radios label {
	padding-left: 2px;
	margin-right: 5px;
	vertical-align: middle;
	width: auto;
}

/* :::: Checkboxes :::: */
.checkboxes label {
	text-align: left;
	width: 475px;
}

button * {
	vertical-align: middle;
}
<!DOCTYPE html>
<html lang="en">
<head>
	<meta charset="utf-8" />
    <title>Creating a Form</title>
	<link rel="stylesheet" href="羽协.css" />
</head>
<body>
<main class="wrapper" role="main">
	<h1>Create a New Account</h1>

	<form method="post" action="show-data.php" enctype="multipart/form-data">
		<!-- START ACCOUNT FIELDS -->
		 <fieldset>
			<h2 class="hdr-account">Account</h2>

			<div class="fields">
				<p class="row">
					<label for="first-name">First Name<span class="required">*</span>:</label>
					<input type="text" id="first-name" name="first_name" class="field-large" required aria-required="true" />
				</p>
				<p class="row">
					<label for="last-name">Last Name:</label>
					<input type="text" id="last-name" name="last_name" class="field-large" />
				</p>
				<p class="row">
					<label for="email">Email:</label>
					<input type="email" id="email" name="email" placeholder="[email protected]" class="field-large" />
				</p>
				<p class="row">
					<label for="password">Password:</label>
					<input type="password" id="password" name="password" />
				</p>
				<p class="row">
					<label for="password2">Re-enter Password:</label>
					<input type="password" id="password2" name="password2" />
				</p>
			</div>
		</fieldset>
		<!-- end account -->

		<!-- START ADDRESS FIELDS -->
		<fieldset>
			<h2 class="hdr-address">Address</h2>

			<div class="fields">
				<div class="row">
					<label for="street-address">Street Address:</label>
					<input type="text" id="street-address" name="street_address" class="field-large" />
				</div>
				<div class="row">
					<label for="city">City:</label>
					<input type="text" id="city" name="city" class="field-large" />
				</div>
				<div class="row">
					<label for="state">State:</label>
					<select id="state" name="state">
						<option value="AL">Alabama</option>
						<option value="AK">Alaska</option>
						<option value="CA">California</option>
						<option value="CO">Colorado</option>
					</select>
				</div>
				<div class="row">
					<label for="zip-code">ZIP Code:</label>
					<input type="text" id="zip-code" name="zip_code" class="field-small" />
				</div>
			</div>
		</fieldset>
		<!-- end address -->

		<!-- START PUBLIC PROFILE FIELDS -->
		<fieldset>
			<h2 class="hdr-public-profile">Public Profile</h2>

			<div class="fields">
				<div class="row">
					<label for="picture">Picture:</label>
					<input type="file" id="picture" name="picture" />
					<p class="instructions">Maximum size of 700k. JPG, GIF or PNG.</p>
				</div>
				<p class="row">
					<label for="screen-name">Screen Name:</label>
					<input type="text" id="screen-name" name="screen_name" class="field-medium" />
				</p>
				<div class="row">
					<label for="website">Website URL:</label>
					<input type="url" id="website" name="website" placeholder="http://www.example.com" class="field-large" />
					<p class="instructions">Have a homepage or a blog? Put the address here, <br />beginning with <kbd>http://</kbd> or <kbd>https://</kbd>.</p>
				</div>
				<p class="row">
					<label for="bio">Bio:</label>
					<textarea id="bio" name="bio" cols="40" rows="5" class="field-large"></textarea>
				</p>
				<div class="row">
					<fieldset class="radios">
						<legend>Gender:</legend>
						<p class="row">
							<input type="radio" id="gender-male" name="gender" value="male" />
							<label for="gender-male">Male</label>
						</p>
						<p class="row">
							<input type="radio" id="gender-female" name="gender" value="female" />
							<label for="gender-female">Female</label>
						</p>
					</fieldset>
				</div>
			</div>
		</fieldset>
		<!-- end public profile -->

		<!-- START EMAILS FIELDS -->
		<fieldset>
			<h2 class="hdr-emails">Emails</h2>
			<div class="fields checkboxes">
				<div class="row">
					<input type="checkbox" id="email-ok-msg-from-users" name="email_signup[]" value="user-emails" />
					<label for="email-ok-msg-from-users">It is okay to email me with messages from other users.</label>
				</div>
				<div class="row">
					<input type="checkbox" id="email-ok-occasional-updates" name="email_signup[]" value="occasional-updates" />
					<label for="email-ok-occasional-updates">It is okay to email me with occasional promotions about our other products.</label>
				</div>
			</div>
		</fieldset>
		<!-- end emails -->

		<input type="submit" value="Create Account" class="btn" />
	</form>
</main>
</body>
</html>
创建表单的步骤:
- 输入<form method=“formmethod”,这里的formmethod是get或者post。
- 输入action=“script.url”>这里的script.url是提交表单时要运行的脚本在服务器上的位置。
- 根据从16.5节开始讲解的知识,创建表单的内容(包括一个提交按钮)
- 输入</form&>以结束表单
(解释:上述的为将表单数据提交到你的后台,)
关于post和get的区别
- post的安全性比get要好。
- get只能向服务器发送ASCII字符,而post则可以发送整个ISO10646中的字符(如果同时指定enctype="multipart/form-data"的话)。
- get和post对应的enctype属性有区别。enctype有两个值,默认值为application/x-www-form-urlencoded,而另一个值multipart/form-data只能用于post。
3. 处理表单
关于处理表单的语言,就是将你的表单数据保存的语言,我们更推荐PHP。(书上是这么说的)
4. 对表单元素进行组织
当我讲到这里的时候,我意识到这个章节不能这么简单的一点点的讲,因为他的联系性太大了。所以我觉得我后面的内容将会是剖析我上面的那一大堆代码而不是一点点的讲各个小节。(我这些文字没删除是为了让你能够明白为什么我只讲到第四小节并且后面的讲述方式和前面的章节都不同)
现在开始剖析代码
<!DOCTYPE html>
<html lang="en">
<head>
	<meta charset="utf-8" />
    <title>Creating a Form</title>
	<link rel="stylesheet" href="羽协.css" />
</head>
<body>
<main class="wrapper" role="main">
这是我们的开头,前面的应该都能了解,但是main里面的role是什么呢?
role属性作用是告诉Accessibility类应用(比如屏幕朗读程序,为盲人提供的访问网络的便利程序),这个元素所扮演的角色,主要是供残疾人使用。使用role可以增强文本的可读性和语义化。
意思就是,告诉屏幕(阅读器)这里是页面的主要成分。
那么什么时候使用呢?
role属性的应用主要是表单,比如输入密码,对于正常人可以用placaholder提示输入密码,但是对于残障人士是无效的,这个时候就需要role了。
<form method="post" action="show-data.php" enctype="multipart/form-data">
关于method,action的用法在第一小节已经说明了,至于enctype

 <fieldset>
			<h2 class="hdr-account">Account</h2>

			<div class="fields">
				<p class="row">
					<label for="first-name">First Name<span class="required">*</span>:</label>
					<input type="text" id="first-name" name="first_name" class="field-large" required aria-required="true" />
				</p>
				<p class="row">
					<label for="last-name">Last Name:</label>
					<input type="text" id="last-name" name="last_name" class="field-large" />
				</p>
				<p class="row">
					<label for="email">Email:</label>
					<input type="email" id="email" name="email" placeholder="[email protected]" class="field-large" />
				</p>
				<p class="row">
					<label for="password">Password:</label>
					<input type="password" id="password" name="password" />
				</p>
				<p class="row">
					<label for="password2">Re-enter Password:</label>
					<input type="password" id="password2" name="password2" />
				</p>
			</div>
		</fieldset>
关于fieldset属性:
fieldset 元素可将表单内的相关元素分组。fieldset标签将表单内容的一部分打包,生成一组相关表单的字段。当一组表单元素放到 fieldset标签内时,浏览器会以特殊方式来显示它们,它们可能有特殊的边界、3D 效果,或者甚至可创建一个子表单来处理这些元素。
关于label属性:
label 标签为 input 元素定义标注(标记)。label 元素不会向用户呈现任何特殊效果。不过,它为鼠标用户改进了可用性。如果您在 label 元素内点击文本,就会触发此控件。就是说,当用户选择该标签时,浏览器就会自动将焦点转到和标签相关的表单控件上。label标签的 for 属性应当与相关元素的 id 属性相同。
其中for属性后面的为定位,与后面的相对应,当你点击后面的内容时,哪怕没有点击回馈,指针也会自动定位到id所对应的位置。
关于input属性:
input标签用于搜集用户信息。根据不同的 type 属性值,输入字段拥有很多种形式。输入字段可以是文本字段、复选框、掩码后的文本控件、单选按钮、按钮等等。
HTML 标签这个里面有完整的input标签,而我后续会讲解一部分的内容。
input里面的type="text"意味着这个是一个表格,需要输入数据,如果是type="submit"那么意味着这是一个提交的按钮
required aria-required=“true” 这个意味着这项表格为必填。其中aria这个是为了残障人士使用的,用于屏幕阅读器,帮助残障人士能够更好的访问网站。
关于placeholder属性:
placeholder 属性提供可描述输入字段预期值的提示信息(hint)。该提示会在输入字段为空时显示,并会在字段获得焦点时消失。


type=“password”,这个意味着这是一个密码域,即当你输入数据时,他会自动使用密码格式(即隐藏)

<fieldset>
			<h2 class="hdr-address">Address</h2>

			<div class="fields">
				<div class="row">
					<label for="street-address">Street Address:</label>
					<input type="text" id="street-address" name="street_address" class="field-large" />
				</div>
				<div class="row">
					<label for="city">City:</label>
					<input type="text" id="city" name="city" class="field-large" />
				</div>
				<div class="row">
					<label for="state">State:</label>
					<select id="state" name="state">
						<option value="AL">Alabama</option>
						<option value="AK">Alaska</option>
						<option value="CA">California</option>
						<option value="CO">Colorado</option>
					</select>
				</div>
				<div class="row">
					<label for="zip-code">ZIP Code:</label>
					<input type="text" id="zip-code" name="zip_code" class="field-small" />
				</div>
			</div>
		</fieldset>
		<!-- end address -->
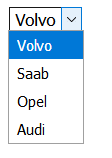
关于select元素:
select 元素可创建单选或多选菜单。<select&> 元素中的 <option&>标签用于定义列表中的可用选项。(我突然发现,在代码框加入&元素能够使代码带上<>一起出现,而不是消失,所以从现在开始,我的元素中都会加入可见的&,你们自动忽略就行)
<fieldset>
			<h2 class="hdr-public-profile">Public Profile</h2>
			<div class="fields">
				<div class="row">
					<label for="picture">Picture:</label>
					<input type="file" id="picture" name="picture" />
					<p class="instructions">Maximum size of 700k. JPG, GIF or PNG.</p>
				</div>
				<p class="row">
					<label for="screen-name">Screen Name:</label>
					<input type="text" id="screen-name" name="screen_name" class="field-medium" />
				</p>
				<div class="row">
					<label for="website">Website URL:</label>
					<input type="url" id="website" name="website" placeholder="http://www.example.com" class="field-large" />
					<p class="instructions">Have a homepage or a blog? Put the address here, <br />beginning with <kbd>http://</kbd> or <kbd>https://</kbd>.</p>
				</div>
				<p class="row">
					<label for="bio">Bio:</label>
					<textarea id="bio" name="bio" cols="40" rows="5" class="field-large"></textarea>
				</p>
				<div class="row">
					<fieldset class="radios">
						<legend>Gender:</legend>
						<p class="row">
							<input type="radio" id="gender-male" name="gender" value="male" />
							<label for="gender-male">Male</label>
						</p>
						<p class="row">
							<input type="radio" id="gender-female" name="gender" value="female" />
							<label for="gender-female">Female</label>
						</p>
					</fieldset>
				</div>
			</div>
		</fieldset>
关于type="file"属性 :
定义输入字段和 "浏览"按钮,供文件上传。

关于 type="url"属性:
提交网址
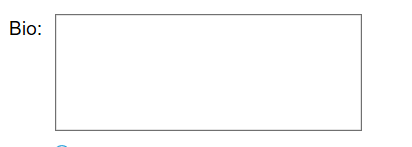
关于 <textarea id=“bio” name=“bio” cols=“40” rows=“5” class=“field-large”&></textarea&>属性:
<textarea&> 标签定义多行的文本输入控件。文本区中可容纳无限数量的文本,其中的文本的默认字体是等宽字体(通常是 Courier)。可以通过 cols 和 rows 属性来规定 textarea 的尺寸,
关于type="radio"属性:
定义单选按钮。
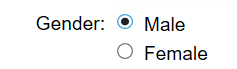
关于<legend&>:
legend 元素为 fieldset 元素定义标题(caption)。
<fieldset>
			<h2 class="hdr-emails">Emails</h2>
			<div class="fields checkboxes">
				<div class="row">
					<input type="checkbox" id="email-ok-msg-from-users" name="email_signup[]" value="user-emails" />
					<label for="email-ok-msg-from-users">It is okay to email me with messages from other users.</label>
				</div>
				<div class="row">
					<input type="checkbox" id="email-ok-occasional-updates" name="email_signup[]" value="occasional-updates" />
					<label for="email-ok-occasional-updates">It is okay to email me with occasional promotions about our other products.</label>
				</div>
			</div>
		</fieldset>
		<!-- end emails -->

		<input type="submit" value="Create Account" class="btn" />
	</form>
关于type=“checkbox”:
定义复选框。

关于value=“user-emails”:
当用户选择后,便会向后台发送对应的数据。
当我叭叭完上面这些的时候我发现内容太多了,并且关于css还有一点点东西没说,于是这一章节我分为上下两个部分。