转载请指明出处 WangYouHu版权归博主所有

由于最近有好多人请教我数据库的问题 由于网络上资料整理不全面 我熬夜两天整理了一下greendao 框架给大家分享 希望大家多多支持小编 关于连结mysql我就不多讲了 不能直连mysql 建议使用json封装查询 废话不多说下面就直接直入话题
本地数据库sqlite原生的数据库具有很多错误
- >1创建表重复创建 思路是判断是否第一次安装app
- >2查询不到数据不判断为空直接删除 等 思路是加入if(xxx!=null)
- >3数据库加密问题 反编译很容易盗取用户信息
- >4最大的缺陷是安卓攻城狮并不了解数据库查询语句 直接导致发生语句错误等
greenDao给我们解决了这些问题 他把查询语句进行了封装 把常见的判断也封装了进去 我们只需要调用方法即可 同时支持多表关联 以及数据库加密
GreenDao的介绍
什么是GreenDao?
GreenDAO 是一个开源的 Android ORM(“对象/关系映射”),通过 ORM(称为“对象/关系映射”),在我们数据库开发过程中节省了开发时间
GreenDao的官方文档
GreenDao,适用于您的SQLite数据库的 Android ORM:
http://greenrobot.org/greendao/
GreenDao的作用?
通过 GreenDao,我们可以更快速的操作数据库,我们可以使用简单的面相对象的API来存储,更新,删除和查询 Java 对象
GreenDao的优缺点?
-
*>1高性能
-
*>2易于使用的强大 API,涵盖关系和连接
-
*>3最小的内存消耗
-
*>4小库大小(<100KB)以保持较低的构建时间并避免65k 方法限制
-
*>5数据库加密:greenDAO 支持 SQLCipher,以确保用户的数据安全
GreenDao的使用
gradle导入库
// Top-level build file where you can add configuration options common to all sub-projects/modules.

buildscript {

    repositories {
        google()
        jcenter()
        //添加
        mavenCentral()
    }
    dependencies {
        classpath 'com.android.tools.build:gradle:3.2.1'
        //添加
        classpath 'org.greenrobot:greendao-gradle-plugin:3.2.2'


        // NOTE: Do not place your application dependencies here; they belong
        // in the individual module build.gradle files
    }
}

allprojects {
    repositories {
        google()
        jcenter()
    }
}

task clean(type: Delete) {
    delete rootProject.buildDir
}
apply plugin: 'com.android.application'
//添加
apply plugin: 'org.greenrobot.greendao'

android {
    compileSdkVersion 28
    defaultConfig {
        applicationId "com.liziyang.dall.greengao2"
        minSdkVersion 16
        targetSdkVersion 28
        versionCode 1
        versionName "1.0"
        testInstrumentationRunner "android.support.test.runner.AndroidJUnitRunner"
    }
    buildTypes {
        release {
            minifyEnabled false
            proguardFiles getDefaultProguardFile('proguard-android.txt'), 'proguard-rules.pro'
        }
    }
}

dependencies {
    implementation fileTree(dir: 'libs', include: ['*.jar'])
    implementation 'com.android.support:appcompat-v7:28.0.0'
    implementation 'com.android.support.constraint:constraint-layout:1.1.3'
    testImplementation 'junit:junit:4.12'
    androidTestImplementation 'com.android.support.test:runner:1.0.2'
    androidTestImplementation 'com.android.support.test.espresso:espresso-core:3.0.2'
    //添加
    implementation 'org.greenrobot:greendao:3.2.2'
   }
//设置greenGao配置
greendao{
    //版本号
    schemaVersion 1
    //设置新建的三个文件包的位置
    daoPackage 'com.liziyang.dall.greengao2'
    //设置DaoMaster、DaoSession、Dao目录
    targetGenDir 'src/main/java'
    //自动生成单元测试。
    generateTests false
    //应存储生成的单元测试的基本目录。默认为 src / androidTest / java

    targetGenDirTests 'src/main/java'
}
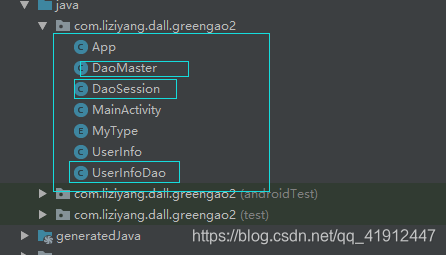
新建一个class 命名为UserInfo 用来自动生成相应的三个类
@Entity
//必须使用注解
public class UserInfo {
    /**
     * autoincrement设置自动递减功能
     */
    @Id(autoincrement = true)
    Long id;
    @Unique
    public String name;
    //unique唯一
    @NotNull
    int number;
    //getter和setter方法不写 点击builder则会自动生成 注意在我下面指示的位置点击否则会出错
    }
这里是生成过的代码
package com.liziyang.dall.greengao2;

import org.greenrobot.greendao.annotation.Entity;
import org.greenrobot.greendao.annotation.Id;
import org.greenrobot.greendao.annotation.NotNull;
import org.greenrobot.greendao.annotation.Unique;
import org.greenrobot.greendao.annotation.Generated;

@Entity
public class UserInfo {
    /**
     * autoincrement设置自动递减功能
     */
    @Id(autoincrement = true)
    Long id;
    @Unique
    public String name;
    //unique唯一
    @NotNull
    int number;
    @Generated(hash = 743709815)
    public UserInfo(Long id, String name, int number) {
        this.id = id;
        this.name = name;
        this.number = number;
    }
    @Generated(hash = 1279772520)
    public UserInfo() {
    }
    public Long getId() {
        return this.id;
    }
    public void setId(Long id) {
        this.id = id;
    }
    public String getName() {
        return this.name;
    }
    public void setName(String name) {
        this.name = name;
    }
    public int getNumber() {
        return this.number;
    }
    public void setNumber(int number) {
        this.number = number;
    }


}
新建一个全局对象 初始化数据
public class App extends Application {
    //声明一个全局对象
    //需要在功能清单注册
    private DaoSession daoSession;

    @Override
    public void onCreate() {
        super.onCreate ();
       //创建一个表
     DaoMaster.DevOpenHelper helper=new DaoMaster.DevOpenHelper ( this,"come.db" );
     Database db=helper.getWritableDb ();
     daoSession=new DaoMaster ( db ).newSession ();
    }
    //这个重写方法不能生成 否则会报错

//    public App(DaoSession daoSession) {
//        this.daoSession = daoSession;
//    }

//这个重写方法会用到的 必不可少 他是一个工具
    public DaoSession getDaoSession() {
        return daoSession;
    }

}
然后在mainfest功能清单注册
<?xml version="1.0" encoding="utf-8"?>
<manifest xmlns:android="http://schemas.android.com/apk/res/android"
    package="com.liziyang.dall.greengao2">

    <application
    //这里是添加的全局对象
        android:name=".App"

        android:allowBackup="true"
        android:icon="@mipmap/ic_launcher"
        android:label="@string/app_name"
        android:roundIcon="@mipmap/ic_launcher_round"
        android:supportsRtl="true"
        android:theme="@style/AppTheme">
        <activity android:name=".MainActivity">
            <intent-filter>
                <action android:name="android.intent.action.MAIN" />

                <category android:name="android.intent.category.LAUNCHER" />
            </intent-filter>
        </activity>
    </application>

</manifest>
点击选项栏builder中的make project
会生成三个类文件 这几个类是我们的辅助的调用接口类
现在已配置完成 下面就是用来实现数据库的增删改查
*我为了测试方便写了一个布局*
<?xml version="1.0" encoding="utf-8"?>
<LinearLayout xmlns:android="http://schemas.android.com/apk/res/android"
    xmlns:app="http://schemas.android.com/apk/res-auto"
    xmlns:tools="http://schemas.android.com/tools"
    android:layout_width="match_parent"
    android:layout_height="match_parent"
    android:orientation="vertical"
    tools:context=".MainActivity">

    <EditText
        android:id="@+id/editText"
        android:layout_width="match_parent"
        android:layout_height="wrap_content"
        android:ems="10"
        android:hint="请输入名字"
        android:inputType="textPersonName" />

    <EditText
        android:id="@+id/editText2"
        android:layout_width="match_parent"
        android:layout_height="wrap_content"
        android:ems="10"
        android:hint="请输入你的账号"
        android:inputType="number" />

    <LinearLayout
        android:layout_width="match_parent"
        android:layout_height="wrap_content"
        android:orientation="horizontal">

        <Button
            android:id="@+id/button"
            android:layout_width="wrap_content"
            android:layout_height="wrap_content"
            android:layout_weight="1"
            android:text="增" />

        <Button
            android:id="@+id/button2"
            android:layout_width="wrap_content"
            android:layout_height="wrap_content"
            android:layout_weight="1"
            android:text="删" />

        <Button
            android:id="@+id/button3"
            android:layout_width="wrap_content"
            android:layout_height="wrap_content"
            android:layout_weight="1"
            android:text="改" />

        <Button
            android:id="@+id/button4"
            android:layout_width="wrap_content"
            android:layout_height="wrap_content"
            android:layout_weight="1"
            android:text="查" />
    </LinearLayout>


</LinearLayout>
*下面是我的实现活动类文件* 在这文件类下面我会详细介绍使用方法
public class MainActivity extends AppCompatActivity {
    private EditText editText1,editText2;
    private Button addButton,deleteButton,changeButton,searchButton;
    private UserInfo userInfo;
    private long MYID=2018120623;
    private TextView textView;
    //表格不需要额外创建了 就不需要判断第一次安装软件了


    @Override
    protected void onCreate(Bundle savedInstanceState) {
        super.onCreate ( savedInstanceState );
        setContentView ( R.layout.activity_main );
        initUI();
        //在按钮点击的时候也可以判断输入是否为空 为空则点击无效
        addButton.setOnClickListener ( new View.OnClickListener () {
            @Override
            public void onClick(View v) {
                addUI();
                //正常
                //添加正常 有数据修改正常
                //不需要加判断 已经封装好
                //insert可能会报错 就是相同数据的 使用insertOrReplace则可以避免 他封装了方法
                //已无错误
            }
        } );
        deleteButton.setOnClickListener ( new View.OnClickListener () {
            @Override
            public void onClick(View v) {
                deleteUI();
                //删除全部  删除行正常
                //删除一列中的某一个键没有这项操作 只能修改
                //已无错误
            }
        } );
        changeButton.setOnClickListener ( new View.OnClickListener () {
            @Override
            public void onClick(View v) {
                changeUI();
                //正常
                //id修改有缺陷 如已有数据已有同name 同其他的就会替换这个相同的数据
                //更新数据update
                //    * 在这里不要添加设置id 否则不会修改
                //    * 修改id用insertOrReplace 但有相同数据又会替换 无replace单独的方法
                //    * 不修改id用update
            }
        } );
        searchButton.setOnClickListener ( new View.OnClickListener () {
            @Override
            public void onClick(View v) {
                SearcherUI();
                //正常
            }
        } );
    }

    private void SearcherUI() {
        /**
         * 查询所有
         * 测试成功
         */
//        DaoSession daoSession=((App)getApplication ()).getDaoSession();
//        List<UserInfo> userInfos=daoSession.loadAll ( UserInfo.class );
        DaoSession daoSession=((App)getApplication ()).getDaoSession ();
        UserInfoDao userInfoDao=daoSession.getUserInfoDao ();
//        /**
//         *  根据条件查询 这里设置id大于3
//         *  使用语句查询ID出错 注意是_id参数 这里我是用db工具打开表看到的键
//         *   其他数据需要大写 如NAME
//         *  测试成功
//         */
//
//        List<UserInfo> list=userInfoDao.queryRaw ( "where _id>?","1881041" );
        /**
         * 从第二条数据开始查询5条信息
         * 可以用来做分页功能
         * offset设置起始位置
         * 测试成功
         */
//        List<UserInfo> list1=userInfoDao.queryBuilder ().offset ( 2 ).limit ( 5 ).list ();

//        /**
//         * 排序1
//         * 查询姓李的所有人 并用id排序
//         * 没加判断 若没有数据不报错
//         * 测试成功
//         */
//        List<UserInfo> list2=userInfoDao.queryBuilder ().where ( UserInfoDao.Properties.Name.eq ( "李紫洋12" ) ).orderAsc ( UserInfoDao.Properties.Id ).list ();
        /**
         * 排序2
         * 查询叫wang的所有人 id是大于2 或(number不等于8   id等于2)
         * 参数gt大于
         * eq等于
         * noteq不等于
         * ge等于或大于
         * 测试成功
         */
//        QueryBuilder<UserInfo>qb=userInfoDao.queryBuilder ();
//        qb.where ( UserInfoDao.Properties.Name.eq ( "wang" ) ,
//                qb.or ( UserInfoDao.Properties.Id.gt ( 2 ),
//                        qb.and ( UserInfoDao.Properties.Id.eq ( 2 ),
//                                UserInfoDao.Properties.Number.notEq ( 8 ) )) );
//        List<UserInfo> list3=qb.list ();
        /**
         * 查询 id在2到74中间 查询2个数据
         * 测试成功
         *
         */
        List<UserInfo> list4=userInfoDao.queryBuilder ().where ( UserInfoDao.Properties.Id.between ( 2,74 ) ).limit ( 2 ).build ().list ();
        /**
         * 这个用来测试输出内容
         * 我使用判断数量来测试 因为logcat并不显示数据库查询到的内容 只是给一个编码
         */

//        for (int i=0;i<list4.size ();i++){
//                Log.i ( "查询内容",list4.get ( i ).toString () +i);
//        }
        /**
         * 这里的logcat打印实现了内容显示
         */
        try {
            for (UserInfo u : list4) {
                Log.i ( "查询内容" , "id" + u.getId () + "名字" + u.getName () + "号码" + u.getNumber () );
            }
        }finally {

        }

        /**
         * 懒加载 这里可以使用方法 读出表中的内容
         * 测试成功
//         */
//        LazyList<UserInfo> l = null;
//        try{
//            l=userInfoDao.queryBuilder ().listLazy ();
//            for ( UserInfo  u:l){
//                Log.i ( "查询内容","id"+u.getId ()+"名字"+u.getName ()+"号码"+u.getNumber () );
//            }
//        }finally {
//            //关闭查询 避免内存泄漏
//            //判断流是否为空 否则会出错
//
//            if (l != null) {
//                l.close ();
//            }
//
//        }


    }

    private void changeUI() {
        DaoSession daoSession=((App)getApplication ()).getDaoSession ();
        UserInfoDao userInfoDao=daoSession.getUserInfoDao ();
        UserInfo userInfo=userInfoDao.queryBuilder ().where ( UserInfoDao.Properties.Name.eq ( "wang" ) ).build ().unique ();
        if (userInfo!=null){
            userInfo.setName ( "王幼虎" );
            userInfo.setNumber ( 1881042 );
            /**
             * 更新数据update
             * 在这里不要添加设置id 否则不会修改
             * 修改id用insertOrReplace 但有相同数据又会替换 无replace单独的方法
             * 不修改id用update
             * 这种做法是为了考虑多表查询 方便处理
             *
             */
            /**
             * insert添加
             * replace更换
             * update更新
             * where(WhereCondition cond, WhereCondition… condMore): 查询条件,参数为查询的条件!
             *
             * or(WhereCondition cond1, WhereCondition cond2, WhereCondition… condMore): 嵌套条件或者,用法同 or。
             *
             * and(WhereCondition cond1, WhereCondition cond2, WhereCondition… condMore): 嵌套条件且,用法同 and。
             *
             * join(Property sourceProperty, Class destinationEntityClass):多表查询,后面会讲。
             *
             * 输出结果有四种方式,选择其中一种最适合的即可,list()返回值是 List,而其他三种返回值均实现 Closeable,需要注意的不使用数据时游标的关闭操作:
             *
             * list ()所有实体都加载到内存中。结果通常是一个没有魔法的 ArrayList。最容易使用。
             *
             * listLazy ()实体按需加载到内存中。首次访问列表中的元素后,将加载并缓存该元素以供将来使用。必须关闭。
             *
             * listLazyUncached ()实体的“虚拟”列表:对列表元素的任何访问都会导致从数据库加载其数据。必须关闭。
             *
             * listIterator ()让我们通过按需加载数据(懒惰)来迭代结果。数据未缓存。必须关闭。
             * eq():“equal (’=?’)” 等于;
             *
             * notEq() :“not equal (’<>?’)” 不等于;
             *
             * like():" LIKE ?" 值等于;
             *
             * between():" BETWEEN ? AND ?" 取中间范围;
             *
             * in():" IN (" in命令;
             *
             * notIn():" NOT IN (" not in 命令;
             *
             * gt():">?" 大于;
             *
             * lt():"<? " 小于;
             *
             * ge():">=?" 大于等于;
             *
             * le():"<=? " 小于等于;
             *
             * isNull():" IS NULL" 为空;
             *
             * isNotNull():" IS NOT NULL" 不为空;
             */
//            userInfoDao.update ( userInfo );
            userInfo.setId ( MYID );
            userInfoDao.insertOrReplace ( userInfo );
            Toast.makeText ( this,"修改成功",Toast.LENGTH_LONG ).show ();
        }else {
            Toast.makeText ( this,"修改出错或找不到数据",Toast.LENGTH_LONG ).show ();
        }


    }

    private void deleteUI() {
        DaoSession daoSession=((App)getApplication ()).getDaoSession ();
        UserInfoDao userInfoDao=daoSession.getUserInfoDao ();
        /**
         *  指定id删除数据  1l是id=1
         *  不需要判断是否为空 不会崩溃 已封装好
         */


       // userInfoDao.deleteByKey ( 1l );
        /**
         * 指定名字删除列
         * 这里使用了deleteQuery 删除查询 再次点击则不会报错
         * 只能删除一列 如果要删除列中一个数据 需要修改 (警告)
         */
        DeleteQuery<UserInfo> deleteQuery=daoSession.queryBuilder ( UserInfo.class ).where ( UserInfoDao.Properties.Name.eq ( "wang" ) ).buildDelete ();
        deleteQuery.executeDeleteWithoutDetachingEntities ();
       // daoSession.clear ();

        /**
         *  Entity实体是数据库表的关联
         *  例如一对多 或多对多等
         */


        /***
         * 删除全部
         */
        //删除数据
        // 设置为全局对象
        // daoSession.delete ( userInfo );
        //删除全部
        //daoSession.deleteAll ( UserInfo.class );


    }

    private void addUI() {
        /**
         * 初始化上下文对象
         * 设置全局对象
         */
        DaoSession daoSession=((App)getApplication ()).getDaoSession();
        /**
         * 获得全文对象
         */
        //App app= (App) getApplication ();
       // DaoSession daoSession1=app.getDaoSession ();
       // UserInfo userInfo=new UserInfo (  );
        userInfo=new UserInfo (  );
        /**
         * 在表注册的时候写了注解@NotNull
         * 说明本值不可以为空
         */
        if (editText2.getText ().length ()!=0){
            String q=editText2.getText ().toString ();
            if (q!=null){
                int number=Integer.parseInt ( q );
                userInfo.setNumber ( number );
                //这里说明一个情况如果number无值 则number则写入为0 需要添加判断

            }

        }


        /**
         * 获取editText输入数字
         */
        //int c=Integer.parseInt ( editText1.getText ().toString () );
        if (editText1.getText ().toString ().length ()!=0){
            String name=editText1.getText ().toString ();
            /**
             * 将数据通过已经定义的方法添加进去
             */
            userInfo.setName ( name );
            //userInfo.setNumber ( number );
            /**
             * id能修改 在insertOrReplace是处理所有情况的方法 以免其他方法出现bug  建议不要使用一个表格来记录所有数据
             */
           // userInfo.setId ( MYID );

        }


        /**
         * 将封装好的东西添加到daoSession
         */
        //添加已有数据中类似的可能会报错
        //daoSession.insert ( userInfo );
        //无数据则添加 数据存在则替换
        daoSession.insertOrReplace ( userInfo );


    }


    private void initUI() {
        editText1=findViewById ( R.id.editText);
        editText2=findViewById ( R.id.editText2);
        addButton=findViewById ( R.id.button );
        deleteButton=findViewById ( R.id.button2 );
        changeButton=findViewById ( R.id.button3 );
        searchButton=findViewById ( R.id.button4 );
        textView=findViewById ( R.id.textView );
    }
}
add添加
/**
  * 初始化上下文对象
  * 设置全局对象
  */
 DaoSession daoSession=((App)getApplication ()).getDaoSession();
 /**
  * 获得全文对象
  */
 //App app= (App) getApplication ();
// DaoSession daoSession1=app.getDaoSession ();
// UserInfo userInfo=new UserInfo (  );
 userInfo=new UserInfo (  );
 /**
  * 在表注册的时候写了注解@NotNull
  * 说明本值不可以为空
  */
 if (editText2.getText ().length ()!=0){
     String q=editText2.getText ().toString ();
     if (q!=null){
         int number=Integer.parseInt ( q );
         userInfo.setNumber ( number );
         //这里说明一个情况如果number无值 则number则写入为0 需要添加判断

     }

 }


 /**
  * 获取editText输入数字
  */
 //int c=Integer.parseInt ( editText1.getText ().toString () );
 if (editText1.getText ().toString ().length ()!=0){
     String name=editText1.getText ().toString ();
     /**
      * 将数据通过已经定义的方法添加进去
      */
     userInfo.setName ( name );
     //userInfo.setNumber ( number );
     /**
      * id能修改 在insertOrReplace是处理所有情况的方法 以免其他方法出现bug  建议不要使用一个表格来记录所有数据
      */
    // userInfo.setId ( MYID );

 }


 /**
  * 将封装好的东西添加到daoSession
  */
 //添加已有数据中类似的可能会报错
 //daoSession.insert ( userInfo );
 //无数据则添加 数据存在则替换
 daoSession.insertOrReplace ( userInfo );
}
Delete删除
 DaoSession daoSession=((App)getApplication ()).getDaoSession ();
 UserInfoDao userInfoDao=daoSession.getUserInfoDao ();
 /**
  *  指定id删除数据  1l是id=1
  *  不需要判断是否为空 不会崩溃 已封装好
  */


// userInfoDao.deleteByKey ( 1l );
 /**
  * 指定名字删除列
  * 这里使用了deleteQuery 删除查询 再次点击则不会报错
  * 只能删除一列 如果要删除列中一个数据 需要修改 (警告)
  */
 DeleteQuery<UserInfo> deleteQuery=daoSession.queryBuilder ( UserInfo.class ).where ( UserInfoDao.Properties.Name.eq ( "wang" ) ).buildDelete ();
 deleteQuery.executeDeleteWithoutDetachingEntities ();
// daoSession.clear ();

 /**
  *  Entity实体是数据库表的关联
  *  例如一对多 或多对多等
  */


 /***
  * 删除全部
  */
 //删除数据
 // 设置为全局对象
 // daoSession.delete ( userInfo );
 //删除全部
 //daoSession.deleteAll ( UserInfo.class );
change修改
private void changeUI() {
        DaoSession daoSession=((App)getApplication ()).getDaoSession ();
        UserInfoDao userInfoDao=daoSession.getUserInfoDao ();
        UserInfo userInfo=userInfoDao.queryBuilder ().where ( UserInfoDao.Properties.Name.eq ( "wang" ) ).build ().unique ();
        if (userInfo!=null){
            userInfo.setName ( "王幼虎" );
            userInfo.setNumber ( 1881042 );
            /**
             * 更新数据update
             * 在这里不要添加设置id 否则不会修改
             * 修改id用insertOrReplace 但有相同数据又会替换 无replace单独的方法
             * 不修改id用update
             * 这种做法是为了考虑多表查询 方便处理
             *
             */
            /**
             * insert添加
             * replace更换
             * update更新
             * where(WhereCondition cond, WhereCondition… condMore): 查询条件,参数为查询的条件!
             *
             * or(WhereCondition cond1, WhereCondition cond2, WhereCondition… condMore): 嵌套条件或者,用法同 or。
             *
             * and(WhereCondition cond1, WhereCondition cond2, WhereCondition… condMore): 嵌套条件且,用法同 and。
             *
             * join(Property sourceProperty, Class destinationEntityClass):多表查询,后面会讲。
             *
             * 输出结果有四种方式,选择其中一种最适合的即可,list()返回值是 List,而其他三种返回值均实现 Closeable,需要注意的不使用数据时游标的关闭操作:
             *
             * list ()所有实体都加载到内存中。结果通常是一个没有魔法的 ArrayList。最容易使用。
             *
             * listLazy ()实体按需加载到内存中。首次访问列表中的元素后,将加载并缓存该元素以供将来使用。必须关闭。
             *
             * listLazyUncached ()实体的“虚拟”列表:对列表元素的任何访问都会导致从数据库加载其数据。必须关闭。
             *
             * listIterator ()让我们通过按需加载数据(懒惰)来迭代结果。数据未缓存。必须关闭。
             * eq():“equal (’=?’)” 等于;
             *
             * notEq() :“not equal (’<>?’)” 不等于;
             *
             * like():" LIKE ?" 值等于;
             *
             * between():" BETWEEN ? AND ?" 取中间范围;
             *
             * in():" IN (" in命令;
             *
             * notIn():" NOT IN (" not in 命令;
             *
             * gt():">?" 大于;
             *
             * lt():"<? " 小于;
             *
             * ge():">=?" 大于等于;
             *
             * le():"<=? " 小于等于;
             *
             * isNull():" IS NULL" 为空;
             *
             * isNotNull():" IS NOT NULL" 不为空;
             */
//            userInfoDao.update ( userInfo );
            userInfo.setId ( MYID );
            userInfoDao.insertOrReplace ( userInfo );
            Toast.makeText ( this,"修改成功",Toast.LENGTH_LONG ).show ();
        }else {
            Toast.makeText ( this,"修改出错或找不到数据",Toast.LENGTH_LONG ).show ();
        }


    }
Searcher查询
  /**
         * 查询所有
         * 测试成功
         */
//        DaoSession daoSession=((App)getApplication ()).getDaoSession();
//        List<UserInfo> userInfos=daoSession.loadAll ( UserInfo.class );
        DaoSession daoSession=((App)getApplication ()).getDaoSession ();
        UserInfoDao userInfoDao=daoSession.getUserInfoDao ();
//        /**
//         *  根据条件查询 这里设置id大于3
//         *  使用语句查询ID出错 注意是_id参数 这里我是用db工具打开表看到的键
//         *   其他数据需要大写 如NAME
//         *  测试成功
//         */
//
//        List<UserInfo> list=userInfoDao.queryRaw ( "where _id>?","1881041" );
        /**
         * 从第二条数据开始查询5条信息
         * 可以用来做分页功能
         * offset设置起始位置
         * 测试成功
         */
//        List<UserInfo> list1=userInfoDao.queryBuilder ().offset ( 2 ).limit ( 5 ).list ();

//        /**
//         * 排序1
//         * 查询姓李的所有人 并用id排序
//         * 没加判断 若没有数据不报错
//         * 测试成功
//         */
//        List<UserInfo> list2=userInfoDao.queryBuilder ().where ( UserInfoDao.Properties.Name.eq ( "李紫洋12" ) ).orderAsc ( UserInfoDao.Properties.Id ).list ();
        /**
         * 排序2
         * 查询叫wang的所有人 id是大于2 或(number不等于8   id等于2)
         * 参数gt大于
         * eq等于
         * noteq不等于
         * ge等于或大于
         * 测试成功
         */
//        QueryBuilder<UserInfo>qb=userInfoDao.queryBuilder ();
//        qb.where ( UserInfoDao.Properties.Name.eq ( "wang" ) ,
//                qb.or ( UserInfoDao.Properties.Id.gt ( 2 ),
//                        qb.and ( UserInfoDao.Properties.Id.eq ( 2 ),
//                                UserInfoDao.Properties.Number.notEq ( 8 ) )) );
//        List<UserInfo> list3=qb.list ();
        /**
         * 查询 id在2到74中间 查询2个数据
         * 测试成功
         *
         */
        List<UserInfo> list4=userInfoDao.queryBuilder ().where ( UserInfoDao.Properties.Id.between ( 2,74 ) ).limit ( 2 ).build ().list ();
        /**
         * 这个用来测试输出内容
         * 我使用判断数量来测试 因为logcat并不显示数据库查询到的内容 只是给一个编码
         */

//        for (int i=0;i<list4.size ();i++){
//                Log.i ( "查询内容",list4.get ( i ).toString () +i);
//        }
        /**
         * 这里的logcat打印实现了内容显示
         */
        try {
            for (UserInfo u : list4) {
                Log.i ( "查询内容" , "id" + u.getId () + "名字" + u.getName () + "号码" + u.getNumber () );
            }
        }finally {

        }

        /**
         * 懒加载 这里可以使用方法 读出表中的内容
         * 测试成功
//         */
//        LazyList<UserInfo> l = null;
//        try{
//            l=userInfoDao.queryBuilder ().listLazy ();
//            for ( UserInfo  u:l){
//                Log.i ( "查询内容","id"+u.getId ()+"名字"+u.getName ()+"号码"+u.getNumber () );
//            }
//        }finally {
//            //关闭查询 避免内存泄漏
//            //判断流是否为空 否则会出错
//
//            if (l != null) {
//                l.close ();
//            }
//
//        }


    }
辅助类工具 这个exe可以打开db文件
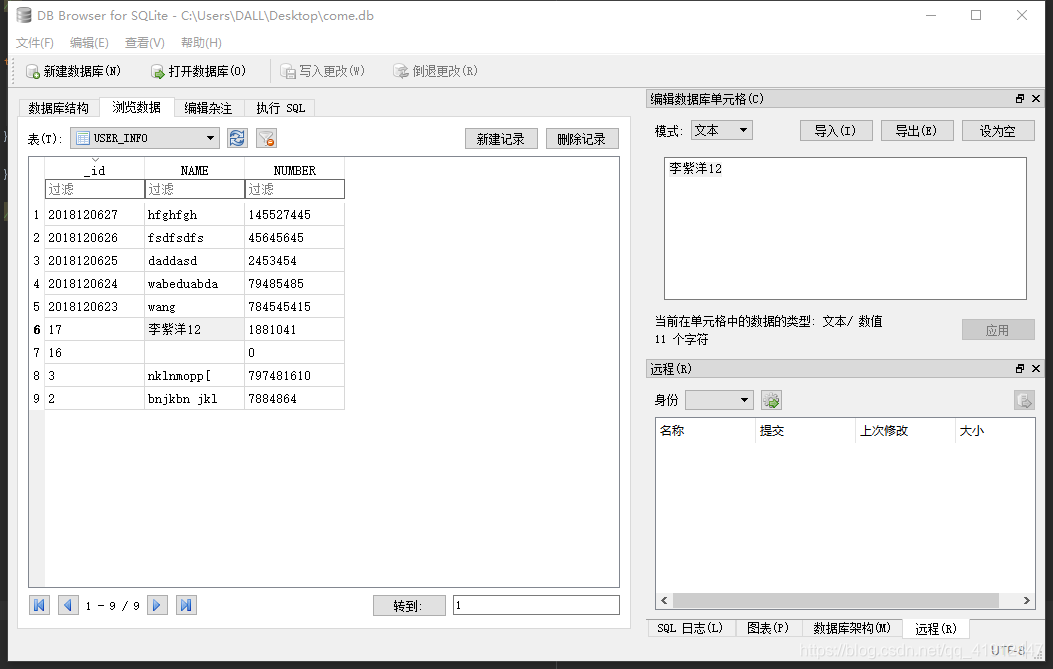
如何找到数据库文件?
一般放在data/data/你的包名/database
这里我用到是模拟器 真机需要root权限 打开这个工具在as右下角
导出文件方法是右击鼠标这个文件点击save as
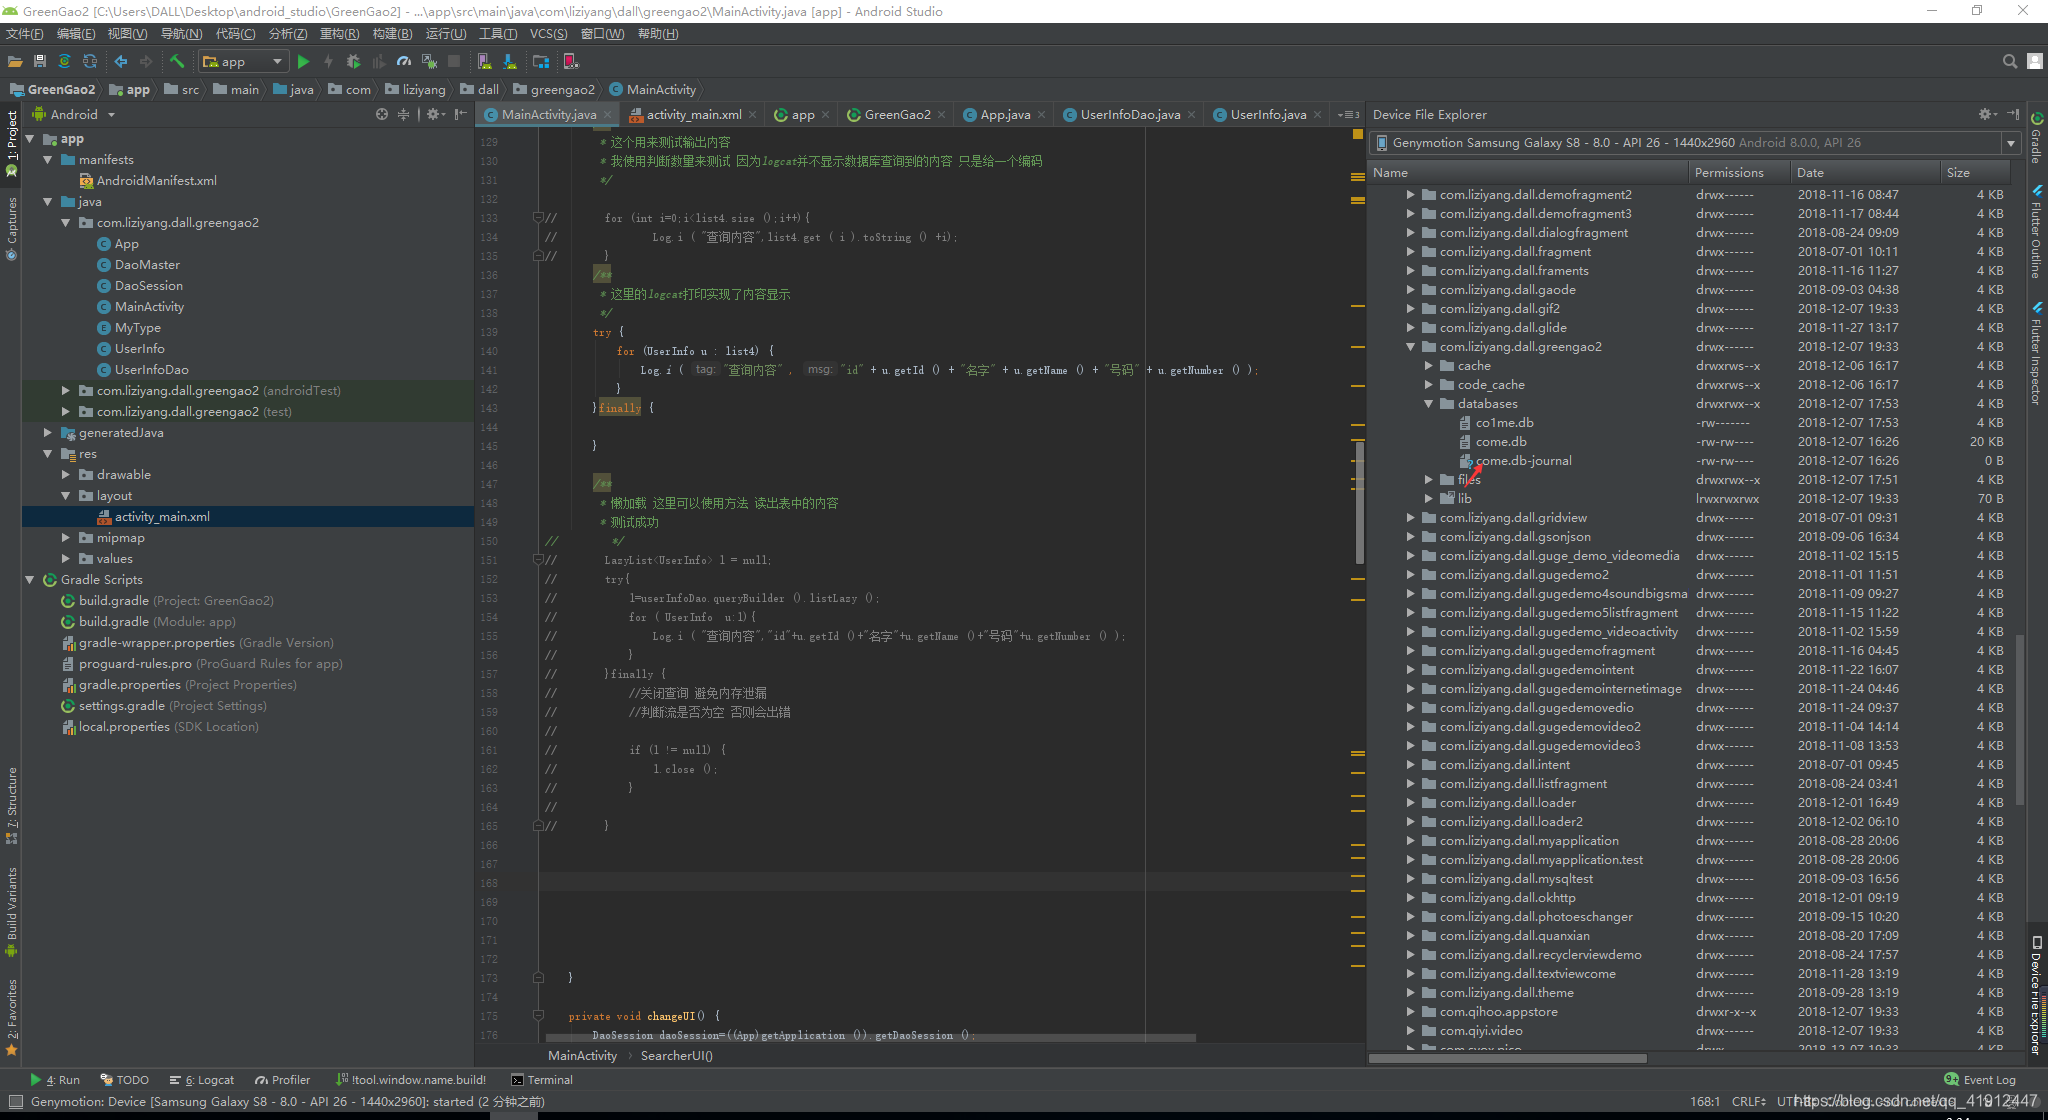
下面来示范logcat打印的日志

对db文件进行加密
导入库
dependencies {
    implementation fileTree(dir: 'libs', include: ['*.jar'])
    implementation 'com.android.support:appcompat-v7:28.0.0'
    implementation 'com.android.support.constraint:constraint-layout:1.1.3'
    testImplementation 'junit:junit:4.12'
    androidTestImplementation 'com.android.support.test:runner:1.0.2'
    androidTestImplementation 'com.android.support.test.espresso:espresso-core:3.0.2'
    implementation 'org.greenrobot:greendao:3.2.2'
    //导入加密的库
    implementation 'net.zetetic:android-database-sqlcipher:3.5.6'
在全局变量类重新配置
public class App extends Application {
    //声明一个全局对象
    //需要在功能清单注册
    private DaoSession daoSession;

    @Override
    public void onCreate() {
        super.onCreate ();
//        //创建一个表
//        DaoMaster.DevOpenHelper helper=new DaoMaster.DevOpenHelper ( this,"come.db" );
//        Database db=helper.getWritableDb ();
//        daoSession=new DaoMaster ( db ).newSession ();
        /**
         * 注意当你写完整个类再加密的话会报错
         * 因为表已经在手机中创建完毕 要不更新数据库版本 要不换一个名字来测试
         */
        DaoMaster.DevOpenHelper helper=new DaoMaster.DevOpenHelper ( this,"co1me.db" );
        Database database=helper.getEncryptedWritableDb ( "wangyouhu.." );
        DaoMaster daoMaster=new DaoMaster ( database );
        daoSession=daoMaster.newSession ();

    }

//    public App(DaoSession daoSession) {
//        this.daoSession = daoSession;
//    }

    public DaoSession getDaoSession() {
        return daoSession;
    }

}
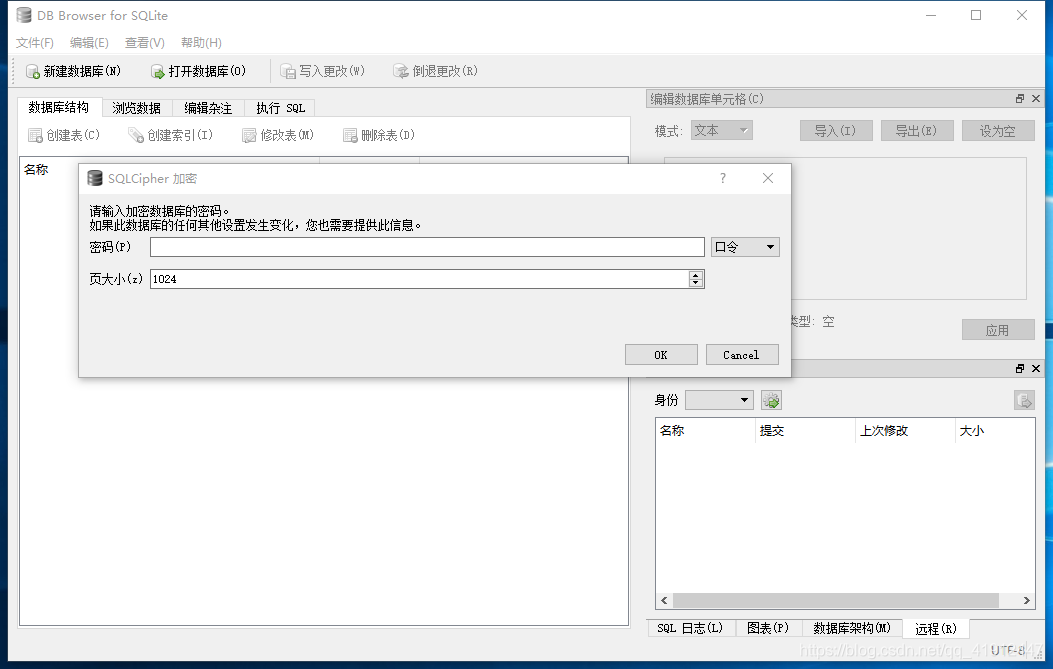
导出文件同样的 你再使用导出文件打开db文件 这个文件就需要输入密码了 为你设置的密码 我不知道会不会通过反编译获得密码
建议使用混淆工具进行混淆 代码如下
buildTypes {
    release {
  //  本来是false 设置成true即可
        minifyEnabled true
        proguardFiles getDefaultProguardFile('proguard-android.txt'), 'proguard-rules.pro'
    }
}
然后你导出文件用db工具打开如下 你只需要输入你注册的密码即可
最后说一下功能清单并未注册写入内存卡权限 未报错 你可以根据需要进行动态权限处理
db文件打开器下载网址如下
http://sqlitebrowser.org/
这里小编就把整理的资料写完了 具体请看官网 我参考了网上多人资料和官网资料 写到这里已经凌晨4点了 希望攻城狮们觉得有用请点赞 你的点赞和评论是我写作的动力
附上github地址https://github.com/surpreme/GreenGao