版权声明:©;2004 Microsoft Corporation. All rights reserved. https://blog.csdn.net/qq_42036824/article/details/87779327
一、MemCache
- 简介:
- memcache是一个高性能的分布式的内存对象缓存系统,用于动态Web应用以减轻数据库负担。
- memcache通过在内存里维护一个统一的巨大的hash表,来存储经常被读写的一些数组与文件,从而极大的提高网站的运行效率。
- memcache是一种内存缓存技术,是一种缓存手段,要看情况来使用。
- 对于频繁读取,每次读取重复率高,数据更新频度低的数据,用memcache可以优化你的系统响应速度。
- MemCache的工作流程如下:

- 检查客户端的请求数据是否在memcached中,如有,直接把请求数据返回,不再对数据库进行任何操作,路径操作为①②③⑦。
- 如果请求的数据不在memcached中,就去查数据库,把从数据库中获取的数据返回给客户端,同时把数据缓存一份到memcached中(memcached客户端不负责,需要程序明确实现),路径操作为①②④⑤⑦⑥。
- 每次更新数据库的同时更新memcached中的数据,保证一致性。
- 当分配给memcached内存空间用完之后,会使用LRU(Least Recently Used,最近最少使用)策略加上到期失效策略,失效数据首先被替换,然后再替换掉最近未使用的数据。
-
memcache使用场景
-
访问频繁的字典数据
-
大量的hot数据
-
页面缓存
-
频繁的查询条件和结果
-
临时处理的数据
-
Memcache和memcached的区别
-
Memcache是这个项目的名称
-
而memcached是它服务器端的主程序文件名。
二、MemCache对PHP页面的缓存加速优化,配置过程详解
- 解压memcache源码包:
[root@server1 ~]# tar zxf memcache-2.2.5.tgz
- 将前边php编译完成的二进制命令加入环境变量中,保证可以直接调用php命令
[root@server1 ~]# vim ~/.bash_profile
PATH=$PATH:$HOME/bin:/usr/local/lnmp/mysql/bin:/usr/local/lnmp/php/bin
[root@server1 ~]# source ~/.bash_profile
- 创建一个预编译环境并进行编译汇编memcache源码包
- phpize是用来扩展php扩展模块的,通过phpize可以建立php的外挂模块,比如你想在原来编译好的php中加入memcached或者ImageMagick等扩展模块,可以使用phpize。
- phpize工具是在php安装目录下,基于这点phpize对应了当时的php环境,所以是要根据该php的配置情况生成对应的configure文件,建立一个configure文件。必须在一个目录下去运行phpize,那么phpize就知道你的的环境是哪个目录,并且configure文件建立在该目录下。
[root@server1 ~]# cd memcache-2.2.5
[root@server1 memcache-2.2.5]# phpize
Configuring for:
PHP Api Version:         20131106
Zend Module Api No:      20131226
Zend Extension Api No:   220131226
[root@server1 memcache-2.2.5]# ./configure        # 源码编译,已经安装好了php,我们就不用再指定新的php扩展模块路径
[root@server1 memcache-2.2.5]# make && make install
- php的配置文件中添加memcache模块
[root@server1 ~]# cd /usr/local/lnmp/php/etc/
[root@server1 etc]# vim php.ini
 873 extension=memcache.so       # 将873行memcache模块的注释打开
[root@server1 etc]# /etc/init.d/php-fpm reload
Reload service php-fpm  done
[root@server1 etc]# php -m   ##查看php模块
[root@server1 etc]# php -m | grep memcache   ##过滤memcache模块,发现已经有了这个模块
memcache

[root@server1 etc]# php -m | grep mysql      ##同时支持mysql
mysql
mysqli
mysqlnd
pdo_mysql
- 安装memcache工具并启动memcache
[root@server1 etc]# yum install -y memcached
[root@server1 etc]# /etc/init.d/memcached start
[root@server1 etc]# netstat -tnlp         ##查看监听端口(11211端口)
- 刚才显示检测所有11211端口的所有主机,如果想只监控本机则进行以下修改(注意,这里只做介绍,实际只监听本机是不合理的,此步骤不用做)
[root@server1 etc]# vim /etc/sysconfig/memcached
PORT="11211"
USER="memcached"
MAXCONN="1024"
CACHESIZE="64"
OPTIONS="-l 127.0.0.1"      ##修改此处

[root@server1 etc]# /etc/init.d/memcached restart
Stopping memcached:                                        [  OK  ]
Starting memcached:                                        [  OK  ]

[root@server1 etc]# netstat -tnlp
Active Internet connections (only servers)
Proto Recv-Q Send-Q Local Address               Foreign Address             State       PID/Program name
tcp        0      0 127.0.0.1:11211             0.0.0.0:*                   LISTEN      3855/memcached            ##显示只监听本机
tcp        0      0 0.0.0.0:80                  0.0.0.0:*                   LISTEN      1251/nginx
tcp        0      0 0.0.0.0:22                  0.0.0.0:*                   LISTEN      910/sshd
tcp        0      0 127.0.0.1:25                0.0.0.0:*                   LISTEN      986/master
tcp        0      0 127.0.0.1:9000              0.0.0.0:*                   LISTEN      3807/php-fpm
tcp        0      0 :::22                       :::*                        LISTEN      910/sshd
tcp        0      0 ::1:25                      :::*                        LISTEN      986/master
tcp        0      0 :::3306                     :::*                        LISTEN      1210/mysqld
- 将测试文件cp到/usr/local/lnmp/nginx/html,设置memcached的密码
[root@server1 ~]# cd memcache-2.2.5
[root@server1 memcache-2.2.5]# cp memcache.php example.php /usr/local/lnmp/nginx/html/
[root@server1 memcache-2.2.5]# cd /usr/local/lnmp/nginx/html/
[root@server1 html]# vim memcache.php
 22 define('ADMIN_USERNAME','memcache');  ##用户为memcache
 23 define('ADMIN_PASSWORD','westos');   ##设置密码为westos     // Admin Password
 28 $MEMCACHE_SERVERS[] = '172.25.79.1:11211'; // add more as an array
 29 #$MEMCACHE_SERVERS[] = 'mymemcache-server2:11211'; // add more as an array
- 安装telnet
[root@server1 etc]# yum install telnet -y


8. 浏览器输入:172.2.79.1:memcache.php
- 登录账号


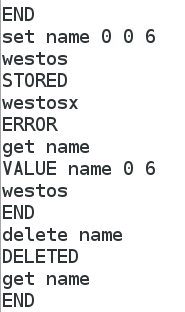
- 然后重新打开一个浏览器页面,输入172.2.79.1:example.php ,不断刷新
- 当访问多次example.php后,查看命中情况会不断提高,最后将会达到百分之百。 如下图:

- 压力测试:加速页面example.php和没加速index.php的对比(错误率对比,相应时间对比)
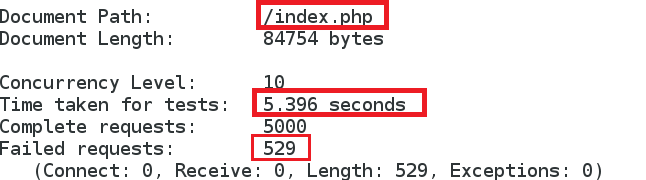
(1)访问 index.php
[root@server1 ~]# ab -c 10 -n 5000 http://172.25.79.1/index.php
- 注意: 如果没有ab这个命令,则可以安装下包:
[root@server1 ~]# yum install httpd-tools-2.2.15-29.el6_4.x86_64 -y
- 可以看到所用时间为5s左右,出错个数为529个
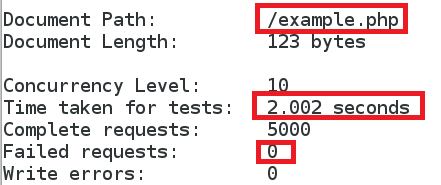
(2)访问 example.php
[root@server1 ~]# ab -c 10 -n 5000 http://172.25.79.1/example.php
- 可以看到所用时间为2s左右,出错个数为0个,速度提高了,错误率大大降低