ActiveMQ消息队列原理场景分析:
应用场景和原理讲解:https://blog.csdn.net/qinweili751/article/details/80620104
注册、发短信、发邮件
业务场景说明:
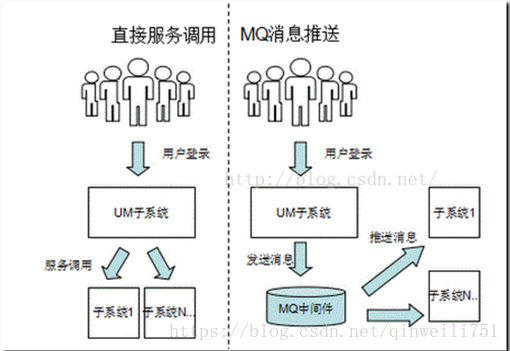
队列的主要作用是消除高并发访问高峰,加快网站的响应速度。
在不使用消息队列的情况下,用户的请求数据直接写入数据库,在高并发的情况下,会对数据库造成巨大的压力,同时也使得系统响应延迟加剧。
在使用队列后,用户的请求发给队列后立即返回,
(例如: 当然不能直接给用户提示订单提交成功,京东上提示:您“您提交了订单,请等待系统确认”),
再由消息队列的消费者进程从消息队列中获取数据,异步写入数据库。
由于消息队列的服务处理速度远快于数据库,因此用户的响应延迟可得到有效改善。
ActiveMQ 应用场景分析
1)用户注册,重点用户信息数据库保存,发短信、发邮件,增加业务处理复杂度,这时候用MQ,将发短信、发邮箱,通知MQ,由另外服务平台完成
2)搜索平台、缓存平台 日志
查询数据,建立缓存、索引,不从数据库查询,从缓存或者索引库查询
当增加、修改,删除数据时,发送消息给MQ,缓存平台、索引平台从MQ获取到这个消息,更新缓存或者索引
ActiveMQ消息队列安装使用
- 官网:http://activemq.apache.org/ JMS(java message service)
- 安装成功访问地址:http://localhost:8161用户名和密码都是admin (解压后在bin目录下启动activemq.bat就可以了 启动之后,可以访问localhost:8161/admin,帐号密码可以在conf文件夹下的users.properties可以查看或是修改密码 接下来还是以分工程的形式来写 )。
- ActiveMQ使用的是标准生产者和消费者模型,有两种数据结构Queue、Topic
1)Queue队列,生产者生产了一个消息,只能由一个消费者进行消费
2)Topic话题,生产者生产了一个消息,可以由多个消费者进行消费
bug:如果ActiveMQ安装后启不来,提示jdk版本问题可将path中的java_home提到最上面
入门案例:
1.使用maven坐标导入导入activemq-all-5.14.0.jar;
<dependency>
  		<groupId>org.apache.activemq</groupId>
  		<artifactId>activemq-all</artifactId>
  		<version>5.14.0</version>
</dependency>
2.编写MQ消息生产者:ActiveMQProducer.java
package activeMQ_helloworld;

import javax.jms.Connection;
import javax.jms.ConnectionFactory;
import javax.jms.MessageProducer;
import javax.jms.Queue;
import javax.jms.Session;

import org.apache.activemq.ActiveMQConnectionFactory;
import org.junit.Test;

public class ActiveMQProducer {
	@Test//测试
	public void testProduceMQ() throws Exception {
		// 连接工厂
		// 使用默认用户名、密码、路径
		// 路径 tcp://host:61616
		ConnectionFactory connectionFactory = new ActiveMQConnectionFactory();
		// 获取一个连接
		Connection connection = connectionFactory.createConnection();
		// 建立会话
		Session session = connection.createSession(true,
				Session.AUTO_ACKNOWLEDGE);
		// 创建队列或者话题对象
		Queue queue = session.createQueue("HelloWorld");
		// 创建生产者 或者 消费者
		MessageProducer producer = session.createProducer(queue);

		// 发送消息
		for (int i = 0; i < 10; i++) {
			producer.send(session.createTextMessage("你好,activeMQ:" + i));
		}
		// 提交操作
		session.commit();

	}
}
3.默认tcp连接activeMQ端口61616 查看控制台

4.使用MessageConsumer完成消费
package activeMQ_helloworld;

import javax.jms.Connection;
import javax.jms.ConnectionFactory;
import javax.jms.JMSException;
import javax.jms.Message;
import javax.jms.MessageConsumer;
import javax.jms.MessageListener;
import javax.jms.Queue;
import javax.jms.Session;
import javax.jms.TextMessage;

import org.apache.activemq.ActiveMQConnectionFactory;
import org.junit.Test;

public class ActiveMQConsumer {

	@Test
	// 直接消费
	public void testCosumeMQ() throws Exception {
		// 连接工厂
		// 使用默认用户名、密码、路径
		// 路径 tcp://host:61616
		ConnectionFactory connectionFactory = new ActiveMQConnectionFactory();
		// 获取一个连接
		Connection connection = connectionFactory.createConnection();
		// 开启连接
		connection.start();
		// 建立会话
		// 第一个参数,是否使用事务,如果设置true,操作消息队列后,必须使用 session.commit();
		Session session = connection.createSession(false,
				Session.AUTO_ACKNOWLEDGE);
		// 创建队列或者话题对象
		Queue queue = session.createQueue("HelloWorld");
		// 创建消费者
		MessageConsumer messageConsumer = session.createConsumer(queue);

		while (true) {
			TextMessage message = (TextMessage) messageConsumer.receive(10000);
			if (message != null) {
				System.out.println(message.getText());
			} else {
				break;
			}
		}
	}

	@Test
	// 使用监听器消费
	public void testCosumeMQ2() throws Exception {
		// 连接工厂
		// 使用默认用户名、密码、路径
		// 路径 tcp://host:61616
		ConnectionFactory connectionFactory = new ActiveMQConnectionFactory();
		// 获取一个连接
		Connection connection = connectionFactory.createConnection();
		// 开启连接
		connection.start();
		// 建立会话
		// 第一个参数,是否使用事务,如果设置true,操作消息队列后,必须使用 session.commit();
		Session session = connection.createSession(false,
				Session.AUTO_ACKNOWLEDGE);
		// 创建队列或者话题对象
		Queue queue = session.createQueue("HelloWorld");
		// 创建消费者
		MessageConsumer messageConsumer = session.createConsumer(queue);

		messageConsumer.setMessageListener(new MessageListener() {
			// 每次接收消息,自动调用 onMessage
			public void onMessage(Message message) {
				TextMessage textMessage = (TextMessage) message;
				try {
					System.out.println(textMessage.getText());
				} catch (JMSException e) {
					e.printStackTrace();
				}
			}
		});

		while (true) {
			// 不能让junit线程死掉
		}
	}
}
查看控制台,发现已经消费;

5.使用监听器,监听消息的内容,进行消费
// 创建消费者
		MessageConsumer messageConsumer = session.createConsumer(queue);

		messageConsumer.setMessageListener(new MessageListener() {
			// 每次接收消息,自动调用 onMessage
			public void onMessage(Message message) {
				TextMessage textMessage = (TextMessage) message;
				try {
					System.out.println(textMessage.getText());
				} catch (JMSException e) {
					e.printStackTrace();
				}
			}
		});

		while (true) {
			// 不能让junit线程死掉
		}
	}
ActiveMQ整合spring
1.实现生产者
- 导入相关jar包
    //Spring开发测试
  	<dependency>
  		<groupId>org.springframework</groupId>
  		<artifactId>spring-context</artifactId>
  		<version>4.1.7.RELEASE</version>
  	</dependency>
  	<dependency>
  		<groupId>org.springframework</groupId>
  		<artifactId>spring-test</artifactId>
  		<version>4.1.7.RELEASE</version>
  	</dependency>
  	<dependency>
  		<groupId>junit</groupId>
  		<artifactId>junit</artifactId>
  		<version>4.12</version>
  	</dependency>

	//引入ActiveMQ
  	<dependency>
  		<groupId>org.apache.activemq</groupId>
  		<artifactId>activemq-all</artifactId>
  		<version>5.14.0</version>
  	</dependency>

	//Spring整合activeMQ
  	<dependency>
  		<groupId>org.springframework</groupId>
  		<artifactId>spring-jms</artifactId>
  		<version>4.1.7.RELEASE</version>
  	</dependency>
2.编写配置生产者:配置activemq连接工厂和配置spring mq管理工厂以及jmsTemplate模板;applicationContext-mq.xml
<?xml version="1.0" encoding="UTF-8"?>
<beans xmlns="http://www.springframework.org/schema/beans"
	xmlns:xsi="http://www.w3.org/2001/XMLSchema-instance" xmlns:aop="http://www.springframework.org/schema/aop"
	xmlns:context="http://www.springframework.org/schema/context"
	xmlns:jdbc="http://www.springframework.org/schema/jdbc" xmlns:tx="http://www.springframework.org/schema/tx"
	xmlns:jpa="http://www.springframework.org/schema/data/jpa" xmlns:task="http://www.springframework.org/schema/task"
	xmlns:amq="http://activemq.apache.org/schema/core"
	xmlns:jms="http://www.springframework.org/schema/jms"
	xsi:schemaLocation="
		http://www.springframework.org/schema/beans http://www.springframework.org/schema/beans/spring-beans-4.1.xsd
		http://www.springframework.org/schema/aop http://www.springframework.org/schema/aop/spring-aop-4.1.xsd
		http://www.springframework.org/schema/context http://www.springframework.org/schema/context/spring-context-4.1.xsd
		http://www.springframework.org/schema/jdbc http://www.springframework.org/schema/jdbc/spring-jdbc-4.1.xsd
		http://www.springframework.org/schema/tx http://www.springframework.org/schema/tx/spring-tx-4.1.xsd
		http://www.springframework.org/schema/data/jpa
		http://www.springframework.org/schema/data/jpa/spring-jpa.xsd
		http://www.springframework.org/schema/jms
        http://www.springframework.org/schema/jms/spring-jms.xsd
		http://activemq.apache.org/schema/core
        http://activemq.apache.org/schema/core/activemq-core-5.8.0.xsd ">

	<!-- 扫描包 -->
	<context:component-scan base-package="cn.itcast.activemq" />

	<!-- ActiveMQ 连接工厂 -->
    <!-- 真正可以产生Connection的ConnectionFactory,由对应的 JMS服务厂商提供-->
    <!-- 如果连接网络:tcp://ip:61616;未连接网络:tcp://localhost:61616 以及用户名,密码-->
    <amq:connectionFactory id="amqConnectionFactory"
        brokerURL="tcp://localhost:61616" userName="admin" password="admin"  />

    <!-- Spring Caching连接工厂 -->
    <!-- Spring用于管理真正的ConnectionFactory的ConnectionFactory -->
    <bean id="connectionFactory" class="org.springframework.jms.connection.CachingConnectionFactory">
        <!-- 目标ConnectionFactory对应真实的可以产生JMS Connection的ConnectionFactory -->
        <property name="targetConnectionFactory" ref="amqConnectionFactory"></property>
        <!-- 同上,同理 -->
        <!-- <constructor-arg ref="amqConnectionFactory" /> -->
        <!-- Session缓存数量 -->
        <property name="sessionCacheSize" value="100" />
    </bean>

     <!-- Spring JmsTemplate 的消息生产者 start-->

    <!-- 定义JmsTemplate的Queue类型 -->
    <bean id="jmsQueueTemplate" class="org.springframework.jms.core.JmsTemplate">
        <!-- 这个connectionFactory对应的是我们定义的Spring提供的那个ConnectionFactory对象 -->
        <constructor-arg ref="connectionFactory" />
        <!-- 非pub/sub模型(发布/订阅),即队列模式 -->
        <property name="pubSubDomain" value="false" />
    </bean>

    <!-- 定义JmsTemplate的Topic类型 -->
    <bean id="jmsTopicTemplate" class="org.springframework.jms.core.JmsTemplate">
         <!-- 这个connectionFactory对应的是我们定义的Spring提供的那个ConnectionFactory对象 -->
        <constructor-arg ref="connectionFactory" />
        <!-- pub/sub模型(发布/订阅) -->
        <property name="pubSubDomain" value="true" />
    </bean>

    <!--Spring JmsTemplate 的消息生产者 end-->


</beans>
3.Queue发送消息的实现和Topic发送消息的实现;
TopicSender.java
package cn.itcast.activemq.producer.topic;

import javax.jms.JMSException;
import javax.jms.Message;
import javax.jms.Session;

import org.springframework.beans.factory.annotation.Autowired;
import org.springframework.beans.factory.annotation.Qualifier;
import org.springframework.jms.core.JmsTemplate;
import org.springframework.jms.core.MessageCreator;
import org.springframework.stereotype.Service;

@Service
public class TopicSender {
	// עÈëjmsTemplate
	@Autowired
	@Qualifier("jmsTopicTemplate")
	private JmsTemplate jmsTemplate;

	public void send(String topicName, final String message) {
		jmsTemplate.send(topicName, new MessageCreator() {

			public Message createMessage(Session session) throws JMSException {
				return session.createTextMessage(message);
			}
		});
	}

}
QueueSender.java
package cn.itcast.activemq.producer.queue;

import javax.jms.JMSException;
import javax.jms.Message;
import javax.jms.Session;

import org.springframework.beans.factory.annotation.Autowired;
import org.springframework.beans.factory.annotation.Qualifier;
import org.springframework.jms.core.JmsTemplate;
import org.springframework.jms.core.MessageCreator;
import org.springframework.stereotype.Service;

@Service
public class QueueSender {
	// עÈëjmsTemplate
	@Autowired
	@Qualifier("jmsQueueTemplate")
	private JmsTemplate jmsTemplate;

	public void send(String queueName, final String message) {
		jmsTemplate.send(queueName, new MessageCreator() {
			public Message createMessage(Session session) throws JMSException {
				return session.createTextMessage(message);
			}
		});
	}
}
4.测试:
@RunWith(SpringJUnit4ClassRunner.class)
@ContextConfiguration(locations = "classpath:applicationContext-mq.xml")
public class ProducerTest {
	@Autowired
	private QueueSender queueSender;

	@Autowired
	private TopicSender topicSender;

	@Test
	public void testSendMessage() {
		queueSender.send("spring_queue", "你好1");
		topicSender.send("spring_topic", "你好2");
	}
}
ActiveMQ整合spring实现消费者
1.配置只扫描consumer包,配置listener监听器,在applicationContext-mq-consumer.xml
<?xml version="1.0" encoding="UTF-8"?>
<beans xmlns="http://www.springframework.org/schema/beans"
	xmlns:xsi="http://www.w3.org/2001/XMLSchema-instance" xmlns:aop="http://www.springframework.org/schema/aop"
	xmlns:context="http://www.springframework.org/schema/context"
	xmlns:jdbc="http://www.springframework.org/schema/jdbc" xmlns:tx="http://www.springframework.org/schema/tx"
	xmlns:jpa="http://www.springframework.org/schema/data/jpa" xmlns:task="http://www.springframework.org/schema/task"
	xmlns:amq="http://activemq.apache.org/schema/core"
	xmlns:jms="http://www.springframework.org/schema/jms"
	xsi:schemaLocation="
		http://www.springframework.org/schema/beans http://www.springframework.org/schema/beans/spring-beans-4.1.xsd
		http://www.springframework.org/schema/aop http://www.springframework.org/schema/aop/spring-aop-4.1.xsd
		http://www.springframework.org/schema/context http://www.springframework.org/schema/context/spring-context-4.1.xsd
		http://www.springframework.org/schema/jdbc http://www.springframework.org/schema/jdbc/spring-jdbc-4.1.xsd
		http://www.springframework.org/schema/tx http://www.springframework.org/schema/tx/spring-tx-4.1.xsd
		http://www.springframework.org/schema/data/jpa
		http://www.springframework.org/schema/data/jpa/spring-jpa.xsd
		http://www.springframework.org/schema/jms
        http://www.springframework.org/schema/jms/spring-jms.xsd
		http://activemq.apache.org/schema/core
        http://activemq.apache.org/schema/core/activemq-core-5.8.0.xsd ">

	<!-- 扫描包 -->
	<context:component-scan base-package="cn.itcast.activemq.consumer" />

	<!-- ActiveMQ 连接工厂 -->
    <!-- 真正可以产生Connection的ConnectionFactory,由对应的 JMS服务厂商提供-->
    <!-- 如果连接网络:tcp://ip:61616;未连接网络:tcp://localhost:61616 以及用户名,密码-->
    <amq:connectionFactory id="amqConnectionFactory"
        brokerURL="tcp://localhost:61616" userName="admin" password="admin"  />

    <!-- Spring Caching连接工厂 -->
    <!-- Spring用于管理真正的ConnectionFactory的ConnectionFactory -->
    <bean id="connectionFactory" class="org.springframework.jms.connection.CachingConnectionFactory">
        <!-- 目标ConnectionFactory对应真实的可以产生JMS Connection的ConnectionFactory -->
        <property name="targetConnectionFactory" ref="amqConnectionFactory"></property>
        <!-- 同上,同理 -->
        <!-- <constructor-arg ref="amqConnectionFactory" /> -->
        <!-- Session缓存数量 -->
        <property name="sessionCacheSize" value="100" />
    </bean>

     <!-- 消息消费者 start-->

    <!-- 定义Queue监听器 -->
    <jms:listener-container destination-type="queue" container-type="default"
    	connection-factory="connectionFactory" acknowledge="auto">
        <!-- 默认注册bean名称,应该是类名首字母小写  -->
        <jms:listener destination="spring_queue" ref="queueConsumer1"/>
        <jms:listener destination="spring_queue" ref="queueConsumer2"/>
    </jms:listener-container>

    <!-- 定义Topic监听器 -->
    <jms:listener-container destination-type="topic" container-type="default"
    	connection-factory="connectionFactory" acknowledge="auto">
        <jms:listener destination="spring_topic" ref="topicConsumer1"/>
        <jms:listener destination="spring_topic" ref="topicConsumer2"/>
    </jms:listener-container>

    <!-- 消息消费者 end -->


</beans>
2.TopicConsumer1 (其他几个消费者类同)
package cn.itcast.activemq.consumer.topic;

import javax.jms.JMSException;
import javax.jms.Message;
import javax.jms.MessageListener;
import javax.jms.TextMessage;

import org.springframework.stereotype.Service;

@Service
public class TopicConsumer2 implements MessageListener {

	public void onMessage(Message message) {
		TextMessage textMessage = (TextMessage) message;
		try {
			System.out
					.println("消费者TopicConsumer2获取消息:" + textMessage.getText());
		} catch (JMSException e) {
			e.printStackTrace();
		}
	}

}
注意:Topic发布消息到某一个topic时,只有正在监听该topic地址的sub能够接收到消息;如果没有sub在监听,该topic就丢失了。
客户注册基于MQ实现短信验证码生产者
实现思路:
- 在bos_fore项目CustomerController作为短信消息生产者,将消息发给ActiveMQ
- 建立单独SMS项目,作为短信消息消费者,从ActiveMQ获取发短信消息,调用第三方接口完成短信发送
bos_fore项目客户注册,作为短信消息生产者
1、配置applicationContext.xml
<?xml version="1.0" encoding="UTF-8"?>
<beans xmlns="http://www.springframework.org/schema/beans"
	xmlns:xsi="http://www.w3.org/2001/XMLSchema-instance" xmlns:aop="http://www.springframework.org/schema/aop"
	xmlns:context="http://www.springframework.org/schema/context"
	xmlns:jdbc="http://www.springframework.org/schema/jdbc" xmlns:tx="http://www.springframework.org/schema/tx"
	xmlns:jpa="http://www.springframework.org/schema/data/jpa" xmlns:task="http://www.springframework.org/schema/task"
	xsi:schemaLocation="
		http://www.springframework.org/schema/beans http://www.springframework.org/schema/beans/spring-beans.xsd
		http://www.springframework.org/schema/aop http://www.springframework.org/schema/aop/spring-aop.xsd
		http://www.springframework.org/schema/context http://www.springframework.org/schema/context/spring-context.xsd
		http://www.springframework.org/schema/jdbc http://www.springframework.org/schema/jdbc/spring-jdbc.xsd
		http://www.springframework.org/schema/tx http://www.springframework.org/schema/tx/spring-tx.xsd
		http://www.springframework.org/schema/data/jpa
		http://www.springframework.org/schema/data/jpa/spring-jpa.xsd">

	<!-- 扫描 @Server @Controller @Repository -->
	<context:component-scan base-package="cn.itcast"/>

	<!-- 加载properties文件 -->
	<context:property-placeholder location="classpath:config.properties" />

	<!-- 引入redis配置 -->
	<import resource="applicationContext-cache.xml"/>

	<!-- 引入mq配置 -->
	<import resource="applicationContext-mq.xml"/>
</beans>
2、配置applicationContext-mq.xml
<?xml version="1.0" encoding="UTF-8"?>
<beans xmlns="http://www.springframework.org/schema/beans"
	xmlns:xsi="http://www.w3.org/2001/XMLSchema-instance" xmlns:aop="http://www.springframework.org/schema/aop"
	xmlns:context="http://www.springframework.org/schema/context"
	xmlns:jdbc="http://www.springframework.org/schema/jdbc" xmlns:tx="http://www.springframework.org/schema/tx"
	xmlns:jpa="http://www.springframework.org/schema/data/jpa" xmlns:task="http://www.springframework.org/schema/task"
	xmlns:amq="http://activemq.apache.org/schema/core"
	xmlns:jms="http://www.springframework.org/schema/jms"
	xsi:schemaLocation="
		http://www.springframework.org/schema/beans http://www.springframework.org/schema/beans/spring-beans-4.1.xsd
		http://www.springframework.org/schema/aop http://www.springframework.org/schema/aop/spring-aop-4.1.xsd
		http://www.springframework.org/schema/context http://www.springframework.org/schema/context/spring-context-4.1.xsd
		http://www.springframework.org/schema/jdbc http://www.springframework.org/schema/jdbc/spring-jdbc-4.1.xsd
		http://www.springframework.org/schema/tx http://www.springframework.org/schema/tx/spring-tx-4.1.xsd
		http://www.springframework.org/schema/data/jpa
		http://www.springframework.org/schema/data/jpa/spring-jpa.xsd
		http://www.springframework.org/schema/jms
        http://www.springframework.org/schema/jms/spring-jms.xsd
		http://activemq.apache.org/schema/core
        http://activemq.apache.org/schema/core/activemq-core-5.8.0.xsd ">

	<!-- ActiveMQ 连接工厂 -->
    <!-- 真正可以产生Connection的ConnectionFactory,由对应的 JMS服务厂商提供-->
    <!-- 如果连接网络:tcp://ip:61616;未连接网络:tcp://localhost:61616 以及用户名,密码-->
    <amq:connectionFactory id="amqConnectionFactory"
        brokerURL="tcp://localhost:61616" userName="admin" password="admin"  />

    <!-- Spring Caching连接工厂 -->
    <!-- Spring用于管理真正的ConnectionFactory的ConnectionFactory -->
    <bean id="mqConnectionFactory" class="org.springframework.jms.connection.CachingConnectionFactory">
        <!-- 目标ConnectionFactory对应真实的可以产生JMS Connection的ConnectionFactory -->
        <property name="targetConnectionFactory" ref="amqConnectionFactory"></property>
        <!-- 同上,同理 -->
        <!-- <constructor-arg ref="amqConnectionFactory" /> -->
        <!-- Session缓存数量 -->
        <property name="sessionCacheSize" value="100" />
    </bean>

     <!-- Spring JmsTemplate 的消息生产者 start-->

    <!-- 定义JmsTemplate的Queue类型 -->
    <bean id="jmsQueueTemplate" class="org.springframework.jms.core.JmsTemplate">
        <!-- 这个connectionFactory对应的是我们定义的Spring提供的那个ConnectionFactory对象 -->
        <constructor-arg ref="mqConnectionFactory" />
        <!-- 非pub/sub模型(发布/订阅),即队列模式 -->
        <property name="pubSubDomain" value="false" />
    </bean>

    <!-- 定义JmsTemplate的Topic类型 -->
    <bean id="jmsTopicTemplate" class="org.springframework.jms.core.JmsTemplate">
         <!-- 这个connectionFactory对应的是我们定义的Spring提供的那个ConnectionFactory对象 -->
        <constructor-arg ref="mqConnectionFactory" />
        <!-- pub/sub模型(发布/订阅) -->
        <property name="pubSubDomain" value="true" />
    </bean>

    <!--Spring JmsTemplate 的消息生产者 end-->


</beans>
3.将jmsTemplate注入CustomerAction
@Autowired
	@Qualifier("jmsQueueTemplate")
	private JmsTemplate jmsTemplate;


	public String sendSms() throws IOException {
		// 手机号保存在Customer对象
		// 生成短信验证码
		String randomCode = RandomStringUtils.randomNumeric(4);
		// 将短信验证码 保存到session
		ServletActionContext.getRequest().getSession()
				.setAttribute(model.getTelephone(), randomCode);

		System.out.println("生成手机验证码为:" + randomCode);
		// 编辑短信内容
		final String msg = "尊敬的用户您好,本次获取的验证码为:" + randomCode
				+ ",服务电话:4006184000";

		// 调用MQ服务,发送一条消息
		jmsTemplate.send("bos_sms", new MessageCreator() {
			@Override
			public Message createMessage(Session session) throws JMSException {
				MapMessage mapMessage = session.createMapMessage();
				mapMessage.setString("telephone", model.getTelephone());
				mapMessage.setString("msg", msg);
				return mapMessage;
			}
		});
		return NONE;

	}

	// 属性驱动
	private String checkcode;

	public void setCheckcode(String checkcode) {
		this.checkcode = checkcode;
	}

	@Autowired
	private RedisTemplate<String, String> redisTemplate;

	@Action(value = "customer_regist", results = {
			@Result(name = "success", type = "redirect", location = "signup-success.html"),
			@Result(name = "input", type = "redirect", location = "signup.html") })
	public String regist() {
		// 先校验短信验证码,如果不通过,调回注册页面
		// 从session获取 之前生成验证码
		String checkcodeSession = (String) ServletActionContext.getRequest()
				.getSession().getAttribute(model.getTelephone());
		if (checkcodeSession == null || !checkcodeSession.equals(checkcode)) {
			System.out.println("短信验证码错误...");
			// 短信验证码错误
			return INPUT;
		}
		// 调用webService 连接CRM 保存客户信息
		WebClient
				.create("http://localhost:9002/crm_management/services"
						+ "/customerService/customer")
				.type(MediaType.APPLICATION_JSON).post(model);
		System.out.println("客户注册成功...");

		// 发送一封激活邮件
		// 生成激活码
		String activecode = RandomStringUtils.randomNumeric(32);

		// 将激活码保存到redis,设置24小时失效
		redisTemplate.opsForValue().set(model.getTelephone(), activecode, 24,
				TimeUnit.HOURS);

		// 调用MailUtils发送激活邮件
		String content = "尊敬的客户您好,请于24小时内,进行邮箱账户的绑定,点击下面地址完成绑定:<br/><a href='"
				+ MailUtils.activeUrl + "?telephone=" + model.getTelephone()
				+ "&activecode=" + activecode + "'>速运快递邮箱绑定地址</a>";
		MailUtils.sendMail("速运快递激活邮件", content, model.getEmail());

		return SUCCESS;
	}

	// 属性驱动
	private String activecode;

	public void setActivecode(String activecode) {
		this.activecode = activecode;
	}

	@Action("customer_activeMail")
	public String activeMail() throws IOException {
		ServletActionContext.getResponse().setContentType(
				"text/html;charset=utf-8");
		// 判断激活码是否有效
		String activecodeRedis = redisTemplate.opsForValue().get(
				model.getTelephone());
		if (activecodeRedis == null || !activecodeRedis.equals(activecodeRedis)) {
			// 激活码无效
			ServletActionContext.getResponse().getWriter()
					.println("激活码无效,请登录系统,重新绑定邮箱!");
		} else {
			// 激活码有效
			// 防止重复绑定
			// 调用CRM webService 查询客户信息,判断是否已经绑定
			Customer customer = WebClient
					.create("http://localhost:9002/crm_management/services"
							+ "/customerService/customer/telephone/"
							+ model.getTelephone())
					.accept(MediaType.APPLICATION_JSON).get(Customer.class);
			if (customer.getType() == null || customer.getType() != 1) {
				// 没有绑定,进行绑定
				WebClient.create(
						"http://localhost:9002/crm_management/services"
								+ "/customerService/customer/updatetype/"
								+ model.getTelephone()).get();
				ServletActionContext.getResponse().getWriter()
						.println("邮箱绑定成功!");
			} else {
				// 已经绑定过
				ServletActionContext.getResponse().getWriter()
						.println("邮箱已经绑定过,无需重复绑定!");
			}

			// 删除redis的激活码
			redisTemplate.delete(model.getTelephone());
		}
		return NONE;
	}
建立SMS系统基于MQ实现短信验证码消费者
配置端口
<build>
  	<plugins>
  		<plugin>
  			<groupId>org.codehaus.mojo</groupId>
  			<artifactId>tomcat-maven-plugin</artifactId>
  			<version>1.1</version>
  			<configuration>
  				<port>9004</port>
  			</configuration>
  		</plugin>
  	</plugins>
  </build>
web.xml配置
<?xml version="1.0" encoding="UTF-8"?>
<web-app xmlns:xsi="http://www.w3.org/2001/XMLSchema-instance"
	xmlns="http://java.sun.com/xml/ns/javaee"
	xsi:schemaLocation="http://java.sun.com/xml/ns/javaee http://java.sun.com/xml/ns/javaee/web-app_2_5.xsd"
	id="WebApp_ID" version="2.5">

	<!-- spring配置文件位置 -->
	<context-param>
		<param-name>contextConfigLocation</param-name>
		<param-value>classpath:applicationContext.xml</param-value>
	</context-param>
	<!-- spring核心监听器 -->
	<listener>
		<listener-class>org.springframework.web.context.ContextLoaderListener</listener-class>
	</listener>


</web-app>
3、applicationContext.xml配置
<?xml version="1.0" encoding="UTF-8"?>
<beans xmlns="http://www.springframework.org/schema/beans"
	xmlns:xsi="http://www.w3.org/2001/XMLSchema-instance" xmlns:aop="http://www.springframework.org/schema/aop"
	xmlns:context="http://www.springframework.org/schema/context"
	xmlns:jdbc="http://www.springframework.org/schema/jdbc" xmlns:tx="http://www.springframework.org/schema/tx"
	xmlns:jpa="http://www.springframework.org/schema/data/jpa" xmlns:task="http://www.springframework.org/schema/task"
	xmlns:amq="http://activemq.apache.org/schema/core"
	xmlns:jms="http://www.springframework.org/schema/jms"
	xsi:schemaLocation="
		http://www.springframework.org/schema/beans http://www.springframework.org/schema/beans/spring-beans-4.1.xsd
		http://www.springframework.org/schema/aop http://www.springframework.org/schema/aop/spring-aop-4.1.xsd
		http://www.springframework.org/schema/context http://www.springframework.org/schema/context/spring-context-4.1.xsd
		http://www.springframework.org/schema/jdbc http://www.springframework.org/schema/jdbc/spring-jdbc-4.1.xsd
		http://www.springframework.org/schema/tx http://www.springframework.org/schema/tx/spring-tx-4.1.xsd
		http://www.springframework.org/schema/data/jpa
		http://www.springframework.org/schema/data/jpa/spring-jpa.xsd
		http://www.springframework.org/schema/jms
        http://www.springframework.org/schema/jms/spring-jms.xsd
		http://activemq.apache.org/schema/core
        http://activemq.apache.org/schema/core/activemq-core-5.8.0.xsd ">

	<!-- 扫描包 -->
	<context:component-scan base-package="cn.itcast.bos.mq" />

	<!-- ActiveMQ 连接工厂 -->
    <!-- 真正可以产生Connection的ConnectionFactory,由对应的 JMS服务厂商提供-->
    <!-- 如果连接网络:tcp://ip:61616;未连接网络:tcp://localhost:61616 以及用户名,密码-->
    <amq:connectionFactory id="amqConnectionFactory"
        brokerURL="tcp://localhost:61616" userName="admin" password="admin"  />

    <!-- Spring Caching连接工厂 -->
    <!-- Spring用于管理真正的ConnectionFactory的ConnectionFactory -->
    <bean id="connectionFactory" class="org.springframework.jms.connection.CachingConnectionFactory">
        <!-- 目标ConnectionFactory对应真实的可以产生JMS Connection的ConnectionFactory -->
        <property name="targetConnectionFactory" ref="amqConnectionFactory"></property>
        <!-- 同上,同理 -->
        <!-- <constructor-arg ref="amqConnectionFactory" /> -->
        <!-- Session缓存数量 -->
        <property name="sessionCacheSize" value="100" />
    </bean>

     <!-- 消息消费者 start-->

    <!-- 定义Queue监听器 -->
    <jms:listener-container destination-type="queue" container-type="default"
    	connection-factory="connectionFactory" acknowledge="auto">
        <!-- 默认注册bean名称,应该是类名首字母小写  -->
        <jms:listener destination="bos_sms" ref="smsConsumer"/>
    </jms:listener-container>

    <!-- 定义Topic监听器 -->
<!--     <jms:listener-container destination-type="topic" container-type="default"  -->
<!--     	connection-factory="connectionFactory" acknowledge="auto"> -->
<!--         <jms:listener destination="spring_topic" ref="topicConsumer1"/> -->
<!--         <jms:listener destination="spring_topic" ref="topicConsumer2"/> -->
<!--     </jms:listener-container> -->

    <!-- 消息消费者 end -->


</beans>
消费者代码编写
package cn.itcast.bos.mq;

import javax.jms.MapMessage;
import javax.jms.Message;
import javax.jms.MessageListener;

import org.springframework.stereotype.Service;

@Service("smsConsumer")
public class SmsConsumer implements MessageListener {

	@Override
	public void onMessage(Message message) {
		MapMessage mapMessage = (MapMessage) message;

		// 调用SMS服务发送短信
		try {
			// String result =
			// SmsUtils.sendSmsByHTTP(mapMessage.getString("telephone"),
			// mapMessage.getString("msg"));
			String result = "000/xxxx";
			if (result.startsWith("000")) {
				// 发送成功
				System.out.println("发送短信成功,手机号:"
						+ mapMessage.getString("telephone") + ",验证码:"
						+ mapMessage.getString("msg"));
			} else {
				// 发送失败
				throw new RuntimeException("短信发送失败, 信息码:" + result);
			}
		} catch (Exception e) {
			e.printStackTrace();
		}

	}

}
如果applicationContext-mq.xml加载比较卡,或者有红叉等将这个配置
<!--  <amq:connectionFactory id="amqConnectionFactory" -->

<!--  brokerURL="tcp://localhost:61616" userName="admin" password="admin" /> -->
替换成下面这一段,同样的配置,换成spring bean的配置方式
<bean id="amqConnectionFactory" class="org.apache.activemq.ActiveMQConnectionFactory">

<property name="brokerURL" value="tcp://localhost:61616"></property>

<property name="userName" value="admin"></property>

<property name="password" value="admin"></property>

</bean>