Swagger是什么
Swagger工具为你的Asp Net Core生成漂亮的API文档。目前社会上大部分都是一个服务端为N个客户端提供接口,往往我们需要提供一个友好的API文档,Swagger的出现,几乎使得API文档完全自动化。
开始使用Swagger
- 此处我们使用开发IDE为VsCode,输入dotnet new webapi -o SwaggerDemo 创建ASP.NET Core Web API项目
- 添加Swashbuckle.AspNetCore包(此处不讨论包的安装方法,请自行上网搜索),在.csproj文件中会生成如下引用

- 打开Startup.cs文件,添加如下代
        public Startup(IConfiguration configuration, IHostingEnvironment env)
        {
            Configuration = configuration;
            this.Env = env;
        }
        public IHostingEnvironment Env { get; }

        public IConfiguration Configuration { get; }

        public string[] docs = new[] { "未分类" };

        // This method gets called by the runtime. Use this method to add services to the container.
        public void ConfigureServices(IServiceCollection services)
        {
            services.AddMvc().SetCompatibilityVersion(CompatibilityVersion.Version_2_2);
            if (Env.IsDevelopment())
            {
                services.AddSwaggerGen(options =>
                {
                    foreach (var d in docs) options.SwaggerDoc(d, new Info { Version = d });
                    options.DocInclusionPredicate((docName, description) =>
                    {
                        description.TryGetMethodInfo(out MethodInfo mi);
                        var attr = mi.DeclaringType.GetCustomAttribute<ApiExplorerSettingsAttribute>();
                        if (attr != null)
                        {
                            return attr.GroupName == docName;
                        }
                        else
                        {
                            return docName == "未分类";
                        }
                    });
                    var ss = options.SwaggerGeneratorOptions;
                    options.IncludeXmlComments(@"E:\VsCode\C#\.Net Core\第三章 利用Swagger生成接口文档\SwaggerDemo\bin\Debug\netcoreapp2.2\SwaggerDemo.xml");
                });
            }
        }

        // This method gets called by the runtime. Use this method to configure the HTTP request pipeline.
        public void Configure(IApplicationBuilder app, IHostingEnvironment env)
        {
            app.UseMvc();
            if (env.IsDevelopment())
            {
                app.UseDeveloperExceptionPage();
                app.UseSwagger()
                .UseSwaggerUI(options  =>
                {
                    options.DocumentTitle = "Ron.liang Swagger 测试文档";
                    foreach (var item in docs)
                        options.SwaggerEndpoint($"/swagger/{item}/swagger.json", item);
                });
            }
        }
代码中涉及到的xml需要换成自己的路径

为保证自己项目xml文档的生成 把.csproj文件添加以下属性

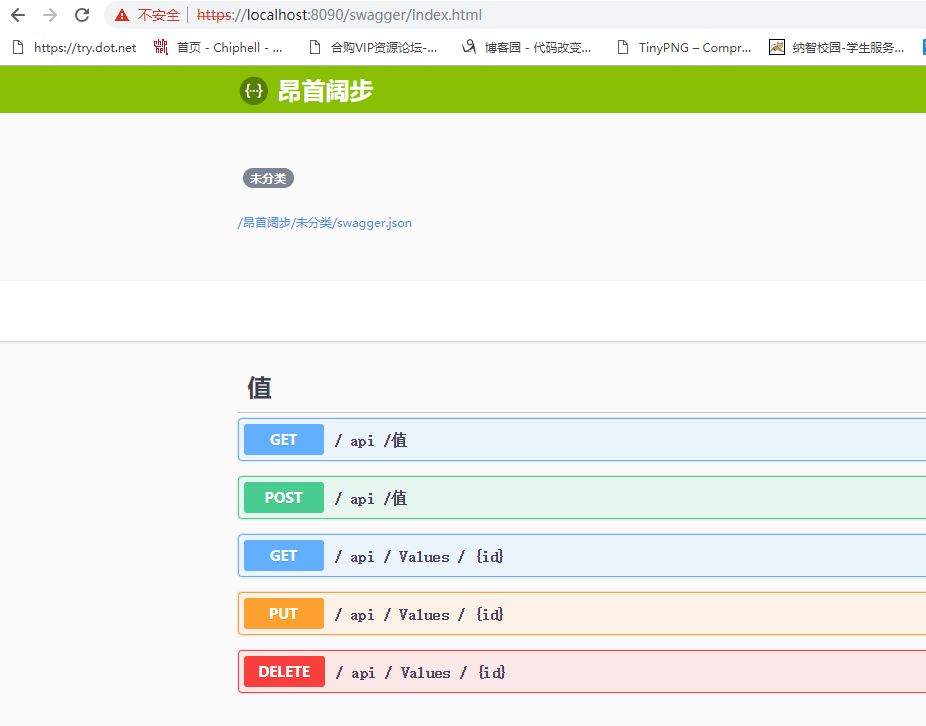
doenet build--->dotnet run-->访问https://localhost:8090/swagger/index.html(此处需要换成自己的网站地址)可以看到api文档已经成功生成,赶快自己点击玩玩把~~~
添加分组和注释信息
上面我们用的默认API文档,实际工作中我们需要分类以及注释信息等。下面我们添加一个测试分组
- 首先打开我们的api控制器(ValuesController).修改为

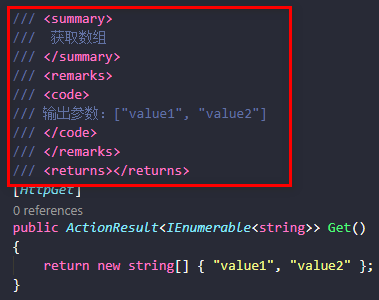
- 添加注释信息
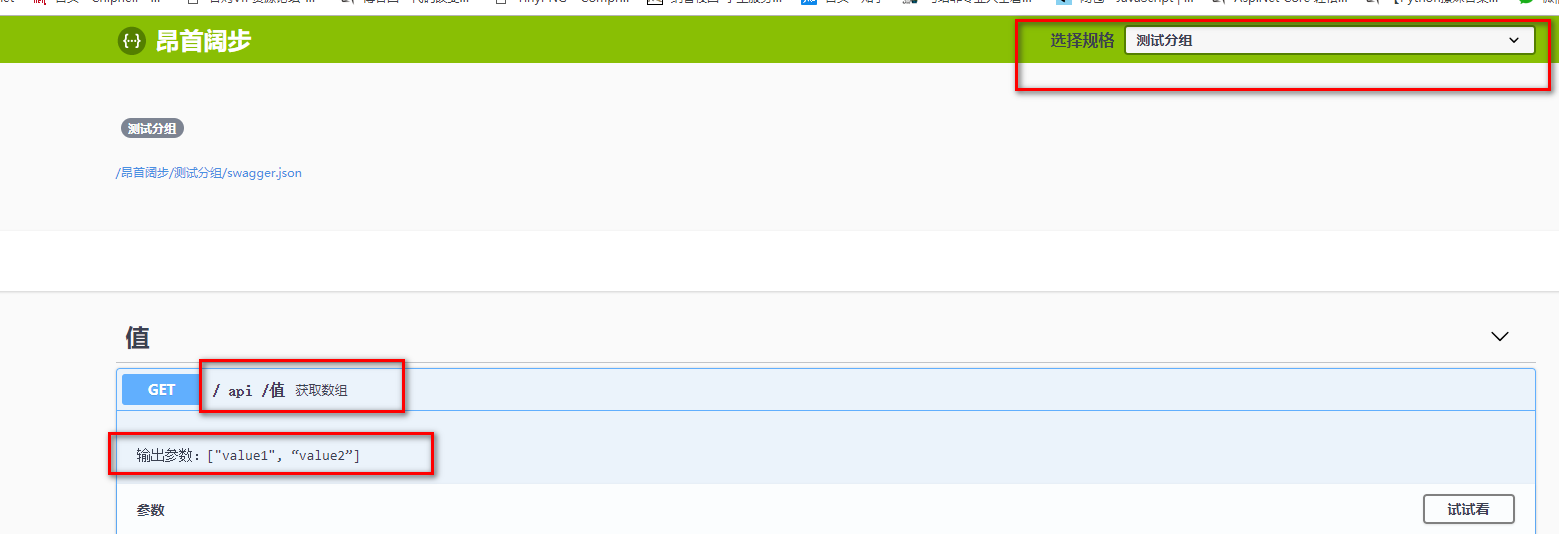
再次访问
总结
- 利用Swagger自动生成API文档
- 对每个控制器进行分组
- 自动抓取注释内容
- 在API文档界面进行测试