从Android8.0(API26)开始,所有的通知必须分配一个渠道。每一个渠道,你都可以设置渠道中所有通知的视觉和听觉行为。然后,用户能够随意修改这些设置来决定通知的行为。
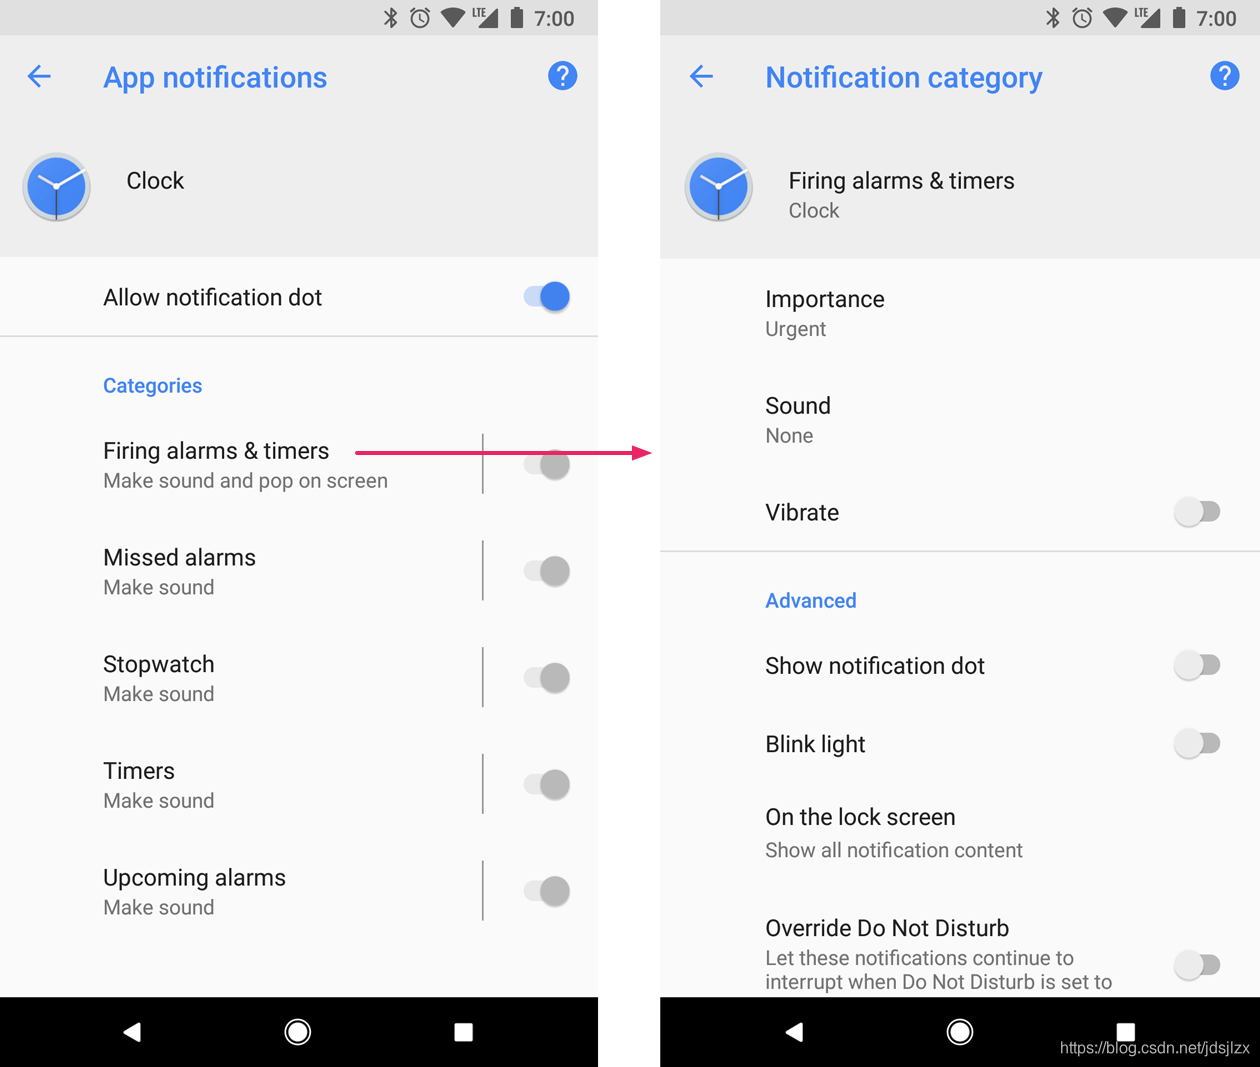
在用户界面渠道显示为 “类别”
渠道创建后就不能更改通知行为了,用户能够完全控制通知的行为,但我们还是可以更改说明和渠道名称
我们可以为每个不同类型的通知创建一个渠道;
如果 target>=26 就必须使用渠道。如果target是在26以下,但是运行在了26及以上了,不要怕,还是会和往常一样,不会抛出异常。
如果 target>=26; 在26及以上运行的时候没有指定一个渠道,通知是不会发出的,系统会记录此错误。可以在logcat看到
Android O 有一个新的开发者设置,当发送了没有指定渠道的通知时显示一个toast。 Settings > Developer options and enable Show notification channel warnings
创建通知渠道
创建渠道有三个步骤
- 使用一个 唯一ID ,一个用户可见的 渠道名称 和一个渠道 重要性 三个参数构造一个 NotificationChannel 实例
- (可选)设置渠道描述 通过 setDescription(); 通过 NotificationManager 的
- createNotificationChannel() 创建渠道
Note: 确保创建代码运行在Android O及以上,因为渠道的API没有在support library中
if (Build.VERSION.SDK_INT >= Build.VERSION_CODES.O) {
    // Create the NotificationChannel
    CharSequence name = getString(R.string.channel_name);
    String description = getString(R.string.channel_description);
    int importance = NotificationManager.IMPORTANCE_DEFAULT;
    NotificationChannel mChannel = new NotificationChannel(CHANNEL_ID, name, importance);
    mChannel.setDescription(description);
    // Register the channel with the system; you can't change the importance
    // or other notification behaviors after this
    NotificationManager notificationManager = (NotificationManager) getSystemService(
            NOTIFICATION_SERVICE);
    notificationManager.createNotificationChannel(mChannel);
}
如果创建的渠道已经存在当进程运行的时候不会出现异常
通知的行为默认是通过设置的重要性(构建Channel实例的第三个参数)来决定的。这些参数来自于 NotificationManagerCompat 中的几个常量。
如果想更进一步的自定行为可以参考以下方法 ;行为在渠道创建后是不能修改的,用户能够完全控制这些设置。
指示灯是否开启 enableLights()
指示灯的颜色 setLightColor()
设置震动模式 setVibrationPattern()
可以通过 createNotificationChannel() 创建多个渠道;
除了给通知添加渠道,还可以考虑为通知添加系统类型。参考: https://developer.android.google.cn/training/notify-user/build-notification.html#system-category
设置重要性级别
渠道重要性决定了渠道中所有的通知打断级别,必须在渠道构造方法中设置重要性级别。有五个重要性级别 从IMPORTANCE_NONE(0) 到 IMPORTANCE_HIGH(4),我们可以将他们指定给渠道中的所有通知。
为了兼容Android O 以下的版本 必须为通知设置优先级 setPriority() 。参数是 NotificationCompat 中的几个常量
重要性级别和优先级常量映射到的用户可见的重要性选项如下
| 用户可见的重要性级别 | 重要性级别(Android O及以上) | 优先级(Android O 以下) |
|---|---|---|
| 紧急。发出声音并显示为单条通知 | IMPORTANCE_HIGH | PRIORITY_HIGH or PRIORITY_MAX |
| 高。发出声音 | IMPORTANCE_DEFAULT | PRIORITY_DEFAULT |
| 中。没有声音 | IMPORTANCE_LOW | PRIORITY_LOW |
| 低。没有声音也不会出现在状态栏中 | IMPORTANCE_MIN | PRIORITY_MIN |
所有的通知,不管重要性如何,都会出现在不影响用户的系统界面上。例如通知栏,启动图标的通知点(可以改变样式或是否显示)
一但将渠道提交到 NotificationManager 就不能再修改重要性级别了,但是用户可随意随时修改。
有关选择适当优先级的信息 ,查看 通知设计指南中的 正确设置和管理优先级
读取通知渠道设置
用户可以在设置界面设置渠道的行为(震动,声音等)可以通过以下步骤获取到用户对我们渠道的行为设置。
- 通过 getNotificationChannel() or getNotificationChannels() 获取
NotificationChannel 实例 - 查询指定的设置 例如 getSound() , getImportance() , getVibrationPattern() 如果检测到用户设置会影响进程的行为。我们可以给用户一个操作让其改变设置。
打开通知渠道设置
渠道在创建了之后就不能通过代码的方式改变其行为了,只能用户在系统设置修改。为了方便用户修改我们可以通过代码打开系统设置,让用户更方便的修改。
通过Intent使用action: ACTION_CHANNEL_NOTIFICATION_SETTINGS 打开系统设置。
需要两个参数 一个是包名 一个是渠道id。
下面就是打开系统设置渠道的代码。
Intent intent = new Intent(Settings.ACTION_CHANNEL_NOTIFICATION_SETTINGS);
intent.putExtra(Settings.EXTRA_APP_PACKAGE, getPackageName());
intent.putExtra(Settings.EXTRA_CHANNEL_ID, myNotificationChannel.getId());
startActivity(intent);
删除通知渠道
可以通过以下代码删除渠道
NotificationManager mNotificationManager =
        (NotificationManager) getSystemService(Context.NOTIFICATION_SERVICE);
// The id of the channel.
String id = "my_channel_01";
mNotificationManager.deleteNotificationChannel(id);
系统设置会显示已经删除的渠道数量,作为垃圾邮件防范机制。可以通过重装进程或者清楚数据来清除测试渠道
创建渠道分组
如果想要更好的在系统设置UI中显示渠道外观,可以创建渠道分组。当你的APP支持多用户的时候可以为每个账户创建一个渠道分组。这样,用户可以轻易的识别和控制具有相同名字的渠道。
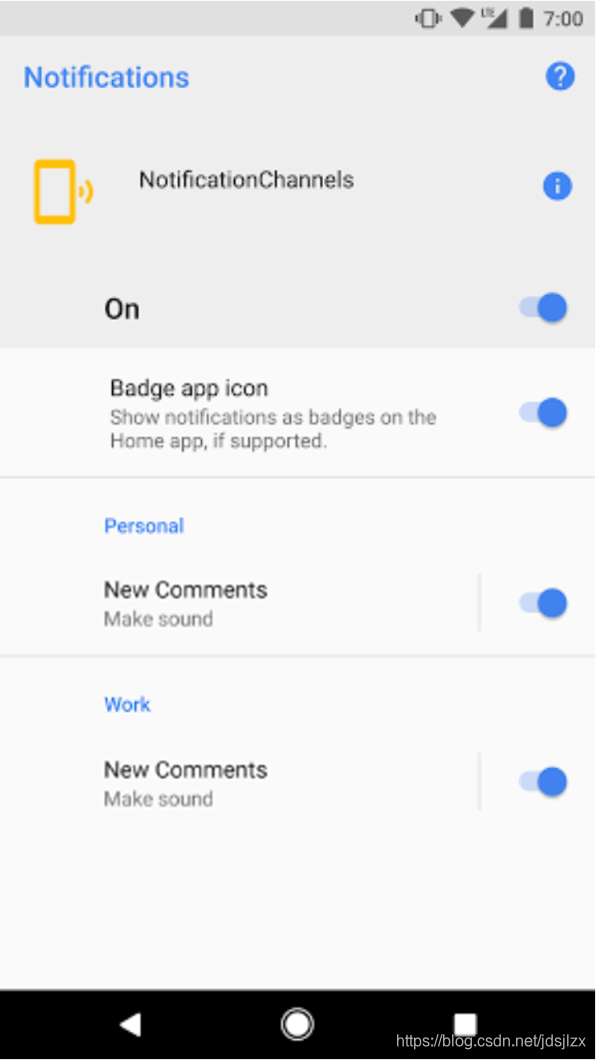
例如,一个网络社交APP可能包含支持个人和工作账户,这种情况下,每个账户可能需要多个相同功能和名称的多个渠道,如下所示:
- 个人账户的两个渠道
- 新评论
- 发布推荐
- 工作账号的两个渠道
- 新评论
- 发布推荐
将每个账户的渠道分组确保用户能够轻易的区分它们。
每一个渠道分组都需要一个包内唯一的ID和一个用户可见的名称,下面代码演示怎么创建一个分组
// The id of the group.
String groupId = "my_group_01";
// The user-visible name of the group.
CharSequence groupName = getString(R.string.group_name);
NotificationManager mNotificationManager =
        (NotificationManager) getSystemService(Context.NOTIFICATION_SERVICE);
mNotificationManager.createNotificationChannelGroup(new NotificationChannelGroup(group_id, group_name));
创建分组后可以通过渠道的 setGroup() 来关联分组。将渠道提交到通知管理后就无法改变关联关系了。
应用进程中创建通知渠道(Notification Channel)的步骤:
- 通过构造方法NotificationChannel(channelId, channelName, importance)创建一个NotificationChannel对象;
- 通过createNotificationChannel ( )来注册NotificationChannel一个对象
我们可以通过使用通知渠道提供给我们的一些公共方法来操纵该通知渠道。
NotificationManager notificationManager =
        (NotificationManager) getSystemService(Context.NOTIFICATION_SERVICE);
String channelId = "some_channel_id";
CharSequence channelName = "Some Channel";
int importance = NotificationManager.IMPORTANCE_LOW;
NotificationChannel notificationChannel = new NotificationChannel(channelId, channelName, importance);
notificationChannel.enableLights(true);
notificationChannel.setLightColor(Color.RED);
notificationChannel.enableVibration(true);
notificationChannel.setVibrationPattern(new long[]{100, 200, 300, 400, 500, 400, 300, 200, 400});
notificationManager.createNotificationChannel(notificationChannel);
创建通知渠道需要三个参数
- channelId 通知渠道的ID 可以是任意的字符串,全局唯一就可以 channelName
- 通知渠道的名称,这个是用户可见的,开发者需要认真规划的命名
- importance 通知渠道的重要等级,用户是可以手动修改的。
我们还可以通过使用通知渠道提供给我们的一些公共方法来操纵该通知渠道:
- getId()—检索给定信道的ID enablellights() -如果使用中的设备支持通知灯,则说明此通知信道是否应显示灯
- setLightColor() -如果我们确定信道支持通知灯,则允许使用传递一个int值,该值定义通知灯使用的颜色
- enablementVisuration()—在设备上显示时,说明来自此信道的通知是否应振动
- getImportance()—检索给定通知信道的重要性值 setSound()—提供一个Uri,用于在通知发布到此频道时播放声音
- getSound()—检索分配给此通知的声音 setGroup()—设置通知分配到的组 getGroup()—检索通知分配到的组
- setBypassDnd()—设置通知是否应绕过“请勿打扰”模式(中断_筛选器_优先级值)
- canBypassDnd()—检索通知是否可以绕过“请勿打扰”模式 getName()—检索指定频道的用户可见名称
- setLockScreenVisibility() —设置是否应在锁定屏幕上显示来自此信道的通知
- getlockscreendisibility() —检索来自此信道的通知是否将显示在锁定屏幕上
- getAudioAttributes()—检索已分配给相应通知信道的声音的音频属性
- canShowBadge()—检索来自此信道的通知是否能够在启动器应用进程中显示为徽章
下面我们写个demo,创建两个通知渠道,升级和私信。
public class MainActivity extends AppCompatActivity {

    @Override
    protected void onCreate(Bundle savedInstanceState) {
        super.onCreate(savedInstanceState);
        setContentView(R.layout.activity_main);
        if (Build.VERSION.SDK_INT >= Build.VERSION_CODES.O) {
            String channelId = "upgrade";
            String channelName = "升级";
            int importance = NotificationManager.IMPORTANCE_HIGH;
            createNotificationChannel(channelId, channelName, importance);
            channelId = "compose";
            channelName = "私信";
            importance = NotificationManager.IMPORTANCE_DEFAULT;
            createNotificationChannel(channelId, channelName, importance);
        }
    }

    //创建通知渠道
    @RequiresApi(api = Build.VERSION_CODES.O)
    private void createNotificationChannel(String channelId, String channelName, int importance) {
        NotificationChannel channel = new NotificationChannel(channelId, channelName, importance);
        NotificationManager notificationManager = (NotificationManager) getSystemService(
                NOTIFICATION_SERVICE);
        notificationManager.createNotificationChannel(channel);
    }

    public void sendUpgradeMsg(View view) {
        NotificationManager manager = (NotificationManager) getSystemService(NOTIFICATION_SERVICE);
        Notification notification = new NotificationCompat.Builder(this, "upgrade")
                .setContentTitle("升级")
                .setContentText("程序员终于下班了。。")
                .setWhen(System.currentTimeMillis())
                .setSmallIcon(R.mipmap.ic_launcher)
                .setLargeIcon(BitmapFactory.decodeResource(getResources(), R.mipmap.ic_launcher))
                .setAutoCancel(true)
                .build();
        manager.notify(100, notification);
    }

    public void sendComposeMsg(View view) {
        NotificationManager manager = (NotificationManager) getSystemService(NOTIFICATION_SERVICE);
        Notification notification = new NotificationCompat.Builder(this, "compose")
                .setContentTitle("私信")
                .setContentText("有人私信向你提出问题")
                .setWhen(System.currentTimeMillis())
                .setSmallIcon(R.drawable.icon)
                .setLargeIcon(BitmapFactory.decodeResource(getResources(), R.drawable.icon))
                .build();
        manager.notify(101, notification);
    }
}

归纳下,Android 8.0上创建通知渠道NotificationChannel
NotificationChannel channel = new NotificationChannel(CHANNEL_ID, CHANNEL_NAME, NotificationManager.IMPORTANCE_HIGH);
channel.setBypassDnd(true);    //设置绕过免打扰模式
channel.canBypassDnd();       //检测是否绕过免打扰模式
channel.setLockscreenVisibility(Notification.VISIBILITY_SECRET);//设置在锁屏界面上显示这条通知
channel.setDescription("description of this notification");
channel.setLightColor(Color.GREEN);
channel.setName("name of this notification");
channel.setShowBadge(true);
channel.setVibrationPattern(new long[]{100, 200, 300, 400, 500, 400, 300, 200, 400});
channel.enableVibration(true);
getNotificationManager().createNotificationChannel(channel);
注意:CHANNEL_ID(随意指定),CHANNEL_NAME(随意指定)
如果要使用通知渠道组NotificationChannelGroup,那么它的样式跟上图一样,使用姿势是下面这样。
在渠道组NotificationChannelGroup上绑定了两个通知渠道NotificationChannel ,每个渠道下各有一个通知Notification.
getNotificationManager().createNotificationChannelGroup(new NotificationChannelGroup(GROUP_ID, "GROUP_CHANNEL"));

        NotificationChannel channel = new NotificationChannel(CHANNEL_ID, CHANNEL_NAME, NotificationManager.IMPORTANCE_HIGH);
        channel.setGroup(GROUP_ID);
        channel.setShowBadge(true);
        channel.setLightColor(Color.RED);
        channel.enableLights(true);
        getNotificationManager().createNotificationChannel(channel);

        NotificationChannel channel2 = new NotificationChannel(CHANNEL_ID_2, CHANNEL_NAME, NotificationManager.IMPORTANCE_HIGH);
        channel2.setGroup(GROUP_ID);
        channel2.setShowBadge(true);
        channel2.setLightColor(Color.RED);
        channel2.enableLights(true);
        getNotificationManager().createNotificationChannel(channel2);


        Intent intent = new Intent(Intent.ACTION_GET_CONTENT);
        intent.setType("image/*");
        intent.addCategory(Intent.CATEGORY_OPENABLE);
        PendingIntent pendingResult = PendingIntent.getActivity(this, REQUEST_CODE_NOTIFY, intent, PendingIntent.FLAG_UPDATE_CURRENT);

        NotificationCompat.Builder mBuilder = new NotificationCompat.Builder(getApplicationContext(), CHANNEL_ID)
                .setSmallIcon(android.R.drawable.stat_notify_chat)
                .setContentTitle("notification title_9")
                .setContentText("notification content_9")
                .setPriority(1000)
                .setAutoCancel(true)
                .setVibrate(new long[]{100, 200, 300, 400, 500, 400, 300, 200, 400})
                .setNumber(3)
                .setDefaults(Notification.DEFAULT_LIGHTS)
                .setContentIntent(pendingResult)
                .setOngoing(true);

        NotificationCompat.Builder mBuilder1 = new NotificationCompat.Builder(getApplicationContext(), CHANNEL_ID_2)
                .setSmallIcon(android.R.drawable.stat_notify_chat)
                .setContentTitle("notification title_10")
                .setContentText("notification content_10")
                .setPriority(1000)
                .setAutoCancel(true)
                .setVibrate(new long[]{100, 200, 300, 400, 500, 400, 300, 200, 400})
                .setNumber(15)
                .setDefaults(Notification.DEFAULT_SOUND | Notification.DEFAULT_VIBRATE)
                .setContentIntent(pendingResult)
                .setOngoing(true);

        getNotificationManager().notify(9, mBuilder.build());
        getNotificationManager().notify(10, mBuilder1.build());
管理通知渠道
之前我们说过,通知渠道一旦创建,控制权就在用户手中,如果有一个重要通知渠道被用户手动关闭了,我们就要提醒用户去手动打开该渠道。
getNotificationChannel()方法可以获取指定的通知渠道对象,
getNotificationChannels() 可以获取所有通知对象的集合,保存在一个list中
if (Build.VERSION.SDK_INT >= Build.VERSION_CODES.O) {
            NotificationChannel channel = manager.getNotificationChannel("upgrade");
            if (channel.getImportance() == NotificationManager.IMPORTANCE_NONE) {
                Intent intent = new Intent(Settings.ACTION_CHANNEL_NOTIFICATION_SETTINGS);
                intent.putExtra(Settings.EXTRA_APP_PACKAGE, getPackageName());
                intent.putExtra(Settings.EXTRA_CHANNEL_ID, channel.getId());
                startActivity(intent);
                Toast.makeText(this, "升级通知不能关闭,请手动将通知打开", Toast.LENGTH_SHORT).show();
            }
删除渠道
getNotificationManager().deleteNotificationChannel(CHANNEL_ID);
删除渠道组
getNotificationManager().deleteNotificationChannelGroup(GROUP_ID);
更新通知渠道
一旦创建了通知渠道,其设置和行为就由用户掌控。可以再次调用 createNotificationChannel()以重命名现有通知渠道,或更新其说明。以下示例代码说明如何通过创建启动 Activity 的 Intent 将用户重定向到通知渠道的设置。
Intent intent = new Intent(Settings.ACTION_CHANNEL_NOTIFICATION_SETTINGS);
intent.putExtra(Settings.EXTRA_CHANNEL_ID,mChannel.getId());
intent.putExtra(Settings.EXTRA_APP_PACKAGE, getPackageName());
startActivity(intent);
最后提供一个工具类供大家参考。完整的demo地址参考:https://github.com/XuMiaoLee/AndroidNotificationChannel
public class NotificationHelper extends ContextWrapper
{
    private NotificationManager mNotificationManager;
    private NotificationChannel mNotificationChannel;

    public static final  String CHANNEL_ID          = "default";
    private static final String CHANNEL_NAME        = "Default Channel";
    private static final String CHANNEL_DESCRIPTION = "this is default channel!";

    public NotificationHelper(Context base)
    {
        super(base);
        if (Build.VERSION.SDK_INT >= Build.VERSION_CODES.O)
        {
            mNotificationChannel = new NotificationChannel(CHANNEL_ID, CHANNEL_NAME, NotificationManager.IMPORTANCE_DEFAULT);
            mNotificationChannel.setDescription(CHANNEL_DESCRIPTION);
            getNotificationManager().createNotificationChannel(mNotificationChannel);
        }
    }

    public NotificationCompat.Builder getNotification(String title, String content)
    {
        NotificationCompat.Builder builder = null;
        if (Build.VERSION.SDK_INT >= Build.VERSION_CODES.O)
        {
            builder = new NotificationCompat.Builder(this, CHANNEL_ID);
        } else
        {
            builder = new NotificationCompat.Builder(this);
            builder.setPriority(NotificationCompat.PRIORITY_DEFAULT);
        }
        builder.setContentTitle(title);
        builder.setContentText(content);
        builder.setSmallIcon(R.mipmap.comments);
        builder.setLargeIcon(BitmapFactory.decodeResource(getResources(), R.mipmap.comments));
        //点击自动删除通知
        builder.setAutoCancel(true);
        return builder;
    }

    public void notify(int id, NotificationCompat.Builder builder)
    {
        if (getNotificationManager() != null)
        {
            getNotificationManager().notify(id, builder.build());
        }
    }

    public void openChannelSetting(String channelId)
    {
        Intent intent = new Intent(Settings.ACTION_CHANNEL_NOTIFICATION_SETTINGS);
        intent.putExtra(Settings.EXTRA_APP_PACKAGE, getPackageName());
        intent.putExtra(Settings.EXTRA_CHANNEL_ID, channelId);
        if (getPackageManager().resolveActivity(intent, PackageManager.MATCH_DEFAULT_ONLY) != null)
            startActivity(intent);
    }

    public void openNotificationSetting()
    {
        Intent intent = new Intent(Settings.ACTION_APP_NOTIFICATION_SETTINGS);
        intent.putExtra(Settings.EXTRA_APP_PACKAGE, getPackageName());
        if (getPackageManager().resolveActivity(intent, PackageManager.MATCH_DEFAULT_ONLY) != null)
            startActivity(intent);
    }

    private NotificationManager getNotificationManager()
    {
        if (mNotificationManager == null)
            mNotificationManager = (NotificationManager) this.getSystemService(this.NOTIFICATION_SERVICE);
        return mNotificationManager;
    }

}
这里需要特别注意的是 NotificationCompat.Builder和NotificationChannel的适配的问题,注意兼容不同的版本。