目的
学习安装coreos集群
三台虚拟机,分别命名core1,core2,core3
安装之前的准备
一、准备用户登录用的公钥证书,比如常用的xshell软件,在“工具”菜单中,创建RSA密钥对,备用。
二、找一台机器,比如本人的CentOS7(10.3.8.234),安装Config transpiler,它是把Container Linux Configs格式转换成Ignition格式的工具:
yum install git make
cd ~
git clone https://github.com/coreos/container-linux-config-transpiler.git
cd container-linux-config-transpiler
make //生成bin/ct脚本
cd bin
vi core1.yml
passwd:
  users:
    - name: core
      ssh_authorized_keys:
        - ssh-rsa AAAAB3NzaC1yc2EAAAAB......(前面xshell软件生成的用户公钥)
      groups:
        - wheel
        - docker

networkd:
  units:
    - name: static.network
      contents: |
        [Match]
        Name=ens192

        [Network]
        Address=10.3.8.101/24
        Gateway=10.3.8.254
        DNS=10.1.4.80

storage:
  files:
    - path: /etc/hostname
      filesystem: root
      mode: 0644
      contents:
        inline: core1
    - path: /etc/hosts
      filesystem: root
      mode: 0644
      contents:
        inline: |
          127.0.0.1  localhost
          ::1        localhost
          10.3.8.101 core1
          10.3.8.102 core2
          10.3.8.103 core3

systemd:
  units:
    - name: "settimezone.service"
      enabled: true
      contents: |
        [Unit]
        Description=Set the timezone

        [Service]
        Type=oneshot
        RemainAfterExit=yes
        ExecStart=/usr/bin/timedatectl set-timezone Asia/Shanghai

        [Install]
        WantedBy=multi-user.target

etcd:
  version:                     "3.3.12"
  name:                        "core1"
  advertise_client_urls:       "http://10.3.8.101:2379"
  initial_advertise_peer_urls:  "http://10.3.8.101:2380"
  listen_client_urls:          "http://0.0.0.0:2379"
  listen_peer_urls:           "http://10.3.8.101:2380"
  initial_cluster:             "core1=http://10.3.8.101:2380,core2=http://10.3.8.102:2380,core3=http://10.3.8.103:2380"
将core1.yml复制为core2.yml和core3.yml,每个文件修改其中的主机名和IP,共6处。
将yml格式转换成json格式:
./ct < core1.yml > core1.json
./ct < core2.yml > core2.json
./ct < core3.yml > core3.json
转换为base64编码格式:
base64 -w0 core1.json > core1.b64
base64 -w0 core2.json > core2.b64
base64 -w0 core3.json > core3.b64
安装CoreOS
下载vmware版本的CoreOS:
https://stable.release.core-os.net/amd64-usr/current/coreos_production_vmware_ova.ova
登录http://ESXI-IP,创建虚拟机,创建类型选择“从OVF或OVA文件部署虚拟机”。
到第五步要注意下:
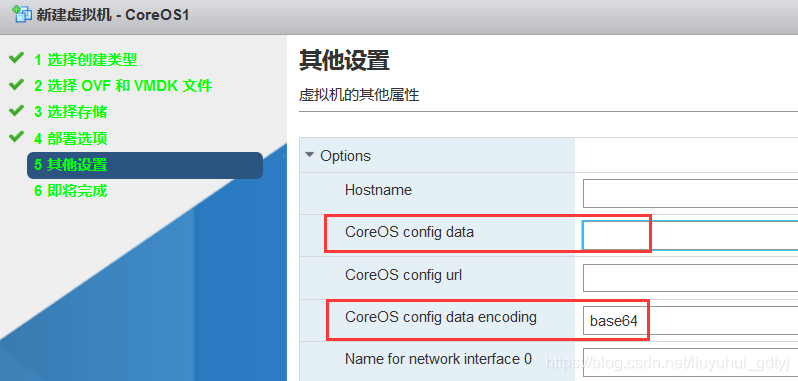
CoreOS config dat encoding填base64,CoreOS config data就是之前创建的core1.b64文件内容。完成后就可以启动虚拟机了,其它两台虚拟机一样的操作。
也可以在第四步时,取消“自动启动电源”,就是创建好虚拟机后不要自动启动。再把虚拟机的vmx文件下载过来编辑,在末尾添加两行:
guestinfo.coreos.config.data.encoding = “base64”
guestinfo.coreos.config.data = “复制core1.b64文件内容到此”
然后再将此修改过的vmx覆盖回原文件,启动虚拟机,它会自动完成初始化配置。
但如果,CoreOS不是第一次启动,则要在进入系统后,执行如下操作:
touch /boot/coreos/first_boot
first_boot文件让内核认为是第一次启动,它会使vmx文件内的guestinfo.coreos.config.data生效。
测试,登录任意一台成员:
HOST_1=http://10.3.8.101
HOST_2=http://10.3.8.102
HOST_3=http://10.3.8.103
ENDPOINTS=
HOST_2:2379,$HOST_3:2379
export ETCDCTL_API=2
etcdctl --endpoints=
ENDPOINTS endpoint health
http://10.3.8.101:2379 is healthy: successfully committed proposal: took = 2.787885ms
http://10.3.8.103:2379 is healthy: successfully committed proposal: took = 3.158167ms
http://10.3.8.102:2379 is healthy: successfully committed proposal: took = 2.069713ms
官方文档如下:
https://coreos.com/os/docs/latest/booting-on-vmware.html
配置TLS
配置TLS有两种方法,一是在yml文件中配置,在CoreOS启动之前初始化TLS,二是在CoreOS启动之后手工调整TLS配置,官方文档就是后者。
方法一:编写yml文件
cat core1.yml(未改动的部分没有列出)
systemd:
  units:
    - name: "etcd-member.service"
      dropins:
        - name: 30-certs.conf
          contents: |
            [Service]
            Environment="ETCD_CERT_FILE=/etc/ssl/certs/etcd.pem"
            Environment="ETCD_KEY_FILE=/etc/ssl/certs/etcd-key.pem"
            Environment="ETCD_TRUSTED_CA_FILE=/etc/ssl/certs/ca.pem"
            Environment="ETCD_CLIENT_CERT_AUTH=true"
            Environment="ETCD_PEER_CERT_FILE=/etc/ssl/certs/etcd.pem"
            Environment="ETCD_PEER_KEY_FILE=/etc/ssl/certs/etcd-key.pem"
            Environment="ETCD_PEER_TRUSTED_CA_FILE=/etc/ssl/certs/ca.pem"
            Environment="ETCD_PEER_CLIENT_CERT_AUTH=true"

etcd:
  version:                  "3.3.12"
  name:                   "core1"
  advertise_client_urls:       "https://10.3.8.101:2379"
  listen_client_urls:          "https://10.3.8.101:2379,https://127.0.0.1:2379"
  listen_peer_urls:           "https://10.3.8.101:2380"
  initial_advertise_peer_urls:  "https://10.3.8.101:2380"
  initial_cluster:             "core1=https://10.3.8.101:2380,core2=https://10.3.8.102:2380,core3=https://10.3.8.103:2380"
  initial_cluster_state:        "new"
将core1.yml复制为core2.yml和core3.yml,每个文件修改其中的主机名和IP,etcd那一段要写具体的IP,因为证书里是指定IP的,不要用0.0.0.0这样的表达式。
同前面步骤一样,将yml格式转换成json格式,再转换成base64格式,写入虚拟机的vmx文件中。如果CoreOS不是第一次启动,则touch /boot/coreos/first_boot,再重启,所做的修改才生效。
初始化CoreOS完成后,将相关证书放入/etc/ssl/certs目录内,其它目录不行,否则报错:
etcdmain: open /etc/ssl/etcd/etcd.pem: no such file or directory
检查集群,登录任意一台成员:
export ETCDCTL_CERT_FILE=/etc/ssl/certs/etcd.pem
export ETCDCTL_KEY_FILE=/etc/ssl/certs/etcd-key.pem
export ETCDCTL_CA_FILE=/etc/ssl/certs/ca.pem
export ETCDCTL_ENDPOINTS=https://10.3.8.101:2379,https://10.3.8.102:2379,https://10.3.8.103:2379
export ETCDCTL_API=2
etcdctl member list
etcdctl cluster-health
或
export ETCDCTL_API=3
etcdctl member list
etcdctl endpoint health
测试https访问:
curl --cacert /etc/ssl/etcd/ca.pem --cert /etc/ssl/etcd/etcd.pem --key /etc/ssl/etcd/etcd-key.pem https://10.3.8.102:2379/v2/stats/self
curl --cacert /etc/ssl/certs/ca.pem --cert /etc/ssl/certs/etcd.pem --key /etc/ssl/certs/etcd-key.pem https://10.3.8.102:2379/v2/stats/self
{“name”:“core2”,“id”:“298d850fbf49f913”,“state”:“StateFollower”,“startTime”:“2019-03-09T04:49:25.627515833Z”,“leaderInfo”:{“leader”:“de7b18977457deb8”,“uptime”:“1m3.536353176s”,“startTime”:“2019-03-09T04:49:26.416629082Z”},“recvAppendRequestCnt”:27,“sendAppendRequestCnt”:0}
这里curl能正常读取/etc/ssl/etcd/内的证书。
方法二:手工调整TLS
参考官方文档:https://coreos.com/etcd/docs/latest/etcd-live-http-to-https-migration.html
根据文档步骤去做遇到两个问题:
一是证书目录问题:etcdmain: open /etc/ssl/etcd/etcd.pem: no such file or directory
二是更新etcd client URLs问题:
修改/etc/systemd/system/etcd-member.service.d/20-clct-etcd-member.conf文件,部分内容如下:
–advertise-client-urls=“https://10.3.8.101:2379,http://0.0.0.0:4001”
–listen-client-urls=“http://0.0.0.0:2379,http://0.0.0.0:4001”
–listen-peer-urls=“http://0.0.0.0:2380,http://0.0.0.0:4001” \
重启服务
systemctl daemon-reload
systemctl restart etcd-member
失败,journalctl -xe显示:
etcdmain: listen tcp 0.0.0.0:4001: bind: address already in use
若修改listen-peer-urls这一行,去掉http://0.0.0.0:4001则能顺利启动。
官方文档未做详细测试,实在累。