android开发百度地图点聚合功能
第一次写博客。。。也不知道怎么写呢。就按照我实现功能的步骤来写吧!
首先,我们得去准备一些东西。
- 百度地图demo ,地址:http://lbsyun.baidu.com/index.php?title=sdk/download&action#selected=mapsdk_basicmap,mapsdk_searchfunction,mapsdk_lbscloudsearch,mapsdk_calculationtool,mapsdk_radar;
- 申请百度地图key ,可以根据教程来申请:http://lbsyun.baidu.com/index.php?title=android-locsdk/guide/key;
- 一个android项目 ,这我就不多说;
步骤(这是我的步骤)
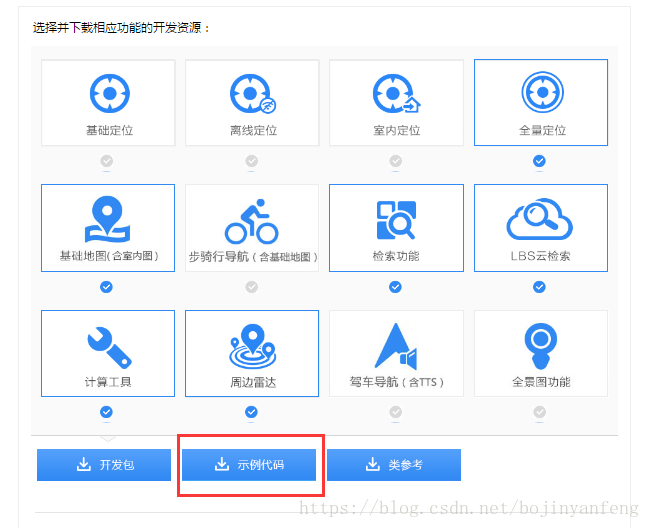
打开下载demo地址,选择要下载的功能资源,然后点击下载实例代码。具体如下图:
下载下来的压缩包里,解压如下图的压缩包:
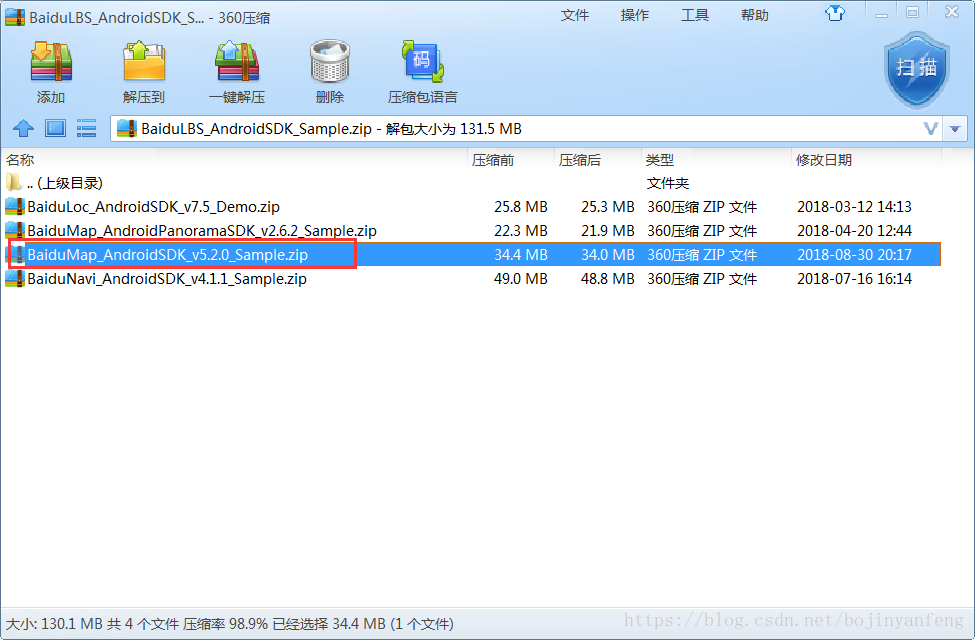
百度的点聚合是对外开放源码的。我们需要在百度提供的demo中把clusterutil整个目录拷贝到自己的工程里面。
具体的路径在:你的解压路径\BaiduMap_AndroidSDK_v5.2.0_Sample\BaiduMapsApiDemo\src\com\baidu\mapapi\clusterutil
除了clusterutil包里的代码外,还需要以下东西:
layout文件夹的text_bubble.xml
styles.xml文件中的相关部分
参考百度地图demo点聚合功能代码
代码在:你的解压路径\BaiduMap_AndroidSDK_v5.2.0_Sample\BaiduMapsApiDemo\src\baidumapsdk\demo\map\MarkerClusterDemo.java
其中,我们用到的
 	private ClusterManager<MyItem> mClusterManager;
	// 定义点聚合管理类ClusterManager
        mClusterManager = new ClusterManager<MyItem>(this, mBaiduMap);
        // 添加Marker点,这里就使用自己添加点的方法了
        //addMarkers();
        // 设置地图监听,当地图状态发生改变时,进行点聚合运算
        mBaiduMap.setOnMapStatusChangeListener(mClusterManager);
        // 设置maker点击时的响应
        mBaiduMap.setOnMarkerClickListener(mClusterManager);

        mClusterManager.setOnClusterClickListener(new ClusterManager.OnClusterClickListener<MyItem>() {
            @Override
            public boolean onClusterClick(Cluster<MyItem> cluster) {
                Toast.makeText(MarkerClusterDemo.this,
                        "有" + cluster.getSize() + "个点", Toast.LENGTH_SHORT).show();

                return false;
            }
        });
        mClusterManager.setOnClusterItemClickListener(new ClusterManager.OnClusterItemClickListener<MyItem>() {
            @Override
            public boolean onClusterItemClick(MyItem item) {
                Toast.makeText(MarkerClusterDemo.this,
                        "点击单个Item", Toast.LENGTH_SHORT).show();

                return false;
            }
        });
     /**
     * 每个Marker点,包含Marker点坐标以及图标
     */
    public class MyItem implements ClusterItem {
        private final LatLng mPosition;

        public MyItem(LatLng latLng) {
            mPosition = latLng;
        }

        @Override
        public LatLng getPosition() {
            return mPosition;
        }

        @Override
        public BitmapDescriptor getBitmapDescriptor() {
            return BitmapDescriptorFactory
                    .fromResource(R.drawable.icon_gcoding);
        }
    }
按照demo的方法基本上是可以完成点聚合的功能的。但是,现在项目要求点击Marker点时需要弹出气泡信息,也就是说需要传递参数进Marker点里。所以MyItem 方法需要加入额外信息Bundle。参考https://blog.csdn.net/fangjingjingll/article/details/51984257
1、修改MyItem ,加入额外信息Bundle
// An highlighted block
/**
     * 每个Marker点,包含Marker点坐标、图标以及额外信息
     */
    public class MyItem implements ClusterItem {
        private final LatLng mPosition;//点
        private Bundle buns;//额外信息
        public MyItem(LatLng latLng) {
            mPosition = latLng;
        }
        public MyItem(LatLng latLng,Bundle bun) {
            mPosition = latLng;
            buns=bun;
        }
        @Override
        public LatLng getPosition() {
            return mPosition;
        }
        @Override
        public Bundle getExtraInfo() {
            return buns;
        }
        @Override
        public BitmapDescriptor getBitmapDescriptor() {//点图标
            return BitmapDescriptorFactory.fromResource(R.drawable.ic_red_maps_equ);
        }
    }
2、ClusterItem 接口添加新的抽象方法
(package com.baidu.mapapi.clusterutil.clustering)
	public interface ClusterItem {

	    /**
	     * The position of this marker. This must always return the same value.
	     */
	    LatLng getPosition();

	    BitmapDescriptor getBitmapDescriptor();

	    Bundle getExtraInfo();//新添加的额外信息
	}
3、DefaultClusterRenderer类添加额外信息
(package com.baidu.mapapi.clusterutil.clustering.view)
     /**
     * Creates markerWithPosition(s) for a particular cluster, animating it if necessary.
     */
    private class CreateMarkerTask {
        private final Cluster<T> cluster;
        private final Set<MarkerWithPosition> newMarkers;
        private final LatLng animateFrom;

        /**
         * @param c            the cluster to render.
         * @param markersAdded a collection of markers to append any created markers.
         * @param animateFrom  the location to animate the markerWithPosition from, or null if no
         *                     animation is required.
         */
        public CreateMarkerTask(Cluster<T> c, Set<MarkerWithPosition> markersAdded, LatLng animateFrom) {
            this.cluster = c;
            this.newMarkers = markersAdded;
            this.animateFrom = animateFrom;
        }

        private void perform(MarkerModifier markerModifier) {
            // Don't show small clusters. Render the markers inside, instead.
            if (!shouldRenderAsCluster(cluster)) {
                for (T item : cluster.getItems()) {
                    Marker marker = mMarkerCache.get(item);
                    MarkerWithPosition markerWithPosition;
                    if (marker == null) {
                        MarkerOptions markerOptions = new MarkerOptions();
                        if (animateFrom != null) {
                            markerOptions.position(animateFrom);
                            markerOptions.icon(item.getBitmapDescriptor());
                            //添加额外信息
                            markerOptions.extraInfo(item.getExtraInfo());
                        } else {
                            markerOptions.position(item.getPosition());
                            markerOptions.icon(item.getBitmapDescriptor());
                             //添加额外信息
                            markerOptions.extraInfo(item.getExtraInfo());
                        }
                        onBeforeClusterItemRendered(item, markerOptions);
                        marker = mClusterManager.getMarkerCollection().addMarker(markerOptions);
                        markerWithPosition = new MarkerWithPosition(marker);
                        mMarkerCache.put(item, marker);
                        if (animateFrom != null) {
                            markerModifier.animate(markerWithPosition, animateFrom, item.getPosition());
                        }
                    } else {
                        markerWithPosition = new MarkerWithPosition(marker);
                    }
                    onClusterItemRendered(item, marker);
                    newMarkers.add(markerWithPosition);
                }
                return;
            }

            MarkerOptions markerOptions = new MarkerOptions()
                    .position(animateFrom == null ? cluster.getPosition() : animateFrom);

            onBeforeClusterRendered(cluster, markerOptions);

            Marker marker = mClusterManager.getClusterMarkerCollection().addMarker(markerOptions);
            mMarkerToCluster.put(marker, cluster);
            mClusterToMarker.put(cluster, marker);
            MarkerWithPosition markerWithPosition = new MarkerWithPosition(marker);
            if (animateFrom != null) {
                markerModifier.animate(markerWithPosition, animateFrom, cluster.getPosition());
            }
            onClusterRendered(cluster, marker);
            newMarkers.add(markerWithPosition);
        }
    }
4、添加点方法,从我的项目中提取的某部分
	List<MyItem> items = new ArrayList<MyItem>();
	for(int i=0;i<c;i++){
             JSONObject job = equList.getJSONObject(i);
              //获取经纬度添加地图标注
             String lo = job.has("longitude")?job.getString("longitude"):"";
             String la = job.has("latitude")?job.getString("latitude"):"";
              if(!TextUtils.isEmpty(lo)&&!TextUtils.isEmpty(la)){
                    LatLng point =  new LatLng(Double.valueOf(la), Double.valueOf(lo));
                    //添加额外信息
                    Bundle bundle = new Bundle();
                    bundle.putString("json",job.toString());
                    MyItem myItem = new MyItem(point,bundle);
                    items.add(myItem);

              	}
     	 }
     	mClusterManager.addItems(items);//把点添加到聚合类里
5、点击聚合点和Marker 点方法,从我的项目中提取部分代码
	mClusterManager.setOnClusterClickListener(new ClusterManager.OnClusterClickListener<MyItem>() {//点击聚合点触发
            @Override
            public boolean onClusterClick(Cluster<MyItem> cluster) {
                //Toast.makeText(getActivity(), "有" + cluster.getSize() + "个点", Toast.LENGTH_SHORT).show();
                List<MyItem> items = (List<MyItem>) cluster.getItems();
                LatLngBounds.Builder builder2 = new LatLngBounds.Builder();
                int i=0;
                for(MyItem myItem : items){
                    builder2 = builder2.include(myItem.getPosition());
                }
                LatLngBounds latlngBounds = builder2.build();
                MapStatusUpdate u = MapStatusUpdateFactory.newLatLngBounds(latlngBounds,mMapView.getWidth(),mMapView.getHeight());
                mBaidumap.animateMapStatus(u);
                return false;
            }
        });
        mClusterManager.setOnClusterItemClickListener(new ClusterManager.OnClusterItemClickListener<MyItem>() {//点击单个Marker点触发
            @Override
            public boolean onClusterItemClick(MyItem item) {
                if(item!=null&&item.getExtraInfo().get("json")!=null){
                    String str = String.valueOf(item.getExtraInfo().get("json"));
                    //点击弹出气泡窗口,显示一些信息。点击窗口可以跳转到详情页面
                    try {
                        JSONObject job = new JSONObject(str);
                        View view = getLayoutInflater().inflate(R.layout.popu_marker, null);
                        TextView text_title = (TextView) view.findViewById(R.id.marker_title);
                        TextView text_text = (TextView) view.findViewById(R.id.marker_text);
                        TextView text_address = (TextView) view.findViewById(R.id.marker_address);
                        SpannableString titleText = new SpannableString("名称:"+(job.has("customerName")?job.getString("customerName"):"无"));
                        /*titleText.setSpan(new ForegroundColorSpan(R.color.generalColor), 0, titleText.length(), 0);*/
                        text_title.setText(titleText);
                        SpannableString texttext = new SpannableString("编号:"+(job.has("customerNum")?job.getString("customerNum"):"无"));
                        text_text.setText(texttext);
                        SpannableString address = new SpannableString("地址:"+(job.has("userAddr")?job.getString("userAddr"):"无"));
                        text_address.setText(address);
                        //点击进入详情页面
                        equipment = new Equipment();
                        ...
                        view.setOnClickListener(new View.OnClickListener() {
                            @Override
                            public void onClick(View view) {
                                //使用json数据传递参数到详情页面。
                                Intent intent = new Intent(getActivity(),EquDetailsActivity.class);
                                Bundle bundle = new Bundle();
                                // Serializable传递对象
                                bundle.putSerializable("equipment", equipment);
                                intent.putExtras(bundle);
                                intent.putExtra("pageType","detail");//用于标别查看页面
                                startActivity(intent);
                            }
                        });
                        //定义用于显示该InfoWindow的坐标点
                        LatLng pt = new LatLng(job.getDouble("latitude"),job.getDouble("longitude"));
                        //创建InfoWindow , 传入 view, 地理坐标, y 轴偏移量
                        InfoWindow mInfoWindow = new InfoWindow(view, pt, -47);
                        //显示InfoWindow
                        mBaidumap.showInfoWindow(mInfoWindow);

                    } catch (JSONException e) {
                        e.printStackTrace();
                    }
                }
                return false;
            }
        });
6、修改聚合数
(通过修改DefaultClusterRenderer类里面的MIN_CLUSTER_SIZE参数来设置当几个点叠在一起时,要进行聚合,默认是4)
        //原demo中,要至少5个点才能聚合,而实际使用时,我可不能这样来实现,只要有两个点靠近了,也是要聚合的。
	private static final int MIN_CLUSTER_SIZE = 1;
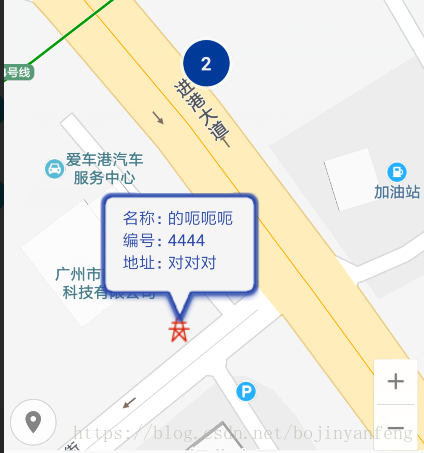
最后贴一个气泡布局popu_marker.xml,上述点击单个点时弹出的气泡信息布局。custom_info_bubble2为安卓.9图。气泡基本情况如下功能实现部分截图。
<?xml version="1.0" encoding="utf-8"?>
<LinearLayout xmlns:android="http://schemas.android.com/apk/res/android"
    android:layout_width="match_parent"
    android:layout_height="match_parent"
    android:background="@drawable/custom_info_bubble2"
    android:orientation="vertical" >


    <TextView
        android:textColor="@color/generalColor"
        android:id="@+id/marker_title"
        android:layout_width="wrap_content"
        android:layout_height="wrap_content" />

    <TextView
        android:textColor="@color/generalColor"
        android:id="@+id/marker_text"
        android:layout_width="wrap_content"
        android:layout_height="wrap_content" />

    <TextView
        android:textColor="@color/generalColor"
        android:id="@+id/marker_address"
        android:layout_width="wrap_content"
        android:layout_height="wrap_content" />

</LinearLayout>
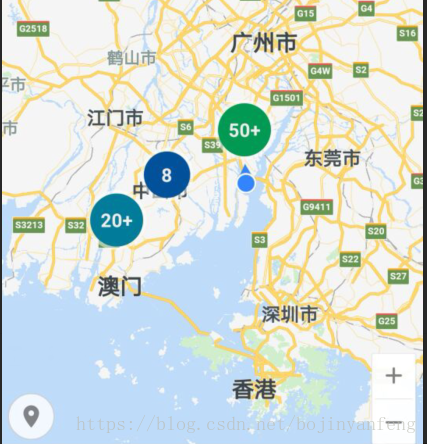
功能实现部分截图
有什么不懂都可以去找“百度”老师来帮忙解决。