文章目录
Spring Boot - 集成Redis
Spring Boot除了对我们常用的关系型数据库支持外,对NOSQL也提供了十分不错的封装自动化。
在我们开发项目的过程中,由于业务越来越繁琐,数据量越来越大,从而我们对一些程序的性能会有所要求,在一些场景下缓存就成了必不可少的一项策略。
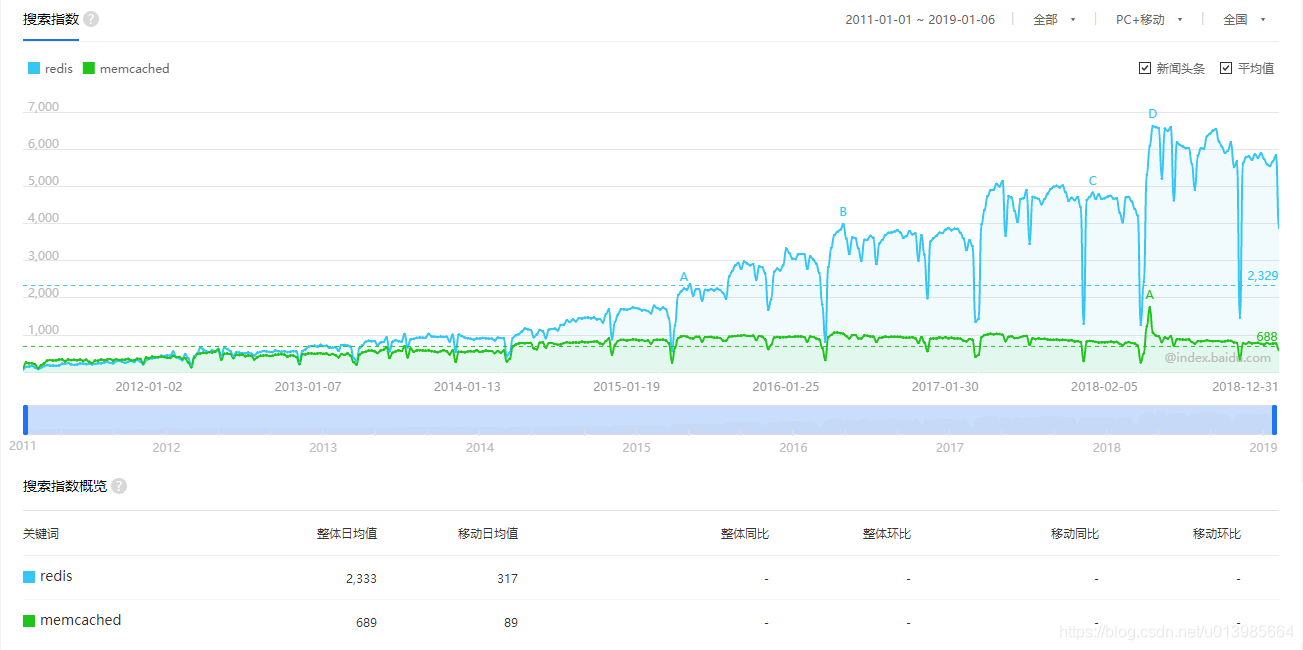
Redis是目前使用最为广泛的内存数据存储,它是一个开源的使用ANSI C语言编写、支持网络、可基于内存亦可持久化的日志型、Key-Value数据库,并提供多种语言的API。相对于其他同种工具,例如Memcached,Redis支持更丰富的数据结构,并且支持数据持久化,除此之外Redis还具备一些数据库的特性,例如事务、主从策略等。所以Redis兼有了缓存系统以及传统数据库的一些特性,有着更加丰富的应用场景,这也是Redis为何从各种缓存工具中脱颖而出的原因,想必大家对Redis肯定都不陌生。从下面这张图我们可以很明显的看出Redis一路高歌的势头并且一直在保持,接下来我们就来看下Spring Boot中是如何集成Redis的。
1.Lettuce
我们都知道在我们java开发中,jedis作为redis的客户端工具,很好地对我们代码开发使用redis进行了支持,但是jedis本身是直连redis server的,所以在多线程的环境下可能会出现线程不安全的情况,然后我们需要通过线程池去对每一个jedis实例增加物理连接。
而Spring Boot 在2.x的版本之后,我们若集成了redis则它默认将jedis替换成了Lettuce,它是基于Netty的连接实例,可以在多个线程间并发访问并且线程安全的,同时它是可伸缩的设计,一个连接实例不够的情况也可以按需增加连接实例,也就是说Lettuce是一种更高级Redis客户端,弥补了jedis的一些缺点并且提供了更丰富的功能支持。关于Redis的几个框架,大家可以参考下面这篇博客,作者总结得比较简练易懂。
Redis的三个框架:Jedis,Redisson,Lettuce
2.集成Redis(lettuce客户端)
2.1 引入pom依赖
pom.xml
<!-- SpringBoot整合Redis-->
<dependency>
    <groupId>org.springframework.boot</groupId>
    <artifactId>spring-boot-starter-data-redis</artifactId>
</dependency>
<!-- 池化连接 springboot2.x集成redis使用jedis操作需要加上该依赖-->
<dependency>
    <groupId>org.apache.commons</groupId>
    <artifactId>commons-pool2</artifactId>
</dependency>
2.2 配置文件
由于2.x版本默认连接池是lettuce,在这里若需要采用jedis,则用
spring.redis.jedis.pool替代spring.redis.lettuce.pool即可。
application.properties
spring.redis.host=127.0.0.1
spring.redis.port=6379
spring.redis.password=root
# 连接超时时间(毫秒)
spring.redis.timeout=10000
# Redis默认情况下有16个分片,这里配置具体使用的分片,默认是0
spring.redis.database=0
# 连接池最大连接数(使用负值表示没有限制) 默认 8
spring.redis.lettuce.pool.max-active=8
# 连接池最大阻塞等待时间(使用负值表示没有限制) 默认 -1
spring.redis.lettuce.pool.max-wait=-1
# 连接池中的最大空闲连接 默认 8
spring.redis.lettuce.pool.max-idle=8
# 连接池中的最小空闲连接 默认 0
spring.redis.lettuce.pool.min-idle=0
# 关闭超时时间
spring.redis.lettuce.shutdown-timeout=100
2.3 自定义redis配置类
Spring Boot对redis的配置可以自动、手动以及传统的xml都支持,但是我们为了更灵活地使用,一般会自定义配置类去配置相关参数。
CacheExpiresMap .java
package com.springboot.config;

import java.util.HashMap;

/**
 * 缓存Cacheable cacheNames过期时间
 *
 * @author hzk
 * @Cacheable(value="xxxx")
 */
public class CacheExpiresMap {
    private static HashMap<String, Integer> map = new HashMap<>();

    static {
        map.put("dic", 60);
    }


    public static HashMap<String, Integer> get() {
        return map;
    }
}
LettuceAutoConfig.java
package com.springboot.config;

import com.fasterxml.jackson.annotation.JsonAutoDetect;
import com.fasterxml.jackson.annotation.PropertyAccessor;
import com.fasterxml.jackson.databind.ObjectMapper;
import org.slf4j.Logger;
import org.slf4j.LoggerFactory;
import org.springframework.cache.Cache;
import org.springframework.cache.CacheManager;
import org.springframework.cache.annotation.CachingConfigurerSupport;
import org.springframework.cache.annotation.EnableCaching;
import org.springframework.cache.interceptor.CacheErrorHandler;
import org.springframework.cache.interceptor.KeyGenerator;
import org.springframework.context.annotation.Bean;
import org.springframework.context.annotation.Configuration;
import org.springframework.data.redis.cache.RedisCacheConfiguration;
import org.springframework.data.redis.cache.RedisCacheManager;
import org.springframework.data.redis.cache.RedisCacheWriter;
import org.springframework.data.redis.connection.lettuce.LettuceConnectionFactory;
import org.springframework.data.redis.core.RedisTemplate;
import org.springframework.data.redis.serializer.Jackson2JsonRedisSerializer;
import org.springframework.data.redis.serializer.StringRedisSerializer;

import java.lang.reflect.Method;
import java.time.Duration;
import java.util.HashMap;
import java.util.Map;

/**
 * 自定义redis配置(lettuce)
 * @author hzk
 * @date 2019/1/7
*/

@Configuration
@EnableCaching //启用缓存
public class LettuceAutoConfig extends CachingConfigurerSupport {

    private static final Logger LOGGER = LoggerFactory.getLogger(LettuceAutoConfig.class);

    /**
     * 自定义缓存key的生成策略。默认的生成策略是可读性较差的
     * @return
     */
    @Bean
    @Override
    public KeyGenerator keyGenerator() {
        return new KeyGenerator() {
            /**
             *
             * @param target  当前被调用对象
             * @param method 当前被调用的方法
             * @param params 调用方法的参数列表
             * @return
             */
            @Override
            public Object generate(Object target, Method method, Object... params) {
                StringBuilder sb = new StringBuilder();
                sb.append(target.getClass().getName())
                        .append(":")
                        .append(method.getName());
                for (Object obj : params) {
                    sb.append(":")
                            .append(obj.toString());
                }
                LOGGER.info("自定义生成Redis Key -> [{}]", sb.toString());
                return sb.toString();
            }
        };
    }

    /**
     * 缓存配置管理器
     */
    @Bean
    public CacheManager cacheManager(LettuceConnectionFactory lettuceConnectionFactory) {
        //以锁写入的方式创建RedisCacheWriter对象
        RedisCacheWriter writer = RedisCacheWriter.lockingRedisCacheWriter(lettuceConnectionFactory);
        //创建默认缓存配置对象
        RedisCacheConfiguration config = RedisCacheConfiguration.defaultCacheConfig();
        //设置默认超过期时间是30秒
        config.entryTtl(Duration.ofSeconds(30));
        //自定义cacheConfig
        Map<String, RedisCacheConfiguration> initialCacheConfigurations = new HashMap<>();
        for (Map.Entry<String, Integer> entry : CacheExpiresMap.get().entrySet()) {
            String key = entry.getKey();
            Integer seconds = entry.getValue();
            LOGGER.info("key{},value{}", key, seconds);
            RedisCacheConfiguration initialCacheConfig = RedisCacheConfiguration.defaultCacheConfig();
            initialCacheConfigurations.put(key, initialCacheConfig.entryTtl(Duration.ofSeconds(seconds)));
        }
        //初始化RedisCacheManager
        RedisCacheManager cacheManager = new RedisCacheManager(writer, config,initialCacheConfigurations);
        return cacheManager;
    }

    /**
     * 手动配置注入redisTemplate
     * @param lettuceConnectionFactory lettuce连接工厂
     * @return {@link RedisTemplate}
     */
    @Bean(name = "redisTemplate")
    public RedisTemplate<Object,Object> setRedisTemplate(LettuceConnectionFactory lettuceConnectionFactory){
        RedisTemplate<Object,Object> template = new RedisTemplate<>();
        template.setKeySerializer(new StringRedisSerializer());
        template.setConnectionFactory(lettuceConnectionFactory);
        //以下代码为将RedisTemplate的Value序列化方式由JdkSerializationRedisSerializer更换为Jackson2JsonRedisSerializer
        //此种序列化方式结果清晰、容易阅读、存储字节少、速度快,所以推荐更换
        Jackson2JsonRedisSerializer jackson2JsonRedisSerializer = new Jackson2JsonRedisSerializer(Object.class);
        ObjectMapper om = new ObjectMapper();
        om.setVisibility(PropertyAccessor.ALL, JsonAutoDetect.Visibility.ANY);
        om.enableDefaultTyping(ObjectMapper.DefaultTyping.NON_FINAL);
        jackson2JsonRedisSerializer.setObjectMapper(om);
        template.setValueSerializer(jackson2JsonRedisSerializer);
        //template.setEnableTransactionSupport(true);//是否启用事务
        template.afterPropertiesSet();
        return template;
    }

    @Override
    @Bean
    public CacheErrorHandler errorHandler() {
        // 异常处理,当Redis发生异常时,打印日志,但是程序正常走
        LOGGER.info("初始化 -> [{}]", "Redis CacheErrorHandler");
        CacheErrorHandler cacheErrorHandler = new CacheErrorHandler() {
            @Override
            public void handleCacheGetError(RuntimeException e, Cache cache, Object key) {
                LOGGER.error("Redis occur handleCacheGetError:key -> [{}]", key, e);
            }

            @Override
            public void handleCachePutError(RuntimeException e, Cache cache, Object key, Object value) {
                LOGGER.error("Redis occur handleCachePutError:key -> [{}];value -> [{}]", key, value, e);
            }

            @Override
            public void handleCacheEvictError(RuntimeException e, Cache cache, Object key)    {
                LOGGER.error("Redis occur handleCacheEvictError:key -> [{}]", key, e);
            }

            @Override
            public void handleCacheClearError(RuntimeException e, Cache cache) {
                LOGGER.error("Redis occur handleCacheClearError:", e);
            }
        };
        return cacheErrorHandler;
    }
}
2.4 使用redis
上面这些步骤完成了,我们就可以使用redis缓存去缓存我们的数据了,在Spring Boot中一般情况下有两种使用方式,一种是传统的手动存取,第二种是注解自动缓存。
DictionaryServiceImpl.java
package com.springboot.service.impl;

import com.springboot.dao.read.BlogDictionaryMapper;
import com.springboot.repository.entity.BlogDictionary;
import com.springboot.repository.entity.BlogDictionaryExample;
import com.springboot.service.IDictionaryService;
import org.springframework.beans.factory.annotation.Autowired;
import org.springframework.cache.annotation.Cacheable;
import org.springframework.data.redis.core.RedisTemplate;
import org.springframework.stereotype.Service;
import org.springframework.transaction.annotation.Transactional;

import java.io.Serializable;
import java.util.List;

/**
 * @author hzk
 * @date 2018/12/19
 */
@Service
public class DictionaryServiceImpl implements IDictionaryService{

    @Autowired
    private BlogDictionaryMapper blogDictionaryMapper_r;

    @Autowired
    private RedisTemplate<Object,Object> redisTemplate;

    /**
     * 手动缓存
     * @param id
     * @return
     */
    @Override
    public BlogDictionary getDictionary(Integer id) {
        //优先查询缓存
        String key = "lettuce_dictionary_"+id;
        //字符串序列化器 用于给redis key做序列化增强可读性 避免redis自身生成不规律的key(\xAC\xED\x00\x05t\x00\x0Ftest_dictionary)
        //redisTemplate.setKeySerializer(redisTemplate.getStringSerializer());
        BlogDictionary blogDictionary = (BlogDictionary)redisTemplate.opsForValue().get(key);
        //双重检测(解决缓存穿透)
        if(null == blogDictionary){
            synchronized (this){
                blogDictionary = (BlogDictionary)redisTemplate.opsForValue().get(key);
                if(null == blogDictionary){
                    blogDictionary = blogDictionaryMapper_r.selectByPrimaryKey(id);
                    if(null != blogDictionary){
                        //将数据存入缓存
                        redisTemplate.opsForValue().set(key,blogDictionary);
                    }
                    System.out.println("命中数据库");
                }else{
                    System.out.println("命中缓存");
                }
            }
        }else{
            System.out.println("命中缓存");
        }

        return blogDictionary;
    }

    /**
     * 自动缓存
     * @param id
     * @return
     */
    @Override
    @Cacheable(value="dic")
    public BlogDictionary getDictionaryAuto(Integer id) {
        System.out.println("命中数据库:"+id);
        BlogDictionary blogDictionary = blogDictionaryMapper_r.selectByPrimaryKey(id);
        return blogDictionary;
    }

}
上面第一种和我们之前传统地使用redis缓存基本没区别,下面使用@Cacheable注解会自动将结果缓存进redis,生成key的规则和我们之前在自定义配置中KeyGenerator一致,例如我们这里请求
http://localhost:8080/dicauto/23会在redis中存储key为dic:com.springboot.service.impl.DictionaryServiceImpl:getDictionaryAuto:23的内容,真正的开发中操作redis大家可以根据需要自己做一些封装使开发更完善便捷。
3.集成Redis(jedis客户端)
3.1 引入pom依赖
pom.xml
<!-- SpringBoot整合Redis-->
<dependency>
    <groupId>org.springframework.boot</groupId>
    <artifactId>spring-boot-starter-data-redis</artifactId>
    <!-- 2.x版本默认连接池是lettuce, 若我们要使用jedis客户端,需要先排除lettuce的jar -->
    <exclusions>
        <exclusion>
            <groupId>redis.clients</groupId>
            <artifactId>jedis</artifactId>
        </exclusion>
        <exclusion>
            <groupId>io.lettuce</groupId>
            <artifactId>lettuce-core</artifactId>
        </exclusion>
    </exclusions>
</dependency>

<!-- 添加jedis客户端 -->
<dependency>
    <groupId>redis.clients</groupId>
    <artifactId>jedis</artifactId>
</dependency>
<!-- 池化连接 springboot2.x集成redis使用jedis操作需要加上该依赖-->
<dependency>
    <groupId>org.apache.commons</groupId>
    <artifactId>commons-pool2</artifactId>
    <version>2.5.0</version>
</dependency>

<!-- 将作为Redis对象序列化器 -->
<dependency>
    <groupId>com.alibaba</groupId>
    <artifactId>fastjson</artifactId>
    <version>1.2.47</version>
</dependency>
3.2 配置文件
由于2.x版本默认连接池是lettuce,在这里若需要采用jedis,则用
spring.redis.jedis.pool替代spring.redis.lettuce.pool即可。
application.properties
spring.redis.host=127.0.0.1
spring.redis.port=6379
spring.redis.password=root
# 连接超时时间(毫秒)
spring.redis.timeout=10000
# Redis默认情况下有16个分片,这里配置具体使用的分片,默认是0
spring.redis.database=0
# 连接池最大连接数(使用负值表示没有限制) 默认 8
spring.redis.jedis.pool.max-active=8
# 连接池最大阻塞等待时间(使用负值表示没有限制) 默认 -1
spring.redis.jedis.pool.max-wait=-1
# 连接池中的最大空闲连接 默认 8
spring.redis.jedis.pool.max-idle=8
# 连接池中的最小空闲连接 默认 0
spring.redis.jedis.pool.min-idle=0
# 关闭超时时间
spring.redis.jedis.shutdown-timeout=100
3.3 自定义redis配置类
RedisConfig .java
package com.springboot.config;

import com.fasterxml.jackson.annotation.JsonAutoDetect;
import com.fasterxml.jackson.annotation.PropertyAccessor;
import com.fasterxml.jackson.databind.ObjectMapper;
import org.slf4j.Logger;
import org.slf4j.LoggerFactory;
import org.springframework.beans.factory.annotation.Autowired;
import org.springframework.beans.factory.annotation.Value;
import org.springframework.boot.context.properties.ConfigurationProperties;
import org.springframework.cache.Cache;
import org.springframework.cache.CacheManager;
import org.springframework.cache.annotation.CachingConfigurerSupport;
import org.springframework.cache.annotation.EnableCaching;
import org.springframework.cache.interceptor.CacheErrorHandler;
import org.springframework.cache.interceptor.KeyGenerator;
import org.springframework.context.annotation.Bean;
import org.springframework.context.annotation.Configuration;
import org.springframework.data.redis.cache.RedisCacheConfiguration;
import org.springframework.data.redis.cache.RedisCacheManager;
import org.springframework.data.redis.cache.RedisCacheWriter;
import org.springframework.data.redis.connection.jedis.JedisConnectionFactory;
import org.springframework.data.redis.core.RedisTemplate;
import org.springframework.data.redis.serializer.Jackson2JsonRedisSerializer;
import org.springframework.data.redis.serializer.StringRedisSerializer;
import redis.clients.jedis.JedisPool;
import redis.clients.jedis.JedisPoolConfig;

import java.lang.reflect.Method;
import java.time.Duration;
import java.util.HashMap;
import java.util.Map;

/**
 * 自定义redis配置(jedis)
 * @author hzk
 * @date 2019/1/7
*/

@Configuration
// 必须加,使配置生效
@EnableCaching
public class RedisConfig extends CachingConfigurerSupport {

    private static final Logger LOGGER = LoggerFactory.getLogger(RedisConfig.class);

    @Autowired
    private JedisConnectionFactory jedisConnectionFactory;

    /**
     * 自定义缓存key的生成策略。默认的生成策略是可读性较差的
     * 通过Spring 的依赖注入特性进行自定义的配置注入并且此类是一个配置类可以更多程度的自定义配置
     * @return
     */
    @Bean
    @Override
    public KeyGenerator keyGenerator() {
        return new KeyGenerator() {
            /**
             *
             * @param target  当前被调用对象
             * @param method 当前被调用的方法
             * @param params 调用方法的参数列表
             * @return
             */
            @Override
            public Object generate(Object target, Method method, Object... params) {
                StringBuilder sb = new StringBuilder();
                sb.append(target.getClass().getName())
                        .append(":")
                        .append(method.getName());
                for (Object obj : params) {
                    sb.append(":")
                            .append(obj.toString());
                }
                LOGGER.info("自定义生成Redis Key -> [{}]", sb.toString());
                return sb.toString();
            }
        };
    }

    /**
     * 缓存配置管理器
     */
    @Bean
    public CacheManager cacheManager(JedisConnectionFactory jedisConnectionFactory) {
        //以锁写入的方式创建RedisCacheWriter对象
        RedisCacheWriter writer = RedisCacheWriter.lockingRedisCacheWriter(jedisConnectionFactory);
        //创建默认缓存配置对象
        RedisCacheConfiguration config = RedisCacheConfiguration.defaultCacheConfig();
        //设置默认超过期时间是30秒
        config.entryTtl(Duration.ofSeconds(30));
        //自定义cacheConfig
        Map<String, RedisCacheConfiguration> initialCacheConfigurations = new HashMap<>();
        for (Map.Entry<String, Integer> entry : CacheExpiresMap.get().entrySet()) {
            String key = entry.getKey();
            Integer seconds = entry.getValue();
            LOGGER.info("key{},value{}", key, seconds);
            RedisCacheConfiguration initialCacheConfig = RedisCacheConfiguration.defaultCacheConfig();
            initialCacheConfigurations.put(key, initialCacheConfig.entryTtl(Duration.ofSeconds(seconds)));
        }
        //初始化RedisCacheManager
        RedisCacheManager cacheManager = new RedisCacheManager(writer, config,initialCacheConfigurations);
        return cacheManager;
    }

    /**
     * 手动配置注入redisTemplate
     * @param jedisConnectionFactory jedis连接工厂
     * @return {@link RedisTemplate}
     */
    @Bean(name = "redisTemplate")
    public RedisTemplate<Object,Object> setRedisTemplate(JedisConnectionFactory jedisConnectionFactory){
        RedisTemplate<Object,Object> template = new RedisTemplate<>();
        template.setKeySerializer(new StringRedisSerializer());
        template.setConnectionFactory(jedisConnectionFactory);
        //以下代码为将RedisTemplate的Value序列化方式由JdkSerializationRedisSerializer更换为Jackson2JsonRedisSerializer
        //此种序列化方式结果清晰、容易阅读、存储字节少、速度快,所以推荐更换
        Jackson2JsonRedisSerializer jackson2JsonRedisSerializer = new Jackson2JsonRedisSerializer(Object.class);
        ObjectMapper om = new ObjectMapper();
        om.setVisibility(PropertyAccessor.ALL, JsonAutoDetect.Visibility.ANY);
        om.enableDefaultTyping(ObjectMapper.DefaultTyping.NON_FINAL);
        jackson2JsonRedisSerializer.setObjectMapper(om);
        template.setValueSerializer(jackson2JsonRedisSerializer);
        //template.setEnableTransactionSupport(true);//是否启用事务
        template.afterPropertiesSet();
        return template;
    }

    @Override
    @Bean
    public CacheErrorHandler errorHandler() {
        // 异常处理,当Redis发生异常时,打印日志,但是程序正常走
        LOGGER.info("初始化 -> [{}]", "Redis CacheErrorHandler");
        CacheErrorHandler cacheErrorHandler = new CacheErrorHandler() {
            @Override
            public void handleCacheGetError(RuntimeException e, Cache cache, Object key) {
                LOGGER.error("Redis occur handleCacheGetError:key -> [{}]", key, e);
            }

            @Override
            public void handleCachePutError(RuntimeException e, Cache cache, Object key, Object value) {
                LOGGER.error("Redis occur handleCachePutError:key -> [{}];value -> [{}]", key, value, e);
            }

            @Override
            public void handleCacheEvictError(RuntimeException e, Cache cache, Object key)    {
                LOGGER.error("Redis occur handleCacheEvictError:key -> [{}]", key, e);
            }

            @Override
            public void handleCacheClearError(RuntimeException e, Cache cache) {
                LOGGER.error("Redis occur handleCacheClearError:", e);
            }
        };
        return cacheErrorHandler;
    }

    /**
     * 创建JedisConnectionFactory和JedisPool
     */
    @ConfigurationProperties
    class DataJedisProperties{

        @Value("${spring.redis.host}")
        private  String host;
        @Value("${spring.redis.password}")
        private  String password;
        @Value("${spring.redis.port}")
        private  int port;
        @Value("${spring.redis.timeout}")
        private  int timeout;
        @Value("${spring.redis.jedis.pool.max-idle}")
        private int maxIdle;
        @Value("${spring.redis.jedis.pool.max-wait}")
        private long maxWaitMillis;

        @Bean
        JedisConnectionFactory jedisConnectionFactory() {
            LOGGER.info("Init jedisConnectionFactory success!");
            JedisConnectionFactory factory = new JedisConnectionFactory();
            factory.setHostName(host);
            factory.setPort(port);
            factory.setTimeout(timeout);
            factory.setPassword(password);
            return factory;
        }
        @Bean
        public JedisPool redisPoolFactory() {
            LOGGER.info("JedisPool init success,host -> [{}];port -> [{}]", host, port);
            JedisPoolConfig jedisPoolConfig = new JedisPoolConfig();
            jedisPoolConfig.setMaxIdle(maxIdle);
            jedisPoolConfig.setMaxWaitMillis(maxWaitMillis);

            JedisPool jedisPool = new JedisPool(jedisPoolConfig, host, port, timeout, password);
            return jedisPool;
        }
    }
}
将lettuce换成jedis只有上面几步差异化修改即可,使用方法一致。
4.Session共享
在架构日益发展的现在,分布式架构可以说是已经很常见的,而有一个我们肯定会遇到要解决的问题就是session共享,做到session共享的方式有很多种,当然使用缓存去管理就是一个很有效的解决方法。在我们使用了Spring Boot之后你就会发现,它对使用redis去做到session共享是如此简单,让我们不得不感叹它的强大。
4.1 引入pom依赖
除了引入redis本身的依赖外我们还需要引入redis对session共享支持的依赖。
<!-- redis session共享依赖-->
<dependency>
    <groupId>org.springframework.session</groupId>
    <artifactId>spring-session-data-redis</artifactId>
</dependency>
4.2 session共享配置类
通过官方文档,我们可以知道我们需要通过
@EnableRedisHttpSession注解去开启spring对session共享的支持,所以这里我们需要注册一个session共享的配置类,这里我们可以配置session的过期时间。
package com.springboot.config;

import org.springframework.context.annotation.Configuration;
import org.springframework.session.data.redis.config.annotation.web.http.EnableRedisHttpSession;

/**
 * maxInactiveIntervalInSeconds默认1800s
 * @author hzk
 * @date 2019/1/7
 */
@Configuration
@EnableRedisHttpSession(maxInactiveIntervalInSeconds = 60*10)
public class RedisSessionConfig {


}
4.3 session共享使用
就简单几步我们就可以利用redis缓存达到session共享的目的,我们来看下效果怎么样。
RedisSessionController .java
package com.springboot.controller;

import com.springboot.service.IDictionaryService;
import org.springframework.beans.factory.annotation.Autowired;
import org.springframework.web.bind.annotation.GetMapping;
import org.springframework.web.bind.annotation.PathVariable;
import org.springframework.web.bind.annotation.RestController;

import javax.servlet.http.HttpServletRequest;
import java.util.HashMap;
import java.util.Map;
import java.util.concurrent.ExecutorService;
import java.util.concurrent.Executors;

/**
 * @author hzk
 * @date 2018/1/7
 */
@RestController
public class RedisSessionController {


    @GetMapping(value = "/session")
    public Object session(HttpServletRequest request){
        Map<String, Object> map = new HashMap<>();
        map.put("sessionId", request.getSession().getId());
        map.put("url", request.getRequestURL());
        return map;
    }

}
我们通过利用两个端口8080、8081去启动两台同样的服务,然后我们分别访问
http://localhost:8080/session以及http://localhost:8081/session接口,可以发现返回的sessionId一致但是url是两个系统各自不同的,也就是说已经达到了session共享的目的,我们再来看下他给我们生成的数据在redis中是如何存储的。

5.Redis哨兵模式配置
实际项目中使用Redis需要考虑高并发的情况,Redis提供了主从的功能,大大减少主服务器数据访问频繁导致宕机的问题,但是如果主服务器依然没有承受住大量的并发请求,例如处理不当造成的大量缓存雪崩以及缓存穿透等,但是Redis提供的主从功能并不具备主从切换和监控的功能,但是我们对Redis进行更多的了解就能发现它其实还提供了一个Sentinel哨兵模式就是用来解决由于服务器宕机所造成服务不可用的问题,那么Spring Boot当然也能够很好地去支持Redis哨兵模式的集成配置。
application.properties
# redis集群配置并非主从配置,一定注意
# spring.redis.cluster.nodes=127.0.0.1:6379,127.0.0.1:6380,127.0.0.1:6381
spring.redis.host=127.0.0.1
spring.redis.port=6379
spring.redis.password=admin
# 连接超时时间(毫秒)
spring.redis.timeout=10000
# Redis默认情况下有16个分片,这里配置具体使用的分片,默认是0
spring.redis.database=0
# 连接池最大连接数(使用负值表示没有限制) 默认 8
spring.redis.lettuce.pool.max-active=8
# 连接池最大阻塞等待时间(使用负值表示没有限制) 默认 -1
spring.redis.lettuce.pool.max-wait=-1
# 连接池中的最大空闲连接 默认 8
spring.redis.lettuce.pool.max-idle=8
# 连接池中的最小空闲连接 默认 0
spring.redis.lettuce.pool.min-idle=0
# 关闭超时时间
spring.redis.lettuce.shutdown-timeout=100

# redis集群中的哨兵模式配置
spring.redis.sentinel.master=mymaster
# 哨兵模式集群 多台哨兵监控一组redis集群
spring.redis.sentinel.nodes=127.0.0.1:26380,127.0.0.1:26381,127.0.0.1:26382
spring.redis.password=admin
这里需要注意的是很多同学会把主从和集群弄混淆,导致在配置集群的地方配置上了主从所以无法启动服务,其他的Redis相关内容我们在其他博客中会介绍到,这里只做Spring Boot整合的简单介绍。除了redis基本配置之外只需要配置三行哨兵的基本属性配置就能整合哨兵模式了。