| 配置阿里yum源 |
mv /etc/yum.repos.d/CentOS-Base.repo /etc/yum.repos.d/CentOS-Base.repo.backup \ |
| 安装常用命令 |
yum install -y vim lrzsz unzip wget telnet net-tools |
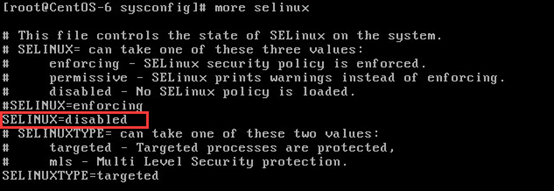
| 关闭防火墙 | 关闭防火墙 systemctl stop firewalld 关闭自启动 systemctl disable firewalld 关闭selinux,SELINUX修改为disabled vim /etc/selinux/config
|
| 配置网络 | 修改网卡名称格式为ethX mv ifcfg-ensxxx ifcfg-eth0
编辑网卡配置文件,保留如下配置即可 vim /etc/sysconfig/network-scripts/ifcfg-eth0 DEVICE=eth0 ONBOOT=yes BOOTPROTO=dhcp PERSISTENT_DHCLIENT=1 MTU=1492 DNS1=114.114.114.114 DNS2=8.8.8.8 修改内核参数,通过编辑/etc/default/grub并加入“net.ifnames=0 biosdevname=0 ”到GRUBCMDLINELinux变量来实现 vim /etc/default/grub net.ifnames=0 biosdevname=0 运行命令来重新生成GRUB配置并更新内核参数 grub2-mkconfig -o /boot/grub2/grub.cfg 重启系统 |
| 关闭DNS查找 | 找到UseDNS yes行,去掉#,修改yes为no
vim /etc/ssh/sshd_config
找到GSSAPIAuthentication yes行,去掉#,修改yes为no GSSAPIAuthentication no |
| 安装密码重置脚本 |
cd \ &&unzip Agent.zip \ &&cd /root/CloudResetPwdUpdateAgent.Linux/ \ &&/bin/bash setup.sh \ &&rm –rf Agent.zip CloudResetPwd* |
| 清除hostname | 清除hostname,以便根据Cloudstack配置的名称命名,编辑network文件
vim /etc/sysconfig/network 仅保留NETWORKING=yes
|
| 清除历史使用记录 |
rm -rf /var/log/btmp \ &&rm -rf /var/log/wtmp \ &&rm -rf /var/log/messages \ &&rm -rf /root/.bash_history \ &&history -c |
centos7 最小安装初始化


猜你喜欢
转载自www.cnblogs.com/omgasw/p/10474906.html
今日推荐
周排行