Flume 1.7.0 用户指南
概述
Apache Flume是一个分布式的,可靠的,且可用的系统,它可以用来有效地从许多不同的数据源收集,聚合和移动大量的日志数据到一个集中的数据中心进行存储。
Apache Flume的使用不仅限于日志数据的聚合。因为数据源是可定制的,Flume可以用来传输大量的事件型数据,包括但不限于,如网络流量数据,社交媒体产生的数据,邮件信息和任何可能的数据源。
Apache Flume是Apache软件基金会的顶级项目。
系统要求
- Java运行环境 - Java 1.7及更高版本
- 内存 - 满足sources, Channels和sinks的配置所需要的内存
- 磁盘空间 - 满足channels和sinks的配置所需要的磁盘空间
- 目录权限 - 对于agent所使用的目录要有读/写权限
架构
数据流模型
Flume event被定义为一个数据流单元,它有一个字节负载和一个可选的字符串属性。一个Flume agent是一个JVM进程,agent中的组件将事件流(event flow)从一个外部源传到下一个目的地。
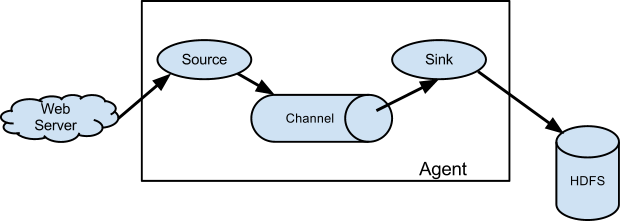
Flume srouce消费从外部源(如web server)传递过来的events。外部源以目标Flume source能识别的格式发送events给Flume。例如,Avro Flume source可以用于接收来自Avro客户端或其他流中的Flume agent的Avro sink发送的Avro events。与此类似的流是,使用Thrift FLume Source接收来自Thrift sink或Thrift Rpc 客户端或来自Flume thrift protocol产生的任意语言写的Thrift 客户端。当Flume source接收到一个event,它存储event到一个或多个channel。这个channel被动存储event,并保留此event,直到它被一个Flume sink消费。例如-file channel,它是存储在本地文件系统。sink把event从channel移除,并把它放到一个外部的库,如HDFS(经过Flume HDFS sink),或把此event转发给流中的下一个Flume agent的Flume source。agent中的source和sink异步地进行event staged。
复杂流
Flume允许用户来建立多跳的流,即event经过多个agent之后才到达最终目的。它也可以“扇入”和“扇出”流(即像扇子一样的流,例如,扇入可以是多个agent,流向同一个agent。扇出也类似,一个agent的event流向多个agent),前面路由和容灾路由。
可靠性
events是阶段性的停留在每个agent的channel中。然后events被传递到下一个agent或最终库(如HDFS)。只有在events被存储在下一个agent的channel中或到达了最终目的,events才会在当前channel中删除。这就是在单跳信息传递中,Flume是如何提供端到端可靠的流。
Flume使用事务型方式来确保可靠的events传输。source和sink都被压缩在一个由channel提供的事务中。这确保events集合可以可靠地从流中的一个点传递到另一个点。这“多跳流“的情况下,来自前一跳的sink和来自下一跳的source,它们都是以事务的方式运行,以此确保数据能够安全的存储在下一跳的channel中。
可恢复性
events暂存在channel中,channel可以从出错中恢复。Flume提供了一个持久的文件channel,这个文件channel是本地文件系统的一个备份。也有memory channel,它简单地存储events在一个内存队列中,它是很快的,但是,当agent进程死了的时候,在memory channel中的任何event都会丢失。
设置
设置agent
Flume agent的配置是存储在一个本地的配置文件中。它是一个遵循Java属性文件格式的文本文件。在相同的配置文件中,可以指定一个或多个agents配置。配置文件包括agent中的每个source,sink和channel的属性,及是如何组织在一起形成数据流的。
配置组件
流中的每个组件(source, sink, channel)都有名字,类型和指定类型和安装的属性集合。例如,一个Avro source需要一个主机名和一个端口号来接收数据。一个memory channel有最大队列大小(capacity),一个HDFS sink需要知道文件系统的URI,创建文件的路径,文件rotation的频率(“hdfs.rollInterval“)等。组件的所有这些属性应该配置在Flume agent主机上的配置文件中。
Wiring the pieces together
agent需要知道哪些组件要加载及它们如何连接以构建成流。通过列出在agent中的每个sources, sinks和channels的名字,然后对每个sink和source指定channel连接,从而构成流。例如,一个agent events流,通过一个名为“file-channel1“的文件channel,从一个名为“avroWeb“的Avro source到名为“hdfs-cluster1“的HDFS sink。配置文件将会包含这些组件的名字,且file-channel是作为avroWeb source和hdfs-cluster1 sink的共享channel。
启动一个agent
通过一个名为flume-ng的shell脚本来启动agent,这个脚本是在flume的bin目录下。你需要在命令行中指定agent的名字,配置文件目录,和配置文件:
$ bin/flume-ng agent -n $agent_name -c conf -f conf/flume-conf.properties.template现在,agent将会启动在配置文件中配置的source和sinks。
一个简单的例子
这里,我们给出了一个示例配置文件,描述了一个单节点的Flume部署。这个配置是让用户产生events并随后将日志打印在控制台输出。
# example.conf: A single-node Flume configuration

# Name the components on this agent
a1.sources = r1
a1.sinks = k1
a1.channels = c1

# Describe/configure the source
a1.sources.r1.type = netcat
a1.sources.r1.bind = localhost
a1.sources.r1.port = 44444

# Describe the sink
a1.sinks.k1.type = logger

# Use a channel which buffers events in memory
a1.channels.c1.type = memory
a1.channels.c1.capacity = 1000
a1.channels.c1.transactionCapacity = 100

# Bind the source and sink to the channel
a1.sources.r1.channels = c1
a1.sinks.k1.channel = c1
这个配置定义了一个agent a1。a1有一个source,这个source监听44444端口的数据,channel缓存数event数据在内存中,sink打印日志在控制台上。配置文件命名不同的组件,然后描述他们的类型和配置参数。配置文件可以定义一些已命名的agent;当给出的Flume进程已经在运行,将会发送一个标识告诉它是哪个agent。
对于给出的这个配置,我们可以启动Fluem:
$ bin/flume-ng agent --conf conf --conf-file example.conf --name a1 -Dflume.root.logger=INFO,console注意:在这个完整的部署中,通常包含一个或多个配置项:--conf=<conf-dir>。<conf-dir>一个包含shell脚本flume-env和一个可能的log4j属性文件的目录。在这个例子中,我们传递了一个Java配置项来强制Flume日志输出到控制台,且我们没有使用一个自定义的环境脚本。
从另外一个终端,我们可以telnet端口44444并发送一个Flume event:
$ telnet localhost 44444
Trying 127.0.0.1...
Connected to localhost.localdomain (127.0.0.1).
Escape character is '^]'.
Hello world! <ENTER>
OK
在启动agent的那个终端,将会以日志信息格式输出event:
12/06/19 15:32:19 INFO source.NetcatSource: Source starting
12/06/19 15:32:19 INFO source.NetcatSource: Created serverSocket:sun.nio.ch.ServerSocketChannelImpl[/127.0.0.1:44444]
12/06/19 15:32:34 INFO sink.LoggerSink: Event: { headers:{} body: 48 65 6C 6C 6F 20 77 6F 72 6C 64 21 0D          Hello world!. }
恭喜你,你成功地配置并部署了一个Flume agent。随后的章节会更加详细的描述agent配置。
Logging raw data
通过注入管线来记录原始数据流到日志文件,在许多生产环境中是不想看到的行为,因为这可能导致泄露敏感数据或安全相关的配置,例如安全密钥。默认情况下,Flume不会记录这些信息。另一方面,如果数据管线破坏了,Flume将会为调试问题尝试提供线索。
调试event管线问题的一种方式是,设置一个额外的memory channel连接到Logger sink,这将输出所有的event数据到Flume日志。然而,这种情况下,这种方式无法满足。
为了能够记录配置相关和数据相关的event,除了log4j属性,必须设置Java系统配置。
为了能够记录配置相关的event。可以设置Java系统属性-Dorg.apche.flume.log.printconfig=true。这可以在命令行输入,也可以在flume-env.sh中设置在变量JAVA_OPTS中。
为了能够记录数据相关的event。可以设置Java系统属性-Dorg.apache.flume.log.rawdata=true。对于大多数组件,log4j的日志级别也必须设置为DEBUG或TRACE,以确保指定的event能够附加到Flume的日志中。
下面是一个例子,能够记录配置和原始数据,不过,也需要设置Log4j的loglevel为DEBUG:
$ bin/flume-ng agent --conf conf --conf-file example.conf --name a1 -Dflume.root.logger=DEBUG,console -Dorg.apache.flume.log.printconfig=true -Dorg.apache.flume.log.rawdata=trueZookeeper based Configuration
Flume支持通过Zookeeper对Agent配置。这是一个试验性的特征。配置文件需要上传到Zookeeper,配置文件是存储在Zookeeper节点数据中。对于agents a1和a2,以下是Zookeeper节点树的样子:
- /flume
 |- /a1 [Agent config file]
 |- /a2 [Agent config file]
配置文件一旦上传,使用以下配置启动agent:
$ bin/flume-ng agent –conf conf -z zkhost:2181,zkhost1:2181 -p /flume –name a1 -Dflume.root.logger=INFO,console| 参数名 | 默认值 | 描述 |
|---|---|---|
| z | - | Zookeeper连接字符串,逗号分隔的hostname:port列表 |
| p | /flume | Zookeeper存储agent配置文件的根目录 |
安装三方插件
Flume有一个基于插件的框架。虽然Flume已经有许多内置的sources, channel , sinks , serializers等,许多已存在的实现都是来自Flume。
虽然通过添加jars到文件flume-env.sh里的变量FLUME_CLASSPATH可以加入定制的Flume组件,现在,FLume支持一个名为plugins.d的特定目录,它会自动加载使用指定格式打包的插件。这就使得管理插件包问题更加容易,一些类的问题的调试更加简单,尤其是包的冲突问题。
plugins.d目录
plugins.d目录在$FLUME_HOME/plugins.d下,在启动的时候,flume-ng脚本会查看目录plugins.d的插件,这些插件是遵照相应格式,当启动java时,插件会包括到合适的路径下。
插件目录的布局
每个plugins.d下的每个插件(子目录)有多达三个子目录:
1. lib - 插件的jar(s)
2. libext - 插件依赖的jar(s)
3. native - 一些必要的本地库,例如.so文件
在plugins.d目录下有两个插件的例子:
plugins.d/
plugins.d/custom-source-1/
plugins.d/custom-source-1/lib/my-source.jar
plugins.d/custom-source-1/libext/spring-core-2.5.6.jar
plugins.d/custom-source-2/
plugins.d/custom-source-2/lib/custom.jar
plugins.d/custom-source-2/native/gettext.so
数据注入
Flume支持一些机制来从外部源注入数据。
RPC
Flume发行版本中的Avro client可以使用avro RPC机制来发送一个文件到Flume Avro source。
$ bin/flume-ng avro-client -H localhost -p 41414 -F /usr/logs/log.10以上命令将会发送文件/usr/logs/log.10的内容到Flume source监听的端口。
命令执行
有一个exec source,这个源执行给出的命令并消费输出。也就是单行的输出,文本后面返回\r,\n或\r\n。
注意:Flume不支持tail作为source。可以包装tail命令在一个exec source到流文件。
网络流
Flume支持以下机制来从日志流类型读取数据,例如:
1. Avro
2. Thrift
3. Syslog
4. Netcat
multi-agent设置

为了让数据在多个agent流动,前一个agent的sink和当前agent的source需要是avro类型,sink指向source的主机和端口。
合并
在日志收集中一个非常常见的场景是,产生日志的客户端有许多个,他们需要发送数据到少量几个连接到存储系统的消费者agent。例如,来自上百个web服务收集的日志发送到12个写数据到HDFS集群agent。
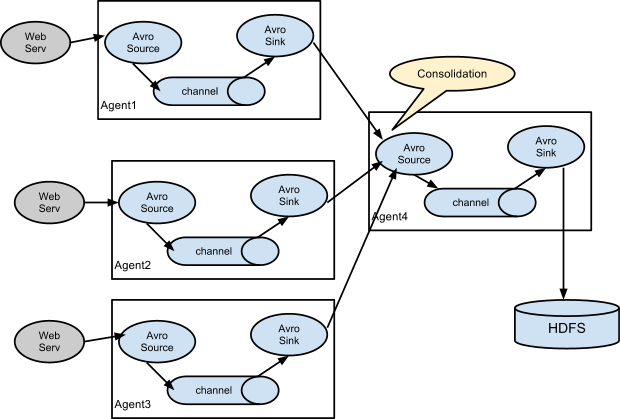
在Flume,通过在第一层配置并排的多个avro sink的agent,所有的agent的sink指定一个单个agent的avro source可以实现上述功能(同样情况下,你也可以使用thrift source/sinks/clients)。第二层agent的source合并收到的event到一个单个的channel,这个channel的sink是消费channel的event到最终目的地(在这里是HDFS)。
多路传输流
Flume支持多路发送event 流到一个或多个目的地。这可以通过定义一个多路发送流来实现,它可以复制或有选择地路由一个event到一个或多个channel。
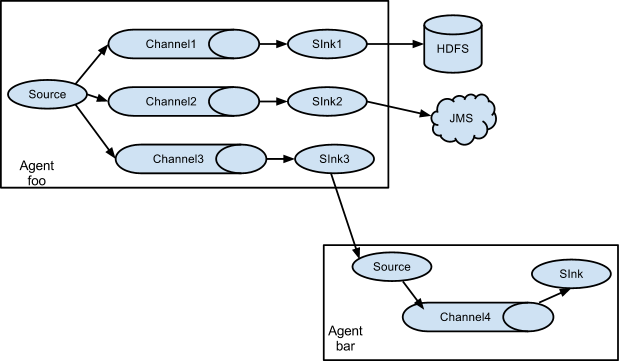
在上述例子中,显示了一个来自agent foo的source,扇出流到三个不同的channel。这个扇出可以复制或多路发送。在复制流的情况下,每个event被发送到所有的三个channel。对于多路发送的情况,当event的属性匹配预先配置的值,event会被传输到一个可用的channel子集。例如,如果一个event属性名为“txnType“,被设置为”customer“,然后,它应该流向channel1和channel3,如果它被设置为“vendor“,然后,它应该流向channel2,否则,流向channel3。这种映射可以在agent的配置文件中进行设置。
配置
如前所述,Flume agent配置是从一个文件中读取的,此文件类似于java属性文件格式,有分层的属性设置。
定义流
想在一个agent中定义流,你需要通过一个channel连接source和sink。你需要列出agent的source,sinks和channels,然后把source和sink指定一个channel。一个source实例可以指定多个channel,但是一个sink实例只能指向一个channel。格式如下:
# list the sources, sinks and channels for the agent
<Agent>.sources = <Source>
<Agent>.sinks = <Sink>
<Agent>.channels = <Channel1> <Channel2>

# set channel for source
<Agent>.sources.<Source>.channels = <Channel1> <Channel2> ...

# set channel for sink
<Agent>.sinks.<Sink>.channel = <Channel1>
例如,一个名为agent_foo的agent,从一个外部的avro client读取数据,然后经过一个内存channel,再发送到HDFS。配置文件weblog.config应该类似于这样:
# list the sources, sinks and channels for the agent
agent_foo.sources = avro-appserver-src-1
agent_foo.sinks = hdfs-sink-1
agent_foo.channels = mem-channel-1

# set channel for source
agent_foo.sources.avro-appserver-src-1.channels = mem-channel-1

# set channel for sink
agent_foo.sinks.hdfs-sink-1.channel = mem-channel-1
这将使得event流经过内存channel mem-channel-1,从avro-AppSrv-source流到hdfs-Cluster1-sink。当agent把weblog.config作为配置文件启动时,它将实例化那个流。
配置组件
定义流之后,你需要为每个source, sink和channel设置属性,你需要为每个组件设置类型和其他属性的值:
# properties for sources
<Agent>.sources.<Source>.<someProperty> = <someValue>

# properties for channels
<Agent>.channel.<Channel>.<someProperty> = <someValue>

# properties for sinks
<Agent>.sources.<Sink>.<someProperty> = <someValue>
对于Flume的每个组件,属性“type“(类型)需要设置,它用来告诉我们它应该是什么对象。每个source,sink和channel的类型有它自己功能所需的属性集合。所有需要设置的都应该设置。在前面的例子,我们有一个流,经过channel mem-channel-1,从avro-AppSrv-source到hdfs-Cluster1-sink。以下有一个例子,显示那些组件的配置:
agent_foo.sources = avro-AppSrv-source
agent_foo.sinks = hdfs-Cluster1-sink
agent_foo.channels = mem-channel-1

# set channel for sources, sinks

# properties of avro-AppSrv-source
agent_foo.sources.avro-AppSrv-source.type = avro
agent_foo.sources.avro-AppSrv-source.bind = localhost
agent_foo.sources.avro-AppSrv-source.port = 10000

# properties of mem-channel-1
agent_foo.channels.mem-channel-1.type = memory
agent_foo.channels.mem-channel-1.capacity = 1000
agent_foo.channels.mem-channel-1.transactionCapacity = 100

# properties of hdfs-Cluster1-sink
agent_foo.sinks.hdfs-Cluster1-sink.type = hdfs
agent_foo.sinks.hdfs-Cluster1-sink.hdfs.path = hdfs://namenode/flume/webdata

#...
在一个agent添加多个流
单个的Flume agent可以包含多个独立的流。你可以在配置里列出多个sources , sinks,和channels。这些组件可以连接形成多条流。
# list the sources, sinks and channels for the agent
<Agent>.sources = <Source1> <Source2>
<Agent>.sinks = <Sink1> <Sink2>
<Agent>.channels = <Channel1> <Channel2>
然后,你可以连接这些source和sink到他们相应的channel来设置两个不同的流。例如,如果你需要在一个agent中设置两个流,一个从外部的avro client到外部的HDFS,另一个从一个tail的输出到avro sink,你可以这么配置:
# list the sources, sinks and channels in the agent
agent_foo.sources = avro-AppSrv-source1 exec-tail-source2
agent_foo.sinks = hdfs-Cluster1-sink1 avro-forward-sink2
agent_foo.channels = mem-channel-1 file-channel-2

# flow #1 configuration
agent_foo.sources.avro-AppSrv-source1.channels = mem-channel-1
agent_foo.sinks.hdfs-Cluster1-sink1.channel = mem-channel-1

# flow #2 configuration
agent_foo.sources.exec-tail-source2.channels = file-channel-2
agent_foo.sinks.avro-forward-sink2.channel = file-channel-2
配置一个多agent的流
想设置一个多层的流,你希望第一跳(可理解为一个agent)的avro/thrift sink指向下一跳的avro/thrift source。这会导致第一个Flume agent转发events到下一个Flume agent。例如,如果你想使用avro client周期性地发送文件到一个本地的Flume agent,然后这个本地的agent可以转发它到另外一个挂载了存储设备的agent。
Weblog agent配置:
# list sources, sinks and channels in the agent
agent_foo.sources = avro-AppSrv-source
agent_foo.sinks = avro-forward-sink
agent_foo.channels = file-channel

# define the flow
agent_foo.sources.avro-AppSrv-source.channels = file-channel
agent_foo.sinks.avro-forward-sink.channel = file-channel

# avro sink properties
agent_foo.sources.avro-forward-sink.type = avro
agent_foo.sources.avro-forward-sink.hostname = 10.1.1.100
agent_foo.sources.avro-forward-sink.port = 10000

# configure other pieces
#...
HDFS agent 配置:
# list sources, sinks and channels in the agent
agent_foo.sources = avro-collection-source
agent_foo.sinks = hdfs-sink
agent_foo.channels = mem-channel

# define the flow
agent_foo.sources.avro-collection-source.channels = mem-channel
agent_foo.sinks.hdfs-sink.channel = mem-channel

# avro sink properties
agent_foo.sources.avro-collection-source.type = avro
agent_foo.sources.avro-collection-source.bind = 10.1.1.100
agent_foo.sources.avro-collection-source.port = 10000

# configure other pieces
#...
这里,我们连接avro-forward-sink,从weblog agent到hdfs agent的avro-collection-srouce。这将使得来自外部appserver source的event最终被存储在HDFS上。
扇出流
如前面章节所讨论,Flume支持从一个source扇出流到多个channel。扇出流有两种模式:复制和多路发送。在复制流,event被发送到所有配置的channel。在多路发送情况下,event是只发送给指定的channel的子集。想扇出流,需要为一个source指定channel列表和扇出策略。这可以通过添加一个“selector“的channel来完成,这个“selector“可以是replicating,也可以是multiplexing。如果是一个多路发送流,然后要指定选择规则。如果没有指定“selector“,则默认是replicating模式。
# List the sources, sinks and channels for the agent
<Agent>.sources = <Source1>
<Agent>.sinks = <Sink1> <Sink2>
<Agent>.channels = <Channel1> <Channel2>

# set list of channels for source (separated by space)
<Agent>.sources.<Source1>.channels = <Channel1> <Channel2>

# set channel for sinks
<Agent>.sinks.<Sink1>.channel = <Channel1>
<Agent>.sinks.<Sink2>.channel = <Channel2>

<Agent>.sources.<Source1>.selector.type = replicating
多路发送的选择对分叉流有进一步的属性集合。这要求为channel指定一个event属性集合的映射。对于在每个event header中配置的属性,选择器都会检查。如果它匹配指定的值,然后这个event就会被发送到映射到那个值的所有的channel。如果没有匹配的,event就会被发送到默认的channel集合:
# Mapping for multiplexing selector
<Agent>.sources.<Source1>.selector.type = multiplexing
<Agent>.sources.<Source1>.selector.header = <someHeader>
<Agent>.sources.<Source1>.selector.mapping.<Value1> = <Channel1>
<Agent>.sources.<Source1>.selector.mapping.<Value2> = <Channel1> <Channel2>
<Agent>.sources.<Source1>.selector.mapping.<Value3> = <Channel2>
#...

<Agent>.sources.<Source1>.selector.default = <Channel2>
对于每个值,这个映射允许重叠channel。
以下例子是单个流,多路发送到两条路径。agent名为agent_foo,有一个avro source,和两个连接到两个sink的channel:
# list the sources, sinks and channels in the agent
agent_foo.sources = avro-AppSrv-source1
agent_foo.sinks = hdfs-Cluster1-sink1 avro-forward-sink2
agent_foo.channels = mem-channel-1 file-channel-2

# set channels for source
agent_foo.sources.avro-AppSrv-source1.channels = mem-channel-1 file-channel-2

# set channel for sinks
agent_foo.sinks.hdfs-Cluster1-sink1.channel = mem-channel-1
agent_foo.sinks.avro-forward-sink2.channel = file-channel-2

# channel selector configuration
agent_foo.sources.avro-AppSrv-source1.selector.type = multiplexing
agent_foo.sources.avro-AppSrv-source1.selector.header = State
agent_foo.sources.avro-AppSrv-source1.selector.mapping.CA = mem-channel-1
agent_foo.sources.avro-AppSrv-source1.selector.mapping.AZ = file-channel-2
agent_foo.sources.avro-AppSrv-source1.selector.mapping.NY = mem-channel-1 file-channel-2
agent_foo.sources.avro-AppSrv-source1.selector.default = mem-channel-1
对于名为“State“的header,选择器会检查。如果值为“CA“,则它的event发送到channel mem-channel-1,如果它的值为“AZ”,则它的event发送到channel file-channel-2,如果它的值是“NY”,则它的event发送到这两个channel。如果“State“ header都没有匹配到前面三个值,则它使用默认的channel mem-channel-1。
选择器也支持optional channel。要为header指定optional channel,需要使用配置参数“optional“:
# channel selector configuration
agent_foo.sources.avro-AppSrv-source1.selector.type = multiplexing
agent_foo.sources.avro-AppSrv-source1.selector.header = State
agent_foo.sources.avro-AppSrv-source1.selector.mapping.CA = mem-channel-1
agent_foo.sources.avro-AppSrv-source1.selector.mapping.AZ = file-channel-2
agent_foo.sources.avro-AppSrv-source1.selector.mapping.NY = mem-channel-1 file-channel-2
agent_foo.sources.avro-AppSrv-source1.selector.optional.CA = mem-channel-1 file-channel-2
agent_foo.sources.avro-AppSrv-source1.selector.mapping.AZ = file-channel-2
agent_foo.sources.avro-AppSrv-source1.selector.default = mem-channel-1
选择器首先将会尝试写到要求的channel,如果这些channel中有一个不能消费events,则写事务会失败。这个事务会重试所有的channel。一旦所有要求的channel消费了这个event,选择器将会尝试写到optional的channel。任何一个optional的channel消费event失败后,只是简单的忽略,不会重试。
如果对于一个指定的header,在optional channel和要求的channel存在重叠,channel会使用要求的,这个channel的失败会引起整个要求的channel集合全部重试。例如,在以上例子中,对于header“CA”,mem-channel-1是要求的,尽管它是被required(要求的)和optional修饰,对这个channel写的失败,将会引起在*选择器上配置的所有*channel重试event写。
注意:如果一个header没有指定要求的channel,event将会写到默认的channel,且会尝试写到那个header的optional的channel。如果没有指定要求的channel,指定optional channel将会引起event被写到默认的channel。如果没有指定默认的channel,也没有指定要求的channel,选择器将尝试写event到optional channel。在这种情况下,任何的失败都只会简单的忽略。
Flume Sources
Avro source
监听Avro端口,从外部的Avro client流接收events。当与另一个Flume agent(前一跳)内置的Avro sink成对时,它能创建分层的集合拓扑结构。粗写的为必填属性。
agent a1例子:
a1.sources = r1
a1.channels = c1
a1.sources.r1.type = avro
a1.sources.r1.channels = c1
a1.sources.r1.bind = 0.0.0.0
a1.sources.r1.port = 4141
ipFilterRules例子
ipFilterRules定义了N个由逗号分隔的ipFilters,模式规则必须是这种格式:
<’allow’ or ‘deny’>:<’ip’ or ‘name’ for computer name>:<pattern> or allow/deny:ip/name:patternexample: ipFilterRules=allow:ip:127.*,allow:name:localhost,deny:ip:*
例如:
allow:name:localhost,deny:ip:
这将允许名为localhost的客户端,任意ip形式的主机都将被拒绝。
deny:name:localhost,allow:ip:
这将拒绝名为localhost的客户端,任意ip形式的主机都允许。
Thrift source
监听Thrift端口,接收来自外部的Thrift client流。当与另一个Flume agent(前一跳)的内置的Thrift sink成对时,它能创建分层的集合拓扑结构。通过启用kerberos授权,Thrift source可以可以配置成在安全模式下启动。属性agent-principal和agent-keytab是用于Thrift source授权给kerberos KDC的属性。以下属性粗写的为必配项。
agent a1例子:
a1.sources = r1
a1.channels = c1
a1.sources.r1.type = thrift
a1.sources.r1.channels = c1
a1.sources.r1.bind = 0.0.0.0
a1.sources.r1.port = 4141
Exec Source
Exec source是启动的时候运行一个Unix命令,预期进程可以持续地产生数据到标准输出(stderr是简单的忽略,除非属性logStdErr是设置为true)。如果进程由于任意原因退出,source也会退出,将不再产生数据。这也意味着像cat [named pipe]或tail -F [file]的配置将会产生要想的结果,然而date将也可能得不到想要的结果-前两个命令产生数据流,而后面这个将产生单个event并且退出。
以下属性粗体为必需属性:
警告:如果发生故障,ExecSource和其他异步源无法保证传递event到channel。在这种情况,数据将会丢失。例如,作为最常见的特征之一是像tail -F [file]的使用情况,即一个应用把日志文件写到磁盘,并Flume来从尾部读取file,每行作为一个event进行发送。尽管这是可以的,但有一个明显的问题,如果channel填満了,并且Flume不能发送event的时候,这个时候会发生什么?因为某种原因,Flume没有方法来指示正在写日志的应用,它需要保留日志还是event不能被发送。如果这没什么意义,你只需要知道:当使用一个单向的异步接口(例如execsource),你的应用从来不能保障数据能收到。作为这个警告的扩展(很清楚) - 当使用这个source,event传输没有绝对的0保障。想要更强的可靠性保障,考虑使用spooling Directory source或通过SDK直接集成到Flume。
agent a1示例:
a1.sources = r1
a1.channels = c1
a1.sources.r1.type = exec
a1.sources.r1.command = tail -F /var/log/secure
a1.sources.r1.channels = c1
配置’shell’是用于通过一个命令shell(例如Bash或Powershell)来触发’command’,‘command‘被解析成一个参数来shell中执行。这就允许’command’使用shell的特征,例如通配符,管道,back ticks,循环,条件等。如果没有配置’shell’,’command’会直接触发。‘shell’常见的值:‘/bin/sh -c‘,/bin/ksh -c,cmd/c,powershell -Command等。
a1.sources.tailsource-1.type = exec
a1.sources.tailsource-1.shell = /bin/bash -c
a1.sources.tailsource-1.command = for i in /path/*.txt; do cat $i; done
JMS Source
JMS source从JMS目的地读取信息,例如一个队列或主题。现有的JMS应用应该可以同任意的JMS提供者工作,但是只测试过ActiveMQ。JMS source提供可配置的batch size,message selector,user/pass,和到flume event的信息转换。注意:供应商提供的JMS的jars应该包含在Flume的类目录下 - 可以在命令行设置,也可以在flume-env.sh中设置变量FLUME_CLASSPATH。
必需的属性为粗体:
Converter (转换器)
JMS允许插件式的转换器,尽管它像默认的转换器,为了某些功能而工作。默认的转换器可以转换字节,文本和对象信息到FlumeEvent。在所有情况下,信息中的属性被添加作为header传输到FlumeEvent。
字节信息:
字节信息被拷贝到FlumeEvent的body。不能转换数据超过2GB的单条信息。
文本信息:
文本信息被转换成字节数组,并拷贝到FlumeEvent的body。默认的转换器默认使用UTF-8,但这是可以配置的。
对象信息:
对象被写到包装在ObjectOutputStream里的ByteArrayOutputStream,产生的数据被拷贝到FlumeEvent的body。
agent a1示例:
a1.sources = r1
a1.channels = c1
a1.sources.r1.type = jms
a1.sources.r1.channels = c1
a1.sources.r1.initialContextFactory = org.apache.activemq.jndi.ActiveMQInitialContextFactory
a1.sources.r1.connectionFactory = GenericConnectionFactory
a1.sources.r1.providerURL = tcp://mqserver:61616
a1.sources.r1.destinationName = BUSINESS_DATA
a1.sources.r1.destinationType = QUEUE
Spooling Directory Source
这个source让你通过放置文件在被注入到磁盘上的“spooling”目录来获取数据。这个source将监视指定的目录下的文件,当新文件出现,source会解析新文件成events。event解析的逻辑是可以支持插件的。当文件被完全地读入到channel之后,文件会被重命名,以指示完成(或可选的删除)。
不像Exec source,这个source是可靠的,甚至是Flume重启或被杀掉,都将不会丢失数据。作为这个可靠性的交换,在这个spooling目录下的文件必须是不可变的,且文件命名唯一。Flume会设法探测这个问题条件,如果有冲突,将会出错:
1. 如果一个文件被放置在spooling目录之后,还往此文件中写数据,Flume将会打印错误信息到它的日志文件并停止进程。
2. 如果在后续的时间,文件名被重新使用,Flume也会打印错误信息到它的日志文件并停止进程。
为了避免上述问题,当日志文件被移动到spooling目录时,添加一个唯一的标识(例如一个时间戳)到日志文件名字可能是有用的。
尽管这个source有可靠性的保证,但如果下流有错误发生,仍然会引起event重复。这个一致性保障由其他的Flume组件提供。
agent agent-1示例:
a1.channels = ch-1
a1.sources = src-1

a1.sources.src-1.type = spooldir
a1.sources.src-1.channels = ch-1
a1.sources.src-1.spoolDir = /var/log/apache/flumeSpool
a1.sources.src-1.fileHeader = true
Event Deserializers(反序列化Event的东东)
以下是Flume自带的event Deserializers
LINE
对于文本输入的每行,这个deserializer产生一个event。
| 属性名 | 默认值 | 描述 |
|---|---|---|
| deserializer.maxLineLength | 2048 | 包含在单个event中的最大字符数。如果一行超过了这个长度,它将截断,剩下的字符将会出现在下一event中 |
| deserializer.outputCharset | UTF-8 | 解码event到channel所使用的字符集 |
AVRO
这个deserializer能够读取一个Avro容器文件,文件中的每个Avro记录产生一个event。每个event有个header注释,指示所使用的schema。event的body是二进制的Avro记录数据,没有包括schema或剩下的容器文件元素。
如果你的spooling directory source一定要重试把一个event放到一个channel(例如channel已满),然后它将会重置并且从最近的Avro容器文件同步点重试。在这样一个错误的场景下,要降低这个潜在的event重复,在你的Avro输入文件中要更加频繁地写同步标记。
| 属性名 | 默认值 | 描述 |
|---|---|---|
| deserializer.schemaType | HASH | schema是如何呈现的。默认情况下,当值为HASH时,Avro schema是哈希的,哈希是存储在每个event,每个event的header”flume.avro.schema.hash”。如果值为LITERAL,用JSON编码的schema是存储在每个event的header”flume.avro.schema.literal”上。树比HASH模式,使用LITERAL效率更低。 |
BlobDeserializer
这个deserializer的每个event读取二进制大对象(BLOB),通常是每个文件为一个二进制大对象。例如一个PDF或JPG文件。注意:这种方式对于非常大的对象不合适,因为整个BLOB是存储在内存中的。
| 属性名 | 默认值 | 描述 |
|---|---|---|
| deserializer | - | 这个类的全限定名:org.apache.flume.sink.solr.morphline.BlobDeserializer$Builder |
| deserializer.maxBlobLength | 100000000 | 对于给出的请求,允许读取和缓存的最大字节数 |
Taildir Source
注意:这个source是作为预览特征提供的。它不能在windows上工作。
监听指定的文件,对于每个文件,一旦探测到有新行加入,接近实时地tail这个文件。如果新行正在写,这个source会等到写完成再重试读这他们。
这个source是可靠的,且不会丢失数据,甚至是循环tail文件时也不会。它会周期性地写每个文件的“最后读位置”到一个JSON格式的位置文件。如果由于某种原因,Flume停止或宕机了,从已存的位置文件中,它能重启,继续tail文件。
在另外一种使用情况,使用位置文件,这个source也可以从文件的任意位置进行tail.当在指定的目录下没有位置文件,它将默认从每个文件的第一行进行tail。
文件会按照他们的修改时间被消耗。最老修改时间的文件将会被首先消耗。
这个source不能对要被tail的文件进行重命名,删除,或任何修改。目前是这个source不支持tail二进制文件。它按行读取文本文件。
agent a1示例:
a1.sources = r1
a1.channels = c1
a1.sources.r1.type = TAILDIR
a1.sources.r1.channels = c1
a1.sources.r1.positionFile = /var/log/flume/taildir_position.json
a1.sources.r1.filegroups = f1 f2
a1.sources.r1.filegroups.f1 = /var/log/test1/example.log
a1.sources.r1.headers.f1.headerKey1 = value1
a1.sources.r1.filegroups.f2 = /var/log/test2/.*log.*
a1.sources.r1.headers.f2.headerKey1 = value2
a1.sources.r1.headers.f2.headerKey2 = value2-2
a1.sources.r1.fileHeader = true
由于内容较多,故剩下内容(少量source,和sink, channel)放在下篇…